FOR TECHNICAL SUPPORT CONTACT: eee ltt ee ease es 1 www.astonbath.
READ THESE WARNINGS BEFORE PROCEEDING IMPORTANT Inspect all glass panels, parts, and hardware for damage prior to installing. Do not proceed if damage is detected. IMPORTANT Glass is very HEAVY. It is recommended that this door be installed by professionals with a minimum of two adults who are experienced in the process. IMPORTANT Glass is manufactured TEMPERED for safety, which causes it to shatter into small but sharp pieces, rather than large dagger like shards that could cause greater damage.
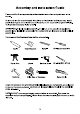
Before You Start Thank you and congratulations on your purchase of a new Shower Door from Aston. We hope it will provide you and your home with years of satisfying functionality, usage and beauty. about how to safely and properly install this unit. If you do not follow these certain conditions for assembly, installation, and maintenance, your warranty may be affected. 1 Please read this manual carefully as it contains information and instructions 1. Inspect boxes for shipping damage.
Detailed Diagram of Shower Door Components 10 Note: All part numbers marked with are different depending on the width of shower opening. # Description Qty. | Part No. || # Description Qty. | Part No.
Product Dimensions ANY C Model # Dimension"A" | Dimension"B" | Dimension"C" | Dimension"D" Sliding Door Fixed Glass Width Height 79%" | 231," | 283," X 795" | 251%" | 303," X 79%" | 27%" | 3233" X 793%" | 29%" 79%" | 31%" | 36%" X 79%" | 331%" X80" | 37 1," X79 Note: Model # marked with indicates hardware finish: CH/SS/ORB/MB/NBR/BG.
Assembly and Installation Guide Please read the following assembly and installation instructions and guidelines in this section. Failure to follow the recommended instructions and installation techniques may lead to possible damage to the unit, the surrounding area, or can cause serious personal injury. This can affect warranty claims as well. ATTENTION: This unit requires assembly.
Shower Door Installation LLL S/S SSS Measure the width of the shower opening at the top between the 2 walls. Note this is dimension "X". The following equation is used to determine the length to be cut from the Top Rail (2) in order to fit your shower's opening: 2. Measure distance "Y" from the end of Top Rail (2) with per-assembled hardware and mark the rail. 3. Using a Hacksaw or Jigsaw cut the Top Rail (2) at the mark. Carefully remove any burrs or sharp edges remaining on Top Rail (2) after cutting.
Installation of Vertical Channel [SAL oOo SSS SSS (SSS SSS NOTE: Please check with a level to ensure that the Vertical Channel (7) is absolutely plumb against your shower alcove wall. 1. Mark the position of the Vertical Channel (7) to place location(s) of drilled holes. See Figure 1. 2. Using the appropriate drill bit for your wall surface. Drill each hole location with a 5/16” diameter drill bit. Install the plastic Wall Anchors provided into the drilled holes on wall surface. See Figure 2.
Mark the Top Rail Location recommended that this door be installed by professionals with a minimum of WARNING: Could cause SERIOUS INJURY. Glass is very HEAVY. Iris two installers. causes it to shatter into small but sharp pieces, rather than large dagger like WARNING: Could cause SERIOUS INJURY. This glass is TEMPERED which Z ' \ shards that could cause greater damage. glass is the corners. Keep the plastic corner protectors on until the glass is in \ WARNING: Could cause SERIOUS INJURY.
4. Position the Top Rail (2) and Fixed Glass (3) as shown in Figure 4 and connect Fixed Glass (3) to Top Rail (2) following the assembly sequence shown in Figure 4. Note: One Door Stopper (1) should be positioned between mounting holes in Top Rail (2) before connecting Top Rail (2) to Fixed Glass (3). NOTE: TOP RAIL IS ATTACHED TO THE INSIDE OF FIXED GLASS. 5. Make certain that the Top Rail (2) and Fixed Glass (3) are sitting correctly in the Vertical Channel (7).
Installation of Wall Mount to Wall 1. Loosen set screws in both Rail End Assemblies (5) (6) and remove from Top Rail (2). See Figure 1-1 and Figure 1-2. 2. Position Rail End Assemblies (5) (6) onto marked location on shower wall and mark pilot hole drilling location. See Figure 2-1 and Figure 2-2. NOTE: If your surface is prone to cracking or chipping then it is recommended that you pilot drill first using a smaller drill bit, and then scale up to the final size. 3.
Top Rail Assembly to Shower glass is the corners. Keep the plastic corner protectors on until the glass is in WARNING: Could cause SERIOUS INJURY. The weakest point on tempered place. Even the slightest bump could cause the glass to shatter. ATTENTION: A minimum of two people are required for the next assembly steps. 1. Slide Rail Ends (5) onto Top Rail (2) and loosely tighten into place. The Rail End (5) should be installed on Top Rail (2) so that threaded end of Rail Ends (5) is facing outward.
6. Insure plastic sliding door glide is in place in underside of Sliding Door Track Divider (8) and positioned to proper location for 10mm glass thickness. See Figure 6. 7. Position the Sliding Door Track Divider (8) into position as seen in Figure 7 and mark the two hole positions. Note: In drawing 7 the hole locations for attaching Sliding Door Track Divider (8) should be from edge of Fixed Glass (3).
Assemble Upper Rollers onto the Door WARNING: Could cause SERIOUS INJURY. DO NOT install the handle until /N\ the door is fully mounted. Lifting the door by the handle will cause the door to shatter. WARNING: Could cause SERIOUS INJURY. All hardware must be installed properly as per instruction. If the hardware is loose, the door's heavy glass will sag placing its corners in jeopardy. Alternatively, hardware that is overly tightened could put the door into stress.
Hanging the Door WARNING: Could cause SERIOUS INJURY. Glass is very HEAVY. It is recommended that this door be installed by professionals with a minimum of two installers. r ~ ool, — g] Upper Roller Cam Adjustment 4% YY 4 Rotate the outer edge A of roller assembly using the small hex, while = holding the large hex 2% hin place. — Y % wrench in place Suspend the Sliding Door (4) on the Top Rail (2). Slide the bottom edge of Sliding Door (4) into the groove of the Sliding Door Track Divider (8).
Assemble Bottom Rollers onto the Door WARNING: Could cause SERIOUS INJURY. All hardware must be installed properly as per instruction. If the hardware is loose, the door's heavy glass will sag placing its corners in jeopardy. Alternatively, hardware that is overly tightened could put the door into stress. 1. Loosen the safety set screw and disassemble the Bottom Roller assemblies (9). Install the Bottom Roller Assemblies (9) on the Sliding Door (4) to secure the Sliding Door (4) to Top Rail (2).
the desired gap of 1/32” between bottom of Top Bar (2) and contact surface of Bottom Roller Assemblies (9). ~ ~ Bottom Roller Cam Adjustment Rotate the outer edge — 3. On the Upper Roller Assemblies position the safety 3 of roller assembly using the small hex, while holding the large hex — wrench in place. set screw pointing upwards for easy access. On the Bottom Roller Assemblies position the safety set screw pointing downward for easy access.
Installing the Door Seals WARNING: Could cause SERIOUS INJURY. ALL SEALS MUST BE INSTALLED properly before usage. Warranty will be voided if not fully installed. inside inside Sliding Door Sliding Door Fixed Glass Install the Door Seal "D" (13) and Door Seal "P" (15) to Sliding Door (4) according to the drawing. NOTE: Cut the "P" seal as necessary to avoid interference with moving parts.
Door Stop Adjustment door stop bumpers must be installed and adjusted to the prescribed distance WARNING: Could cause SERIOUS INJURY. On Sliding Door models, the from the wall. The Door Stoppers (1) must be adjusted properly to avoid bumping the door against the wall in both the open and closed positions. Do not aggressively slide the door either open or closed. Follow the procedures below in order to adjust the door stops properly. o Use a 5.
Install the Door Threshold and Door Seal 2 [SL LSS ~/ SSS SSS The Door Threshold is used to prevent water from seeping out while showering. Install the threshold according to these instructions. 1. Measure the distance between the Fixed Glass (3) and the shower wall. See Figure 1. 2. Using a hacksaw, cut the Door Threshold Bar (11) to dimension Y which is the distance between the Fixed Glass (3) and the wall minus Remove any sharp edges or burrs after cutting Door Threshold Bar (11). See Figure 2. 3.
NOTE: If your surface is prone to cracking or chipping then it is recommended that you pilot drill first using a smaller drill bit, and then scale up to the final size. 4. Using the appropriate drill bit for your base surface, drill the hole locations with a 3" diameter drill bit. Install the plastic anchors provided into the drilled holes. Repeat for the other side. See Figure 4. 5. Add a small amount of silicone sealant to bottom of threshold bar assembly place into position. See Figure 5. 6.
Install the Door Handle the door is fully mounted. Lifting the door by the handle will cause the door to WARNING: Could cause SERIOUS INJURY. DO NOT install the handle until shatter. Install the Door Handle (16) using hardware provided. Inside Outside N Final Sealing Using bath & kitchen silicone sealant, seal the Fixed Glass (3) along bottom edge on shower base, and side edge along shower wall. Next, seal around Sliding Door Track Divider (8).
Care and Maintenance As with any luxury item, maintenance and care are critical to the long-lasting quality and enjoyment of your shower door. The proper care and maintenance outlined in this section are necessary to ensure the longevity of the unit. Damage caused by not following the care and maintenance guidelines in this section is not covered under the manufacturer's warranty.
ASTON GLOBAL INC. — Limited Warranty This warranty applies to products purchased from Aston Global Inc. after May 1, 2017. Aston Global Inc., a Texas Corporation ("Aston"), provides the following warranty coverage for shower doors and enclosures, bathtubs, shower panels and related components (The Products).
PARTS ONLY WARRANTY This warranty is extensive in that it covers replacement of all defects. LABOR CHARGES AND/OR DAMAGE INCURRED DURING INSTALLATION, REPAIR, OR REPLACEMENT, AS WELL AS ANY OTHER KIND OF ANCILLARY COST, LOSS OR DAMAGE ARE EXCLUDED. COMMERCIAL USE AND OTHER EXCLUSIONS This warranty excludes all industrial, commercial and business usage.
THE FOREGOING WARRANTIES ARE IN LIEU OF ALL OTHER WARRANTIES, EXPRESSED OR IMPLIED, INCLUDING BUT NOT LIMITED TO THE IMPLIED WARRANTIES OF MERCHANT ABILITY AND FITNESS FOR A PARTICULAR PURPOSE. ASTON DISCLAIMS ALL LIABILITY FOR SPECIAL, INCIDENTAL OR CONSEQUENTIAL DAMAGES.
RESIDENTIAL INSTALLATIONS SHOWER DOORS and ENCLOSURES GLASS: Limited Lifetime Aston warrants the glass of shower doors, tub doors and shower enclosures to be free from defects in workmanship and materials under normal residential use for the life of the product. * Aston does not warrant glass for scratches, chips, water spots, breaking or any other damage during installation or after. Star Cast Protective Coating by Windshield (On Certain Models Only): Ten (10) Years, provided by PCT Global LLC.
HARDWARE: One (1) Year Aston warrants shower door, tub door and shower enclosure hardware (i.e. handles, rollers, hinges, profiles, clips, guides, brackets, towel and support bars) to be free from defects in workmanship and materials under normal commercial use for one (1) year. SHOWER BASES: One (1) Year Aston warrants shower bases to be free from defects in workmanship and materials under normal commercial use for one (1) year.
ANTON ESCAPE THE EVERYDAY Customer Service 877-424-9699 Aston Global Inc 902 Nicholson Rd Suite 100 Garland, TX 75042 If further assistance is needed , or you have a question, please visit our wed site at: www.astonbath.