INSTALLATION AND OWNER'S MANUAL Please select your shower enclosure model, or shower enclosure style from the selection below for easy installation. ATTENTION: This door is extremely heavy and the hinges on this door must be attached to the studs or to preinstalled 2 X 6 wood reinforcement behind the wall. ,, [ , Style A - AQUADICA (SEN988 ) ,, [ ,, Style B - AQUADICA GS (SEN993) Please carefully read these instructions before you begin to install the products.
Before you start Thank you for purchasing your Aston shower door. We hope that it will provide you with years of satisfying use and enjoyment. Please read this manual carefully because it contains information and instructions about the proper installation of the unit. If you do not follow certain conditions of installation and maintenance, your warranty may be affected. 1. Inspect boxes for shipping damage.
Installation Guide Please read and follow the installation instructions and guidelines in this section. Failure to follow the recommended instructions and installation techniques may lead to possible damage to the unit or the surrounding area. This can affect warranty claims. ATTENTION: This unit requires assembly. A minimum of two people are required for assembly, as several of the sections can be large and unstable until assembled.
Detailed Diagrams of Shower Enclosure Components Diagram A Diagram B Diagram C Shower Door Stationary Glass Panel with Top Brace Stationary Glass Panel with Glass Shelves 3 [ 14 � , 15 � Diagram A 01 03 04 05 Glass door Handle Wall anchor MS X 60 screw 1pc 1pc 8pcs 8pcs 06 07 08 09 Hinge Side strip (3 sections to cut) Bottom anti-water strip Magnetic strip 2pcs 1pc 1pc 1pc Diagram B 02 04 05 09 Stationary glass panel Wall anchor M4 X 60 screw Magnetic Strip 1pc 4pcs 3pcs 1pc 10 11 12 Glass
PLEASE NOTE: During unpacking carefully inspect all parts and identify all parts using detailed diagram in your manual as a reference. Before discarding the packaging check for any parts or small hardware bags that may have been overlooked.
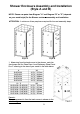
Shower Enclosure Assembly and Installation {Style A and B) NOTE: Please use parts from Diagram "A" and Diagram "B" or "C" (depends on your model style) for the Shower enclosure assembly and installation. ATTENTION: A minimum of two people are required for the next assembly steps. [ ,, Style A [ Style B 1. Measuring from the back corner in the shower, mark the the shower wall for Glass Door A and Stationary Glass Panel B or C referring to the size of your model in the table below.
2. Remove pre-installed screws from pre-assembled Hinges (06). Attach the Hinges (06) to Glass door (01). The smooth flat surface of Hinge (06) should be installed on outside of glass door. See Figure 1 for details. NOTE: outside 2 Never set your glass down directly onto a tile or concrete floor. Always use a piece of wood or cardboard and leave the corner pads on the glass until it becomes necessary to remove them to protect the bottom edge and the corners of the glass from breakage. 3.
4. Set the door aside and drill the holes in the wall using 0 ¾ 6" drill bit. 1 0¾ If your surface is prone to cracking or chipping then is recommended that you pilot drill first using a smaller drill bit, and then step up to the final size. 3 Install the wall anchors (04) into the drilled holes. II �<� Position the Glass door (01) back on the flat timber and attach both hinges to the wall using M5X60 screws (05).
7. Press the Magnetic strips (09) onto the vertical edge of the Glass Door (01) and Stationary Glass Panel (02). See Figure 7 for details. Figure 7 8. Carefully position the Stationary glass (02) against the wall vertically according to the measurements in size table. While securely holding the Stationary glass panel (02) in place, close the Glass door (01) and check the alignment with Stationary glass panel (02).
. Using the appropriate drill bit for your wall surface drill each hole location with a 5/16" diameter drill bit. Using the appropriate drill bit for your floor surface drill hole location with an 1/8" diameter drill bit for Aston shower base, use a 5/16" diameter drill bit for other surfaces and plastic wall anchor. See Figure 10 for details.
13. Place the Stationary glass (02) into position in shower area and install glass clamps (10) to Stationary glass (02). See Figure 13 for detals. outside Figure 13 14. Marks on the Side Strip (07) at 8116", 48 ¾" and 8 ½".
16. Apply silicone sealant to edge of Stationary glass (02) and shower wall, and Stationary glass (02) and shower base. See Figure 16 for details. II ,, Caulk [ ,, Caulk Figure 16 Please continue your installation: • • Style A for Support bar installation. Style B for Glass shelves installation.
Support Bar Assembly and Installation (Style A) NOTE: Please use parts from Diagram "B" for the Support Bar assembly and installation. 17. Position the Support bar (12) on the Stationary glass (02). Using a level, check support bar is level and mark the bracket's location on the shower wall. Remove the Support bar (12) from the Stationary glass (02) and detach the wall bracket. Position the wall bracket to the marked area on shower wall and mark the drilling location on shower wall.
Glass Shelves Assembly and Installation {Style B) NOTE: Please use parts from Diagram "C" for the Glass Shelves assembly and installation. 17. Mark the hole locations on shower wall for attaching glass shelve brackets. Drill the holes using 5/16" drill bit. If your surface is prone to cracking or chipping then is recommended that you pilot drill first using a smaller drill bit, and then step up to the final size. Insert the Wall anchors (04).
Care and Maintenance As with any other luxury item, maintenance and care are critical to the long lasting quality and enjoyment of your shower door and tray. The proper care and maintenance outlined in this section are necessary to ensure the longevity of the unit. Damage caused by not following the care and maintenance guidelines in this section is not covered under the manufacturer's warranty. The glass doors and panels can be cleaned using any commercially available glass cleaner.
Warranty PLEASE READ THESE WARRANTY TERMS AND CONDITIONS CAREFULLY BEFORE USING YOUR ASTON GLOBAL BATHROOM PRODUCT. BY USING THE PRODUCT, YOU ARE CONSENTING TO BE BOUND BY THE FOLLOWING WARRANTY TERMS AND CONDITIONS. SHOWER DOOR/SHOWER TRAY Aston Global Inc. Parts-Only Limited Warranty 5 years. Warranty for any part in oil rubbed bronze finish is limited to two (2) years. Aston Global, Inc.
THIS WARRANTY DOES NOT COVER: 1. Product installed in buildings other than single family dwelling units. 2. Product installed outdoors or any other non-standard bathroom location. 3. Component parts not manufactured by Aston Global. 4. Workmanship of any installer of Aston Global Product.
Customer is required to provide adequate access the Product for any repair or inspection. Aston Global shall not be liable for expenses or damage which may include but are limited to water damage, removal of any and all common building product such as tile, flooring, wood, sheet rock, plumbing fixtures, concrete board, vanities, bathtubs and toilets or any other custom items. THIS WARRANTY G IVES YOU SPEC IFIC LEGAL RIGHTS AND YOU MAY HAVE OTHER RIGHTS WHICH VARY FROM STATE TO STATE.
ESCAPE THE EVERYDAY Customer Service If further assistance is needed or you have a question or need additional product information, please visit our website: www.astonbath.