USE AND CARE GUIDE 52-INCH CRYSTAL CEILING FAN
Table of Contents Safety Information Pre-Installation HARDWARE INCLUDED Ceiling 2 3 4 5 Hanging the Fan Attaching the Fan Blades Attaching the Lights Install the crystal shade Use of remote control Care and cleaning 6 7 8 9 10 11 Safety Information 1, To reduce the risk or electric shock the electricity has been turned off at the circuit breaker or fuse box before begin. 2, All wiring must be in accordance with the National Electrical Code NASVNFPA 70-1999 and local electrical codes.
Warranty The supplier warrants the fan motor to be free from defects in workmanship and material present at time of shipment from the factory for a lifetime after the date of purchase by the original purchaser.The supplier also warrants that all other fan parts.excluding any glass or acrylic blades.to be free feom defects in workmanship and material at the time of shipment from the factory for a period of one year after the date of purchase by the original purchaser.
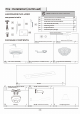
Pre-Installation ( continued) HARDWARE INCLUDED � NOTE:Hardware not shown to actual size.
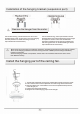
Installation of the hanging bracket (suspension part) I I I I I I I I I I I I I I I I I :tt�LL_LLl_��t'±'!�t=: � = 0 0 = 0 - C ,,, ,\ /: ·•·· .·•. .• . • .. ''' �' · · · '' ''. /. . •...' ffi I Remove the hanger from the motor. I For wooden ceiling, use wood screw to drill on the wooden beam or the "junction box" to fix the hanging bracket (selection is made according to actual requirements of the customers).
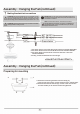
Assembly - Hanging the Fan(continued) 1 Making the electrical connections WARNING: Each wire not supplied with this fan is designed to accept A up to one 12-gauge house wire and two wires from the fan . If you have � larger than 12-gauge house wiring or more than one house wire to connect to the fan wiring,consult an electrician for the proper size wire nuts to use. 0 IMPORTANT: Use the plastic wire connectors(BB) supplied with your fan.
Assembly- Attaching the Fan Blades 1 , Attaching the blades to the arms I Clji' 11 11 I 0 I 1- AA /E d 1 :Pass the red washer through the screw. 2:Tighten the screw through the blade and tighten it on the arms. 3:Repeat the above steps to tighten the four sets of blades. 1 0 I I I I I I -: 1 � --8 Assembly - Attaching the Fan Blades 2 Fastening the blade arms to the motor NOTE: Your fan features revolutionary advancements for quick and easy blade installation.
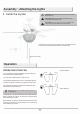
Assembly - Attaching the Lights 1 Connecting lamp wire 1 Attaching the light kit fitter assembly A � I - �,: :� -- CAUTION: To reduce the risk of electric shock, disconnect the electrical circuit to the fa before installing the light fixture. 1. Insert the "white" line in the switching box of the motor into the "white" line of the light and tie insulated rubber tape. 2.lnsert the "blue" line in the switching box of the motor into the "blue" line of the light and tie insulated rubber tape.
Assembly - Attaching the Lights 3 Install the crystal � A A WARN I NG: Allow the shatter resistant bowl to cool completely before removing. CAUTION: Make sure the power is off before attaching or removing the shatter resistant bowl. CAUTION: Do not over tighten the hex nut,overtightening the hex nut may cause the shatter resistant bowl to break. 1.Connect the chain to the fan and the light switch.(hand pull chain only ) 2.Select the appropriate bulb and install it on the lamp holder.
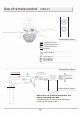
Use of remote control remote control ILOwl IMEDI [Bil ISTOPI NO/OFF II8] � 11B] � FanSpeed Low Level FanSpeed Middle Level FanSpeed High level FanSTOP LIGHT NO/OFF Auto off after 1 hr Auto off after 2hr Auto off after 4hr Auto off after 8hr remote control I From CEILING FANI From controller FOR AC IN L FOR AC INN remote control SWITCH OFF THE ELECTRICAL MAINS AT THE CIRCUIT BREAKER FUSE BOX 1 )Connect wires from receiver to terminal block properly as instrustion diag
Care and Cleaning WARN I NG:Make sure the power is off before cleaning your fan. □ Because of the fan's natural movement, some connections may become loose.Check the support connections,brackets,and blade attachments twice a year. Make sure they are secure. It is not necessary to remove the fan from the celling. □ Clean your fan periodically to help maintain its new appearance over the years. Do not use water when cleaning, as this could damage the motor or the wood, or possibly cause an electrical shock.