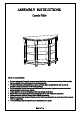
ASSEMBLY INSTRUCTIONS Console Table LER NOTE TO CUSTOMERS: For ease and speed of assembly we recommend that before you commence each step of the assembly that you identify all the parts required to complete that step. ‘We recommend that where possible you allow sufficient space to assemble the item as close as possible to the place where it will be once assembled. For the protection of your furniture we recommend that the product is placed on protected surfaces during assembly to prevent any damage.
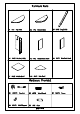
Furniture Parts Al 1PC Top Panel A2 1PC Bottom Panel A3 PCS Leg (L&R) TAMARIND TY = A4 PCS AS 1PC Middle Back Panel A6 PCS Side Back Panel A7 PCS Middle Shelf <> A8 PCS Side Shelf Hardware Provided @__C9 Bl TSETSE Cam lock = B2 PCS Wood Dowel au) B3 PCS Screw & B4 PCS Shelf Support 2 _\ B5 1PC Glue -Page 2 of
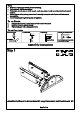
Note: » Read these instructions carefully before assembling, » Tools required : Phillips screwdriver. » Find a clean, smooth area on which to work , such as a carpet, in order to avoid scratching the wood surfaces. ® Wait to dispose of the packing material until assembly is complete and all parts and hardware are accounted for. * Two or more people might be required for assembly. To use Dowels: 1. Add glue (about ¥ full ) in the hole(s) of each board to be joined. 2. Insert the Dowel(s) and join boards. 3.
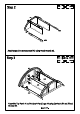
PCS Attach Legs A3 to Bottom Panel A2 using Wood Dowels B2. Step 3 [B1: @ae send [2 == as) Assemble Top Panel Al to Dividers A4 and Legs A3 using Cam locks B1 and Wood Dowels B2.
Step 4 B3: am) PCS Attach Back Panels A5&AS6 to the back of this unit using Screws B3. Step 5 Bs [LF zodiacs Bond” : AT Insert Shelf Supports B4 into the holes on Dividers A4 and Legs A3. Then place Shelves ASBESTOS onto Shelf Supports B4. NOTE: If you feel Side Shelves A8 are difficult to put on Shelf Support B4, please reverse it or put it to the other side.