
Troubleshooting guide


SECTION 2
INSTALLING THE PRINTER
17
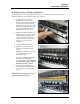
Installing Envelope Printing Attachment
Use this attachment if you are primarily printing envelopes or running large batches of envelopes. The
attachment flattens the envelope flap for better print consistency.
1. Open the Top Cover. Press the
Printhead Latch Cover Release
Button (or click the Printhead Release
from the Services Tab or the User
Interface screen in the Toolbox.) The
Printer pumps any ink in the system
back into the Tanks. Wait for the
Printhead Latch Cover to open.
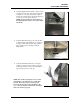
2. Make sure the Printhead Latch Cover
is fully opened to retract the ink lines.
Tilt the Printhead Cartridge back
toward the ink lines and lift it up
slightly. This will keep the printing
surface out of the way during
installation.
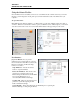
3. Open the Printhead Clamshell.
4. [A] Slide the Envelope Printing
Attachment up behind the metal
support.
[B] Push the Attachment to the right
side of the Printer to lock the
Attachment in place.
[C] While the Printhead Clamshell is
still open, snap the Printhead
Cartridge back into place. Make sure
the Attachment is aligned with the
Printhead Cartridge as shown.
5. Close and relatch the Printhead
Clamshell. Close the Printhead Latch
Cover and Top Cover. Reprime the
system.
NOTE: Remove the Attachment if you are
going to primarily run flat sheets.