
Troubleshooting guide


SECTION 4
MAINTENANCE
41
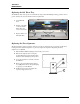
Jams in the Printer
If a jam occurs, STOP the Printer.
Some possible causes for jamming are:
1. Feeding more than one piece of media (double-feeding).
2. Damaged media, such as dog-eared (turned down corners).
3. Media that is not stiff enough may not be usable. Media that meets Postal stiffness requirements
for automated feeding is acceptable in the AstroJet M1.
4. Envelopes caught under the flap of another envelope or stick to one another.
Removing Jammed Media
Clearing a jam depends on where the jam occurred.
Feed Section: Clear by pulling the paper out of the Separators.
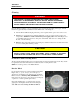
Antistatic Brush Assembly: If necessary, remove the Antistatic Brush
Assembly [A] to access jammed material. Unlatch the two latches (one
on either side of the Assembly) and lift the Assembly off the four
mounting pins as shown. Do not bend the brushes! Clear the jam, then
carefully reinstall the Brush Assembly.
CAUTION
DO NOT BEND, PINCH OR CUT THE INK LINES LOCATED
DIRECTLY IN FRONT OF THE BRUSH ASSEMBLY.
NOTE: Make sure Brush Assembly is correctly reinstalled and
aligned before starting to print. Assembly should sit flat on transport
area surface.
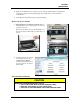
Print Engine Area: Open the Top
Cover. Release and lift up the two
latches [B] (one on each side of the
Printhead Assembly) at the same time
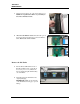
to raise the Printhead Assembly [C].
Clear the jam, then carefully lower and
relatch the Printhead Assembly. Close
the Top Cover.
CAUTION
OPERATE AND HOLD ONTO BOTH
LATCHES WHEN OPENING AND
CLOSING THE PRINTHEAD ASSEMBLY
TO PREVENT DAMAGE.
DO NOT ALLOW THE ASSEMBLY DROP
BY ITSELF TO CLOSE LATCHES.
TO PREVENT DAMAGE TO INK LINES,
DO NOT OPEN THE PRINTHEAD
ASSEMBLY MORE THAN 60°.
Misfeeds
Misfeeds can be corrected by readjusting the Sheet Separators to the media or replacing them. See
“Replacing the Sheet Separators” on previous page.
B
Unlatch the Print Engine Assembly
B
Raise the Print Engine Assembly
C