
Troubleshooting guide


SECTION 2
INSTALLING THE PRINTER
16
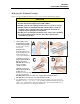
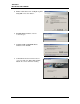
2. Take the Printhead
Cartridge you hydrated
and set aside earlier,
remove the orange cover
and proceed to Step 3.
Otherwise, follow the
Steps below:
[A] Carefully remove the
Printhead Cartridge
from the foil packaging.
Tear at notch or cut end
with scissors.
[B] Remove the protective
plastic cover. Hold the
Printhead by the handle and
unclip the cover from the
Printhead.
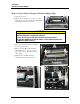
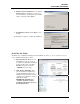
[C] Remove protective
strip from the Printhead
Electrical Contacts.
DO NOT allow removed strip to touch the electrical contacts.
[D] Remove protective strip from the Printhead Nozzles. Hold the Printhead by the handle.
Pull the strip tab and slowly peel the strip from the Printhead.
DO NOT pull the strip at less than a 45° angle from the Printhead surface.
DO NOT allow removed strip to touch the Printhead Nozzles.
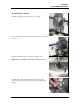
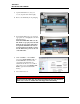
IMPORTANT! Use distilled water to moisten the foam strip in the orange plastic cover you
removed in Step 2B (or moisten a clean, lint-free cloth). Carefully snap the Printhead back
into the plastic cover. Set the Printhead aside for 15 to 20 minutes. This rehydrates Printhead
and allows easier priming once it is installed in the Printer.
WARNING!
TO AVOID ELECTRICAL SHOCK OR SHORTING:
Before installing Printhead, make sure nozzles are hydrated and contacts are DRY!
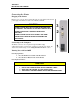
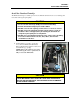
3. Carefully insert the Cartridge into the compartment at an angle [4], with the Printhead surface
facing down and the Ink Nozzles facing the Ink Hoses. Once it is seated, gently tilt the Cartridge
back until it snaps into an upright position [5]. DO NOT FORCE the Cartridge into position.