
Troubleshooting guide


SECTION 4
MAINTENANCE
50
Print Engine
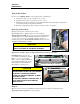
Areas in the Print Engine can become glazed with a buildup of dust, paper lint and accumulated ink and
have to be cleaned regularly. Open the Top Cover. Open the Clamshell Assembly by releasing the two
latches. Use a vacuum to pick up any loose debris.
NOTE: Be careful around Ink Tray and Capping Station in the Print Engine area as accumulated ink may
splash onto other parts of the Printer. Take care not to damage the PC Boards or electrical wiring.
CAUTION
USE ONLY DEIONIZED/DISTILLED WATER TO CLEAN PRINT ENGINE
COMPONENTS. AVOID CONTAMINATING THE PRINTHEAD WITH CLEANERS,
LUBRICANTS OR OTHER CHEMICALS.
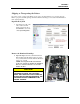
[A] Grit Rollers: Clean as needed by
moistening a small hard-bristled brush
or toothbrush with distilled water. DO
NOT use anything other than distilled
water to clean the Rollers.
[B] Media Sensors: Paper lint and
dust may build up on the Media
Sensors. Use a can of compressed air
or a damp (not wet) foam or lint-free
cotton swab to gently swab the
Sensors. Take care not to drip water
into the Circuit Boards. Use a clean,
dry swab to dab surfaces dry.
Remember to wipe the clear panel over the Sensor Receiver in the
upper Printhead Assembly (see inset).
[C] Capping Station Seal and Squeegee. Clean as needed with
distilled water on a damp, lint-free cloth. Be careful not to splash or
drip ink on other parts of the Printer.
[D] Printing Platen. Wipe with distilled water on a damp, lint-free cloth. Pat dry with a lint-free cloth.
Cleaning the Ink Revolver Couplings
1. First Deprime the system and remove the
Printhead Cartridge.
2. Moisten a foam swab in distilled water.
3. Insert the swab into one of the ink channels
and rotate the swab to clean the chamber.
4. Use a new swab for each of the remaining
ink channels until all 10 openings are clean.
(5 on each side.)