R 3DexPlorer 3000 ® 3DP-V3000 Graphics Card USER’S MANUAL Hardware & Video Drivers
USER’S NOTICE No part of this manual, including the products and software described in it, may be reproduced, transmitted, transcribed, stored in a retrieval system, or translated into any language in any form or by any means, except documentation kept by the purchaser for backup purposes, without the express written permission of ASUSTeK COMPUTER INC. (“ASUS”).
ASUS CONTACT INFORMATION ASUSTeK COMPUTER INC. Marketing Info Address: Telephone: Fax: Email: 150 Li-Te Road, Peitou, Taipei, Taiwan 112, ROC +886-2-894-3447 +886-2-894-3449 info@asus.com.tw Technical Support Fax: BBS: Email: WWW: Gopher: FTP: +886-2-895-9254 +886-2-896-4667 tsd@asus.com.tw www.asus.com.tw gopher.asus.com.tw ftp.asus.com.
CONTENTS I. Introduction ..................................................................................... 7 Item Checklist .................................................................................. 7 Key Benefits .................................................................................... 7 Features ............................................................................................ 7 II. Hardware Installation ...................................................................
CONTENTS IV. Microsoft Windows NT .............................................................. 19 Windows NT 4.0 ............................................................................ 19 Installation Procedures ....................................................... 19 Windows NT 3.51 .......................................................................... 20 Installation Procedures ....................................................... 20 1.1. Installation Procedures in DOS .....................
FCC & DOC COMPLIANCE Federal Communications Commission Statement This device complies with FCC Rules Part 15. Operation is subject to the following two conditions: • • This device may not cause harmful interference, and This device must accept any interference received, including interference that may cause undesired operation. This equipment has been tested and found to comply with the limits for a Class B digital device, pursuant to Part 15 of the FCC Rules.
I. Introduction I. Introduction Features Thank you for purchasing the ASUS 3DP-V3000 Graphics & Video Accelerator. With the SGS-THOMSON RIVA 128™ built in, the ASUS 3DP-V3000 provides you with fast acceleration in both 2D/3D graphics and high quality scalable video playback, which can fully support 3D Gaming and Multimedia Applications.
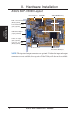
II. Hardware Installation ASUS 3DP-V3000 Layout VIP Connector A VGA BIOS 4MB SGRAM Memory CCD / camcorder input (RCA) (optional) Tuner/TV Box/SVHS In (7pin) (optional) II. Installation Layout VGA Monitor Output (15pin) (standard) SVHS / TV output (4pin) (optional) composite / TV output (RCA) (optional) VIP Connector B SGS-Thomson Riva 128™ 3D Chipset NOTE: The input and output connectors are optional.
II. Hardware Installation ASUS 3DP-V3000 Connection Examples • Camcorder • Video Cassette Player • Laser Disc Player • Other Video Devices Composite (RCA) Input RCA Plug Video Input With ASUS Tuner Box: • TV / FM Tuner II.
II. Hardware Installation II. Installation Procedures WARNING! Computer boards and components contain very delicate Integrated Circuit (IC) chips. To protect the computer board and other components against damage from static electricity, you must follow some precautions. 1. Make sure that you unplug your power supply when adding or removing expansion cards or other system components. Failure to do so may cause severe damage to both your motherboard and expansion cards. 2.
III. Windows 95 Device Connection Notes: Monitor Out and Video Out (optional) NOTE: There is a limitation in the signal output. Only one device can be used as an output device at one time. Choose one output device and disconnect the other. To use another output device, power off your system, disconnect the current output device and connect the other output device, then power on your system. Video In (optional) ASUS 3DP-V3000 User’s Manual III.
III. Windows 95 1. Installation for an Installed ASUS 3DP-V3000 “New hardware found” refers to the prompt for drivers when installing Windows 95 with the ASUS 3DP-V3000 VGA card already installed. This Manual assumes that your CD-ROM disc drive is drive D: and that Windows 95 is in C:\windows. Replace either with the actual location, if necessary. 1.1 Windows 95 When installing Windows 95, a New Hardware Found window will appear: Select Do not install a driver and follow the steps on the next page. III.
III. Windows 95 Insert the ASUS 3DP-V3000 installation CD with your current VGA card. The ASUS Windows 95 Install Shell will appear. If it does not appear, run D:\setup.exe. You will be presented with a list of install options. Click Install 3DP-V3000 Display Driver and follow the installation steps. The Setup program window appears. III. Windows 95 Display Driver Click Next > to install 3DP-V3000 display drivers on your computer. The Features window will be displayed.
III. Windows 95 2. Replacing an Existing VGA Card If wish to replace an existing VGA card with the ASUS 3DP-V3000 graphics card, the current display drivers must be replaced first. To replace, insert the ASUS 3DP-V3000 installation CD. The ASUS Windows 95 Install Shell will appear. If it does not appear, run D:\setup.exe. You will be presented with a list of install options. Click Install 3DP-V3000 Display Driver and the Setup program window will appear.
III. Windows 95 3. Video Driver Uninstallation If you want to install other graphics cards or if you no longer need the 3DP-V3000 display drivers, you can use one of the following procedures to completely uninstall the drivers from Windows 95 to save disk space. 3.1 Using the Autorun Screen Insert the ASUS 3DP-V3000 installation CD. III. Windows 95 Uninstall Drivers Select Remove 3DP-V3000 Display Driver in the ASUS Windows 95 Install Shell and follow the uninstallation steps. 3.
III. Windows 95 4. DirectX5 Installation Microsoft DirectX5 allows 3D hardware acceleration support in Windows 95. For Software MPEG support in Windows 95, you must first install the Microsoft DirectX 5 libraries, then you may install the MPEG Video Player. Reinsert your CD or double click on your CD drive icon in My Computer to bring up the autorun screen or run Setup.exe in the root directory of the CD. Click Install Microsoft DirectX5 III.
III. Windows 95 5. Video Utility (optional) ASUS LIVE3000 ASUS LIVE3000 must be installed in order to use the video-in function on the 3DPV3000. III. Windows 95 Video Utility After installation, you may run the program through the “Start” button-ProgramsASUS LIVE3000-LIVE3000 or remove the program using the unInstallSHIELD. When first using ASUS LIVE3000, you must choose Options-Video Source from the pull-down menu.
III. Windows 95 6. PowerPlayer PowerPlayer is a video player that allows you to view VCD (*.DAT) or MPEG (*.MPG) CD titles. Reinsert your CD or double click on your CD drive icon in My Computer to bring up the autorun screen or run Setup.exe in the root directory of the CD. III. Windows 95 PowerPlayer Follow the self-explanatory instructions to complete the installation. Moving your cursor over the buttons will give the command name. If you need help, click the “?” button.
IV. Microsoft Windows NT Windows NT 4.0 Installation Procedures 1. Start Windows NT, switch display properties to VGA mode (16 colors, 640 x 480 pixels), then restart your computer to make the change. 2. After your computer restarts, right-click the desktop and click Properties. 3. Click the Settings tab. 4. Select Change Display Type. 5. Select Adapter Type and click Change. 6. Click Have Disk. 7. Insert the ASUS 3DP-V3000 Installation CD. 8.
IV. Microsoft Windows NT Windows NT 3.51 After installing your graphics card, WinNT3.51 will default to the standard VGA mode (640x480, 16 colors). The procedure below describes how you install ASUS 3DP-V3000 series display driver for WinNT3.51. Installation Procedures 1. Start Windows NT, switch display properties to VGA mode (16 colors, 640 x 480 pixels), then restart your computer to make the change. 2. After your computer restarts, right-click the desktop and click Properties. 3.
V. Windows 3.x This Manual assumes that you have already installed the ASUS 3DP-V3000 graphics & video card and your CD-ROM disc drive is drive D: and that the Windows 3.x directory is in C:\windows. Replace these with the actual location, if necessary. The ASUS 3DP-V3000 Video drivers for Windows 3.x can be installed under DOS mode or Windows 3.x. 1.1. Installation Procedures in DOS 1. Start your computer and enter DOS mode. 2. Type D: and change to the \WIN31 directory. 3.
V. Windows 3.x 1.2. Installation Procedures in Windows 3.x 1. Start your computer in DOS mode. 2. Change to your Windows 3.x directory. 3. Type SETUP. The System Information screen will appear. 4. Go to the Display section and then select VGA. Switch to the standard VGA mode (16 colors, 640 x 480 pixels), then start Windows by typing WIN. 5. Insert the ASUS 3DP-V3000 installation CD and run D:\setup.exe. A list of install options will appear. V. Windows 3.x Installation in Win3.x 6.
V. Windows 3.x 1.3. Installation of Video for Windows For Software MPEG support in Windows 3.x, you must first install Microsoft Video for Windows, then you may install your own MPEG Video Player. NOTE: ASUS does not provide an MPEG Video Player. 1. Start Windows 3.x. 2. Insert the ASUS 3DP-V3000 Installation CD. 3. Run D:\setup.exe. A list of install options will appear. 4. Click Install Win32s Runtime Library. V. Windows 3.
(This page was intentionally left blank) 24 ○ ○ ○ ○ ○ ○ ○ ○ ○ ○ ○ ○ ○ ○ ○ ○ ○ ○ ○ ○ ○ ○ ○ ○ ○ ○ ○ ○ ○ ○ ○ ○ ○ ○ ○ ○ ○ ○ ○ ○ ○ ○ ○ ○ ○ ○ ○ ○ ○ ○ ○ ○ ○ ○ ○ ○ ○ ○ ○ ○ ○ ○ ○ ○ ○ ○ ○ ○ ○ ○ ○ ○ ○ ○ ○ ○ ○ ○ ○ ○ ○ ○ ○ ○ ○ ○ ○ ○ ○ ○ ○ ○ ○ ○ ○ ○ ○ ○ ○ ○ ○ ○ ○ ○ ○ ○ ○ ○ ○ ○ ○ ○ ○ ○ ○ ○ ○ ○ ○ ○ ○ ○ ○ ○ ○ ○ ○ ○ ○ ○ ○ ○ ○ ○ ○ ○ ○ ○ ○ ○ ○ ○ ○ ○ ○ ○ ○ ○ ○ ○ ○ ○ ○ ○ ○ ○
VI. Display Information VI. Display Info Resolution Table Resolution Table 4MB Video Memory Resolution Vertical Frequency Horizontal Frequency Color Depth 8bpp = 256 colors Standard 16bpp = 65K colors High Color 32bpp = True Color 640 x 480 60Hz 72Hz 75Hz 85Hz 100Hz 120Hz 31.4KHz 36.1KHz 37.6KHz 43.0KHz 50.9KHz 61.8KHz ü ü ü ü ü ü ü ü ü ü ü ü ü ü ü ü ü ü 800 x 600 60Hz 72Hz 75Hz 85Hz 100Hz 120Hz 37.9KHz 45.1KHz 47.1KHz 53.5KHz 63.6KHz 77.
VII. Hardware Information VIP Connectors VII. Hardware Info VIP Connectors VIP uses two dual row 0.1” center connectors — Connector A and Connector B. Connector A is a 26-pin connector, which is the same as the standard Feature Connector. Connector B is a 14-pin connector consisting of the power pins, ground, VRST#, and I2S. On the master side, Connector A is male, and Connector B is female. This applies to either the graphics adapter card or the motherboard.
VII. Hardware Information VIP CONNECTOR A (26 Pin Dual Row Header, 0.100 in.
VIII. Troubleshooting Description Recommended Action After installing the driver, Windows 95 doesn't prompt me to restart and the driver still doesn't work after I restart my computer. You may have installed similar drivers before. Try the following steps to install: VIII. Troubleshooting Descriptions/Actions After installation and restarting, Windows 95 informs me that the display setting is still incorrect. 1. Right-click My Computer on the desktop. 2. Select Properties.