Podręcznik użytkownika RT-N18U Router bezprzewodowy o dużej mocy 2,4 GHz 600 Mb/s
PL9415 Wydanie pierwsze Maj 2014 Copyright © 2014 ASUSTeK COMPUTER INC. Wszelkie prawa zastrzeżone. Żadnej z części tego podręcznika, włącznie z opisem produktów i oprogramowania, nie można powielać, przenosić, przetwarzać, przechowywać w systemie odzyskiwania danych lub tłumaczyć na inne języki, w jakiejkolwiek formie lub w jakikolwiek sposób, za wyjątkiem wykonywania kopii zapasowej dokumentacji otrzymanej od dostawcy, bez wyraźnego, pisemnego pozwolenia ASUSTeK COMPUTER INC. (“ASUS”).
Spis treści 1 1.1 1.2 1.3 1.4 1.5 1.6 Poznanie routera bezprzewodowego Witamy!.............................................................................................6 Zawartość opakowania...............................................................6 Router bezprzewodow................................................................7 Usytuowanie routera...................................................................9 Wymagania dotyczące instalacji..........................................
Spis treści (Centrum serwerów)..........................................................................35 3.5.3 Sieć 3G/4G................................................................................41 3.6 Korzystanie z aplikacji AiCloud............................................. 43 3.6.1 Funkcja Cloud Disk (Dysk w chmurze)............................44 3.6.2 Funkcja Smart Access (Dostęp inteligentny)................46 3.6.3 Funkcja Smart Sync (Synchronizacja inteligentna)....47 4 4.
Spis treści 4.6.2 Filtr adresów URL...................................................................77 4.6.3 Filtr słów kluczowych............................................................78 4.6.4 Network Services Filter (Filtr usług sieciowych)..........79 4.7 Administration (Administracja)............................................. 81 4.7.1 4.7.2 4.7.3 4.7.4 4.8 5 5.1 5.2 5.3 Operation Mode (Tryb działania).....................................81 System..........................................
1 Poznanie routera bezprzewodowego 1.1 Witamy! Dziękujemy za zakup routera bezprzewodowego RT-N18U firmy ASUS! Jest to router Wi-Fi o dużej mocy 2,4 GHz 802.11n z obsługą technologii TurboQAM™ i szybkością do 600 Mb/s. Jest wyposażony w port USB 3.0 oraz łączność Gigabit Ethernet, co czyni go doskonałym rozwiązaniem dla użytkowników wymagających dużej wydajności. 1.
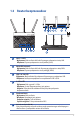
1.3 Router bezprzewodow RT-N18U Wireless 2.4GHz 600Mbps High Power Router 1 LAN 1~4 LED Wyłączona: Brak zasilania lub brak fizycznego połączenia z siecią LAN. W łączona: Fizyczne połączenie z siecią lokalną (LAN). 2 WAN LED (Internet) W yłączona: Brak zasilania lub brak fizycznego połączenia z siecią WAN. W łączona: Fizyczne połączenie z siecią rozległą (WAN). 3 USB 3.0 / 2.0 LED Wyłączona: Brak zasilania lub połączenia fizycznego z urządzeniem USB.
Przycisk zasilania On Off Naciśnij ten przycisk w celu włączenia lub wyłączenia zasilania systemu. Gniazda USB 3.0/2.0 Gniazda te służą do podłączania urządzeń USB 3.0/2.0 takich jak dyski twarde USB lub pamięci flash USB. Do jednego z tych gniazd można podłączyć kabel USB iPada w celu naładowania iPada. Przycisk RESET Przycisk służy do przywracania domyślnych ustawień systemu. Gniazdo sieci WAN (Internet) Służy do podłączania kabla sieciowego w celu ustanowienia połączenia z siecią rozległą.
1.4 Usytuowanie routera Dla zapewnienia najlepszej transmisji sygnału bezprzewodowego pomiędzy routerem bezprzewodowym a podłączonymi urządzeniami sieciowymi należy upewnić się, że: • Router bezprzewodowy należy umieścić centralnie, aby zapewnić maksymalny zasięg transmisji bezprzewodowej do urządzeń sieciowych w pomieszczeniu bądź w budynku. • Urządzenie trzymać z dala od metalowych przeszkód oraz bezpośredniego działania promieniowania słonecznego.
1.5 Wymagania dotyczące instalacji Do wykonania ustawień sieci potrzeba jednego lub dwóch komputerów, które spełniają następujące wymagania systemowe: • Port Ethernet RJ-45 (LAN) (10Base-T/100BaseTX/1000BaseTX) • Obsługa sieci bezprzewodowej IEEE 802.
1.6 Instalacja routera WAŻNE! • Router bezprzewodowy należy zainstalować za pomocą połączenia przewodowego, aby uniknąć możliwych problemów z instalacją. • Przed skonfigurowaniem routera bezprzewodowego ASUS wykonać następujące czynności: • W przypadku zastępowania istniejącego routera odłączyć router od sieci. • Odłączyć kable/przewody od istniejącego modemu. Jeżeli modem ma baterię zasilania awaryjnego należy ją również wyciągnąć. • Ponownie uruchomić komputer (zalecane). 1.6.
2. Używając dołączonego kabla sieciowego, podłączyć komputer do gniazda sieci lokalnej routera bezprzewodowego. WAŻNE! Upewnij się, czy dioda sieci lokalnej miga. 3 Używając drugiego kabla sieciowego, podłączyć modem do gniazda sieci WAN routera bezprzewodowego. 4. Włożyć wtyczkę zasilacza prądu przemiennego modemu do gniazda wejścia prądu stałego i włożyć zasilacz do gniazda sieciowego. 1.6.
3. Włożyć wtyczkę zasilacza prądu przemiennego modemu do gniazda wejścia prądu stałego i włożyć zasilacz do gniazda sieciowego. 4. Zainstalować w komputerze bezprzewodową kartę sieciową IEEE 802.11a/b/g/n. Uwagi: • Szczegółowe informacje dotyczące połączenia z siecią bezprzewodową znajdują się w podręczniku użytkownika adaptera WLAN.
2 Ustawienia sprzętu 2.1 Logowanie do GUI web Router bezprzewodowy ASUS jest dostarczany z intuicyjnym GUI (graphics user interface (graficzny interfejs użytkownika)), który umożliwia łatwą konfigurację jego różnych funkcji poprzez przeglądarkę sieci web, taką jak Internet Explorer, Firefox, Safari lub Google Chrome. UWAGA: Funkcje mogą się różnić w zależności od wersji oprogramowania sprzętowego. Aby zalogować się do GUI web: 1.
2.2 QIS z autodetekcją Quick Internet Setup (Szybkie ustawienia połączenia z Internetem ) Funkcja QIS (Quick Internet Setup (Szybkie ustawienia połączenia z Internetem)) pomaga w szybkim wykonaniu połączenia z Internetem. Uwagi: Podczas ustawiania połączenia z Internetem pierwszy raz, naciśnij i przytrzymaj przycisk Reset na routerze bezprzewodowym w celu przywrócenia jego ustawień fabrycznych. Aby użyć QIS z autodetekcją: 1. Zaloguj się do sieciowego interfejsu graficznego.
2. Router bezprzewodowy automatycznie wykryje, czy typ połączenia ISP to Dynamic IP (Dynamiczny adres IP), PPPoE, PPTP, L2TP oraz Static IP (Statyczny adres IP). Wprowadź niezbędne informacje dla typu połączenia ISP. WAŻNE! Uzyskaj niezbędne informacje dotyczące połączenia z Internetem od ISP.
Typ połączenia Static IP (Statyczny adres IP) Uwagi: • Automatyczne wykrywanie typu połączenia ISP jest wykonywane przy pierwszej konfiguracji routera bezprzewodowego lub po zresetowaniu routera bezprzewodowego do ustawień domyślnych. • Jeżeli funkcja QIS nie może wykryć typu połączenia z Internetem, kliknij polecenie Skip to manual setting (Przejdź do ustawień ręcznych) (patrz zrzut ekranu w etapie 1) i ręcznie skonfiguruj ustawienia połączenia. 3.
4. Wyświetlone zostaną ustawienia połączenia z Internetem oraz dane dotyczące połączenia bezprzewodowego. Aby kontynuować kliknij Next (Dalej). 5. Przeczytaj instrukcję połączenia Twojego komputera z siecią bezprzewodową. Po zakończeniu kliknij Finish (Zakończ).
2.3 Łączenie z siecią bezprzewodową Po skonfigurowaniu routera bezprzewodowego za pomocą funkcji QIS można połączyć komputer lub inne urządzenia inteligentne z siecią bezprzewodową. W celu połączenia z siecią: 1. Kliknij ikonę sieci w obszarze powiadomień komputera, aby wyświetlić dostępne sieci bezprzewodowe. 2. Wybierz sieć bezprzewodową do połączenia, a następnie kliknij przycisk Connect (Połącz). 3.
3 Konfiguracja ustawień ogólnych 3.1 Korzystanie z pozycji Network Map (Mapa sieci) Pozycja Network Map (Mapa sieci) umożliwia konfigurowanie ustawień zabezpieczeń sieci, zarządzanie klientami sieciowymi oraz monitorowanie urządzenia USB.
3.1.1 Wykonanie ustawień zabezpieczenia sieci bezprzewodowej Aby zabezpieczyć sieć bezprzewodową przed nieautoryzownym dostępem należy skonfigurować ustawienia zabezpieczenia. W celu wykonania ustawień zabezpieczenia sieci bezprzewodowej: 1. W panelu nawigacji przejdź do pozycji General (Ogólne) > Network Map (Mapa sieci). 2.
4. Na rozwijanej liście Security Level (Poziom zabezpieczenia), wybierz metodę szyfrowania dla sieci bezprzewodowej. WAŻNE! Standard IEEE 802.11n/ac zakazuje używania wysokiej przepustowości z WEP lub WPA-TKP, jako pojedynczego szyfru. Jeśli używane są te metody szyfrowania, szybkość danych spadnie do szybkości połączenia 54Mbps IEEE 802.11g. 5. Wprowadź klucz hasła zabezpieczenia. 6. Po wykonaniu kliknij Apply (Zastosuj). 3.1.2 Zarządzanie klientami sieci W celu zarządzania klientami sieci: 1.
3.1.3 Monitorowanie urządzenia USB Router bezprzewodowy firmy ASUS jest wyposażony w dwa porty USB, do których można podłączyć urządzenia USB lub drukarkę USB w celu udostępnienia plików i drukarki klientom w sieci. Uwaga: • Do używania tej funkcji wymagane jest podłączenie do portu USB 3.0/2.0 na panelu tylnym posiadanego routera bezprzewodowego urządzenia pamięci masowej USB takiego jak dysk twardy USB lub napęd flash USB. Patrz lista obsługiwanych urządzeń Plug-n-Share Disk pod adresem http://event.
WAŻNE! Aby inni klienci sieciowi mogli uzyskiwać dostęp do urządzenia USB za pomocą witryny FTP/narzędzia klienta FTP innej firmy, funkcji Servers Center (Centrum serwerów), usługi Samba lub aplikacji AiCloud, należy najpierw utworzyć konto udostępniania i skonfigurować uprawnienia/prawa dostępu. Dalsze szczegółowe informacje znajdują się w części 3.5. Używanie aplikacji USB i 3.6 Korzystanie z aplikacji AiCloud w niniejszym podręczniku użytkownika. Aby monitorować urządzenie USB: 1.
Bezpieczne usuwanie dysku USB WAŻNE: Nieprawidłowe usunięcie dysku USB może spowodować uszkodzenie danych. Aby bezpiecznie usunąć dysk USB: 1. W panelu nawigacji przejdź do pozycji General (Ogólne) > Network Map (Mapa sieci). 2. W prawym górnym rogu ekranu kliknij pozycję > Eject USB disk (Wysuń dysk USB). Po pomyślnym wysunięciu dysku USB jego stan zostanie zmieniony na Unmounted (Odłączony).
3.2 Tworzenie Guest Network (Sieć gości) Pozycja Guest Network (Sieć gości) udostępnia tymczasowym użytkownikom możliwość połączenia z Internetem za pomocą oddzielnych identyfikatorów SSID lub sieci, bez zapewniania dostępu do sieci prywatnej. UWAGA: Router RT-N18U obsługuje maksymalnie cztery identyfikatory SSID. W celu utworzenia sieci gości: 1. W panelu nawigacji przejdź do pozycji General (Ogólne) > Guest Network (Sieć gości). 2.
4. W celu skonfigurowania dodatkowych opcji kliknij przycisk Modify (Modyfikuj). 5. Kliknij przycisk Yes (Tak) na ekranie Enable Guest Network (Włącz sieć gości). 6. Przypisz sieci tymczasowej nazwę sieci bezprzewodowej w polu Network Name (SSID) [Nazwa sieci (SSID)]. 7. Wybierz ustawienie dla pozycji Authentication Method (Metoda uwierzytelniania). 8. Wybierz metodę Encryption (Szyfrowanie). 9. Określ ustawienie pozycji Access time (Czas dostępu) lub wybierz opcję Limitless (Nieograniczony). 10.
3.3 Używanie Traffic Manager (Menedżer ruchu) 3.3.1 Zarządzanie pasmem QoS (Quality of Service) QoS (Quality of Service) umożliwia ustawienie priorytetu pasma i zarządzanie ruchem sieciowym. Aby ustawić priorytet szerokości pasma: 1. W panelu nawigacji przejdź do pozycji General (Ogólne) > Traffic Manager (Menedżer ruchu) > wybierz zakładkę QoS (Jakość usługi). 2. Kliknij ON (Włącz), aby włączyć domyślną zasadę i wypełnij pola pasma dla przesyłanie i pobieranie.
4. Na stronie User-defined QoS rules (Definiowane przez użytkownika reguły QoS) dostępne są cztery domyślne typy usług online — korzystanie z sieci Web, HTTPS i transferowanie plików. Wybierz preferowaną usługę, wypełnij pola Source IP or MAC (Adres IP lub MAC źródła), Destination Port (Port docelowy), Protocol (Protokół), Transferred (Przetransferowano) i Priority (Priorytet), a następnie kliknij przycisk Apply (Zastosuj). Informacje zostaną skonfigurowane na ekranie reguł QoS.
5. Na stronie User-defined Priority (Priorytet definiowany przez użytkownika), dla aplikacji lub urządzeń sieciowych można określić jeden z pięciu poziomów priorytetu za pomocą listy rozwijanej User-defined QoS rules (Definiowane przez użytkownika reguły QoS). W zależności od poziomu priorytetu, pakiety danych można wysyłać za pomocą następujących metod: • Zmień kolejność przesyłanych pakietów sieciowych, które są wysyłane do Internetu.
3.3.2 Monitorowanie ruchu Funkcja monitorowania ruchu zapewnia informacje dotyczące przepustowości i szybkości połączenia z Internetem, siecią przewodową i bezprzewodową. Umożliwia ona monitorowanie ruchu sieciowego na poziomie każdego dnia. Uwaga: Pakiety z Internetu są równomiernie przesyłane do urządzeń przewodowych i bezprzewodowych.
3.4 Konfiguracja pozycji Parental Control (Kontrola rodzicielska) Funkcja Parental Control (Kontrola rodzicielska) umożliwia kontrolę czasu dostępu do Internetu. Użytkownicy mogą ustawić ograniczenie czasu korzystania z sieci klienta. Aby korzystać z funkcji kontroli rodzicielskiej: 1. W panelu nawigacji przejdź do pozycji General (Ogólne) > Parental control (Kontrola rodzicielska). 2. Kliknij pozycję ON (WŁ.) w celu włączenia funkcji Parental Control (Kontrola rodzicielska). 3.
3.5 Używanie aplikacji USB Funkcja USB Extension (Rozszerzenie USB) udostępnia podmenu AiDisk, Servers Center (Centrum serwerów), Network Printer Server (Serwer wydruków sieciowych) i Download Master (Zarządzanie pobieraniem). WAŻNE! Aby móc korzystać z funkcji serwera, należy podłączyć urządzenie pamięci USB, takie jak dysk twardy USB lub pamięć flash USB, do portu USB 2.0 na panelu tylnym routera bezprzewodowego. Urządzenie pamięci USB powinno zostać odpowiednio sformatowane i podzielone na partycje.
3. Wybierz prawa dostępu, które chcesz przydzielić użytkownikom mającym dostęp do współdzielonych danych. 4. Utwórz nazwę domeny przez usługi DDNS ASUS, wybierz I will use the service and accept the Terms of service (Będę korzystał z tej usługi i akceptuję warunki korzystania z usługi) i wprowadź nazwę domeny. Po zakończeniu kliknij Next (Dalej).
3.5.2 Korzystanie z funkcji Servers Center (Centrum serwerów) Funkcja Servers Center (Centrum serwerów) umożliwia udostępnianie plików multimedialnych z dysku USB poprzez katalog Media Server (Serwer multimediów), usługę udostępniania Samba lub FTP. Za pomocą funkcji Servers Center (Centrum serwerów) można także skonfigurować inne ustawienia dysku USB.
W celu wyświetlenia strony ustawień Media Server (Serwer multimediów) przejdź do pozycji General (Ogólne) > USB application (Aplikacja USB) > Servers Center (Centrum serwerów) > wybierz zakładkę Media Server (Serwer multimediów). Należy zapoznać się z poniższymi opisami pól: • Włącz serwer multimediów DLNA: Wybierz pozycję ON/ OFF (WŁ./WYŁ.) w celu włączenia/wyłączenia serwera multimediów DLNA. • Włączyć serwer iTunes?: Wybierz pozycję ON/OFF (WŁ./ WYŁ.) w celu włączenia/wyłączenia serwera iTunes.
2. Wykonaj poniższe czynności, aby dodać, usunąć lub zmodyfikować konto. W celu utworzenia nowego konta: a) Kliknij ikonę , aby dodać nowe konto. b) W polach Account (Konto) i Password (Hasło) wpisz nazwę i hasło klienta sieciowego. Wprowadź ponownie hasło w celu potwierdzenia. Kliknij przycisk Add (Dodaj) w celu dodania konta do listy. W celu usunięcia istniejącego konta: a) Wybierz konto, które chcesz usunąć. b) Kliknij ikonę .
3. Z listy plików/folderów wybierz typ praw dostępu, który ma zostać przydzielony określonym plików/folderów: • R/W: Wybierz tę opcję, aby przypisać dostęp do zapisu/ odczytu. • R: Wybierz tę opcję, aby przypisać dostęp tylko do odczytu. • Nie: Wybierz tę opcję, aby nie udostępniać określonego foldera. 4. Kliknij Apply (Zastosuj), aby zastosować zmiany.
W celu korzystania z usługi udostępniania FTP: UWAGI: Upewnij się, że serwer FTP został skonfigurowany za pomocą funkcji AiDisk. Szczegółowe informacje znajdują się w rozdziale 3.5.1 Korzystanie z funkcji AiDisk. 1. W panelu nawigacji kliknij pozycję General (Ogólne) > USB application (Aplikacja USB) > Servers Center (Centrum serwerów) > wybierz zakładkę FTP Share (Udostępnianie FTP). 2.
Miscellaneous setting (Różne ustawienia) Ustawienie Miscellaneous (Różne) umożliwia konfigurację innych ustawień dla dysku USB, włącznie z maksymalną liczbą logowania użytkownika, nazwą urządzenia, grupą roboczą i zestawem znaków używanych na serwerze FTP. W celu skonfigurowania pozycji Miscellaneous setting (Różne ustawienia): 1.
• Work Group (Grupa robocza) Przypisywanie nazwy sieci lokalnej routera RT-N18U zgodnie ze wskazaniem w otoczeniu sieciowym. UWAGA: Standardowe znaki dla pozycji Device Name (Nazwa urządzenia) i Work Group (Grupa robocza) to litery (a–z, A–Z), cyfry (0–9), spacja, podkreślenia (_) i łączniki (-). Pierwszym ani ostatnim znakiem nie może być spacja. Nieprawidłowa nazwa grupy roboczej utrudnia znalezienie urządzenia w sieci przez inne urządzenia.
W celu skonfigurowania dostępu do Internetu 3G/4G: 1. W panelu nawigacji kliknij pozycję General (Ogólne) > USB application (Aplikacja USB) > 3G/4G. 2. W polu Enable USB Modem (Włącz modem USB) zaznacz pozycję Yes (Tak). 3. Skonfiguruj następujące pozycje: • Lokalizacja: Wybierz lokalizację dostawcy usług 3G/4G z listy rozwijanej. • Usługodawca internetowy: Wybierz usługodawcę internetowego (ISP) z listy rozwijanej.
3.6 Korzystanie z aplikacji AiCloud AiCloud to aplikacja usługi w chmurze umożliwiająca zapisywanie, synchronizowanie, udostępnianie i uzyskiwanie dostępu do plików. W celu korzystania z aplikacji AiCloud: 1. Pobierz aplikację ASUS AiCloud ze sklepu Google Play lub Apple Store i zainstaluj ją na urządzeniu inteligentnym. 2. Połącz urządzenie inteligentne z siecią. Wykonaj instrukcje, aby ukończyć proces konfiguracji aplikacji AiCloud.
3.6.1 Funkcja Cloud Disk (Dysk w chmurze) W celu utworzenia dysku w chmurze: 1. Podłącz urządzenie pamięci USB do routera bezprzewodowego. 2. Włącz funkcję Cloud Disk (Dysk w chmurze). 3. P rzejdź do witryny https://router.asus.com i wprowadź konto logowania i hasło routera. W celu zapewnienia lepszego działania zalecane jest używanie przeglądarki Google Chrome lub Firefox.
4. M ożna już uzyskiwać dostęp do plików dostępnych w ramach funkcji Cloud Disk (Dysk w chmurze) za pomocą urządzeń połączonych z siecią. UWAGA: Uzyskanie dostępu do urządzeń połączonych z siecią wymaga ręcznego wprowadzenia nazwy użytkownika i hasła danego urządzenia, które ze względów bezpieczeństwa nie zostaną zapisane przez aplikację AiCloud.
3.6.2 Funkcja Smart Access (Dostęp inteligentny) Funkcja Smart Access (Dostęp inteligentny) ułatwia uzyskiwanie dostępu do sieci domowej za pomocą nazwy domeny routera. UWAGI: 46 • Nazwę domeny routera można utworzyć za pomocą usługi ASUS DDNS. Szczegółowe informacje zawiera rozdział 4.3.5 DDNS (Usługa DDNS). • Aplikacja AiCloud zapewnia domyślnie zabezpieczone połączenie HTTPS.
3.6.3 Funkcja Smart Sync (Synchronizacja inteligentna) W celu korzystania z funkcji Smart Sync (Synchronizacja inteligentna): 1. Uruchom aplikację AiCloud, kliknij pozycję Smart Sync (Synchronizacja inteligentna) > Go (Idź). 2. Wybierz pozycję ON (WŁ.) w celu włączenia funkcji Smart Sync (Synchronizacja inteligentna). 3. Kliknij przycisk Add new account (Dodaj nowe konto). 4. Wprowadź hasło konta w usłudze ASUS WebStorage i wybierz katalog, który chcesz zsynchronizować z usługą WebStorage. 5.
4 Konfiguracja ustawień zaawansowanych 4.1 Wireless (Sieć bezprzewodowa) 4.1.1 General (Ogólne) Zakładka General (Ogólne) umożliwia konfigurację podstawowych ustawień sieci bezprzewodowej. W celu skonfigurowania podstawowych ustawień sieci bezprzewodowej: 1. W panelu nawigacji przejdź do pozycji Advanced Settings (Ustawienia zaawansowane) > Wireless (Sieć bezprzewodowa) > wybierz zakładkę General (Ogólne). 2. Wybierz pasmo częstotliwości sieci bezprzewodowej 2,4 GHz. 3.
4. W polu Hide SSID (Ukryj SSID) wybierz opcję Yes (Tak), aby nie dopuścić do wykrywania identyfikatora SSID przez urządzenia bezprzewodowe. Po włączeniu tej funkcji konieczne będzie ręczne wprowadzanie identyfikatora SSID w urządzeniu bezprzewodowym w celu zapewnienia jego dostępu do sieci bezprzewodowej. 5. Wybierz jedną z dostępnych opcji trybu sieci bezprzewodowej w celu określenia typów urządzeń bezprzewodowych, które będą mogły łączyć się z routerem bezprzewodowym: • Automat.
• WPA/WPA2 Personal/WPA Auto-Personal: Ta opcja zapewnia mocne zabezpieczenia. Można korzystać z zabezpieczenia WPA (z TKIP) lub WPA2 (z AES). Po wybraniu tej opcji konieczne jest korzystanie z szyfrowania TKIP + AES i wprowadzenie hasła WPA (klucza sieciowego). • WPA/WPA2 Enterprise/WPA Auto-Enterprise: Ta opcja zapewnia bardzo mocne zabezpieczenia. Jest ona dostępna z zintegrowanym serwerem EAP lub zewnętrznym serwerem uwierzytelniania RADIUS z wewnętrzną bazą danych. • Radius z 802.
4.1.2 WPS WPS (Wi-Fi Protected Setup) to standard zabezpieczeń sieci bezprzewodowej, który ułatwia łączenie urządzeń z siecią bezprzewodową. Funkcję WPS można skonfigurować za pomocą kodu PIN lub przycisku WPS. UWAGA: Należy upewnić się, że urządzenia obsługują funkcję WPS. W celu włączenia funkcji WPS w sieci bezprzewodowej: 1. W panelu nawigacji przejdź do pozycji Advanced Settings (Ustawienia zaawansowane) > Wireless (Sieć bezprzewodowa) > wybierz zakładkę WPS. 2.
Uwaga: Funkcja WPS obsługuje uwierzytelnianie za pomocą metody Open System (Otwarty system), WPA-Personal i WPA2-Personal. Funkcja WPS nie obsługuje sieci bezprzewodowych korzystających z metody szyfrowania Shared Key (Klucz wspólny), WPA-Enterprise, WPA2Enterprise ani RADIUS. 3. W polu WPS Method (Metoda WPS) wybierz opcję Push Button (Przycisk polecenia) lub Client PIN Code (Kod PIN klienta). Po wybraniu opcji Push Button (Przycisk polecenia) przejdź do kroku 4.
4.1.3 Bridge (Mostek) Dzięki funkcji Bridge (Mostek) lub WDS (Wireless Distribution System) router bezprzewodowy firmy ASUS może łączyć się z innym bezprzewodowym punktem dostępowym w trybie wyłączności, przy jednoczesnym braku dostępu innych urządzeń lub stacji bezprzewodowych do routera bezprzewodowego firmy ASUS. Można to także traktować jako repeater bezprzewodowy, za pomocą którego router bezprzewodowy firmy ASUS komunikuje się z innym punktem dostępowym lub urządzeniem bezprzewodowym.
• HYBRID (HYBRYDOWY): Włączenie funkcji mostka bezprzewodowego z możliwością łączenia się innych urządzeń/stacji bezprzewodowych z routerem. UWAGA: W trybie Hybrid (Hybrydowy) urządzenia bezprzewodowe połączone z routerem bezprzewodowym firmy ASUS będą miały zapewnioną tylko połowę szybkości połączenia punktu dostępowego. 4.
4.1.4 Wireless MAC Filter (Filtr adresów MAC urządzeń bezprzewodowych) Pozycja Wireless MAC Filter (Filtr adresów MAC urządzeń bezprzewodowych) zapewnia kontrolę nad pakietami przesyłanymi na określony adres MAC (Media Access Control) w danej sieci bezprzewodowej. W celu skonfigurowania filtra adresów MAC urządzeń bezprzewodowych: 1.
4.1.5 RADIUS Setting (Ustawienia serwera RADIUS) Pozycja RADIUS (Remote Authentication Dial In User Service) Setting (Ustawienia serwera RADIUS) zapewnia dodatkową warstwę zabezpieczeń w przypadku wybrania metody uwierzytelniania WPA-Enterprise, WPA2-Enterprise lub Radius with 802.1x (Radius z 802.1x). W celu skonfigurowania ustawień serwera RADIUS w sieci bezprzewodowej: 1. Upewnij się, że wybrana metoda uwierzytelniania routera bezprzewodowego to WPA-Enterprise, WPA2-Enterprise lub Radius with 802.
4.1.6 Professional (Profesjonalne) Na ekranie Professional (Profesjonalne) dostępne są opcje konfiguracji zaawansowanej. UWAGA: Zalecane jest zachowanie wartości domyślnych tego ekranu. Na ekranie Professional Settings (Ustawienia profesjonalne) można skonfigurować następujące pozycje: • Częstotliwość: Wybierz pasmo częstotliwości dla pozycji, dla których zastosowanie mają ustawienia profesjonalne. • Włącz łączność radiową: Wybierz opcję Yes (Tak), aby włączyć sieć bezprzewodową.
• Data włączania łączności radiowej (weekend): Można określić, w które dni weekendu sieć bezprzewodowa ma być włączona. • Pora dnia, w której łączność radiowa ma być włączona: Można określić przedział czasu, w którym sieć bezprzewodowa ma być włączona podczas weekendu. • Ustawiaj izolowany punkt dostępowy: Pozycja Set AP isolated (Ustawiaj izolowany punkt dostępowy) uniemożliwia wzajemną komunikację urządzeń bezprzewodowych połączonych z daną siecią.
• Przekierowywanie multiemisji bezprzewodowych: Wybierz opcję Enable (Włącz), aby router bezprzewodowy mógł przekierowywać ruch multiemisji do innych urządzeń bezprzewodowych obsługujących multiemisje. Wybierz opcję Disable (Wyłącz), aby router nie mógł przekierowywać transmisji multiemisyjnych. • Włącz tryb WMM APSD: Pozycja Enable WMM APSD (WiFi Multimedia Automatic Power Save Delivery) (Włącz tryb WMM APSD) usprawnia zarządzanie energią urządzeń bezprzewodowych.
W celu zmodyfikowania ustawień adresu IP sieci LAN: 1. W panelu nawigacji przejdź do pozycji Advanced Settings (Ustawienia zaawansowane) > LAN (Sieć LAN) > wybierz zakładkę LAN IP (Adres IP sieci LAN). 2. Zmodyfikuj pozycje IP address (Adres IP) i Subnet Mask (Maska podsieci). 3. Po zakończeniu kliknij przycisk Apply (Zastosuj). 4.2.2 DHCP Server (Serwer DHCP) Router bezprzewodowy korzysta z serwera DHCP do automatycznego przypisywania adresów IP w sieci.
3. W polu tekstowym Domain Name (Nazwa domeny) wprowadź nazwę domeny routera bezprzewodowego. 4. W polu IP Pool Starting Address (Adres początkowy zakresu IP) wprowadź adres początkowy IP. 5. W polu IP Pool Ending Address (Adres końcowy zakresu IP) wprowadź adres końcowy IP. 6. W polu Lease Time (Czas dzierżawy) wprowadź czas zakończenia ważności adresów IP, po czym router bezprzewodowy automatycznie przydzieli nowe adresy IP klientom sieci.
4.2.3 Route (Trasa) Jeśli dana sieć korzysta z więcej niż jednego routera bezprzewodowego, można skonfigurować tabelę routingu w celu współdzielenia tej samej usługi internetowej. UWAGA: Jeśli użytkownik nie posiada specjalistycznej wiedzy na temat tabel routingu, zalecane jest pozostawienie domyślnych ustawień trasy. W celu skonfigurowania tabeli routingu sieci LAN: 1. W panelu nawigacji przejdź do pozycji Advanced Settings (Ustawienia zaawansowane) > LAN (Sieć LAN) > wybierz zakładkę Route (Trasa). 2.
4.2.4 IPTV Router bezprzewodowy obsługuje połączenia z usługami IPTV udostępniane przez usługodawcę internetowego lub sieć LAN. Zakładka IPTV zawiera ustawienia konieczne do konfiguracji pozycji IPTV, VoIP, multiemisji i UDP dla danej usługi. W celu uzyskania konkretnych informacji dotyczących usługi należy skontaktować się z usługodawcą internetowym.
4.3 WAN (Sieć WAN) 4.3.1 Internet Connection (Połączenie internetowe) Na ekranie Internet Connection (Połączenie internetowe) można skonfigurować ustawienia różnego typu połączeń WAN. W celu skonfigurowania ustawień połączenia WAN: 1. W panelu nawigacji przejdź do pozycji Advanced Settings (Ustawienia zaawansowane) > WAN (Sieć WAN) > wybierz zakładkę Internet Connection (Połączenie internetowe). 2. Skonfiguruj poniższe ustawienia. Po zakończeniu kliknij przycisk Apply (Zastosuj).
• Włącz NAT: Translator adresów sieciowych NAT (Network Address Translation) to system, w którym jeden publiczny adres IP (adres IP sieci WAN) jest używany do zapewniania dostępu do Internetu klientom sieciowym o prywatnym adresie IP w sieci LAN. Prywatny adres IP każdego klienta sieciowego jest zapisywany w tabeli NAT i używany do rozsyłania przychodzących pakietów danych.
• Adres MAC: Pozycja MAC (Media Access Control) address (Adres MAC) to unikatowy identyfikator urządzenia sieciowego. Niektórzy usługodawcy internetowi monitorują adresy MAC urządzeń sieciowych, które łączą się z ich usługą i odrzucają wszelkie próby połączeń urządzeń nierozpoznanych. Aby uniknąć problemów z połączeniami spowodowanych niezarejestrowanym adresem MAC, można: • Skontaktować się z usługodawcą internetowym i zaktualizować adres MAC skojarzony z jego usługą.
4.3.2 Port Trigger (Wyzwalanie portów) Wyzwalanie zakresu portu otwiera wstępnie określony port przychodzący na ograniczony czas za każdym razem, gdy klient w sieci lokalnej nawiązuje połączenie wychodzące z określonym portem. Wyzwalanie portów jest używane w następujących przypadkach: • Więcej niż jeden klient lokalny wymaga przekierowania portu dla tej samej aplikacji, ale w innym czasie. • Aplikacja wymaga określonych portów przychodzących innych niż porty wychodzące.
• Port wyzwalania: Określ port wyzwalający otwarcie portu przychodzącego. • Protokół: Wybierz protokół TCP lub UDP. • Port przychodzący: Określ port przychodzący do odbierania danych przychodzących z Internetu. • Protokół: Wybierz protokół TCP lub UDP. UWAGI: 68 • Podczas łączenia z serwerem IRC komputer kliencki nawiązuje połączenie wychodzące zgodnie z zakresem portu wyzwalania 66660–7000.
4.3.3 Virtual Server/Port Forwarding (Serwer wirtualny/ Przekierowanie portów) Przekierowanie portów to metoda kierowania ruchu sieciowego z Internetu przychodzącego na określony port lub zakres portów do urządzenia lub urządzeń w sieci lokalnej. Po skonfigurowaniu funkcji Port Forwarding (Przekierowanie portów) routera komputery spoza sieci będą mogły uzyskiwać dostęp do określonych usług zapewnianych przez komputer w sieci.
2. Skonfiguruj poniższe ustawienia. Po zakończeniu kliknij przycisk Apply (Zastosuj). • Włącz przekierowanie portów: Wybierz opcję Yes (Tak), aby włączyć funkcję Port Forwarding (Przekierowanie portów). • Lista znanych serwerów: Określ typ usługi, do której chcesz uzyskiwać dostęp. • Lista znanych gier: Pozycja ta zawiera listę portów wymaganych do prawidłowego działania popularnych gier online.
• Lokalny adres IP: Wprowadź adres IP sieci LAN klienta. UWAGA: W celu zapewnienia prawidłowego działania funkcji przekierowania portów należy wprowadzić statyczny adres IP klienta lokalnego. Informacje na ten temat znajdują się w części 4.2 LAN (Sieć LAN). • Local Port (Port lokalny): Wprowadź określony port do odbierania przekierowanych pakietów. Pozostaw to pole puste, jeśli chcesz, aby pakiety przychodzące były przekierowywane na określony zakres portu. • Protocol (Protokół): Wybierz protokół.
4.3.4 DMZ (Strefa DMZ) W wirtualnej strefie DMZ dostęp do Internetu ma jeden klient, który odbiera wszystkie pakiety przychodzące do danej sieci lokalnej. Ruch przychodzący z Internetu jest zwykle odrzucany i kierowany do określonego klienta tylko wtedy, gdy w danej sieci skonfigurowane zostało przekierowanie portów lub wyzwalanie portów. W przypadku konfiguracji strefy DMZ tylko jeden klient sieciowy odbiera wszystkie pakiety przychodzące.
4.3.5 DDNS (Usługa DDNS) Skonfigurowanie usługi DDNS (Dynamic DNS) umożliwia uzyskiwanie dostępu do routera spoza sieci za pomocą usługi ASUS DDNS lub innej usługi DDNS. W celu skonfigurowania usługi DDNS: 1. W panelu nawigacji przejdź do pozycji Advanced Settings (Ustawienia zaawansowane) > WAN (Sieć WAN) > wybierz zakładkę DDNS (Usługa DDNS). 2. Skonfiguruj poniższe ustawienia. Po zakończeniu kliknij przycisk Apply (Zastosuj).
• Włącz symbole wieloznaczne: Włącz obsługę symboli wieloznacznych, jeśli jest to wymagane przez usługę DDNS. UWAGI: Usługa DDNS nie będzie działać w poniższych przypadkach: • Router bezprzewodowy korzysta z prywatnego adresu IP sieci WAN (192.168.x.x, 10.x.x.x lub 172.16.x.x), na co wskazuje tekst w kolorze żółtym. • Router może być w sieci, która korzysta z wielu tabel NAT. 4.3.
4.4 IPv6 (Protokół IPv6) Niniejszy router bezprzewodowy obsługuje adresowanie IPv6, system obsługujący więcej adresów IP. Standard ten nie jest jeszcze powszechnie dostępny. W celu sprawdzenia, czy dana usługa internetowa obsługuje protokół IPv6 należy skontaktować się z usługodawcą internetowym. W celu skonfigurowania protokołu IPv6: 1. W panelu nawigacji przejdź do pozycji Advanced Settings (Ustawienia zaawansowane) > IPv6 (Protokół IPv6). 2. Wybierz opcję dla pozycji Connection Type (Typ połączenia).
4.5 Serwer sieci VPN Wirtualna sieć prywatna VPN (Virtual Private Network) zapewnia bezpieczną komunikację z komputerem zdalnym lub siecią zdalną przy użyciu sieci publicznej, np. Internetu. UWAGA: Do skonfigurowania połączenia sieci VPN konieczny jest adres IP lub nazwa domeny serwera sieci VPN, do którego dostęp ma zostać uzyskany. W celu skonfigurowania dostępu do serwera sieci VPN: 1. W panelu nawigacji przejdź do pozycji Advanced Settings (Ustawienia zaawansowane) > VPN Server (Serwer sieci VPN). 2.
4.6 Zapora Router bezprzewodowy może pełnić funkcję zapory sprzętowej w sieci. UWAGA: Funkcja Firewall (Zapora) jest domyślnie włączona. 4.6.1 Ogólne W celu skonfigurowania podstawowych ustawień pozycji Firewall (Zapora): 1. W panelu nawigacji przejdź do pozycji Advanced Settings (Ustawienia zaawansowane) > Firewall (Zapora) > wybierz zakładkę General (Ogólne). 2. W polu Enable Firewall (Włącz zaporę) zaznacz pozycję Yes (Tak). 3.
W celu skonfigurowania filtra adresów URL: 1. W panelu nawigacji przejdź do pozycji Advanced Settings (Ustawienia zaawansowane) > Firewall (Zapora) > wybierz zakładkę URL Filter (Filtr adresów URL). 2. W polu Enable URL Filter (Włącz filtr adresów URL) wybierz pozycję Enabled (Włączono). 3. Wprowadź adres URL i kliknij przycisk . 4. Kliknij przycisk Apply (Zastosuj). 4.6.3 Filtr słów kluczowych Filtr słów kluczowych blokuje dostęp do stron sieci Web zawierających określone słowa kluczowe.
3. Wprowadź słowo lub wyrażenie i kliknij przycisk Add (Dodaj). 4. Kliknij przycisk Apply (Zastosuj). UWAGI: • Pozycja Keyword Filter (Filtr słów kluczowych) zależy od zapytania DNS. Jeśli klient sieciowy uzyskał już dostęp do witryny sieci Web, np. http://www.abcxxx.com, witryna ta nie zostanie zablokowana (odwiedzone wcześniej witryny sieci Web są zapisywane w pamięci podręcznej DNS).
W celu skonfigurowania filtra usług sieciowych: 1. W panelu nawigacji przejdź do pozycji Advanced Settings (Ustawienia zaawansowane) > Firewall (Zapora) > wybierz zakładkę Network Service Filter (Filtr usług sieciowych). 2. W polu Enable Network Services Filter (Włącz filtr usług sieciowych) zaznacz pozycję Yes (Tak). 3. Wybierz opcję dla pozycji Filter table type (Typ tabeli filtrów). Pozycja Black List (Czarna lista) umożliwia blokowanie określonych usług sieciowych.
4.7 Administration (Administracja) 4.7.1 Operation Mode (Tryb działania) Na stronie Operation Mode (Tryb działania) można wybrać odpowiedni tryb sieci. W celu skonfigurowania trybu działania: 1. W panelu nawigacji przejdź do pozycji Advanced Settings (Ustawienia zaawansowane) > Administration (Administracja) > wybierz zakładkę Operation Mode (Tryb działania). 2.
4.7.2 System Na stronie System można skonfigurować ustawienia routera bezprzewodowego. W celu skonfigurowania ustawień System: 1. W panelu nawigacji przejdź do pozycji Advanced Settings (Ustawienia zaawansowane) > Administration (Administracja) > wybierz zakładkę System. 2. Można skonfigurować następujące ustawienia: • Zmień hasło logowania routera: Hasło i nazwę logowania routera bezprzewodowego można zmienić, wprowadzając nową nazwę i hasło.
4.7.3 Aktualizacja firmware Uwaga: Pobierz najnowszy firmware ze strony sieci web ASUS, pod adresem http://www.asus.com. Aktualizacja firmware: 1. W panelu nawigacji przejdź do pozycji Advanced Settings (Ustawienia zaawansowane) > Administration (Administracja) > wybierz zakładkę Firmware Upgrade (Uaktualnienie oprogramowania sprzętowego). 2. W polu New Firmware File (Nowy plik oprogramowania sprzętowego) kliknij pozycję Browse (Przeglądaj), aby zlokalizować pobrany plik. 3. Kliknij Upload (Prześlij).
4.8 System Log (Dziennik systemu) W pozycji System Log (Dziennik systemu) znajduje się lista zarejestrowanych aktywności w sieci. UWAGA: Po ponownym uruchomieniu lub wyłączeniu routera dziennik systemu jest resetowany. W celu wyświetlenia dziennika systemu: 1. W panelu nawigacji przejdź do pozycji Advanced Settings (Ustawienia zaawansowane) > System Log (Dziennik systemu). 2.
5 Narzędziowych Uwagi: • Pobierz i zainstaluj programy narzędziowe routera bezprzewodowego z witryny firmy ASUS: • Device Discovery wer. 1.4.7.1 — http://dlcdnet.asus.com/pub/ ASUS/LiveUpdate/Release/Wireless/Discovery.zip • FFirmware Restoration wer. 1.9.0.4 — http://dlcdnet.asus.com/ pub/ASUS/LiveUpdate/Release/Wireless/Rescue.zip • Windows Printer Utility wer. 1.0.5.5 — http://dlcdnet.asus.com/ pub/ASUS/LiveUpdate/Release/Wireless/Printer.
5.2 Firmware Restoration Narzędzie Firmware Restoration (Odtwarzanie oprogramowania) wykorzystywane jest w routerze bezprzewodowym ASUS w przypadku niepowodzenia procesu aktualizacji oprogramowania. Umożliwia ono wczytanie określonego oprogramowania. Proces trwa około trzech do czterech minut. WAŻNE! : Przed skorzystaniem z narzędzia Firmware Restoration (Odtwarzanie oprogramowania) uruchomić tryb ratunkowy. UWAGA: Funkcja ta nie jest obsługiwana w systemie MAC OS.
3. Ustaw statyczny adres IP komputera i wprowadź poniższe wartości w celu skonfigurowania ustawień protokołu TCP/IP: Adres IP: 192.168.1.x Maska podsieci: 255.255.255.0 4. Na pulpicie komputera kliknąć Start (Start)> All Programs (Wszystkie programy) > ASUS Utility RT-N18U Wireless Router (Narzędzie routera bezprzewodowego ASUS RT-N18U) > Firmware Restoration (Odtwarzanie oprogramowania sprzętowego). 5. Wybrać plik oprogramowania, a następnie kliknąć przycisk Upload (Prześlij).
UWAGA: Funkcja serwera wydruku jest obsługiwana w systemie Windows® XP, Windows® Vista i Windows® 7. W celu skonfigurowania trybu udostępniania drukarki EZ: 1. W panelu nawigacji przejdź do pozycji General (Ogólne) > USB Application (Aplikacja USB) > Network Printer Server (Sieciowy serwer wydruku). 2. Kliknij pozycję Download Now! (Pobierz teraz!), aby pobrać program narzędziowy drukarki sieciowej.
4. Wykonaj instrukcje ekranowe w celu przeprowadzenia ustawień sprzętu, a następnie kliknij Next (Dalej). 5. Zaczekaj kilka minut na zakończenie początkowych ustawień. Kliknij Next (Dalej). 6. Kliknij Finish (Zakończ) w celu dokończenia instalacji.
7. Wykonaj instrukcje systemu operacyjnego Windows® w celu instalacji sterownika drukarki. 8. Po zakończeniu instalacji sterownika drukarki klienci sieciowi będą mogli korzystać z drukarki.
5.3.2 Udostępnianie drukarki za pomocą protokołu LPR Za pomocą protokołu LPR/LPD (Line Printer Remote/Line Printer Daemon) drukarkę można udostępnić komputerom z systemem operacyjnym Windows® i MAC. Udostępnianie drukarki LPR W celu udostępnienia drukarki LPR: 1. Na pulpicie systemu Windows® kliknij kolejno pozycje Start > Devices and Printers (Urządzenia i drukarki) > Add a printer (Dodaj drukarkę) w celu uruchomienia pozycji Add Printer Wizard (Kreator dodawania drukarki). 2.
3. Zaznacz pozycję Create a new port (Utwórz nowy port), a następnie ustaw dla pozycji Type of Port (Typ portu) opcję Standard TCP/IP Port (Standardowy port TCP/IP). Kliknij przycisk New Port (Nowy port). 4. W polu Hostname or IP address (Nazwa hosta drukarki lub adres IP) wprowadź adres IP routera bezprzewodowego, a następnie kliknij przycisk Next (Dalej).
5. Zaznacz pozycję Custom (Niestandardowy), a następnie kliknij przycisk Settings (Ustawienia). 6. Ustaw dla pozycji Protocol (Protokół) opcję LPR. W polu Queue Name (Nazwa kolejki) wprowadź wartość LPRServer (Serwer LPR), a następnie kliknij przycisk OK, aby kontynuować.
7. Kliknij przycisk Next (Dalej), aby zakończyć konfigurację standardowego portu TCP/IP. 8. Zainstaluj sterownik drukarki podany na liście dostawców. Jeśli danej drukarki nie ma na liście, kliknij przycisk Have Disk (Z dysku), aby ręcznie zainstalować sterowniki drukarki z dysku CD-ROM lub pliku.
9. Kliknij przycisk Next (Dalej), aby zaakceptować domyślną nazwę drukarki. 10. Kliknij przycisk Finish (Zakończ), aby zakończyć instalację.
5.4 Program Download Master Download Master to program narzędziowy umożliwiający pobieranie plików nawet wtedy, gdy laptop lub inne urządzenia są wyłączone. UWAGA: Aby móc korzystać z programu Download Master, do routera bezprzewodowego należy podłączyć urządzenie USB. W celu korzystania z programu Download Master: 1. Kliknij kolejno pozycje General (Ogólne) > USB application (Aplikacja USB) > Download Master, aby automatycznie pobrać i zainstalować program narzędziowy.
5. Skonfiguruj ustawienia zaawansowane za pomocą panelu nawigacji. 5.4.1 Konfigurowanie ustawień pobierania BitTorrent W celu skonfigurowania ustawień pobierania BitTorrent: 1. W panelu nawigacji programu Download Master kliknij pozycję Bit Torrent (Pobieranie BitTorrent), aby wyświetlić stronę Bit Torrent Setting (Ustawienia pobierania BitTorrent). 2. Wybierz określony port dla zadania pobierania. 3.
5.4.2 Ustawienia pobierania NZB Można skonfigurować serwer USENET w celu pobierania plików NZB. Po wprowadzeniu ustawień serwera USENET kliknij przycisk Apply (Zastosuj).
6 Rozwiązywanie problemów 6.1 Rozwiązywanie podstawowych problemów W rozdziale tym omówiono rozwiązania problemów, które mogą wystąpić podczas korzystania z routera. W przypadku pojawienia się problemów, których nie opisano w tym rozdziale, należy przejść do witryny pomocy technicznej firmy ASUS dostępnej pod adresem: http://support.asus.com/ w celu uzyskania dalszych informacji o produkcie oraz szczegółowych danych kontaktowych działu pomocy technicznej firmy ASUS.
Uruchom ponownie sieć, wykonując czynności w następującej kolejności: 1. Wyłącz modem. 2. Odłącz modem od zasilania. 3. Wyłącz router i komputery. 4. Podłącz modem do zasilania. 5. Włącz modem i odczekaj 2 minuty. 6. Włącz router i odczekaj 2 minuty. 7. Włącz komputery. Sprawdź, czy kable Ethernet są prawidłowo podłączone. • Jeśli kabel Ethernet łączący router z modemem jest podłączony w prawidłowy sposób, świecić się będzie dioda LED sieci WAN.
• W przypadku niektórych dostawców usług internetowych zapewnianych przez modem kablowy wymagane jest używanie adresu MAC komputera, dla którego zarejestrowano wstępnie konto. Adres MAC można sprawdzić za pomocą sieciowego interfejsu graficznego, na stronie Network Map (Mapa sieci) > Clients (Klienci) po umieszczeniu wskaźnika myszy nad urządzeniem w pozycji Client Status (Stan klienta).
6.2 Często zadawane pytania (FAQ) Nie mogę uzyskać dostępu do interfejsu graficznego routera przy użyciu przeglądarki sieci Web • Jeśli komputer jest podłączony w sposób przewodowy, sprawdź połączenie kabla Ethernet i stan diody LED zgodnie z opisem w poprzedniej części. • Upewnij się, że używane dane logowania są prawidłowe. Domyślna fabryczna nazwa logowania i hasło to „admin/ admin”. Upewnij się, że podczas wprowadzania danych logowania klawisz Caps Lock jest wyłączony.
Klient nie może ustanowić połączenia bezprzewodowego z routerem. • Poza zakresem: • Przesuń router bliżej klienta bezprzewodowego. • Ustaw anteny routera w najlepszym położeniu zgodnie z opisem w części 1.4 Ustawianie pozycji routera. • Wyłączono serwer DHCP: 1. Uruchom sieciowy interfejs graficzny. Przejdź kolejno do pozycji General (Ogólne) > Network Map (Mapa sieci) > Clients (Klienci) i wyszukaj urządzenie, które chcesz połączyć z routerem. 2.
• Ukryto identyfikator SSID. Jeśli urządzenie wyszukuje identyfikatory SSID innych routerów, ale nie może znaleźć identyfikatora SSID posiadanego routera, przejdź do pozycji Advanced Settings (Ustawienia zaawansowane) > Wireless (Sieć bezprzewodowa) > General (Ogólne), zaznacz opcję No (Nie) dla pozycji Hide SSID (Ukryj SSID) i zaznacz opcję Auto (Automat.) dla pozycji Control Channel (Kanał kontrolny).
Niedostępny Internet. • Sprawdź, czy router może nawiązać połączenie z adresem IP sieci WAN usługodawcy internetowego. Aby to zrobić, uruchom sieciowy interfejs graficzny, przejdź do pozycji General (Ogólne) > Network Map (Mapa sieci) i sprawdź pozycję Internet Status (Stan połączenia z Internetem).
• Jeśli dostęp do Internetu jest nadal niemożliwy, uruchom ponownie komputer, a następnie sprawdź adres IP i adres bramy sieci. • Sprawdź wskaźniki stanu modemu ADSL i routera bezprzewodowego. Jeśli nie świeci się dioda LED sieci WAN routera bezprzewodowego, sprawdź, czy wszystkie kable są prawidłowo podłączone. Nie pamiętam identyfikatora SSID (nazwy sieci) lub hasła sieciowego • Skonfiguruj nowy identyfikator SSID i klucz szyfrowania za pomocą połączenia przewodowego (kabel Ethernet).
Niepowodzenie uaktualnienia oprogramowania sprzętowego. Uruchom tryb ratunkowy i skorzystaj z narzędzia Firmware Restoration (Odtwarzanie oprogramowania sprzętowego). Informacje na temat korzystania z narzędzia Firmware Restoration (Odtwarzanie oprogramowania sprzętowego) można znaleźć w części 5.2 Odtwarzanie oprogramowania sprzętowego.
Nie można uzyskać dostępu do sieciowego interfejsu graficznego Przed konfiguracją routera bezprzewodowego wykonać czynności opisane w tej części dla komputera hosta i klientów sieciowych. A. Wyłączyć serwer proxy jeżeli jest włączony Windows® 7 1. Kliknij przycisk Start > Internet Explorer w celu uruchomienia przeglądarki internetowej. 2. Kliknij przycisk Tools (Narzędzia) > Internet options (Opcje internetowe) > zakładkę Connections (Połączenia) > LAN settings (Ustawienia sieci LAN). 3.
MAC OS 1. W przeglądarce Safari kliknąć Safari > Preferences (Preferencje) > Advanced (Zaawansowane) > Change Settings... (Zmień ustawienia...) 2. Na ekranie Network (Sieć) usunąć zaznaczenie FTP Proxy (Proxy FTP) i Web Proxy (HTTP) (Proxy www (HTTP)). 3. Po zakończeniu kliknąć przycisk Apply Now (Zastosuj teraz). Uwaga: Szczegółowe informacje dotyczące wyłączania serwera proxy, patrz funkcja pomocy danej przeglądarki. B. Skonfigurować ustawienia TCP/IP do automatycznego uzyskiwania adresu IP.
3. W celu automatycznego uzyskania ustawień iPv4 IP, zaznacz opcję Obtain an IP address automatically (Automatycznie uzyskaj adres IP). W celu automatycznego uzyskania ustawień iPv6 IP, zaznacz opcję Obtain an IPv6 address automatically (Automatycznie uzyskaj adres IPv6). 4. Po zakończeniu kliknij przycisk OK. MAC OS 1. Kliknij ikonę Apple located on the top left of your screen. umieszczoną w górnej lewej części ekranu. 2.
C. Wyłączyć połączenie dial-up jeżeli jest włączone. Windows® 7 1. Kliknij przycisk Start > Internet Explorer w celu uruchomienia przeglądarki internetowej. 2. Kliknij przycisk Tools (Narzędzia) > Internet options (Opcje internetowe) > zakładkę Connections (Połączenia). 3. Zaznaczyć opcję Never dial a connection (Nigdy nie wybieraj połączenia). 4. Po zakończeniu kliknij przycisk OK. Uwaga: Szczegółowe informacje o wyłączaniu połączenia dial-up, patrz funkcja pomocy przeglądarki sieciowej.
Załączniki Ogłoszenie ASUS Recycling/Takeback Services ASUS recycling and takeback programs come from our commitment to the highest standards for protecting our environment. We believe in providing solutions for you to be able to responsibly recycle our products, batteries, other components, as well as the packaging materials. Please go to http://csr.asus. com/english/Takeback.htm for the detailed recycling information in different regions.
against harmful interference in a residential installation. This equipment generates, uses and can radiate radio frequency energy and, if not installed and used in accordance with the instructions, may cause harmful interference to radio communications. However, there is no guarantee that interference will not occur in a particular installation.
Safety Information To maintain compliance with FCC’s RF exposure guidelines, this equipment should be installed and operated with minimum distance 20cm between the radiator and your body. Use on the supplied antenna. Declaration of Conformity for R&TTE directive 1999/5/EC Essential requirements – Article 3 Protection requirements for health and safety – Article 3.1a Testing for electric safety according to EN 60950-1 has been conducted. These are considered relevant and sufficient.
Canada, Industry Canada (IC) Notices This Class B digital apparatus complies with Canadian ICES-003 and RSS-210. Operation is subject to the following two conditions: (1) this device may not cause interference, and (2) this device must accept any interference, including interference that may cause undesired operation of the device. Radio Frequency (RF) Exposure Information The radiated output power of the Dell Wireless Device is below the Industry Canada (IC) radio frequency exposure limits.
canadiennes ICES-003 et RSS-210. Son fonctionnement est soumis aux deux conditions suivantes: (1) cet appareil ne doit pas causer d’interférence et (2) cet appareil doit accepter toute interférence, notamment les interférences qui peuvent a ecter son fonctionnement.
Everyone is permitted to copy and distribute verbatim copies of this license document, but changing it is not allowed. Preamble The licenses for most software are designed to take away your freedom to share and change it. By contrast, the GNU General Public License is intended to guarantee your freedom to share and change free software--to make sure the software is free for all its users.
We protect your rights with two steps: (1) copyright the software, and (2) offer you this license which gives you legal permission to copy, distribute and/or modify the software. Also, for each author’s protection and ours, we want to make certain that everyone understands that there is no warranty for this free software.
not covered by this License; they are outside its scope. The act of running the Program is not restricted, and the output from the Program is covered only if its contents constitute a work based on the Program (independent of having been made by running the Program). Whether that is true depends on what the Program does. 1.
the program under these conditions, and telling the user how to view a copy of this License. (Exception: if the Program itself is interactive but does not normally print such an announcement, your work based on the Program is not required to print an announcement.) These requirements apply to the modified work as a whole.
cost of physically performing source distribution, a complete machine-readable copy of the corresponding source code, to be distributed under the terms of Sections 1 and 2 above on a medium customarily used for software interchange; or, c) Accompany it with the information you received as to the offer to distribute corresponding source code.
Therefore, by modifying or distributing the Program (or any work based on the Program), you indicate your acceptance of this License to do so, and all its terms and conditions for copying, distributing or modifying the Program or works based on it. 6. Each time you redistribute the Program (or any work based on the Program), the recipient automatically receives a license from the original licensor to copy, distribute or modify the Program subject to these terms and conditions.
on consistent application of that system; it is up to the author/ donor to decide if he or she is willing to distribute software through any other system and a licensee cannot impose that choice. This section is intended to make thoroughly clear what is believed to be a consequence of the rest of this License. 8.
NO WARRANTY 11 BECAUSE THE PROGRAM IS LICENSED FREE OF CHARGE, THERE IS NO WARRANTY FOR THE PROGRAM, TO THE EXTENT PERMITTED BY APPLICABLE LAW. EXCEPT WHEN OTHERWISE STATED IN WRITING THE COPYRIGHT HOLDERS AND/OR OTHER PARTIES PROVIDE THE PROGRAM “AS IS” WITHOUT WARRANTY OF ANY KIND, EITHER EXPRESSED OR IMPLIED, INCLUDING, BUT NOT LIMITED TO, THE IMPLIED WARRANTIES OF MERCHANTABILITY AND FITNESS FOR A PARTICULAR PURPOSE. THE ENTIRE RISK AS TO THE QUALITY AND PERFORMANCE OF THE PROGRAM IS WITH YOU.
For Turkey only Authorised distributors in Turkey: BOGAZICI BIL GISAYAR SAN. VE TIC. A.S. Tel. No.: +90 212 3311000 Address: AYAZAGA MAH. KEMERBURGAZ CAD. NO.10 AYAZAGA/ISTANBUL CIZGI Elektronik San. Tic. Ltd. Sti. Tel. No.: +90 212 3567070 Address: CEMAL SURURI CD. HALIM MERIC IS MERKEZI No: 15/C D:5-6 34394 MECIDIYEKOY/ ISTANBUL KOYUNCU ELEKTRONiK BiLGi iSLEM SiST. SAN. VE DIS TIC. A.S. Tel. No.: +90 216 5288888 Address: EMEK MAH.ORDU CAD. NO:18, SARIGAZi, SANCAKTEPE ISTANBUL AEEE Yönetmeliğine Uygundur.
Informacje kontaktowe producenta ASUSTeK COMPUTER INC. (Asia Pacific) Adres 15 Li-Te Road, Peitou, Taipei, Taiwan 11259 Strona internetowa www.asus.com.tw Pomoc techniczna Telefon Faks Wsparcie online +886228943447 +886228907698 support.asus.com ASUS COMPUTER INTERNATIONAL (Ameryka) Adres Telefon Faks Strona internetowa Strona internetowa 800 Corporate Way, Fremont, CA 94539, USA +15107393777 +15106084555 usa.asus.com support.asus.
Informacje o globalnych punktach wsparcia technicznego dla sieci Region Country Service Hours 09:00-13:00 ; 14:00-18:00 Mon-Fri 09:00-18:00 Mon-Fri Cyprus 800-92491 France Hungary 0033-170949400 0049-1805010920 0049-1805010923 ( component support ) 0049-2102959911 ( Fax ) 0036-15054561 Italy 199-400089 Greece 00800-44142044 Austria Netherlands/ Luxembourg Belgium Norway Sweden Finland Denmark Poland Spain Portugal Slovak Republic Czech Republic Switzerland-German Switzerland-French Switzerland-I
Informacje o globalnych punktach wsparcia technicznego dla sieci Region Country Australia New Zealand Japan Korea Thailand Asia-Pacific Singapore Malaysia Philippine India India(WL/NW) Indonesia Americas Hotline Numbers 1300-278788 0800-278788 0800-1232787 0081-473905630 ( Non-Toll Free ) 0082-215666868 0066-24011717 1800-8525201 0065-64157917 0065-67203835 ( Repair Status Only ) 0060-320535077 1800-18550163 1800-2090365 0062-2129495000 500128 (Local Only) Vietnam 1900-555581 Hong Kong USA Canada
Informacje o globalnych punktach wsparcia technicznego dla sieci Region Middle East + Africa Country Egypt Saudi Arabia UAE Turkey South Africa Israel Romania Bosnia Herzegovina Bulgaria Balkan Countries Croatia Montenegro Serbia Slovenia Estonia Latvia Lithuania-Kaunas Lithuania-Vilnius Hotline Numbers 800-2787349 800-1212787 00971-42958941 0090-2165243000 0861-278772 *6557/00972-39142800 *9770/00972-35598555 0040-213301786 Service Hours 09:00-18:00 Sun-Thu 09:00-18:00 Sat-Wed 09:00-18:00 Sun-Thu 09:0