MB169B+ USB Monitor User Guide
Table of contents Notices.......................................................................................................... iii Safety information....................................................................................... iv Care & cleaning............................................................................................. v Takeback services....................................................................................... vi 1.1 Welcome!...................................
Notices Federal Communications Commission Statement This device complies with Part 15 of the FCC Rules. Operation is subject to the following two conditions: • This device may not cause harmful interference, and • This device must accept any interference received including interference that may cause undesired operation. This equipment has been tested and found to comply with the limits for a Class B digital device, pursuant to Part 15 of the FCC Rules.
Safety information iv • Before setting up this USB monitor, carefully read all the documentation that came with the package. • To prevent fire or shock hazard, never expose this USB monitor to rain or moisture. • Never try to open this USB monitor cabinet. • Before using this USB monitor, make sure all cables are correctly connected and the power cables are not damaged. If you detect any damage, contact your dealer immediately. • Avoid dust, humidity, and temperature extremes.
Care & cleaning • Cleaning. Turn your monitor off and unplug the power cord. Clean the monitor surface with a lint-free, non-abrasive cloth. Stubborn stains may be removed with a cloth dampened with mild cleaner. • Avoid using a cleaner containing alcohol or acetone. Use a cleaner intended for use with the LCD. Never spray cleaner directly on the screen, as it may drip inside the monitor and cause an electric shock.
Where to find more information Refer to the following sources for additional information and for product and software updates. 1. ASUS websites The ASUS websites worldwide provide updated information on ASUS hardware and software products. Refer to http://www.asus.com 2. Optional documentation Your product package may include optional documentation that may have been added by your dealer. These documents are not part of the standard package.
1.1 Welcome! Thank you for purchasing the ASUS® USB monitor! The latest ASUS USB monitor provides great portability and simplicity to your daily life, enhancing both of your viewing experience and style. 1.2 Package contents Check your package for the following items: USB Monitor Quick Start Guide CD-ROM Warranty Card USB 3.0 Cable Leather Case/Stand • If any of the above items is damaged or missing, contact your retailer immediately.
1.3 System requirement Minimum requirements: • Windows 7 with 1.4GHz Core 2 Duo • Mac OS X 10.6 • 1GB RAM Recommended requirements: • Windows 7 with 2.4GHz Core 2 Duo or above • Mac OS X 10.
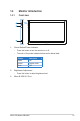
1.4 Monitor introduction 1.4.1 Front view 1 2 3 1. 2. Power Button/Power Indicator • Press this button to turn the monitor on or off. • The color of the power indicator defines as the below table. Description White ON Amber Standby mode Dark OFF Brightness Adjustment • 3. Status Press this button to adjust brightness level. Micro B USB 3.
1.4.2 Auto-Rotate Our USB monitor is equipped with G-sensor to detect its real-time position. The screen shot will automatically change from landscape to portrait position, or vice versa, depending on monitor’s current position. To disable, you can uncheck this function via ASUS Ezlink Utility. • 1-4 The Auto-Rotate function will not work under MAC OS or Windows XP environment.
2.1 Adjusting the monitor • For optimal viewing, we recommend that you look at the full face of the monitor, then adjust the monitor to the angle that is most comfortable for you. • You can adjust the monitor’s angle by two positions with leather case. • There are two strips for viewing angle adjustment. For upright position, use the far side strip from the top cover. For tilt-back position, use the other one instead.
2.
2.3 Installing driver The USB monitor will work only when the included support-CD are installed properly. Before installation, please make sure the USB cable is connected between the USB monitor and the system. Insert the included support-CD into your computer, the auto-run program will start to install the needed software and driver. USB • The auto-run program only works under Windows Operation System. • Please check ASUS Support website for latest driver and software updates.
3.1 Specifications Model MB169B+ Panel Size 15.6” (16:9, 39.62cm) wide screen Resolution 1920 x 1080 Brightness (Typ.) 200 cd/m2 Contrast ≧600:1 Display Colors 262 K Digital Input USB 3.0 Colors Dark Gray Power Consumption ≦7W Operating Temp. 0° ~ 50° Phys. Dimension (WxHxD) Box Dimension (WxHxD) 379.1 x 235.8 x 8.5 mm 435 x 297 x 57 mm Net Weight (Esti.) 0.8 kg Gross Weight (Esti.
3.2 Troubleshooting (FAQ) Problem Possible Solution Power LED is not ON • Press the button to check if the monitor is in the ON mode. • Check if the USB cable is properly connected to the monitor and the power outlet. The power LED lights amber • Check if the monitor and the computer are in and there is no screen image the ON mode. • Make sure the USB cable is properly connected between the USB monitor and the computer. • Inspect the signal cable and make sure none of the pins are bent.