PB27U Series LCD Monitor User Guide
Table of contents Notices.......................................................................................................... iii Safety information....................................................................................... iv Care & Cleaning............................................................................................ v 1.1 Welcome!....................................................................................... 1-1 1.2 Package contents..............................
Notices Federal Communications Commission Statement This device complies with Part 15 of the FCC Rules. Operation is subject to the following two conditions: • This device may not cause harmful interference, and • This device must accept any interference received including interference that may cause undesired operation. This equipment has been tested and found to comply with the limits for a Class B digital device, pursuant to Part 15 of the FCC Rules.
Safety information iv • Before setting up the monitor, carefully read all the documentation that came with the package. • To prevent fire or shock hazard, never expose the monitor to rain or moisture. • Never try to open the monitor cabinet. The dangerous high voltages inside the monitor may result in serious physical injury. • If the power supply is broken, do not try to fix it by yourself. Contact a qualified service technician or your retailer.
Care & Cleaning • Before you lift or reposition your monitor, it is better to disconnect the cables and power cord. Follow the correct lifting techniques when positioning the monitor. When lifting or carrying the monitor, grasp the edges of the monitor. Do not lift the display by the stand or the cord. • Cleaning. Turn your monitor off and unplug the power cord. Clean the monitor surface with a lint-free, non-abrasive cloth. Stubborn stains may be removed with a cloth dampened with mild cleaner.
Where to find more information Refer to the following sources for additional information and for product and software updates. vi 1. ASUS websites The ASUS websites worldwide provide updated information on ASUS hardware and software products. Refer to http://www.asus.com 2. Optional documentation Your product package may include optional documentation that may have been added by your dealer. These documents are not part of the standard package.
1.1 Welcome! Thank you for purchasing the ASUS® LCD monitor! The latest widescreen LCD monitor from ASUS provides a crisper, broader, and brighter display, plus a host of features that enhance your viewing experience. With these features, you can enjoy the convenience and delightful visual experience that the monitor brings you! 1.
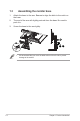
1.3 Assembling the monitor base 1. Attach the base to the arm. Beware to align the latch to the notch on the base. 2. The end of the arm will slightly protrude from the base. No need to push it in. 3. Screw the base to the arm tightly. 1 4 3 2 5 • 1-2 We recommend that you cover the table surface with soft cloth to prevent damage to the monitor.
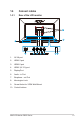
1.4 Connect cables 1.4.1 Rear of the LCD monitor 9 8 10 1 2 3 4 1. AC-IN port 2. HDMI-3 port 3. HDMI-2 port 4. HDMI-1(V 2.0) port 5. DisplayPort 6. Audio - in Port 7. Earphone - out Port 8. Kensington Lock 9. Screw Holes for VESA Wall Mount 5 6 7 10.
1.5 Monitor introduction 1.5.1 Using the Controls button Use the control button on the back of the monitor to adjust the image settings. Standard Mode DisplayPort 3840x2160@60Hz Menu QuickFit Input Select Close Brightness Blue light filter 7 6 5 4 3 2 1 1. Power Button/Power Indicator: • Press this button to turn the monitor on/off. • The color definition of the power indicator is as the below table. 2.
4. Input Select Button: • 5. Use this hotkey to switch from HDMI-1(v 2.0), HDMI-2,HDMI-3, DisplayPort input signal. Close Button • 6. Exit the OSD menu. Shortcut key1 • 7. This is a Shortcut key. The default setting is Brightness. Shortcut key2 • This is a Shortcut key. The default setting is Blue light filter.
1.5.2 QuickFit Function The QuickFit function contains three patterns: (1) Grid (2) Paper size (3) Photo size. 1. Grid pattern: Facilitates designers and users to organize content and layout on one page and achieve a consistent look and feel. Alignment Grid 2. Paper size: Provides users to view their documents in real size on the screen. A4 B5 Letter A4 B5 Letter EXIT 3. EXIT Photo size: Provides photographers and other users to accurately view and edit their photos in real size on the screen.
2.1 Detaching the arm/stand (for VESA wall mount) The detachable stand of this monitor is specially designed for VESA wall mount. 1. Disconnect power and signal cables. Carefully put the front of the monitor face down on a clean table. 2. Use your fingers to loosen the screw located at the bottom of the base, and remove the base from the stand. 3. Or you may directly use a screwdriver to remove the screws that secure the stand to the monitor, and detach the stand from the monitor.
2.2 Adjusting the monitor • For optimal viewing, we recommend that you look at the full face of the monitor, then adjust the monitor to the angle that is most comfortable for you. • Hold the stand to prevent the monitor from falling while changing its angle. • You can adjust the monitor’s angle from -5˚ to 20˚.
3.1 OSD (On-Screen Display) menu 3.1.1 How to reconfigure PB27U Standard Mode DisplayPort 3840x2160@60Hz Splendid Scenery mode Blue Light Filter Standard Mode Color Theater Mode Image Game Mode Sound Night View Mode PIP/PBP Setting sRGB Mode Input Select Reading Mode More Darkroom Mode PB27U Standard Mode DisplayPort 3840x2160@60Hz Back System Setup Shortcut 1. Press the MENU button to activate the OSD menu. 2. Press the and buttons to toggle between options in the Menu.
3.1.2 1. OSD Function Introduction Splendid This function contains eight sub-functions that you can select for your preference. Each mode has the Reset selection, allowing you to maintain your setting or return to the preset mode.
2. Blue Light Filter Adjust the energy level of blue light emitted from LED backlight. PB27U Standard Mode DisplayPort 3840x2160@60Hz Splendid Level 0 Blue Light Filter Level 1 Color Level 2 Image Level 3 Sound Level 4 PIP/PBP Setting Input Select More • Level 0: No change. • Level 1~4: The higher the level,the more blue light will be reduced. • When Blue Light Filter is activated,the default settings of Standard Mode will be automatically imported.
3. Color Select the image color you like from this function. PB27U Standard Mode DisplayPort 3840x2160@60Hz Splendid Brightness Blue Light Filter Contract Color Saturation Image Color Temp Sound Skin Tone PIP/PBP Setting Input Select More • Brightness: The adjustive range is from 0 to 100. • Contrast: The adjustive range is from 0 to 100. • Saturation: The adjustive range is from 0 to 100. • Color Temp.: Contains three preset color modes (Cool, Normal, Warm) and User Mode.
4. Image You can adjust the image Sharpness, Trace Free, Aspect Control, VividPixel, ASCR, Adaptive-Sync from this main function. PB27U Standard Mode DisplayPort 3840x2160@60Hz Splendid Sharpness Blue Light Filter Trace Free Color Aspect Control Image VividPixel Sound ASCR PIP/PBP Setting Adaptive-Sync Input Select More • Sharpness: Adjusts the picture sharpness.The adjustive range is from 0 to 100. • Trace Free: Speeds up the response time by Over Drive technology.
5. Sound Adjust the sound settings to your preference. PB27U Standard Mode DisplayPort 3840x2160@60Hz Splendid Volume Blue Light Filter Mute Color Source Image Sound PIP/PBP Setting Input Select More 6. • Volume: Adjusts the output volume level. • Mute: Mute the output volume.
• PIP/PBP Mode: Selects PIP, PBP function or turn it off. • PIP/PBP Source: Selects the video input source among, “HDMI-1(v 2.0), HDMI-2, HDMI-3, DisplayPort”. • Size: Adjust the PIP size to “Small”, “Middle”, or “Large”. • Position: Adjusts the position of PIP sub-window to “Right-Top”, “LeftTop”,“Right-Bottom” or “Left-Bottom”. • Aspect Control: Adjusts the PIP aspect ratio and automatically adjust the PIP window size. • Swap: Swaps the sources of the main- and sub-windows. Subwindow 7.
8. System Setup Adjusts the system configuration. PB27U Standard Mode DisplayPort 3840x2160@60Hz Back Splendid Demo Mode System Setup GamePlus Shortcut ECO Mode OSD Setup DisplayPort Stream Language Key Lock More PB27U Standard Mode DisplayPort 3840x2160@60Hz Back Back System Setup Information Shortcut Power Indicator Power Key Lock All Reset • Splendid Demo Mode: Activate the demo mode for the Splendid function.
GamePlus main menu GamePlus-Aimpoint GamePlus FPS Aimpoint Timer FPS Counter Display Alignment (Practice Mode) GamePlus main-Timer GamePlus main-Timer-Position Position • ECO Mode: Activate the ecology mode for power saving. • OSD Setup: Adjusts the OSD Timeout, DDC/CI, and Transparency of the OSD screen. • DisplayPort Stream: Compatibility with graphic card. Select DP 1.1 or DP 1.2 by graphic card DP version. (3840x2160-60Hz is available at DP 1.2 only.
9. • More: Return the next page of System Setting. • Back: Return the previous page of System Setting. • Information: Displays the monitor information. • Power Indicator: Turn the power LED indicator on/off. • Power Key Lock: To disable / enable power key • All Reset: Selects “Yes” to revert all settings to the factory default mode. Shortcut Selecting this option allows you to set two shortcut keys.
3.2 Specifications Model PB27UQ Panel Size 27” W (68.4 cm) Max. Resolution 3840 x 2160 Brightness (Typ.) 300cd/m2 Dynamic Contrast Ratio (Typ.) ≥100,000,000:1 Viewing Angle (CR≤10) 178°(V); 178°(H) Display Colors Response Time (Typ.) 1073.7 M ≤5 ms (Gray to Gray) DisplayPort input Yes HDMI input Yes PC Audio input Yes Power ON Consumption Speaker Earphone Power saving mode Power off mode Tilt Swivel(angle) Power on<60 W* 2W x 2 Yes < 0.5 W < 0.
3.3 Troubleshooting (FAQ) Problem Power LED is not ON Possible Solution • Press the button to check if the monitor is in the ON mode. • Check if the power cord is properly connected to the monitor and the power outlet. • Check Power Indicator function in main menu OSD. Select “ON” to turn on power LED. The power LED lights amber and • Check if the monitor and the computer are in the there is no screen image ON mode. • Make sure the signal cable is properly connected the monitor and the computer.
• Check the HDMI version of your graphics card. (a) If it is HDMI 1.4, 3840x2160@60Hz output is not available to your card. Change to a HDMI 2.0 card. Cannot select 3840x2160@60Hz (b) If it is HDMI 2.0, connect to HDMI-1 (V 2.0), i.e. the for HDMI HDMI port next to DP. Note: The HDMI-1 (V 2.0) input port supports up to 3840x2160@60Hz HDMI-2, HDMI-3 input ports support up to 3840x2160@30Hz • Check the DP version of your graphics card. Cannot select 3840x2160@60Hz (a) If it is DP 1.
3.4 Supported Timing List Timing List HDMI1.4 HDMI2.0 Display Port 1.
Video Timing Timing List HDMI1.4 HDMI2.0 Display Port 1.2 720x480P@59.94 V V V 720x480P@60 V V V 720x576P@50 V V V 1280x720P@50 V V V 1280x720P@59.94 V V V 1280x720P@60 V V V 1440x480P@59.94 V V V 1440x480P@60 V V V 1440x576P@50 V V V 1920x1080i@50 V V V 1920x1080i@60 V V V 1920x1080P@23.97 V V X 1920x1080P@24 V V X 1920x1080P@25 V V X 1920x1080P@29.97 V V X 1920x1080P@30 V V X 1920x1080P@50 V V V 1920x1080P@59.