
User's Manual


ASUS A320M-C
1-1
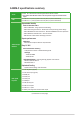
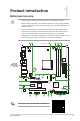
A320M-C
PCI1
PCIEX16
PCIEX1_1
PCIEX1_2
CLRTC
SPEAKER
CHASSIS
USB3_12
TPM
LPT
COM2
AAFP
EATXPWR
CHA_FAN2
CHA_FAN1
CPU_FAN
ASM1480
BATTERY
Super
I/O
ALC
887
ASM
1083
DIGI
+VRM
24.4cm(9.6in)
SOCKET AM4
AMD
®
A320
Realtek
8111H
DDR4 DIMM_A1 (64bit, 288-pin module)
2280 2260 2242
M.2(SOCKET3)
DDR4 DIMM_B1 (64bit,288-pin module)
AUDIO
KBMS
HDMI
LAN_USB12
USB3_3-6
23.6cm(9.3in)
SATA6G_3 SATA6G_4SATA6G_1 SATA6G_2
DVI
VGA
COM1
ATX12V
F_PANEL
USB56USB34
13 22
1
4
111213
9
10
8
1
5
7
16
18
6
15 14
19
18
17
Product introduction
1
Motherboard overview
• Unplugthepowercordfromthewallsocketbeforetouchinganycomponent.
• Beforehandlingcomponents,useagroundedwriststraportouchasafelygrounded
objectorametalobject,suchasthepowersupplycase,toavoiddamagingthemdue
tostaticelectricity.
• Beforeyouinstallorremoveanycomponent,ensurethattheATXpowersupplyis
switchedofforthepowercordisdetachedfromthepowersupply.Failuretodoso
maycauseseveredamagetothemotherboard,peripherals,orcomponents.
• Unplugthepowercordbeforeinstallingorremovingthemotherboard.Failuretodoso
cancauseyouphysicalinjuryanddamagetomotherboardcomponents.
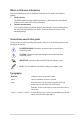
Place this
side towards
the rear of the
chassis
ScantheQRcodetogetthedetailedpindenitions.