
User Guide


Chapter 2: Hardware setup
2-12
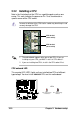
2. Hold down the heatsink lightly
and twist each of the four screws
with a Philips (cross) screwdriver
just enough to attach the heatsink
to the motherboard. When the
four screws are attached, tighten
them one by one to completely
secure the heatsink.
3. Connect the thermistor cable to
the 2-pin cable from the mid-fan
board.
2.2.3 Installing the CPU heatsink
To install the CPU heatsink:
1. Carefully place the heatsink on
top of the installed CPU (CPU1),
with the thermistor cable near the
connector labeled CPUFAN1.
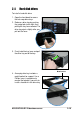
4. Follow steps 1 and 2 to install the
second CPU heatsink.
The second CPU heatsink
does not have a thermistor
cable.
Heatsink for CPU2
Thermistor cable