Chromebox for meetings Οδηγός Χρήστη
GK9152 αναθεωρημένη έκδοση Δεκέμβριος 2014 Σημείωση περί Δικαιωμάτων Πνευματικής Ιδιοκτησίας Απαγορεύεται η αναπαραγωγή οποιουδήποτε τμήματος του παρόντος εγχειριδίου συμπεριλαμβανομένων των προϊόντων και του λογισμικού που περιγράφονται σε αυτό, καθώς και η μετάδοση, αντιγραφή, αποθήκευση σε σύστημα αποθήκευσης και ανάκτησης, ή μετάφραση σε οποιαδήποτε γλώσσα υπο οποιαδήποτε μορφή και με οποιοδήποτε μέσο, εκτός από την τεκμηρίωση που φυλάσσεται από τον κάτοχο για λόγους εφεδρικούς, χωρίς την έγγραφη άδεια
Περιεχόμενα Σχετικά με αυτό το εγχειρίδιο......................................................................... 4 Περιεχόμενα συσκευασίας.............................................................................. 5 Γνωριμία με το Chromebox for meetings 7 Χαρακτηριστικά................................................................................................... 8 Μπροστινή όψη................................................................................................. 8 Αριστερή όψη.........
Σχετικά με αυτό το εγχειρίδιο Αυτό το εγχειρίδιο παρέχει πληροφορίες σχετικά με τα χαρακτηριστικά του υλικού και του λογισμικού του Chromebox for meetings, οργανωμένες στα ακόλουθα κεφάλαια: Κεφάλαιο 1: Γνωριμία με το Chromebox for meetings Στο κεφάλαιο αυτό παρουσιάζονται τα στοιχεία υλικού του Chromebox for meetings. Κεφάλαιο 2: Χρήση του Chromebox for meetings Στο κεφάλαιο αυτό παρέχονται πληροφορίες για τη χρήση του Chromebox for meetings.
Περιεχόμενα συσκευασίας Η συσκευασία του Chromebox for meetings περιέχει τα ακόλουθα στοιχεία: Τηλεχειριστήριο και δέκτης Chromebox for meetings Κάμερα Ηχείο Μετασχηματιστής ισχύος AC* 6 πόδια καλώδιο HDMI 15 πόδια καλώδιο CAT5e Ethernet 15 πόδια καλώδιο επέκτασης USB Παθητικό Βραχίονας στήριξης-L Υλικό τοποθέτησης Τεχνική τεκμηρίωση Πίνακας Mat *Το παρεχόμενο τροφοδοτικό μπορεί να ποικίλλει ανάλογα με τις περιοχές.
ΣΗΜΕΙΩΣΕΙΣ: • Αν η συσκευή ή τα συστατικά της δεν λειτουργούν ή η λειτουργία τους δεν είναι η σωστή κατά τη διάρκεια κανονικής και σωστής χρήσης μέσα στη χρονική περίοδο της εγγύησης, πρέπει να προσκομίσετε την κάρτα εγγύησης στο Κέντρο Σέρβις της ASUS για αντικατάσταση των ελαττωματικών στοιχείων. • Μερικά πακέτα εξαρτημάτων μπορεί να διαφέρουν ανάλογα με τα μοντέλα. Για λεπτομέρειες σχετικά με αυτά τα εξαρτήματα, ανατρέξτε στα αντίστοιχα εγχειρίδια χρήσης τους.
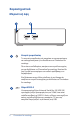
1 Γνωριμία με το Chromebox for meetings
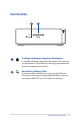
Χαρακτηριστικά Μπροστινή όψη Κουμπί τροφοδοσίας Το κουμπί τροφοδοσίας σάς επιτρέπει να ενεργοποιήσετε, να απενεργοποιήσετε ή να κλειδώσετε το Chromebox for meetings. Όταν είστε συνδεδεμένοι, πατήστε το κουμπί λειτουργίας για να κλειδώσετε το Chromebox for meetings. Κατόπιν θα σας ζητηθεί να εισαγάγετε τον κωδικό πρόσβασης του λογαριασμού. Εάν βρίσκεστε στην οθόνη σύνδεσης ή στα Hangouts, πατήστε το κουμπί λειτουργίας για να κλείσει το Chromebox for meetings. Θύρα USB 3.
Αριστερή όψη Υποδοχή κλειδαριάς ασφαλείας Kensington Η υποδοχή κλειδαριάς ασφαλείας Kensington σάς επιτρέπει να ασφαλίσετε το Chromebox for meetings χρησιμοποιώντας προϊόντα ασφαλείας Kensington®. Αναγνώστης Μνήμης Flash Ο ενσωματωμένος αναγνώστης καρτών μνήμης δίνει τη δυνατότητα ανάγνωσης και εγγραφής δεδομένων από και προς κάρτες MMC/SD στον Chromebox for meetings.
Οπίσθια όψη Ανεμιστήρες Οι θυρίδες εξαερισμού επιτρέπουν την είσοδο δροσερού αέρα μέσω του πλαισίου του Chromebox for meetings. ΣΗΜΑΝΤΙΚΟ: Για βέλτιστη αποβολή θερμότητας και εξαερισμό, βεβαιωθείτε ότι δεν υπάρχουν εμπόδια στα ανοίγματα εξαερισμού. Υποδοχή τροφοδοσίας ρεύματος Με χρήση αυτής της υποδοχής ο παρεχόμενος μετασχηματιστής ισχύος μετατρέπει το ρεύμα AC σε DC. Μέσω της υποδοχής αυτής παρέχεται τροφοδοσία ισχύος στο Chromebox for meetings.
Θύρα LAN Η θύρα δικτύου LAN RJ-45 8-ακίδων υποστηρίζει τυπικό καλώδιο Ethernet για σύνδεση σε τοπικό δίκτυο. Θύρα USB 3.0 Η συγκεκριμένη θύρα Universal Serial Bus 3.0 (USB 3.0) προσφέρει ρυθμό μεταφοράς έως και 5 Gbit/s και είναι οπίσθια συμβατή με USB 2.0. Θύρα HDMI Η θύρα HDMI (High Definition Multimedia Interface) υποστηρίζει συσκευή Full-HD όπως τηλεόραση LCD ή οθόνη ώστε να μπορείτε να βλέπετε σε μεγαλύτερη εξωτερική οθόνη.
Chromebox for meetings
Χρήση του Chromebox for meetings 2
Εκκίνηση Σύνδεση οθόνης στο Chromebox for meetings Μπορείτε να συνδέσετε μια οθόνη ή έναν προβολέα στο Chromebox for meetings που διαθέτει τους ακόλουθους ακροδέκτες: • Ακροδέκτης HDMI • DisplayPort • Ακροδέκτης DVI (χρησιμοποιείται με έναν προσαρμογέα HDMIDVI) ΣΗΜΕΙΩΣΗ: Ο προσαρμογέας HDMI-DVI πωλείται ξεχωριστά. Για να συνδέσετε μια οθόνη στο Chromebox for meetings: Συνδέστε ένα καλώδιο οθόνης είτε στη θύρα HDMI είτε στη θύρα οθόνης.
Σύνδεση του ηχείου ανοικτής συνομιλίας Μπορείτε να συνδέσετε το ηχείο ανοικτής ακρόασης σε οποιαδήποτε από τις θύρες USB 3.0 του Chromebox for meetings. ΣΗΜΕΙΩΣΗ: Κατά τη σύνδεση του ηχείου ανοιχτής ακρόασης, μπορείτε να ανατρέξετε στον ακόλουθο τεχνικό φάκελο: http://www. jabra.com/products/pc_headsets/jabra_speak__410_series/jabra_ speak_410_ms.
Σύνδεση της κάμερας Μπορείτε να συνδέσετε την κάμερα σε οποιαδήποτε από τις θύρες USB 3.0 του Chromebox for meetings. ΣΗΜΕΙΩΣΗ: Κατά τη σύνδεση της κάμερας, μπορείτε να ανατρέξετε στον ακόλουθο τεχνικό φάκελο: http://www.logitech.com/ assets/45920/hd-pro-webcam-c920-quick-start-guide.pdf.
Συνδέστε το δέκτη του τηλεχειριστηρίου Τοποθετήστε το dongle του δέκτη τηλεχειριστηρίου στη θύρα USB 3.0 στον μπροστινό πίνακα του Chromebox for meetings. Αφαιρέστε το προστατευτικό εξάρτημα -έναντι εκφόρτισης της μπαταρίας- από το τηλεχειριστήριο ΣΗΜΕΙΩΣΗ: Το τηλεχειριστήριο και ο δέκτης έχουν συζευχθεί στο εργοστάσιο και πραγματοποιείται αυτόματη σύζευξη όταν ενεργοποιούνται.
Σύνδεση του μετασχηματιστή ισχύος AC στο Chromebox for meetings Για να συνδέσετε το μετασχηματιστή ισχύος AC στο Chromebox for meetings: A. Συνδέστε το τροφοδοτικό AC σε μια πρίζα ρεύματος 100V~240V. B. Εισάγετε τον συνδετήρα ρεύματος DC στην είσοδο ρεύματος (DC) του Chromebox for meetings σας. ΣΗΜΕΙΩΣΗ: Ο προσαρμογέας ισχύος ενδέχεται να διαφέρει σε εμφάνιση, ανάλογα με τα μοντέλα και την περιοχή σας.
ΣΗΜΑΝΤΙΚΟ! • Συνιστάται ιδιαιτέρως να χρησιμοποιείτε μόνο το μετασχηματιστή ισχύος AC και το καλώδιο που παρέχονται με το Chromebox for meetings. • Συνιστάται ιδιαιτέρως να χρησιμοποιείτε γειωμένη πρίζα τοίχου όταν χρησιμοποιείτε το Chromebox for meetings. • Η πρίζα υποδοχής πρέπει να είναι εύκολα προσβάσιμη και κοντά στο Chromebox for meetings σας. • Για να αποσυνδέσετε το Chromebox for meetings σας από την κύρια παροχή ρεύματός του, βγάλτε το Chromebox for meetings από την πρίζα ισχύος.
Ενεργοποίηση του Chromebox for meetings Πατήστε το κουμπί λειτουργίας για να ενεργοποιήσετε το Chromebox for meetings. ΣΗΜΑΝΤΙΚΟ: Βεβαιωθείτε ότι όλες οι συσκευές (ηχείο ανοιχτής ακρόασης, κάμερα, τηλεχειριστήριο και δέκτης) και ο προσαρμογέας εναλλασσόμενου ρεύματος έχουν συνδεθεί σωστά πριν ενεργοποιήσετε το Chromebox for meetings.
Ρύθμιση παραμέτρων του Chromebox for meetings 3 Chromebox for meetings 21
Πριν αρχίσετε να χρησιμοποιείτε τη συσκευή για βιντεοσυνδιασκέψεις Απαιτήσεις εγκατάστασης Μέγεθος αίθουσας και ρύθμιση Το σύστημα Chromebox for meetings είναι σχεδιασμένο για αίθουσα συνεδριάσεων 3-6 ατόμων, αν και λειτουργεί καλά και σε αίθουσες 2-10 ατόμων. Συνιστούμε αίθουσα στην οποία θα υπάρχει είτε ένα μακρόστενο τραπέζι με την οθόνη στο ένα άκρο του (ιδανικό), ή ένα στρογγυλό τραπέζι. Δεν συνιστούμε τη χρήση του Chromebox for meetings σε αίθουσες που χρησιμοποιούνται ως σχολική τάξη.
Προδιαγραφές Οθόνης και τοποθέτηση Το Chromebox for meetings λειτουργεί με οθόνες LCD, LED, πλάσμα και τύπου προβολέα και τηλεοράσεις. Η οθόνη πρέπει να διαθέτει σύνδεση HDMI ή DisplayPort. Η ανάλυση της οθόνης πρέπει να είναι τουλάχιστον 1280 x 720 pixel. Για την καλύτερη δυνατή ποιότητα εικόνας, σας συστήνουμε ανάλυση 1920 x 1080 pixel. Μπορείτε να τοποθετήσετε την οθόνη σε ένα τραπέζι ενάντια σε ένα τοίχο ή να τοποθετήσετε την οθόνη σε ένα τοίχο ή την οροφή για έναν προβολέα.
• Καλώδιο concealers, εάν χρειάζεται, για τοποθέτηση σε τοίχο ΣΗΜΕΙΩΣΗ: Τα καλώδιο concealers για τοποθέτηση στον τοίχο δεν περιλαμβάνονται στην συσκευασία και πρέπει να αγοραστούν ξεχωριστά. ΣΗΜΑΝΤΙΚΟ: Το συμπεριλαμβανόμενο καλώδιο για την κάμερα έχει 5 πόδια μήκος, και το συμπεριλαμβανόμενο καλώδιο για το μεγάφωνο ανοικτής ακρόασης έχει 3 πόδια μήκος.
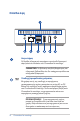
Συνδέστε τα καλώδια Χρησιμοποιώντας τα συμπεριλαμβανόμενα καλώδια και αισθητήρες, συνδέστε το Chromebox for meetings με τα υπόλοιπα εξαρτήματα του συστήματος: 6 1 2 3 4 5 7 1 1 2 2 3 3 4 4 Το DisplayPort προορίζεται για σύνδεση μίας οθόνης μέσω υποδοχής DisplayPort. Το HDMI προορίζεται για σύνδεση μίας οθόνης μέσω υποδοχής HDMI.
1 1 1 2 2 2 3 3 3 4 4 4 1 5 5 5 2 6 6 6 3 7 7 1 7 4 2 5 3 6 4 7 5 6 7 Η θύρα USB 3.0 προορίζεται για σύνδεση κάμερας. Η θύρα USB 3.0 προορίζεται για σύνδεση του συγκροτήματος ανοικτής ακρόασης. Η θύρα LAN προορίζεται για σύνδεση δρομολογητή (router). ΣΥΜΒΟΥΛΗ: Αν και μπορείτε να χρησιμοποιήσετε τη συσκευή Chromebox for meetings μέσω σύνδεσης ασύρματου δικτύου, σας συνιστούμε να χρησιμοποιήσετε σύνδεση ενσύρματου δικτύου για καλύτερη ποιότητα ήχου και βίντεο.
Καταχώρηση συσκευής Ολοκλήρωση βασικής καταχώρησης Αυτή η ενότητα εξηγεί την ροή βασικής καταχώρησης, που λειτουργεί σχεδόν για όλους τους χρήστες. Για να μάθετε περισσότερα σχετικά με άλλες επιλογές που εμφανίζονται κατά την διαδικασία καταχώρησης, βλ. Select other enrollment options (Επιλέξτε άλλες επιλογές καταχώρησης). ΣΥΜΒΟΥΛΗ: Συνιστούμε να συνδέσετε ένα πληκτρολόγιο USB για να καταχωρήσετε τα στοιχεία καταχώρησης ευκολότερα.
4. Επιλέξτε Continue (Συνέχεια). 5. Accept (Αποδοχή) των Όρων του Google Chrome OS. 6. Συνδεθείτε μέσω της ηλεκτρονικής σας διεύθυνσης και τον κωδικό πρόσβασης Google Apps. ΣΥΜΒΟΥΛΗ: Εάν χρησιμοποιείτε το τηλεχειριστήριο για να εισάγετε τον κωδικό πρόσβασής σας, ολόκληρος ο κωδικός πρόσβασης μπορεί να εμφανιστεί στην οθόνη. Χρήση ενός πληκτρολογίου USB ώστε ο κωδικός σας να παραμείνει κρυφός καθώς τον πληκτρολογείτε. 7. Η διαδικασία καταχώρησης γίνεται αυτόματα.
9. Κάντε κλικ στην επιλογή μέσα από τις οθόνες για να δείτε συμβουλές σχετικά με τη χρήση του Chromebox for meetings. Στο τέλος της καταχώρησης της συσκευής, η οθόνη εμφανίζει μία διεύθυνση URL για αυτή τη συσκευή στην σελίδα της κονσόλας Διαχειριστή του Chromebox for meetings. Χρησιμοποιώντας αυτή τη διεύθυνση URL, ένας χρήστης - διαχειριστής πρέπει να προσθέσει το on line ημερολόγιο της αίθουσας στη συσκευή για την ενεργοποίηση των προγραμματισμένων συσκέψεων.
Πραγματοποίηση βιντεοκλήσης Δημιουργία βιντεοκλήσης Ο προγραμματισμός μιας συνάντησης που περιλαμβάνει βιντεοκλήση είναι εύκολος. Η πρόσκλησή σας θα περιλαμβάνει όλα όσα χρειάζονται για τη σύνδεση από μία αίθουσα ή μία προσωπική συσκευή. 1. Συνδεθείτε χρησιμοποιώντας το λογαριασμό σας Google Apps. 2. Ανοίξτε το ημερολόγιο Google ή εισαγάγετε τη διεύθυνση google.com/calendar στη γραμμή διευθύνσεων. 3. Κάντε κλικ στο κουμπί Create (Δημιουργία) για να προγραμματίσετε μια εκδήλωση. 4.
Διαχείριση συσκευών και αιθουσών Ελέγξτε τις ρυθμίσεις της κονσόλας Διαχειριστή για τις συσκευές Βιντεοδιασκέψεων (Video Conferencing) Google Για να διαχειριστείτε τις συσκευές Chromebox for meetings από την κονσόλα Διαχειριστή, πρέπει να βεβαιωθείτε ότι η ζώνη ώρας για την περιοχή σας έχει ρυθμιστεί σωστά. Επίσης, μπορείτε να επιλέξετε να επανεκκινήστε τις συσκευές Chromebox for meetings σε ένα προγραμματισμένο χρονικό διάστημα. 1.
3. Η οθόνη διαχείρισης συσκευών για την συσκευή σας Chromebox for meetings θα εμφανιστεί. Κάντε κλικ στο Add calendar and room resource (Προσθήκη ημερολογίου και πόροι αίθουσας). 4. Στη δεξιά πλευρά της οθόνης, κάντε κλικ στο Unassigned (Μη καθορισμένη) και κάντε ένα από τα εξής: •• Αν η αίθουσα όπου η συσκευή Chromebox for meetings βρίσκεται, εμφανίζεται στη λίστα, κάντε κλικ στο όνομα της αίθουσας. Κάντε κλικ στο Save (Αποθήκευση).
Επεξεργασία του ονόματος συσκευής 1. Από έναν φορητό υπολογιστή ή άλλη συσκευή, συνδεθείτε στην κονσόλα Διαχειριστή του λογαριασμού Google. 2. Κάντε κλικ στο κουμπί Device management (Διαχείριση συσκευών), στη συνέχεια, στα δεξιά της επιλογής Hangouts device management (Διαχείριση συσκευής Hangout), κάντε κλικ στο Devices (Συσκευές). 3. Εμφανίζεται μία οθόνη με τις ενεργές συσκευές Chromebox for meetings. Κάντε κλικ στις συσκευές που θέλετε να ονομάσετε εκ νέου. 4.
Προβολή πληροφοριών συσκευής 1. Από έναν φορητό υπολογιστή ή άλλη συσκευή, συνδεθείτε στην κονσόλα Διαχειριστή του λογαριασμού Google. 2. Κάντε κλικ στο κουμπί Device management (Διαχείριση συσκευών), και στη συνέχεια, στα δεξιά της επιλογής Hangouts device management (Διαχείριση συσκευής Hangout), κάντε κλικ στο Devices (Συσκευές). 3. Εμφανίζεται μία οθόνη με τις ενεργές συσκευές Chromebox for meetings. Κάντε κλικ στις συσκευές των οποίων θέλετε να προβληθούν οι πληροφορίες. 4.
Εισαγάγετε πληροφορίες αναγνώρισης σχετικά με την συσκευή σας 1. Από έναν φορητό υπολογιστή ή άλλη συσκευή, συνδεθείτε στην κονσόλα Διαχειριστή του λογαριασμού Google. 2. Κάντε κλικ στο κουμπί Device management (Διαχείριση συσκευών), και στη συνέχεια, στα δεξιά της επιλογής Hangouts device management (Διαχείριση συσκευής Hangout), κάντε κλικ στο Devices (Συσκευές). 3. Εμφανίζεται μία οθόνη με τις ενεργές συσκευές Chromebox for meetings.
Συσχετίστε την συσκευή σας με ένα διαφορετικό ημερολόγιο αίθουσας, ή αφαιρέστε τη συσκευή από οποιοδήποτε αίθουσα Εάν μετακινήσετε τη συσκευή Chromebox for meetings σε διαφορετική αίθουσα, πρέπει να αντιστοιχίσετε τη συσκευή με το ημερολόγιο της νέας αίθουσας. Εναλλακτικά, αν έχετε σταματήσει να χρησιμοποιείτε την συσκευή Chromebox for meetings, μπορείτε να αφαιρέσετε την συσκευή από οποιαδήποτε αίθουσα. 1. Από έναν φορητό υπολογιστή ή άλλη συσκευή, συνδεθείτε στην κονσόλα Διαχειριστή Google. 2.
Επεξεργασία ονόματος αίθουσας, τύπου, ή περιγραφής 1. Από έναν φορητό υπολογιστή ή άλλη συσκευή, συνδεθείτε στην κονσόλα Διαχειριστή του λογαριασμού Google. 2. Κάντε κλικ στο κουμπί Device management (Διαχείριση συσκευών), και στη συνέχεια, στα δεξιά της επιλογής Hangouts device management (Διαχείριση συσκευής Hangout), κάντε κλικ στο Devices (Συσκευές). 3. Εμφανίζεται μία οθόνη με τις ενεργές συσκευές Chromebox for meetings.
Chromebox for meetings
Αντιμετώπιση προβλημάτων Chromebox for meetings 39
Διόρθωση προβλήματος Διαχείριση συσκευών και αιθουσών Δεν ξέρω πώς να αναγνωρίσω τη συσκευή Chromebox for meetings που θέλω να βρίσκεται στην οθόνη λίστας συσκευών. Εάν δεν είστε βέβαιοι ποια συσκευή να επιλέξετε, μπορείτε να εντοπίσετε την σωστή από το σειριακό της αριθμό. Μπορείτε να βρείτε τον σειριακό αριθμό της συσκευής σας στην κάρτα που συμπεριλαμβανόταν στο κουτί στο κάτω μέρος της συσκευής. Βοήθεια και υποστήριξη Μεταβείτε στη διεύθυνση support.google.
Παραρτήματα
Πληροφορίες ασφαλείας Το Chromebox for meetings έχει σχεδιαστεί και δοκιμαστεί ώστε να ικανοποιεί τα πιο εξελιγμένα πρότυπα ασφαλείας εξοπλισμού πληροφορικής. Παρόλα αυτά, για να διασφαλίσετε την ασφάλεια σας, είναι σημαντικό να διαβάσετε τις ακόλουθες οδηγίες. Εγκατάσταση του συστήματος • Διαβάστε και ακολουθήστε όλες τις οδηγίες που περιλαμβάνονται στην παρούσα τεκμηρίωση πριν ξεκινήσετε τη λειτουργία του συστήματός σας. • Μη χρησιμοποιείτε το προϊόν αυτό κοντά σε νερό ή σε πηγή θερμότητας.
– Το σύστημα έχει υποστεί πτώση ή έχει τραυματιστεί το περίβλημα. – Η απόδοση του συστήματος παρουσιάζει αλλαγές. Προειδοποίηση μπαταρίας λιθίου μετάλλου (Lithium-Metal) ΠΡΟΣΟΧΗ: Κίνδυνος έκρηξης σε περίπτωση εσφαλμένης αντικατάστασης της μπαταρίας. Η μπαταρία πρέπει να αντικαθίσται μόνο με τον ίδιο ή αντίστοιχο τύπο που συνιστάται από τον κατασκευαστή. Να αποθέτετε τις χρησιμοποιημένες μπαταρίες ως απορρίμματα σύμφωνα με τις οδηγίες του κατασκευαστή.
Κανονιστικές γνωστοποιήσεις REACH Σε συμμόρφωση με το κανονιστικό πλαίσιο REACH (Registration, Evaluation, Authorisation, and Restriction of Chemicals Καταχώριση, Αξιολόγηση, Αδειοδότηση και Απαγόρευση χημικών ουσιών), δημοσιεύσαμε τις χημικές ουσίες που υπάρχουν στα προϊόντα μας στον ιστότοπο ASUS REACH στη διεύθυνση http://csr. asus.com/english/REACH.
Η συσκευή αυτή έχει ελεγχθεί και έχει διαπιστωθεί ότι πληροί τους περιοριστικούς όρους για ψηφιακές συσκευές κατηγορίας Β, σύμφωνα με το τμήμα 15 του κανονισμού FCC. Οι περιορισμοί αυτοί αποσκοπούν στην παροχή εύλογης προστασίας έναντι επιβλαβών παρεμβολών σε κατοικημένες περιοχές. Η συσκευή αυτή παράγει, χρησιμοποιεί και μπορεί να εκπέμψει ενέργεια ραδιοσυχνότητας και εάν δεν εγκατασταθεί και χρησιμοποιηθεί σύμφωνα με τις οδηγίες, μπορεί να προκαλέσει παρεμβολές στις ραδιοεπικοινωνίες.
Δήλωση Συμμόρφωσης (Οδηγία R&TTE 1999/5/EC) Τα ακόλουθα ολοκληρώθηκαν και θεωρήθηκαν συναφή και επαρκή: • Βασικές απαιτήσεις ως αναφέρονται στο [Άρθρο 3] • Προδιαγραφές προστασίας της υγείας και της ασφάλειας ως αναφέρονται στο [Άρθρο 3.1α] • Δοκιμές ηλεκτρικής ασφάλειας σύμφωνα με το [EN 60950] • Προδιαγραφές προστασίας ηλεκτρομαγνητικής συμβατότητας ως αναφέρονται στο [Άρθρο 3.
Στις υπηρεσίες που αναφέρονται στη συνέχεια, για ολόκληρη τη ζώνη των 2,4 GHz: • Η μέγιστη επιτρεπόμενη ισχύς σε εσωτερικό χώρο είναι 100mW • Η μέγιστη επιτρεπόμενη ισχύς σε εξωτερικό χώρο είναι 10mW Υπηρεσίες στις οποίες η χρήση της ζώνης 2400–2483,5 MHz επιτρέπεται με EIRP μικρότερο από 100mW στο εσωτερικό και μικρότερο από 10mW στο εξωτερικό: 01 05 11 24 32 41 55 60 64 Ain Hautes Alpes Aude Dordogne Gers Loir et Cher Meuse Oise Pyrénées Atlantique 02 08 12 25 36 45 58 61 66 Aisne Ardennes Aveyron Do
Δήλωση Συμμόρφωσης του Υπουργείου Επικοινωνιών του Καναδά Αυτή η ψηφιακή συσκευή δεν υπερβαίνει τα όρια εκπομπής ραδιοπαρεμβολών από ψηφιακές συσκευές Κατηγορίας Β που έχουν τεθεί από τους Κανονισμούς για τις Ραδιοπαρεμβολές του Καναδικού Υπουργείου Επικοινωνιών. Η ψηφιακή αυτή συσκευή κατηγορίας Β είναι συμβατή με τους Καναδικούς κανονισμούς ICES-003.
Σήμανση CE Σήμανση CE για συσκευές χωρίς ασύρματο τοπικό δίκτυο/Bluetooth Η έκδοση αυτής της συσκευής που αποστέλλεται από το εργοστάσιο συμμορφώνεται με τις απαιτήσεις των οδηγιών της ΕΕ 2004/108/ΕΚ “Ηλεκτρομαγνητική συμβατότητα” και 2006/95/ΕΚ “Οδηγία χαμηλής τάσης”.
Σύμμορφο προϊόν ENERGY STAR Το ENERGY STAR αποτελεί κοινό πρόγραμμα της Υπηρεσίας Περιβαλλοντικής Προστασίας Η.Π.Α. και της Διεύθυνσης Ενέργειας Η.Π.Α. το ο οποίο μας βοηθά να εξοικονομούμε χρήματα και να προστατεύουμε το περιβάλλον μέσω ενεργειακά αποδοτικών προϊόντων και πρακτικών. Όλα τα προϊόντα ASUS με το λογότυπο ENERGY STAR είναι σύμμορφα με το πρότυπο ENERGY STAR και η ιδιότητα διαχείρισης ισχύος είναι ενεργοποιημένη ως προεπιλογή.
Στοιχεία επικοινωνίας με την ASUS ASUSTeK COMPUTER INC. Διεύθυνση 15 Li-Te Road, Peitou, Taipei, Taiwan 11259 Τηλέφωνο +886-2-2894-3447 Φαξ +886-2-2890-7798 E-mail info@asus.com.tw Τοποθεσία Web http://www.asus.com/tw Τεχνική υποστήριξη Τηλέφωνο +86-21-38429911 Φαξ +86-21-58668722, εσωτ. 9101# Υποστήριξη μέσω διαδικτύου http://www.asus.
EC Declaration of Conformity We, the undersigned, Manufacturer: ASUSTeK COMPUTER INC. Address, City: 4F, No. 150, LI-TE Rd., PEITOU, TAIPEI 112, TAIWAN Country: TAIWAN Authorized representative in Europe: ASUS COMPUTER GmbH Address, City: HARKORT STR.
DECLARATION OF CONFORMITY Per FCC Part 2 Section 2. 1077(a) Asus Computer International Responsible Party Name: 800 Corporate Way, Fremont, CA 94539.
Chromebox for meetings