Chromebox for meetings ユーザーマニュアル
J8906 初版 2014年7月 COPYRIGHTについて バックアップの目的で利用する場合を除き、本書に記載されているハードウェア・ソフトウェ アを含む、全ての内容は、ASUSTeK Computer Inc.
もくじ もくじ ...........................................................................................................................3 本マニュアルについて..............................................................................................4 このマニュアルの表記について.............................................................................4 パッケージの内容.......................................................................................................5 本機の概要 各部の名称と機能...............................................
本マニュアルについて このマニュアルには本機のハードウェアとソフトウェアについての説 明が記載されており、以下のChapterから構成されています。 Chapter 1: 本機の概要 本機のハードウェアとコンポーネントについての説明が記載され ています。 Chapter 2: 本機を使用する 本機の使用方法についての説明が記載されています。 Chapter 3: 本機の設定 本機を使用したビデオ会議の設定方法についての説明が記載さ れています。 トラブルシューティング 本機のトラブルシューティングが記載されています。 付録 製品の規格や海外の法令についての説明が記載されています。 このマニュアルの表記について 本製品を正しくお取り扱いいただくため、以下の表記をご参照くだ さい。 重要: 作業を完了するために従わなければならない指示です。 注: 作業を完了するための追加情報です。 ヒント: 作業を完了するためのヒントです。 警告: 作業を行う際、人体への危険を避けるため、または本機のコン ポーネントへの損害、本機内のデータの消失を避けるために、必ず 従わなければならない事項です。 4 C
パッケージの内容 製品パッケージに以下のものが揃っていることをご確認ください。 リモコンとレシーバー Chromebox for meetings スピーカー ACアダプター* カメラ 1.8m HDMI ケーブル 4.5m CAT5eイーサネット ケーブル 4.
注: • 本体、システム構成部品は通常のご使用条件で使用し不具合が 発生した場合、保証期間内であれば無料で修理・交換致します (その他付属品・ケーブル、ネジ、取り付けブラケット等は保証適 用外です)。 なお、保証を受けるには保証書をASUSのコールセ ンターまでご送付いただく必要があります。 初期不良について は購入後1ヶ月間となります。 • 付属品の内容はモデルにより異なる場合があります。付属品の詳 細については、各ユーザーマニュアルをご参照ください。 6 Chromebox for meetings
本機の概要 1
各部の名称と機能 前面 電源ボタン 本機の電源のON/OFFを切り替えます。本機をロックする こともできます。 ログイン時に電源ボタンを押すと本機をロックすること ができます。ロック解除にはパスワード入力が必要です。 サインイン画面またはHangouts使用時は、電源ボタンを 押して本機をシャットダウンしてください。 USB 3.0ポート 5Gbit/sのデータ転送速度を提供し、USB2.0との下位互換 性があります。また、 これらのポートではBattery Charging Version 1.2 (BC 1.
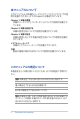
左側 Kensington® セキュリティスロット Kensington® 互換セキュリティ製品と併用して、本機を固 定することができます。 メモリーカードスロット 内蔵のカードスロットはMMC/SDカードをサポートして います。 Chromebox for meetings 9
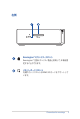
背面 通気孔 通気孔により本体から熱を逃がします。 重要: 通気口からは高温の空気が排気されます。故 障や事故の原因となりますので、人体、紙、本、衣 類、ケーブルなどを密接し塞がないようにしてくだ さい。 電源入力 付属のACアダプターを接続し、本機に電源を供給します。 付属のACアダプター以外は使用しないでください。故障 の原因となります。 警告: ACアダプターは、使用中高温となることがあり ます。アダプターを物で覆ったり、また身体に密着さ せて使用しないでください。 10 Chromebox for meetings
LANポート 8ピンRJ-45LANポートは標準イーサネットケーブルに対 応し、LANに接続することができます。 USB 3.0ポート 5Gbit/sのデータ転送速度を提供し、USB2.
Chromebox for meetings
本機を使用する 2
使用の手引き ディスプレイパネルを本機に接続する 本機にディスプレイパネルまたはプロジェクターを接続することが できます。サポートしている接続タイプは次のとおりです。 • HDMIコネクター • DisplayPort • DVIコネクター (HDMI–DVIアダプターと併用) 注: HDMI–DVIアダプターは別途お買い求めください 。 手順 HDMIポートまたはDiplayPortにディスプレイケーブルを接続します。 HDMIポートにディスプレイを接続 DisplayPortにディスプレイを接続 14 Chromebox for meetings
スピーカーフォンを接続する 本機の任意のUSB 3.0ポートにスピーカーフォンを接続することがで きます。 注: スピーカーフォンを接続する際は、次の文書をご参照ください。 http://www.jabra.
カメラを接続する 本機の任意のUSB 3.0ポートにカメラを接続することができます。 注: カメラを接続する際は、次の文書をご参照ください。 http://www.logitech.com/assets/45920/hd-pro-webcam-c920quick-start-guide.
リモコンレシーバーを接続する 本機のフロントパネルにあるUSB 3.
本機にACアダプターを接続する 手順 A. 電源コードを100V~240Vの電源に接続します。 B.
重要: • 本製品付属のACアダプターおよびケーブル以外で本機に電力を 供給しないでください。また、付属のACアダプターと電源コード を他の製品に使用しないでください。故障の原因となります。 • 本機の使用する際は、本機が接地された電源コンセントに接続 されていることをご確認ください。 • 本機を電源アダプターに接続しているときは、電源コンセントや 電源タップの近くでご使用ください。 • 主電源から本機を切断するには、電源コントセントから本機を切 断してください。 注: ACアダプターについて • 入力電圧: 100-240 Vac • 入力周波数: 50-60Hz • 定格出力電流: 3.
本機の電源を入れる 本機の電源ボタンを押し、電源をオンにします。 重要: 本機の電源を入れる前に、周辺機器 (スピーカーフォン、カ メラ、リモコンとレシーバー) とACアダプターを正しく接続してくだ さい。 20 Chromebox for meetings
本機の設定 3 Chromebox for meetings 21
ビデオ会議を始める前に セットアップの要件 会議室の大きさとセットアップ 本機は収容人数2~10人の会議室にも対応可能ですが、収容人数3 ~6人の会議室を前提に設計されています。長方形、楕円、または 円形のテーブルの一端にディスプレイが設置された会議室が最適 です。教室のようなレイアウトがされた空間での使用はお勧めし ません。 本機の使用には次のものが必要です。 • イーサネットポート(有線ネットワーク接続用) • 電源コンセント ネットワークの要件 本機は有線/無線ネットワークのいずれでも動作します。ネットワー ク要件はHangoutsの要件と同じです。なお、グループビデオ会議に は1Mbps/2 Mbps(上り/下り)の最小帯域幅を推奨します。 ヒント: ワイヤレスネットワーク接続を通じて本機を使用することも できますが、最高のサウンドと動画の品質を得るため、有線ネットワ ーク接続をお勧めします。 設置場所の要件 • 本機の取り付け、またはテーブルへの設置には、 50 mm×145 mm×145 mm (高×奥行×長) の空間が必要です。 • スピーカーフォンのテーブルまたは壁面への設置には、
ディスプレイの要件と配置 本機はLCD/LED/プラズマディスプレイ、またプロジェクタータイプ のディスプレイやテレビと併用することができます。ディスプレイは HDMI入力またはDisplayPort入力端子搭載のものをご使用くださ い。画面の解像度は1280×720ピクセル以上である必要がありま す。最高のビデオ品質を得るため、1920×1080ピクセルの解像度を 推奨いたします。 ディスプレイをテーブルの上に置く、または壁面や天井に設置してプ ロジェクターと併用することができます。壁掛け設置する際は、設置 面に穴を開けケーブルを隠す必要がある場合があります。使用場所 に別のビデオ会議システムが既に構築されている場合、本機の使用 に合わせて既存の会議システムを再利用できる場合があります。 スピーカーフォンの配置 スピーカーフォンの配置は、会議室のサイズとレイアウトによって決 めます。 • 参加者がディスプレイに向かうように会議室の奥に座る場合、テ ーブル上のできる限り本機とディスプレイに近い場所にスピーカ ーフォンを配置することをお勧めします。 • 比較的広い会議室でディスプレイの位置に関わらず参加者
• 必要に応じ、壁掛け設置用にケーブルコンシーラーを使用し ます。 注: 壁掛け設置用のケーブルコンシーラーはパッケージに含まれてい ません。必要な場合は別途お買い求めください。 重要: カメラに付属のケーブルの長さは約1.
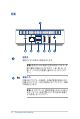
ケーブルを接続する 付属のケーブルとセンサーを使用し、他のシステムコンポーネントを 本機に接続します。 6 1 2 3 4 5 7 1 1 2 2 3 3 4 4 5 5 DisplayPortです。DisplayPort対応のディスプレイを接続する ことができます。 HDMIポートです。HDMI対応のディスプレイを接続することが できます。 Chromebox for meetings 25
1 1 2 1 2 3 2 3 4 3 4 5 1 4 5 6 2 5 6 7 3 1 6 7 4 2 7 3 5 4 6 7 5 6 7 USB 3.0ポートです。カメラを接続することができます。 USB 3.0ポートです。スピーカーフォンを接続することができ ます。 LANポートです。ルーターを接続することができます。 ヒント: ワイヤレスネットワーク接続を通じて本機を使用することもでき ますが、最高のサウンドと動画の品質を得るため、有線ネットワーク接 続をお勧めします。 電源ポートです。電源コンセントに接続します。 重要: 電源プラグは、他のすべての接続を行った後にコンセントに接続 してください。 USB 3.
本機を登録する 基本的な登録を行う このセクションでは、本機を通常使用する際に必要な基本的な登録 の流れを説明します。登録作業時に表示されるその他のオプション については、 「他の登録オプションを選択する」をご参照ください。 ヒント: 登録情報を入力する際は、USBキーボードの使用をお勧めし ます。リモコンを使う場合、次の操作方法で画面上を移動します。 • 次の欄に移動する場合は、 「右」を押します。 • 前の欄に戻る場合は、 「左」を押します。 • 欄内を上下にスクロールする場合は、 「上」または「下」を押し ます。 • 項目やオプションを選択する場合は。 「Select」を押します。 基本的な登録の手順 1. ディスプレイの電源を入れます。 2. 本機の電源を入れます。 3.
4. 「Continue (継続)」を選択します。 5. Google Chrome OSの利用規約を読み、同意します。 6. Google Appsのメールアドレスとパスワードでサインインし ます。 ヒント: リモコンでパスワードを入力する際は、パスワードがすべて 画面上に表示される場合があります。パスワードを表示したくない 場合は、USBキーボードをご使用ください。 7. 登録作業が自動的に実行されます。完了したら、 「Done」をク リックします。 8.
9.
ビデオ通話 ビデオ通話を行う ビデオ通話を使用する会議を簡単にスケジュールすることができま す。カレンダーの招待には他の参加者が必要な情報がすべて含まれ ています。 1. Google Appsアカウントでサインインします。 2. Googleカレンダーを開くか、アドレスバーに「google.com/ calendar」と入力します。 3. 「作成」をクリックし、イベントをスケジュールします。 4. イベントの詳細を入力します (イベントタイトル、日付、時刻、 ゲスト等)。 5. ページの右側の 「場所」をクリックします。 6. 本機と会議室の名前を入力し、 「追加」をクリックします。 7. 会議室を予約した後、 「ビデオハングアウトを追加」をクリック します。 8. ビデオ通話に分かりやすい名前を付けます。(名前は半角英数 文字15字以内で入力します) 9.
本機と会議室を管理する Googleビデオ会議デバイスのための管理コンソール の設定を確認する 管理コンソールから本機を管理するには、タイムゾーンが正しく設 定されていることを確認してください。また、スケジュールした間隔 で本機を再起動するかを選択することができます。 1. ノートパソコンや他の機器から、Googleの管理コンソールにロ グインします。 2. 「端末管理」をクリックし、 「Chrome for Meetings」の右側で 「設定」をクリックします。 3. (省略可) 「スケジュールされた再起動」の欄に再起動を行うま での待機日数を入力します。 例: 5日ごとに本機を再起動したい場合は、 「5」と入力します。 4.
3. 本機のデバイス管理画面が表示されます。 「カレンダーリソース を追加」をクリックします。 4.
デバイス名を編集する 1. ノートパソコンや他の機器から、Googleの管理コンソールにロ グインします。 2. 「端末管理」をクリックし、 「Chrome for Meetings」の右側で 「端末」をクリックします。 3. 利用可能なデバイスが表示されます。名前を変更したいデバイス をクリックします。 4. デバイス名の右にある矢印をクリックします。 5. 「端末名を編集」をクリックします。 6. 新しい名前を入力し、 「保存」をクリックします。 7.
デバイス情報を表示する 1. ノートパソコンや他の機器から、Googleの管理コンソールにロ グインします。 2. 「端末管理」をクリックし、 「端末管理」の右側で「端末」をクリ ックします。 3. 利用可能なデバイスが表示されます。情報を表示したいデバイス を選択します。 4.
本機を識別するための情報を入力する 1. ノートパソコンや他の機器から、Googleの管理コンソールにロ グインします。 2. 「端末管理」をクリックし、 「Chrome for Meetings」の右側で 「端末」をクリックします。 3. 利用可能なデバイスが表示されます。情報を追加したいデバイス をクリックします。 4. 「メモ」をクリックします。 5. 画面の右側の「編集」をクリックします。 6. 「ユーザー」、 「メモ」、 「場所」の欄に必要な情報を入力します。 7.
別の会議室のカレンダーと本機を関連付ける、本機と会議室 との割り当てを解除する 別の会議室に本機を移動する場合は、その会議室のカレンダーに 本機を割り当てる必要があります。 また、本機を使用しないときは割り当てを解除することもできます。 1. ノートパソコンや他の機器から、Googleの管理コンソールにロ グインします。 2. 「端末管理」をクリックし、 「Chrome for Meetings」の右側で 「端末」をクリックします。 3. 利用可能なデバイスが表示されます。再割り当て/割り当て解除 をしたいデバイスをクリックします。 4. 「カレンダーリソースを追加」をクリックします。 5. 画面の右側で現在本機が割り当てられている会議室をクリック し、次のいずれかの操作を行います。 •• 本機を他の会議室のカレンダーに割り当てる場合は、その 会議室をクリックします。 •• 本機の割り当てを解除するには、 「割り当て解除済み」を クリックします。 6.
会議室の名前、タイプ、説明を編集する 1. ノートパソコンや他の機器から、Googleの管理コンソールにロ グインします。 2. 「端末管理」をクリックし、 「Chrome for Meetings」の右側で 「端末」をクリックします。 3. 利用可能なデバイスが表示されます。会議室情報を編集したい 会議室に置かれているデバイスを選択します。 4. 「カレンダーリソースを追加」をクリックします。 5.
Chromebox for meetings
トラブルシューティング Chromebox for meetings 39
問題を解決する 本機と会議室を管理する 自分が使用しているデバイスを、デバイスリストから選択することが できない。 クリックするデバイスが分からない場合は、シリアル番号で確認す ることができます。シリアル番号は製品パッケージ内のカード、また 製品本体の底部に記載があります。 ヘルプとサポート セットアップの詳細、各種ユーザーマニュアル等は次のURLをご参照 ください。 support.google.
付録
安全上の注意 大切なデータを守り、安全に快適にご使用いただくためのヒントを 記載しました。本製品の使用方法に関する記載と併せてお読みくだ さい。 システムをセットアップする • 本機を使用する前に、本マニュアルに記載の説明及び指示をす べて読み、それに従ってください。 • 湿気のある場所および熱を発する熱源のそばで本機を使用 しないでください。 • 設置する際は安定した水平面に設置してください。 • ケースの開口部は通気孔です。紙、本、衣類、ケーブルまたはその 他の物で通気孔を塞がないようにしてください。設置の際は、本 体と壁などの間にスペースを空けて設置してください。また、通 気孔に物を入れる等の行為はお止めください。 • 本機は5°〜35℃の周辺温度でご使用ください。 • 延長コードを使用する際は、接続したすべてのデバイスの定格電 流の総量が、延長コードの定格電流を超過しないようにしてくだ さい。 使用中のお手入れ • 電源コードを踏まないでください。また、物を乗せないでくだ さい。 • 液体・雨・湿気を避けてください。 • 本機のお手入れの際は、電源を切りACアダプターを取り外し
リチウムバッテリーについての警告 警告: バッテリーの交換は正しく行わないと破裂の原因となり ます。バッテリーは製造元が指定するもの、またはそれに相当 するものをご使用ください。バッテリー廃棄の際は、製造元の 指示に従ってください。 バッテリーの誤飲に注意 本製品に付属のリモコンには、ボタン電池が含まれています。ボタン 電池を飲み込んだ場合、2時間以内に深刻な内部やけどを引き起こ し、死に至る危険性もあります。 ボタン電池は幼児・子供・ペットの触れない所に保管してください。 ボタン収納部が正しく閉じない場合は製品の使用を中止し、幼児・ 子供・ペットの触れない所に保管してください。 万一ボタン電池の誤飲が起こった場合は、速やかに医師の診察を 受けてください。 分解禁止 お客様が本機を分解した場合、 保証の対象外となります。 本機やバッテリー(該当する場合)を一般廃棄物として廃棄しない でください。本製品のコンポーネントの中にはリサイクルできるよ う設計されているものがあります。なお、本製品は水銀ボタン電池 を含む電子機器です。本製品を一般ゴミとして廃棄しないでくだ さい。リサイクル、廃棄の際は電子機器の
ご注意 REACH (原文) Complying with the REACH (Registration, Evaluation, Authorization, and Restriction of Chemicals) regulatory framework, we publish the chemical substances in our products at ASUS REACH website at http://csr.asus.com/english/REACH.htm.
This equipment has been tested and found to comply with the limits for a Class B digital device, pursuant to Part 15 of the FCC Rules. These limits are designed to provide reasonable protection against harmful interference in a residential installation. This equipment generates, uses and can radiate radio frequency energy and, if not installed and used in accordance with manufacturer’s instructions, may cause harmful interference to radio communications.
Declaration of Conformity (R&TTE directive 1999/5/EC) The following items were completed and are considered relevant and sufficient: • Essential requirements as in [Article 3] • Protection requirements for health and safety as in [Article 3.1a] • Testing for electric safety according to [EN 60950] • Protection requirements for electromagnetic compatibility in [Article 3.
In the departments listed below, for the entire 2.4 GHz band: • Maximum authorized power indoors is 100 mW • Maximum authorized power outdoors is 10 mW Departments in which the use of the 2400–2483.
Canadian Department of Communications Statement This digital apparatus does not exceed the Class B limits for radio noise emissions from digital apparatus set out in the Radio Interference Regulations of the Canadian Department of Communications. This class B digital apparatus complies with Canadian ICES-003. IC Radiation Exposure Statement for Canada This equipment complies with IC radiation exposure limits set forth for an uncontrolled environment.
CE Mark Warning CE marking for devices without wireless LAN/Bluetooth The shipped version of this device complies with the requirements of the EEC directives 2004/108/EC “Electromagnetic compatibility” and 2006/95/EC “Low voltage directive”. CE marking for devices with wireless LAN/ Bluetooth This equipment complies with the requirements of Directive 1999/5/EC of the European Parliament and Commission from 9 March, 1999 governing Radio and Telecommunications Equipment and mutual recognition of conformity.
ENERGY STAR complied product ENERGY STAR is a joint program of the U.S. Environmental Protection Agency and the U.S. Department of Energy helping us all save money and protect the environment through energy efficient products and practices. All ASUS products with the ENERGY STAR logo comply with the ENERGY STAR standard, and the power management feature is enabled by default. The monitor and computer are automatically set to sleep after 10 and 30 minutes of user inactivity.
ASUSコンタクトインフォメーション ASUSTeK COMPUTER INC. 住所 電話 ファックス 電子メール Webサイト テクニカルサポート 電話 ファックス オンラインサポート 15 Li-Te Road, Peitou, Taipei, Taiwan 11259 +886-2-2894-3447 +886-2-2890-7798 info@asus.com.tw http://www.asus.com/tw +86-21-38429911 +86-21-58668722, ext. 9101# http://www.asus.com/tw/support/ ASUS COMPUTER INTERNATIONAL (アメリカ) 住所 電話 ファックス Webサイト テクニカルサポート サポートファックス 電話 オンラインサポート 800 Corporate Way, Fremont, CA 94539, USA +1-510-739-3777 +1-510-608-4555 http://www.asus.
EC Declaration of Conformity We, the undersigned, Manufacturer: ASUSTeK COMPUTER INC. Address, City: 4F, No. 150, LI-TE Rd., PEITOU, TAIPEI 112, TAIWAN Country: TAIWAN Authorized representative in Europe: ASUS COMPUTER GmbH Address, City: HARKORT STR.
DECLARATION OF CONFORMITY Per FCC Part 2 Section 2. 1077(a) Asus Computer International Responsible Party Name: 800 Corporate Way, Fremont, CA 94539.
Chromebox for meetings