
User’s Manual

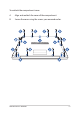

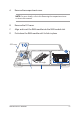
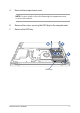
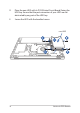
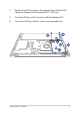

Table Of Contents
- About this manual
- Chapter 1: Hardware Setup
- Chapter 2: Using your Notebook PC
- Chapter 3: Working with Windows® 10
- Chapter 4: Power-On Self-Test (POST)
- Chapter 5: Upgrading your Notebook PC
- Tips and FAQs
- Appendices
- DVD-ROM Drive Information
- Blu-ray ROM Drive Information
- Federal Communications Commission Interference Statement
- FCC Radio Frequency (RF) Exposure Caution Statement
- Compliance Statement of Innovation, Science and Economic Development Canada (ISED)
- Déclaration de conformité de Innovation, Sciences et Développement économique Canada (ISED)
- Caution
- Avertissement
- Wireless Operation Channel for Different Domains
- Power Safety Requirement
- TV Notices
- Macrovision Corporation Product Notice
- UL Safety Notices
- Nordic Lithium Cautions (for lithium-ion batteries)
- ENERGY STAR complied product
- Global Environmental Regulation Compliance and Declaration
- ASUS Recycling/Takeback Services
- Rechargeable Battery Recycling Service in North America
- Coating Notice
- National Telecommunications Commission of the Philippines
- Regional notice for California
- Regional notice for Singapore
- REACH
- Prevention of Hearing Loss
- DVD-ROM Drive Information

80
Notebook PC E-Manual
Installing an M.2 card
Refer to the following steps when installing a compatible M.2 card in
your Notebook PC:
IMPORTANT! Purchase your M.2 card from authorized retailers of this
Notebook PC to ensure maximum compatibility and reliability.
WARNING! Disconnect all the connected peripherals, any telephone or
telecommunication lines and power connector (such as external power
supply, battery pack, etc.) before removing the compartment cover.
NOTE:
• The appearance of your Notebook PC’s bottom side and M.2 card
may vary per model but the module installation remains the same.
• It is recommended that you install the M.2 card under professional
supervision. You may also visit an authorized service center for
further assistance.