Mini PC PN42-Serien Brugervejledning
DA21455 Første udgave August 2023 OPHAVSRET INFORMATION Ingen del af denne brugervejledning, inklusive produkterne og softwaren beskrevet heri, må undtagen som reservedokumentation for køberen selv - på nogen måde kopieres, transmitteres, transkriberes, lagres på et søgesystem eller oversættes til andet sprog uden udtrykkelig, skriftlig tilladelse fra ASUSTeK COMPUTER INC. (“ASUS”).
Indhold Om denne brugervejledning.............................................................................................5 Konventioner, der anvendes i denne brugervejledning..........................................6 Typografi...................................................................................................................................6 Pakkeindhold...........................................................................................................................
Tillæg Sikkerhedsinformation.........................................................................................................46 Installation af systemet........................................................................................................47 Forsigtighed under brugen................................................................................................47 Regulative bemærkninger.................................................................................................
Om denne brugervejledning Denne brugervejledning indeholder oplysninger om hardwaren og softwaren i din Mini PC. Den er organiseret i følgende kapitler: Kapitel 1: Gør dig bekendt med din Mini PC I dette kapitel beskrives hardware-komponenterne i din Mini PC. Kapitel 2: Sådan bruger du din Mini PC Dette kapitel fortæller dig, hvordan du bruger din Mini PC.
Konventioner, der anvendes i denne brugervejledning For at fremhæve nøgleoplysninger i denne brugervejledning, vises nogen tekst på følgende måde: VIGTIGT! Denne meddelelse indeholder vigtige oplysninger, som skal følges for at udføre en opgave. BEMÆRK: Denne meddelelse indeholder yderligere oplysninger og tips, som kan hjælpe med at udføre bestemte opgaver.
Pakkeindhold Din Mini PC-pakke skal indeholde følgende dele: ASUS Mini PC PN-serien AC strømadapter* Strømkabel* Dokumenter med tekniske oplysninger PN-Serien 7
BEMÆRKNINGER: • De mest opdaterede og nøjagtige produktspecifikationer kan findes og downloads på www.asus.com. • Billeder af produkter og tilbehør er kun til reference. Modellernes udseende og specifikationer er muligvis ikke ens. • *Den medfølgende strømadapter kan være anderledes afhængig af model og landet (eller region), hvor produktet sælges. • Det medfølgende tilbehør kan variere, afhængig af din model. For mere information om tilbehøret, henvises der til brugervejledninger som følger med.
1 Gør dig bekendt med din Mini PC
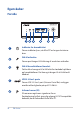
Egenskaber Forside Indikator for drevaktivitet Denne indikator lyser, når Mini PC’en bruger de interne drev. Stik til mikrofon Denne port bruges til tilslutning af en ekstern mikrofon. Stik til hovedtelefoner/headset Dette stik er beregnet til at tilslutte forstærkede højttalere og hovedtelefoner. Det kan også bruges til at tilslutte dit headset. USB 3.2 Gen 2 porte Denne USB 3.2 Gen 2-port (Universal Serial Bus) muliggør overførselshastigheder på op til 10 Gbit/s.
Tænd/Sluk-knap Din Mini PC tændes og slukkes på tænd/sluk-knappen. Din Mini PC kan sættes i dvale ved at trykke på tænd/slukknappen, eller hold knappen nede i fire (4) sekunder, for at tvinge den til at lukke ned.
Venstre panel Ventilationsåbninger Luftåbningerne gør at luften kan strømme rundt i kabinettet på din Mini PC, så den ikke overopheder. VIGTIGT! For at opnå en optimal varmeafledning og luftventilation, skal du sørge for at intet spærrer for ventilationshullerne.
Højre panel Ventilationsåbninger Luftåbningerne gør at luften kan strømme rundt i kabinettet på din Mini PC, så den ikke overopheder. VIGTIGT! For at opnå en optimal varmeafledning og luftventilation, skal du sørge for at intet spærrer for ventilationshullerne. Hul til en Kensington®-lås Med Kensington®-låsehullet kan du låse din Mini PC fst med et Kensington®-kompatibelt sikkerhedsprodukt.
Bagsiden The USB Type-C® port is only available as a configurable option with PN42. USB 2.0 port USB-porten (Universal Seriel Bus) er kompatibel med enheder med USB 2.0-porte, såsom tastaturer, pegeudstyr, flash diskenheder, eksterne harddiske, højttalere, kameraer og printere. USB 3.2 Gen 1 porte Denne USB 3.2 Gen 1-port (Universal Serial Bus) muliggør overførselshastigheder på op til 5 Gbit/s.
HDMI port HDMI-porten (High Definition Multimedia Interface) understøtter en 4K-enhed såsom et LCD-TV eller skærm, hvilket giver mulighed for at se billedet på en større ekstern skærm. BEMÆRK: Den venstre HDMI-port kan bruges med CEC (Consumer Electronics Control). Tilslut en CECkompatibel enhed til dette stik, som du vil styre med en fjernbetjening og sørg for, at enhedens HDMI-CEC-funktion er slået til.
Strømindgang Den medfølgende strømadapter omformer vekselstrøm (AC) til jævnstrøm (DC) til brug med dette stik. Mini PC’en bliver strømforsynet gennem dette stik. For at undgå at beskadige din Mini PC, skal du altid bruge den medfølgende strømadapter. ADVARSEL! Strømadapteren kan blive meget varm under brug. Undgå at tildække adapteren, og hold den væk fra kroppen. BEMÆRK: Se venligst følgende oplysninger på strømadapteren: 65 W strømadapter: +19.0 Vdc 3.42 A, +19.5 Vdc 3.
Konfigurerbar port Denne port varierer fra model til model og består af følgende portalternativer: USB 3.2 Gen 2 Type-C®/DisplayPort kombi-port (fås kun som ekstraudstyr på PN42) Denne USB Type-C® (Universal Serial Bus) port kan bruges til følgende: • Overførselshastigheder op til 10 Gbit/s. • Understøtter Display port 1.4. Brug en USB Type-C® adapter til, at forbinde din Mini PC til en ekstern skærm. • USB-strømforsyning op til 5 V/3 A.
HDMI port HDMI-porten (High Definition Multimedia Interface) understøtter en 4K-enhed såsom et LCD-TV eller skærm, hvilket giver mulighed for at se billedet på en større ekstern skærm. BEMÆRK: Når du kun bruger denne port som en udgangskilde til skærmen, understøtter denne port en opløsning på op til 4096 x 2160 med 60 Hz. Opløsningen kan også påvirkes af kabelføringen og udgangsenheden.
2 Sådan bruger du din Mini PC
Kom i gang Slut AC-adapteren til din Mini PC Sådan sluttes AC-strømadapteren til din Mini PC: A. Slut strømkablet til AC omformeren. B. Sæt DC-strømadapteren i Mini PC’ens strømindgang (DC). C. Sæt AV-strømadapteren i en 100~240 V strømkilde. BEMÆRK: Strømadapterens udseende kan variere afhængig af model og landet (eller region), hvor produktet sælges.
VIGTIGT! • Vi anbefaler stærkt, at du kun bruger AC-adapteren og kablet, der følger med din Mini PC. • Vi anbefaler stærkt, at du kun slutter din Mini PC til en jordforbundet stikkontakt. • Stikkontakten skal være nem tilgængelig og være i nærheden af din Mini PC. • For at afbryde din Mini PC fra strømforsyningen, skal du trække stikket ud af stikkontakten.
Tilslutning af en skærm til din Mini PC Du har mulighed for at slutte en skærm eller en projektor til din Mini PC, hvis de har følgende stik: • VGA-port • HDMI port • DisplayPort • USB Type-C® port BEMÆRK: Disse porte kan varierer efter model. Sådan slutter du en skærm til din Mini PC: Forbind den ene ende af et VGA, HDMI, DisplayPort eller USB Type-C® kabel til en ekstern skærm og den anden ende af kablet til VGA-port, HDMI port, DisplayPort eller USB Type-C® port på din Mini PC.
BEMÆRKNINGER: • Det er muligt at forbinde og vise op til tre skærme på samme tid, afhængigt af model og de valgte indstillinger*. • Hvis en af nedenstående porte bruges som den eneste udgangskilde til skærmen, kan følgende maksimale opløsning brgues**: - HDMI-port Understøtter en opløsning på op til 4096 x 2160 med 60Hz. - DisplayPort Understøtter en opløsning på op til 3840 x 2160 med 60 Hz. - Konfigurerbar USB Type-C®-port Understøtter en opløsning på op til 3840 x 2160 med 60 Hz.
Slut skærmen til VGA-porten Slut skærmen til HDMI-porten 24 PN-Serien
Slut skærmen til DisplayPort Slut skærmen til USB Type-C®-porten PN-Serien 25
Tilslut USB-kablet fra et tastatur eller en mus Det er muligt at tilslutte stor set alle slags USB-tastature og mus til din Mini PC. Det er også muligt at tilslutte en USB-dongle til trådløse tastaturer og mus. Sådan slutter du et tastatur og en mus til din Mini PC: Slut USB-kablet fra tastaturet og musen til en af USB portene på din Mini PC. BEMÆRK: Tastaturet er muligvis anderledes afhængig af landet (eller region), hvor produktet sælges.
Tænd for din Mini PC Tryk på tænd/sluk-knappen for at tænde for din Mini PC.
Sådan slukker du for din Mini PC Hvis din Mini PC holder op med at reagere, skal du holde tænd/slukknappen nede i mindst fire (4) sekunder, indtil den slukker. Sådan sætter du din Mini PC i dvale For at indstille din Mini-pc til at slumre, ved at trykke én gang på tænd/ sluk-knappen, skal du søge efter Control Panel (Kontrolpanel) i Windowssøgefeltet.
Indlæs BIOS-standardindstillingerne For at indlæse standardværdierne for hver af parametrene i din BIOS: 1. Åbn din BIOS ved, at trykke på eller på skærmen POST. BEMÆRK: POST (Power-On Self Test) er en række softwarestyrede diagnosetests, som kører når du tænder for din Mini PC. 2. Gå til menuen Exit (Afslut). 3. Vælg Load Optimized Defaults (Indlæs optimeret standarder), eller tryk på . 4. Vælg OK for at indlæse BIOS-standardindstillingerne.
PN-Serien
3 Opgradering af din Mini PC
VIGTIGT! • Hvis du skal installere eller opgradere nogle af hukommelsesmodulerne, det trådløse kort, aluminiumsplade og SSD-drevet, anbefales det at gøre dette under tilsyn af en faglært person. Besøg et ASUS servicecenter for yderligere hjælp. • Sørg for, at dine hænder er tørre, inden du gå i gang med installationen.
Sådan sættes bunddækslet på igen 1. Sæt bunddækslet på plads, som vist. 2. Spænd bunddækslet fast med de fire (4) skruer.
Sådan installeres hukommelsesmodulerne Din Mini PC er udstyret med et stik til et SO-DIMM-hukommelsesmodul, der giver dig mulighed for at installere et DDR4 SO-DIMM-modul. VIGTIGT! Du kan finde en komplet liste over kompatible DIMMenheder på https://www.asus.com. Det er kun muligt, at installere DDR4 SO-DIMM-enheder i DIMM-stikkene på din Mini PC. 1. Træk forsigtigt EMI-filmen op, så du kan se stikket til hukommelsesmodulet. 2. Sæt hukommelsesmodulet ind i stikket. 3.
PN-Serien 35
Installing an M.2 SSD 1. Sæt 2280 M.2 SSD-harddisken i dens rille inde i din Mini PC. 2. Tryk forsigtigt din 2280 M.2 SSD-harddisk ned oven på skruehullet, og spænd den fast med de medfølgende 3 mm skruer.
3. Før bunddækslet sættes på igen, skal du sørge for at fjerne plastikdelen på termopuden, hvis der er et. Termisk pude Plastikfilm BEMÆRK: Specifikationerne til den termiske pude, der bruges i denne Mini PC, er som følger: Tykkelse: 2.5 mm Størrelse: 65 mm x 20 mm Varmeledningsevne: 3 W/mK Hårdhed: < 40 Sc FORSIGTIG! Varmeafledningen kan stadig variere, selv hvis du skifter den termiske pude med en, der opfylder ovenstående specifikationer. For at undgå mulig skader på M.
Installation af dit trådløse kort BEMÆRK: Din Mini PC har et M.2-stik, der er beregnet til 2230 trådløse- og Bluetooth-adaptere. Du kan finde en komplet liste over kompatible trådløse netværkskort og Bluetooth-adaptere på https://www.asus.com. 1. (valgfri) Tag din M.2 SSD-harddisk ud, hvis den sidder i systemet. For at fjerne din M.2 SSD, skal du fjerne skruen fra skruehullet og derefter fjerne din M.2 SSD. 2. (valgfri) Fjern aluminiumspladen, hvis sådan en er installeret.
3. Sæt det trådløse kort i stikket i din Mini PC, og tryk forsigtigt det trådløse kort ned oven på stikket. 4. Spænd det trådløse kort fast med afstandsstykket. 5. (valgfri) Slut antennerne til dit trådløse kort. 6. (valgfri) Organiser dine antennekabler med kabelholderklemmerne. BEMÆRKNINGER: • Hvis antennerne sluttes til dit trådløse kort, kan det muligvis styrke det trådløse signal. • En blød kliklyd betyder, at antennen er spændt ordentligt fast på det trådløse kort.
7. Sæt aluminiumspladen, som du fjernede tidligere, på igen, og spænd den fast med tre skruer. BEMÆRK: Hvis der ikke er sat en aluminiumsplade i fra fabrikken, burde der følge en med din Mini PC. Før aluminiumspladen sættes i, skal du sørge for at plastikfilmen på termopuderne på begge sider af aluminiumspladen er blevet fjernet.
8. (valgfri) Sæt M.2 SSD-modulet i, hvis du har taget det ud.
PN-Serien
TPM 4
Om TPM Systemet har 2 TPM-muligheder: Firmware TPM (fTPM) og den diskrete TPM (dTPM). dTPM er en indbygget chip. Tilgængeligheden af den indbyggede dTPM chip kan variere fra model til model. BEMÆRKNINGER: • fTPM understøttes som standard, men er muligvis ikke aktiveret. Du kan finde flere oplysninger om aktivering af TPM på www.asus. com/support. • dTPM er ekstraudstyr, som fås på udvalgte modeller. Du kan se, om dit system har dTPM på følgende måder: • Brug af appen Windows Security a.
Tillæg
Sikkerhedsinformation Din Mini PC konstrueret og testet til at opfylde de seneste sikkerhedsstandarder for informationsteknologiudstyr. Af hensyn til din sikkerhed er det imidlertid vigtigt, at du læser nedenstående sikkerhedsinstruktioner. • Batterier må ikke sluges. Fare for kemisk forbrænding. • Dette produkt indeholder et knapcellebatteri. Hvis mønt-/knapcellebatteriet sluges, kan det føre til alvorlige indre forbrændinger på kun 2 timer, hvilket kan være livsfarligt.
Installation af systemet • Læs og følg alle dokumentationens anvisninger, inden du bruger systemet. • Brug ikke produktet nær vand eller varmekilder. • Anbring systemet på en stabil overflade. • Dækslets åbninger er til ventilation. Disse åbninger må ikke blokeres eller tildækkes. Sørg for rigeligt med ventilationsrum omkring systemet. Anbring aldrig noget i ventilationsåbningerne. • Anvend produktet i omgivelser med temperaturer på mellem 0 ˚C (32 ˚F) og 35 ˚C (95 ˚F).
• Undgå kontakt med de varme dele i enheden. Under drift bliver nogle dele varme nok til at brænde huden. Inden du åbner enhedsdækslet, skal du slukke for enheden, afbryde strømmen og vente ca. 30 minutter på, at delene afkøles. • Hvis batteriet bortskaffelse i ild eller i en varm ovn eller ved mekanisk knusning, eller hvis det skæres op, kan det føre til en eksplosion. • Hvis et batteri efterlades i et område med høj varme, kan det føre til en eksplosion eller lækage af brændbart væske eller gas.
Regulative bemærkninger BEMÆRKNING TIL BELÆGNINGEN VIGTIGT! For at give enheden en elektrisk isolering og bibeholde sikkerhed omkring elektricitet, er hele computer-kabinettet belagt med en isolering, undtagen siderne hvor IO-portene findes. Federal communications commission erklæring Denne enhed opfylder FCC reglerne, del 15.
VIGTIGT! Det er ulovligt at bruge enheden udendørs på frekvensbåndet 5,15 ~ 5,25. Denne enhed har ingen Ad-hockapaciteter til 5250~5350 og 5470~5725 MHz. Advarsel fra FCC om radiofrekvenser ADVARSEL! Alle ændringer og modifikationer, der ikke udtrykkeligt er godkendt af den ansvarshavende, kan ugyldiggøre brugerens ret til at betjene udstyret.
Advarsel fra ISED om Wi-Fi 6E (RLAN-enheder) Enheder må ikke bruges til styring af eller kommunikation med ubemandede luftfartøjssystemer. Les dispositifs ne doivent pas être utilisés pour commander des systèmes d’aéronef sans pilote ni pour communiquer avec de tels systèmes. HDMI-varemærke meddelelse Varemærkerne HDMI, HDMI High-Definition Multimedia Interface og HDMI-logoet er varemærker eller registrerede varemærker tilhørende HDMI Licensing Administrator, Inc.
Overensstemmelseserklæring for produkt miljøforordning ASUS følger det grønne designkoncept i forbindelse med design og fremstilling af vores produkter og sikrer, at hvert eneste trin i ASUSprodukternes livscyklus er i overensstemmelse med de globale miljøbestemmelser. Derudover offentliggør ASUS relevante oplysninger baseret på lovgivningskravene. Se https://csr.asus.com/Compliance.htm for offentliggørelse af oplysninger baseret på lovgivningskravene, som ASUS har overholdt.
ASUS-genbrug/returneringstjenester ASUS-genbrugs- og returneringsprogrammer er baseret på vores ønske om at leve op til de højeste standarder for beskyttelse af miljøet. Vi tror på at skabe løsninger, hvor du er i stand til på ansvarlig vis at genbruge vores produkter, batterier, andre komponenter og emballage. Gå til https://csr.asus.com/english/Takeback.htm for nærmere oplysninger om genbrug i forskellige regioner.
Produktet opfylder kravene i ENERGY STAR® ENERGY STAR® er et fælles program under U.S. Environmental Protection Agency og U.S. Department of Energy og hjælper os alle med at spare penge og beskytte miljøet via energieffektive produkter og -praksisser. Alle ASUS-produkter med ENERGY STAR®-logoet overholder ENERGY STAR®-standarden, og ENERGY STAR®-funktionen er som standard aktiveret. Skærmen indstilles automatisk til at gå i dvale inden for 10 minutter uden brug.
Forenklet EU-overensstemmelseserklæring ASUSTek Computer Inc. erklærer hermed, at denne enhed overholder de væsentlige krav og andre relevante bestemmelser i direktiv 2014/53/EU. Den fulde ordlyd af EU-overensstemmelseserklæringen findes på https://www.asus.com/support/. Den wi-fi-funktionalitet, der er i båndet 5150-5350 MHz, begrænses til indendørs brug i de lande, der er angivet i nedenstående tabel: a.
Bemærkning om Wi-Fi-netværk VIGTIGT! Udvalgte modeller er udstyret med et Wi-Fi 6E netværkskort. Wi-Fi 6E-båndet forbindes på forskellige måder i henhold til reglerne og certificeringen i landet/området. Service og Støtte Besøg vores flersprogede websted: https://www.asus.com/support/.