ASUS Mini PC Серії PN53-S1 Посібник користувача
UA21929 Перше Видання Серпень 2023 Інформація про авторські права Жодна частина цього посібника, включаючи описані в ньому вироби і ПЗ, без письмового дозволу ASUSTeK COMPUTER INC. (ASUS) не може бути відтворена, передана, переписана, збережена у файлообмінній системі або перекладена іншою мовою у будь-якій формі будь-яким способом, крім документації, яку зберігає користувач як довідковий матеріал.
Зміст Про цей посібник..................................................................................................................5 Позначки, що використовуються у цьому посібнику..........................................6 Шрифти.....................................................................................................................................6 Комплектація..........................................................................................................................
Зміст TPM Про TPM.....................................................................................................................................38 Додатки Заходи безпеки......................................................................................................................40 Налаштування системи.....................................................................................................41 Догляд під час використання................................................................
Про цей посібник У цьому посібнику наведена інформація про апаратне та програмне забезпечення для ПК, що поділяється на такі розділи: Розділ 1. Знайомство з пристроєм Mini PC У цьому розділі детально описані компоненти ПЗ для пристрою Mini PC. Розділ 2. Використання пристрою Mini PC У цьому розділі наведена інформація про використання пристрою Mini PC. Розділ 3.
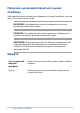
Позначки, що використовуються у цьому посібнику Щоб виділити критично важливу інформацію у цьому посібнику, частини тексту позначені таким чином. ВАЖЛИВО! Це повідомлення містить інформацію, критично важливу для виконання задачі. ПРИМІТКА. Це повідомлення містить додаткову інформацію та підказки, які можуть допомогти виконати задачі.
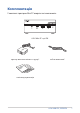
Комплектація У комплект пристрою Mini PC входять такі компоненти: ASUS Mini PC серії PN адаптер живлення змінного струму* кабель живлення* технічна документація ASUS MINI PC, СЕРІЯ PN 7
ПРИМІТКИ. • Найточніші технічні характеристики виробу на поточний момент можна завантажити з www.asus.com. • Зображення продукту і аксесуарів наведені тільки з метою ілюстрації. Фактичний вигляд і характеристики можуть відрізнятись в залежності від моделі. • *Комплектний адаптер живлення може відрізнятися залежно від моделі та країна (або регіон) продажу. • Деякі аксесуари з комплекту постачання можуть відрізнятися залежно від моделі.
1 Знайомство з пристроєм Mini PC
Особливості Передня панель Кнопка живлення Кнопка живлення надає можливість вмикати і вимикати Mini PC. Кнопкою живлення можна переводити Mini PC у режим сну або натискати її протягом чотирьох (4) секунд, щоб примусово вимкнути систему Mini PC. Роз’єм гарнітури/навушників/мікрофона До цього роз’єму можна підключити динаміки з підсиленням або гарнітуру. Також можна користуватися цим роз’ємом для підключення гарнітури або зовнішнього мікрофона.
Комбінований порт USB 3.2 Gen 2 Type-C® / DisplayPort Цей порт USB Типу C® (універсальної серійної шини) надає наступне: • Швидкість передачі до 10 Гбіт/сек. • Підтримує Display port 1.2. Для підключення зовнішнього дисплея до Mini PC використовуйте адаптер USB Типу C®. • Енергопостачання USB з виходом макс. 5 В / 3 A. ПРИМІТКА. Коли ви користуєтеся лише цим портом як джерелом виходу для дисплею, він підтримуватиме роздільну здатність до 3840 x 2160 на 60 Гц .
Ліва панель Вентиляційні отвори (впускні) Через ці вентиляційні отвори до корпусу Mini PC потрапляє холодне повітря. ВАЖЛИВО! Для забезпечення оптимального розподілу тепла та вентиляції слід упевнитися, що вентиляційні отвори не заблоковані.
Права панель Вентиляційні отвори (впускні) Через ці вентиляційні отвори до корпусу Mini PC потрапляє холодне повітря. ВАЖЛИВО! Для забезпечення оптимального розподілу тепла та вентиляції слід упевнитися, що вентиляційні отвори не заблоковані. Замок Kensington Замок Kensington надає можливість закріпити портативний Mini PC сумісними з Kensington® пристроями безпеки.
Задня панель Порт HDMI Порт HDMI (High Definition Multimedia Interface) підтримує виведення зображення у форматі Full HD на такі пристрої, як РК-телевізори або монітори. За їх допомогою можна переглядати зображення на великому зовнішньому дисплеї. ПРИМІТКА. Коли ви користуєтеся лише цим портом як джерелом виходу для дисплею, він підтримуватиме роздільну здатність до 4096 x 2160 на 60 Гц . На роздільну здатність можуть впливати кабелі та пристрій виходу.
Порт зі змінною конфігурацією Цей порт відрізняється залежно від моделі і може мати таку функціональність: Порт VGA (лише на окремих моделях) Цей порт надає можливість підключати до Mini PC зовнішній дисплей. ПРИМІТКА. Коли ви користуєтеся лише цим портом як джерелом виходу для дисплею, він підтримуватиме роздільну здатність до 1920 x 1200 на 60 Гц . На роздільну здатність можуть впливати кабелі та пристрій виходу.
Комбінований порт USB 3.2 Gen 2 Type-C® / DisplayPort Цей порт USB Типу C® (універсальної серійної шини) надає наступне: • Швидкість передачі до 10 Гбіт/сек. • Підтримує Display port 1.2. Для підключення зовнішнього дисплея до Mini PC використовуйте адаптер USB Типу C®. • Енергопостачання USB з виходом макс. 5 В / 3 A. ПРИМІТКА. Коли ви користуєтеся лише цим портом як джерелом виходу для дисплею, він підтримуватиме роздільну здатність до 3840 x 2160 на 60 Гц .
2 Використання пристрою Mini PC
Початок експлуатації Підключення адаптера живлення змінного струму до пристрою Mini PC Підключення адаптера живлення змінного струму до пристрою Mini PC: A. Підключіть шнур живлення змінного струму до адаптера змінного струму. B. Підключіть сполучувач живлення постійного струму до вхідного порту живлення (постійного струму) на пристрої Mini PC. C. Увімкніть адаптер живлення змінного струму до джерела живлення 100~240 В. ПРИМІТКА.
ВАЖЛИВО! • Наполегливо радимо використовувати лише адаптер живлення змінного струму та кабель, що входять в комплект пристрою Mini PC. • Наполегливо радимо використовувати заземлену настінну розетку для пристрою Mini PC. • Розетка електромережі повинна бути легкодоступною та знаходитися поруч із пристроєм Mini PC. • Щоб відключити пристрій Mini PC від основного джерела живлення, відключіть пристрій Mini PC від електромережі.
Підключення дисплея до пристрою Mini PC Ви можете підключити дисплей або проектор до пристрою Mini PC, що має такі відеовходи: • Сполучувач VGA • Сполучувач HDMI • DisplayPort • Сполучувач USB Типу C® ПРИМІТКИ: Ці порти можуть відрізнятися залежно від моделі.
ПРИМІТКИ. • Можна підключити до чотири панелей дисплею – залежно від моделі та вибраних опцій*. Проте організувати одночасний показ можна максимум на три. • Якщо використовувати один із портів, наведених нижче як єдине джерело виведення зображення, він надає вказану мак симальну роздільну здатність**. - Порт HDMI Підтримує роздільну здатність до 4096 x 2160 з частотою оновлення 60 Гц. - Порт USB Типу C® Підтримує роздільну здатність до 3840 x 2160 з частотою оновлення 60 Гц.
Підключення дисплея до пристрою Mini PC: Підключіть один кінець кабелю HDMI, VGA, DisplayPort або USB Типу C® до зовнішнього дисплея, а інший кінець — до порту HDMI, VGA, DisplayPort або USB Типу C® пристрою Mini PC.
Підключення дисплея через порт DisplayPort Підключення дисплея через порт USB Типу C® ASUS MINI PC, СЕРІЯ PN 23
Підключення клавіатури або миші з інтерфейсом USB Ви можете підключити до пристрою Mini PC практично будь-яку клавіатуру або мишу з інтерфейсом USB. Ви можете також підключити USB-адаптер з комплекту бездротової клавіатури та миші. Підключення клавіатури та миші до пристрою Mini PC: підключіть USB-кабель клавіатури або миші до будь-якого порту USB пристрою Mini PC. ПРИМІТКА. Клавіатура різниться залежно від країни (або регіону) продажу.
Увімкнення пристрою Mini PC Щоб увімкнути пристрій Mini PC, натисніть кнопку живлення.
Вимкнення пристрою Mini PC Якщо пристрій Mini PC не реагує, натисніть та утримуйте кнопку живлення щонайменше чотири (4) секунди, доки пристрій не вимкнеться.
Відновлення типових налаштувань BIOS Щоб відновити типове значення для кожного з параметрів BIOS: 1. Увійдіть до BIOS, натискаючи або на екрані POST. ПРИМІТКА. POST (Самоперевірка після подачі живлення) – це серія діагностичних тестів, контрольованих ПЗ, яка запускається під час увімкнення пристрою Mini PC. 2. 3. 4. Перейдіть до меню Exit (Вихід). Виберіть опцію Load Optimized Defaults (Завантажити оптимізовані фабричні налаштування) або натисніть .
ASUS MINI PC, СЕРІЯ PN
Модернізація Mini PC 3
ВАЖЛИВО! • Встановлювати та замінювати модулі пам’яті, карту бездротового зв’язку або твердотільний диск (SSD) рекомендується під наглядом кваліфікованих фахівців. Щодо подальшої допомоги зверніться до сервісного центру ASUS. • Перш ніж починати роботу зі встановлення, переконайтеся, що у вас сухі руки.
3. Зніміть чотири (4) гвинти з нижньої кришки (А); щоб зняти нижню кришку (B), посуньте її вліво. Як установити на місце нижню кришку 1. Щоб установити нижню кришку в Mini PC (B), посуньте її зліва направо; потім прикріпіть її чотирма (4) гвинтами, які ви раніше вийняли (В).
Встановлення модулів пам’яті Пристрій Mini PC оснащений двома слотами SO-DIMM, що надають можливість установити два модулі оперативної пам’яті DDR4 формату SO-DIMM. ВАЖЛИВО! Див. на сайті https://www.asus.com список сумісних модулі оперативної пам’яті DDR4 формату SO-DIMM. У Mini PC можна встановлювати лише модулі пам’яті DDR4 формату SODIMM. Сумістіть та вставте модуль пам’яті в слот (A) та натискайте на нього (B), доки він не стане на місце. Повторіть ті ж кроки, щоб установити інший модуль пам’яті.
Встановлення 2,5-дюймового жорсткого або твердотільного диска 1. Підготуйте 2,5-дюймовий жорсткий або твердотільний диск, зрівняйте його з відсіком накопичувача внизу на нижній кришці Mini PC. 2. Вставте жорсткий або твердотільний диск до відсіку накопичувача (А), закріпіть його чотирма (4) гвинтами (В). ВАЖЛИВО! Цей пристрій підтримує лише жорсткий або твердотільний диск 7 мм, 2,5 дюйма.
Встановлення твердотільного диска (SSD) формату M2 (лише на окремих моделях) ПРИМІТКА. SSD формату M2 підтримується лише на окремих моделях. 1. Зрівняйте з роз’ємом у Mini PC і вставте до нього твердотільний диск формату M2 2280. 2. Обережно натисніть на твердотільний диск формату M2 2280 над отвором для гвинта і закріпіть його одним гвинтом 3 мм з комплекту.
Встановлення карти бездротового зв’язку ПРИМІТКА. Mini PC оснащений роз’ємом M.2 для бездротових (Wi-Fi) та Bluetooth-модулів форм-фактору M.2 2230. Див. на сайті https://www.asus.com список сумісних модулів. 1. (опціонально) Вийміть твердотільний диск M.2, якщо його встановлено. Щоб вийняти SSD формату M2, вийміть гвинти з отвору для нього, а потім вийміть диск. 2. Зрівняйте і вставте карту бездротового зв’язку до цього роз’єму в Mini PC. 3.
ПРИМІТКИ. • Підключення антен до карти бездротового зв’язку може посилити бездротовий сигнал. • Легке клацання означатиме, що антену надійно прикріплено до карти бездротового зв’язку.
TPM 4
Про TPM Система має дві (2) опції TPM: мікропрограма TPM (fTPM) або дискретний TPM (dTPM). dTPM - це вбудований чіп. Доступність вбудованого чіпа dTPM може відрізнятися залежно від моделі. ПРИМІТКИ. • fTPM підтримується за замовчуванням, проте може бути не активований. Більше інформації про активацію ТРМ подано на www.asus.com/support. • dTPM є додатковим, він доступний лише на вибраних моделях. Наступними методами можна перевірити, чи система має dTPM: • Додатком Windows Security a.
Додатки
Заходи безпеки Пристрій Mini PC розроблений та протестований відповідно до найновіших стандартів безпеки обладнання інформаційних технологій. Однак для вашої безпеки ви повинні прочитати викладені нижче інструкції з техніки безпеки. • Не ковтати батарею! Небезпека хімічного опіку! • Цей виріб містить батарею таблеткового типу. Якщо батарею таблеткового типу проковтнути, вона може спричинити важкі внутрішні опіки, і лише за 2 години призвести до смерті. • Бережіть від дітей нові та використані батареї.
Налаштування системи • Прочитайте усі інструкції, що містяться в цьому документі, та дотримуйтеся їх, перш ніж використовувати систему. • Цей пристрій заборонено використовувати біля води або нагрівачів. • Встановіть систему на стійку поверхню. • Отвори на корпусі призначені для вентиляції. Ці отвори не повинні бути заблоковані або закриті. Залиште достатньо вільного простору довкола системи для вентиляції. Заборонено вставляти будь-які предмети у вентиляційні отвори.
• • • • 42 Уникайте контакту із гарячими компонентами всередині пристрою. Під час роботи деякі компоненти розігріваються настільки, що можуть спричинити опіки шкіри. Перш ніж відкрити кришку пристрою, вимкніть його, відключіть живлення і дайте близько 30 хвилин на охолодження компонентів.
Нормативи Примітка про покриття ВАЖЛИВО! Для забезпечення електроізоляції та електробезпеки застосовують покриття для ізоляції всього корпусу пристрою, окрім панелей, на яких знаходяться порти введення-виведення. Заява Федеральної комісії зв’язку (США) Цей пристрій відповідає Частині 15 Правил федеральної комісії Зв’язку (США). Робота пристрою здійснюється за виконання наступних двох умов: • Цей пристрій не може викликати шкідливу інтерференцію.
ВАЖЛИВО! Заборонена робота просто неба у діапазоні 5,15~5,25 ГГц. Пристрій не має здатності працювати в режимі Adhoc для 5250~5350 і 5470~5725 МГц. Заява про застереження щодо радіочастот Федеральної Комісії Зв’язку (США) ОБЕРЕЖНО! Будь-які зміни або модифікації, не схвалені у письмовій формі стороною, відповідальною за дотримання норм, можуть призвести до втрати дозволу на користування приладом.
Зява про застереження ISED Wi-Fi 6E (пристрої RLAN) Пристрої не можна використовувати для контролю або комунікації з беспілотними літальними апаратами. Les dispositifs ne doivent pas être utilisés pour commander des systèmes d’aéronef sans pilote ni pour communiquer avec de tels systèmes. Примітка про торгову марку HDMI Назви HDMI, HDMI High-Definition Multimedia Interface та логотип HDMI є торговими марками або зареєстрованими торговими марками HDMI Licensing Administrator, Inc.
Заява про відповідність виробу екологічним вимогам ASUS впроваджує концепцію екологічного дизайну для проектування і виготовлення наших виробів та забезпечення дотримання глобальних екологічних норм на кожному етапі експлуатаційного періоду виробів ASUS. Також ASUS оприлюднює відповідну інформацію на основі нормативних вимог. Правила, яким відповідає виріб ASUS, вказано на веб-сайті https://csr.asus.com/Compliance.htm.
Послуги переробки і прийому спрацьованих виробів ASUS В основі програми переробки і прийому спрацьованих виробів ASUS - прагнення досягти найвищих стандартів захисту довкілля. Ми переконані, що можемо забезпечити Вас способами відповідально переробляти вироби, батареї та інші компоненти, а також і пакувальні матеріали. Детальна інформація щодо переробки у різних регіонах подана тут: https://csr.asus.com/english/Takeback.htm.
Виріб, сертифікований ENERGY STAR® ENERGY STAR® – це спільна програма Агенства Захисту Довкілля США і Департаментом Енергетики США, яка допомогає нам заощадити гроші та захищати довкілля завдяки енергоефективним виробам і заходам. Усі вироби ASUS із логотипом ENERGY STAR® відповідають стандарту ENERGY STAR®, і функція енергозбереження активована у них за промовчанням.
Спрощена декларація про відповідність нормам ЄС ASUSTek Computer Inc. заявляє, що цей пристрій відповідає основним вимогам та іншим відповідним вимогам Директиви 2014/53/EU. Повний текст декларації відповідності нормам ЄС доступний на веб-сайті https://www.asus.com/support/. Робота Wi-Fi на частоті 5150–5350 МГц обмежується використанням у приміщенні для країн, поданих у таблиці нижче: a.
Примітка про мережу Wi-Fi ВАЖЛИВО! Мережева карта Wi-Fi 6E доступна на певних моделях. З’єднання діапазону Wi-Fi 6E може різнитися залежно від нормативів і сертифікації кожної країни/регіону. Обслуговування і Підтримка Відвідайте наш багатомовний веб-сайт на https://www.asus.com/support/.