ASUS Hangouts Meet hardware kit User Guide
E15646 Revised Edition V3 July 2019 COPYRIGHT INFORMATION No part of this manual, including the products and software described in it, may be reproduced, transmitted, transcribed, stored in a retrieval system, or translated into any language in any form or by any means, except documentation kept by the purchaser for backup purposes, without the express written permission of ASUSTeK COMPUTER INC. (“ASUS”).
Contents About this user guide........................................................................................ 5 Package contents................................................................................................ 6 Getting to know your Chromebox Features................................................................................................................10 Front view...........................................................................................................
About this user guide This user guide provides information about the hardware and software features of your Hangouts Meet hardware kit, organized through the following chapters: Chapter 1: Getting to know your Chromebox This chapter details the hardware components of your Chromebox. Chapter 2: Using your Hangouts Meet hardware kit This chapter provides you with information on using your Chromebox Hangouts Meet.
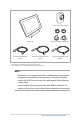
Package contents Your Hangouts Meet hardware kit package contains the following items: Chromebox VESA mounting plate Power cable* VESA mounting plate screw set AC power adapter* Technical documentations Camera Camera USB cable (Type-A to Type-C™) Speakermic Speakermic cable (Type-A to Micro USB) *The bundled power adapter may vary with territories.
Touchscreen power adapter Touchscreen Touchscreen HDMI cable (Green) Touchscreen adapter plug heads* Touchscreen USB power cable (Red) Touchscreen USB data cable (Blue)** * The bundled power adapter plug heads may vary with territories ** The bundled Touchscreen USB data cable (Blue) may vary with territories NOTE: • • If the device or its components fail or malfunction during normal and proper use within the warranty period, bring the warranty card to the ASUS Service Center for replacement of the
ASUS Hangouts Meet hardware kit
Getting to know your Chromebox 1
Features Front view Power button The power button allows you to turn the Chromebox on or off. You can use the power button to put your Chromebox to sleep mode or press it for four (4) seconds to force shutdown your Chromebox. Headphone/Headset/Microphone jack This port allows you to connect amplified speakers or headphones. You can also use this port to connect your headset or an external microphone. USB 3.1 Gen 1 port The USB 3.
Left side view Kensington security slot The Kensington security slot allows you to secure your Chromebox using Kensington® security products.
Rear view Air vents The air vents on the rear allow warm air to exit the Chromebox chassis. IMPORTANT: For an optimum heat dissipation and air ventilation, ensure that the air vents are free from obstructions. LAN port The 8-pin RJ-45 LAN port supports a standard Ethernet cable for connection to a local network. USB 3.1 Gen 1 port The USB 3.1 Gen 1 (Universal Serial Bus) port provides a transfer rate up to 5 Gbit/s. USB 2.
USB 3.1 Gen 1 port The USB 3.1 Gen 1 (Universal Serial Bus) port provides a transfer rate up to 5 Gbit/s. HDMI port The HDMI (High Definition Multimedia Interface) port supports a Full-HD device such as an LCD TV or monitor to allow viewing on a larger external display. Power input The supplied power adapter converts AC power to DC power for use with this jack. Power supplied through this jack supplies power to the Chromebox. To prevent damage to the Chromebox, always use the supplied power adapter.
ASUS Hangouts Meet hardware kit
Using your Hangouts Meet hardware kit 2
Getting started Connect a display panel to your Chromebox You can connect a display panel or projector that has the following connectors: • HDMI connector • DisplayPort (USB Type-C™) • DVI connector (used with an HDMI–DVI adapter) NOTE: • • The HDMI–DVI adapter is purchased separately. The Type-C™-HDMI cable is purchased separately. To connect a display panel to your Chromebox: Connect a display cable either to the HDMI port or the Type-C™ DisplayPort.
Connect the speakermic Connect the speakermic to a USB 3.1 Gen 1 port on the rear of your Chromebox. NOTE: Please refer to pages 31-32 for more information on the recommended USB 3.1 Gen 1 port to connect the speakermic to.
Connect the camera Connect the camera to a USB 3.1 Gen 1 port on the rear of your Chromebox. NOTE: Please refer to pages 31-32 for more information on the recommended USB 3.1 Gen 1 port to connect the camera to.
Connect the touchscreen To connect the touchscreen to your Chromebox NOTE: Ensure to use the Touchscreen USB data cable (Blue). A. Connect the Touchscreen USB data cable (Blue) to the data USB port on your touchscreen. B. Connect the touchscreen to a USB 3.1 Gen 1 port on the rear of your Chromebox. Ensure to connect the USB 3.1 Gen 1 connector to connect to your Chromebox. NOTE: Please refer to pages 31-32 for more information on the recommended USB 3.1 Gen 1 port to connect the touchscreen to.
To connect the AC power adapter of your touchscreen NOTE: Ensure to use the Touchscreen USB power cable (Red). A. Connect the Touchscreen USB power cable (Red) to the AC power adapter. B. Connect the Touchscreen USB power cable (Red) to the power USB port on your touchscreen. C. Attach the appropriate adapter plug head to the adapter, then plug the AC power adapter into a 100V~240V power source.
To connect the touchscreen for local presentations (optional) NOTE: Ensure to use the Touchscreen HDMI cable (Green). A. Connect the Touchscreen HDMI cable (Green) to the HDMI port on your touchscreen. B. Connect the touchscreen to a device’s (such as a laptop) HDMI out port for local presentations. WARNING! Do not connect the HDMI cable (Green) to your Chromebox.
Connect the AC power adapter to your Chromebox To connect the AC power adapter to your Chromebox: A. Connect the AC power cord to the AC/DC adapter. B. Connect the DC power connector into your Chromebox’s power (DC) input port. C. Plug the AC power cord into a 100V~240V power source. NOTE: The power adapter may vary in appearance, depending on models and your region.
IMPORTANT! • • • • We strongly recommend that you use only the AC power adapter that came with your Chromebox. We strongly recommend that you use a grounded wall socket while using your Chromebox. The socket outlet must be easily accessible and near your Chromebox. To disconnect your Chromebox from its main power supply, unplug your Chromebox from the power socket.
Turn on your Chromebox Press the power button to turn on your Chromebox. IMPORTANT! Ensure that all peripherals (speakermic, camera, touchscreen) and AC power adapter are connected properly before you turn on your Chromebox.
3 Configuring your Hangouts Meet hardware kit
Before you begin using your device for video conferencing Setup requirements Room size and setup Your Hangouts Meet hardware kit system is designed for a 2-10 person conference room. We recommend a room that contains either a long table with the monitor at one end (optimal), or a round table. We do not recommend using Chromebox with rooms set up in a classroom style.
Display requirements and placement Your Chromebox work with LCD, LED, plasma, and projectortype monitors and televisions. The display must have an HDMI or DisplayPort input. The screen resolution must be at least 1280 x 720 pixels. For best video quality, we recommend a resolution of 1920 x 1080 pixels. You can place the display on a table against one wall, or mount the display on a wall or ceiling for a projector unit. Note that if you mount the display, you may need to drill holes and conceal cables.
• Cable concealers, if needed for wall mounting NOTE: The cable concealers for wall mounting and CAT5e Ethernet cable are not included in the package and must be purchased separately. IMPORTANT! The included cable for the camera is 5 feet long, and the included cable for the speakermic is 3 feet long. If your setup of the display, Chromebox, and peripherals requires longer distances, you may need to purchase additional USB extension cables.
Recommended meeting room configuration 1 System setup CHROMEBOX MEET CAMERA VESA MOUNT DISPLAY CHROMEBOX CN65 (WITH VESA MOUNT MOUNTED TO DISPLAY) MICROPHONE & SPEAKER TOUCH PANEL DISPLAY RECOMENDED HEIGHT BETWEEN 750 - 1000mm [29 1 2" - 39 1 2"] OPTIONAL USB HUB CABLING (SURFACE/CONCEALED RUN) FRONT WALL EXAMPLE EQUIPMENT LAYOUT (FRONT WALL) Room layout example DISPLAY D note 1 120°note 2 MEET CAMERA (FRONT WALL) AUTOZOOM RANGE 3.5M (11'-6") NOTES: 1.
Recommended meeting room configuration 2 System setup CHROMEBOX MEET CAMERA MEET CAMERA DISPLAY DISPLAY MICROPHONE & SPEAKER TOUCH PANEL CREDENZA RECOMMENDED HEIGHT BETWEEN 750 - 1000mm [29 CHROMEBOX 1 2" - 39 1 CREDENZA 2"] OPTIONAL USB HUB FRONT WALL EXAMPLE EQUIPMENT LAYOUT CABLING (SURFACE/CONCEALED RUN) (FRONT WALL) Room layout example DISPLAY 120° (FRONT WALL) MEET CAMERA 30 ASUS Hangouts Meet hardware kit
Connect your cables Using the included cables and sensor, connect your Chromebox to the other system components: NOTE: The connections shown in the illustrations are recommended, you may adjust the connections accordingly to suit your needs. 1 1 2 3 1 2 3 4 5 6 7 Power port connects to a power outlet. IMPORTANT! Be sure to connect to a power outlet last, after you have made all the other connections. 4 2 DisplayPort connects a display with USB Type-C™ connector.
1 2 3 4 USB 3.1 Gen 1 port connects to the touchscreen 5 USB 3.1 Gen 1 port connects the speakermic assembly. 6 USB 3.1 Gen 1 port connects the camera. 7 LAN port connects to a router. NOTE: Although you can use your Chromebox device over a wireless network connection, we recommend using a wired network connection for optimal sound and video quality. You can find connection instructions for your specific model on the Hangouts Meet hardware kit product site.
Enroll your device Complete basic enrollment This section explains the basic enrollment flow, which works for almost all users. To learn about other options shown during the enrollment process, see Advanced enrollment options. NOTE: We recommend connecting a USB keyboard to make entering the enrollment information easier. To complete basic enrollment: 1. Turn on the display. 2. Turn on the Chromebox. 3. Verify or change your language, keyboard layout, and network.
4. Select Continue. 5. Accept the Google Chrome OS Terms. 6. Sign in with your Google Apps email address and password. 7. The enrollment process takes place automatically. After the process is complete, click Done. 8. When the Hangouts screen appears, follow the onscreen instructions to test your camera and speakermic. NOTE: If you can’t see video or hear audio during the test: Ensure that your camera and speakermic were connected to your Chromebox before you turned on your device.
Advanced enrollment options Users can go through the simple enrollment flow described in Complete basic enrollment to enroll their device. Additional options are available for users who want to customize the setup experience or learn more. These options appear on the second enrollment screen, except for accessibility, which appears on both the first and second screens: Accessibility: Accessibility options include larger font and cursor size, voice prompts, and more.
Manage devices and rooms You can view, modify and update your Chromebox and rooms through the Google Admin console. For more details on managing your devices and rooms, please visit the Chromebox Help website.
Troubleshooting
Fix a problem Manage devices and rooms I do not know how to identify the Chromebox device I want on the device list screen. If you are not sure which device to click, you can identify the correct one by its serial number. You can find your device’s serial number on the card that was included in the box and on the bottom of the device itself. Help and support Visit support.google.
Appendix
Safety information Your Chromebox is designed and tested to meet the latest standards of safety for information technology equipment. However, to ensure your safety, it is important that you read the following safety instructions. Setting up your system • • • • • • • 40 Read and follow all instructions in the documentation before you operate your system. Do not use this product near water or a heated source. Set up the system on a stable surface. Openings on the chassis are for ventilation.
Care during use • • • • Do not walk on the power cord or allow anything to rest on it. Do not spill water or any other liquids on your system. When the system is turned off, a small amount of electrical current still flows. Always unplug the power cord from the power outlets before cleaning the system. If you encounter the following technical problems with the product, unplug the power cord and contact a qualified service technician or your retailer. – The power cord or plug is damaged.
Regulatory notices REACH Complying with the REACH (Registration, Evaluation, Authorization, and Restriction of Chemicals) regulatory framework, we publish the chemical substances in our products at ASUS REACH website at http://csr.asus.com/english/REACH.htm ASUS Recycling/Takeback Services ASUS recycling and takeback programs come from our commitment to the highest standards for protecting our environment.
If this equipment does cause harmful interference to radio or television reception, which can be determined by turning the equipment off and on, the user is encouraged to try to correct the interference by one or more of the following measures: • • • • Reorient or relocate the receiving antenna. Increase the separation between the equipment and receiver. Connect the equipment to an outlet on a circuit different from that to which the receiver is connected.
Compliance Statement of Innovation, Science and Economic Development Canada (ISED) This device complies with Innovation, Science and Economic Development Canada licence exempt RSS standard(s). Operation is subject to the following two conditions: (1) this device may not cause interference, and (2) this device must accept any interference, including interference that may cause undesired operation of the device.
Regional notice for Singapore Complies with IMDA Standards DB103778 This ASUS product complies with IMDA Standards. ENERGY STAR complied product ENERGY STAR is a joint program of the U.S. Environmental Protection Agency and the U.S. Department of Energy helping us all save money and protect the environment through energy efficient products and practices. All ASUS products with the ENERGY STAR logo comply with the ENERGY STAR standard, and the power management feature is enabled by default.
India RoHS This product complies with the “India E-waste (Managemen) Rules 2016” and prohibits use of lead, mercury, hexavalent chromium, polybrominated biphenyls (PBBs), and polybrominated diphenyl ethers (PBDEs) in concentrations exceeding 0.1 % by weight in homogenous materials and 0.01 % by weight in homogenous materials for cadmium, except for the exemptions listed in Schedule II of the Rule. Précautions d’emploi de l’appareil : a.
Manufacturer ASUSTeK Computer Inc. Tel: +886-2-2894-3447 Address: 4F, No. 150, LI-TE RD., PEITOU, TAIPEI 112, TAIWAN Authorised ASUSTeK Computer GmbH representative in Address: HARKORT STR.
ASUS contact information ASUSTeK COMPUTER INC. Address Telephone Fax Web site 4F, No. 150, Li-Te Road, Peitou, Taipei 112, Taiwan +886-2-2894-3447 +886-2-2890-7798 www.asus.com Technical Support Telephone +86-21-38429911 Fax +86-21-5866-8722, ext. 9101# Online support https://www.asus.com/support/Product/ContactUs/Services/ questionform/?lang=en ASUS COMPUTER INTERNATIONAL (America) Address Telephone Fax Web site Technical Support Support fax Telephone Online support 48720 Kato Rd.
FCC COMPLIANCE INFORMATION Per FCC Part 2 Section 2.1077 Responsible Party: Address: Phone/Fax No: Asus Computer International 48720 Kato Rd, Fremont, CA 94538 (510)739-3777/(510)608-4555 hereby declares that the product Product Name : Model Number : Thin Client Chromebox 3 compliance statement: This device complies with part 15 of the FCC Rules.
ASUS Hangouts Meet hardware kit