LED 投影機 使用手冊 S2 系列
T14596 第一版 2019 年 2 月 版權說明 ©ASUSTeK Computer Inc. All rights reserved.
目錄 關於本使用手冊................................................................................................. 5 訊息 ............................................................................................................... 6 多國語言版本 .................................................................................................... 6 安全性須知 .......................................................................................................... 7 使用注意事項 ....................................................
第三章:使用 OSD 選單 第一次使用 LED 投影機 ................................................................................40 調整您的 LED 投影機設定 ...........................................................................41 從 OSD 選單裡啟動程式 ...............................................................................42 Image(影像) ...............................................................................................42 Display(顯示) ............................................................................................
關於本使用手冊 本使用手冊提供您關於 LED 投影機的硬體資訊與軟體功能,內容 則是由下面幾個章節所組成: 第一章:認識您的 LED 投影機 本章節介紹關於 LED 投影機與附帶遙控器的各部說明。 第二章:設定 本章節將告訴您如何設定 LED 投影機與如何連接輸入設備。 第三章:使用 OSD 選單 本章節介紹如何使用 LED 投影機的 OSD(on screen display ,螢幕顯示)選單,以及如何使用控制面板進行瀏覽。 附錄 本章附錄將介紹包含有關 LED 投影機的安全注意事項。 LED 投影機使用手冊 5
訊息 為了強調手冊中的重要資訊,訊息說明會以下列方式呈現: 重要!本訊息包含必須遵守才能完成工作的重要資訊。 說明:本訊息包含助於完成工作的額外資訊與提示。 警告!本訊息包含在特定工作時必須遵守以維護使用者安全以及避免造 成 LED 投影機的資料與組件毀損的重要資訊。 多國語言版本 請至華碩服務網 http://support.asus.
安全性須知 使用注意事項 • 在您使用 LED 投影機前,請先閱讀並依照使用手冊上的說明 操作。 • 請注意本使用手冊內的注意事項與警告說明。 • 請勿將 LED 投影機放置在不平或不穩的表面上。 • 請不要在有煙霧的環境中使用 LED 投影機。煙霧殘留物可能 會聚積在重要元件並造成 LED 投影機的損壞,或降低其使用 效能。 • 請將 LED 投影機的塑膠包裝擺放在幼童接觸不到的地方。 • 請勿阻塞 LED 投影機的通風孔或在其附近擺放任何物品。這 麼做會導致內部散熱聚集而無法正常排出,可能會影響影像 輸出品質與造成投影機損壞。 • 請確認 LED 投影機的工作電壓與電源電壓相符合。 維修與元件更換 • 請勿自行拆卸或嘗試維修 LED 投影機。如有需要請聯繫您當 地的華碩服務中心以尋求協助。 • 當需要更換特定華碩 LED 投影機元件、購買套件時,請聯繫 您當地的華碩服務中心以尋求協助。 LED 投影機使用手冊 7
保養您的投影機 • 在清潔 LED 投影機之前,請先關機並從電源插座上拔除電源 線。 • 當清潔 LED 投影機的外殼時,請用乾淨且蘸有水或水與中性 清潔劑混合的清潔劑進行清潔,然後再用乾的軟布拭乾。 • 請確認鏡頭冷卻後再進行清潔。使用拭鏡紙輕輕擦拭鏡頭, 並勿讓手觸摸到鏡頭。 • 請勿在 LED 投影機上倒液體或噴霧型清潔劑、苯或稀釋劑。 • 請勿在剛使用過 LED 投影機並移出時,便將機器放置在寒冷 的地方。當 LED 投影機遇到急劇的溫度變化時,濕氣可能會 凝結在鏡頭或其他內部的零件上。為了避免這種情況,建議 間隔 2 小時才變換至極端或突然有溫度變化的環境中。 正確的回收處裡 請勿將本 LED 投影機當作一般垃圾丟棄。本產品零組件 設計為可回收利用。這個打叉的垃圾桶標誌表示本產品 (電器與電子設備)不應視為一般垃圾丟棄,請依照您 所在地區有關廢棄電子產品的處理方式處理。 請勿將內含汞的電池當作一般垃圾丟棄。這個打叉的垃 圾桶標誌表示電池不應視為一般垃圾丟棄。 8 LED 投影機使用手冊
第一章: 認識您的 LED 投影機 第一章:認識您的 LED 投影機 LED 投影機使用手冊 9
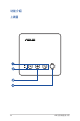
功能介紹 上視圖 10 LED 投影機使用手冊
電源指示燈與電池狀態指示燈 此 LED 指示燈為 LED 投影機在下列狀態時的燈號指示: • 當 LED 投影機開機時,會亮燈顯示。 • 當顯示綠燈或紅燈時,則為顯示電池充電時的狀態。 此 LED 指示燈在電池供電模式下,則顯示電池容量的狀 態,詳細說明請參考以下表格: 顏色 狀態 綠色恆亮 LED 投影機連接外接電源,或在電池 模式下運作,且電池電力大於 25%。 紅色恆亮 LED 投影機僅在電池模式下運作,且 電池電力不超過 25%。 電池充電指示燈 此 LED 指示燈亮燈時,表示 LED 投影機已連接電源線充 電。 重要!請使用包裝盒內容物中的電源變壓器為 LED 投影機充 電。 LED 投影機使用手冊 11
控制面板按鈕 這些按鈕所對應在 LED 投影機上的功能,如下所示: 梯形修正 輸入 返回/Splendid 操縱桿 這個操縱桿可以讓您瀏覽與選擇螢幕上顯示的選單設定, 其所對應在 LED 投影機上的功能,如下所示: 主選單/確定 調焦環 音量 (向中間輕推) (向上或向下移動) (向左或向右移動) 說明:欲了解更多有關使用 LED 投影機的設定,請參考本使用 手冊 使用 OSD 選單 章節的說明。 12 LED 投影機使用手冊
前視圖 雷射對焦 雷射對焦有助於測量 LED 投影機與牆壁之間的距離,以實 現自動對焦功能。 鏡頭 鏡頭會投射出您所連接裝置裡的視訊或圖片檔案。 重要!請勿將手或尖銳物品接觸到鏡頭。 LED 投影機使用手冊 13
後視圖 音效輸出孔 此插孔可讓您將 LED 投影機連接至擴音喇叭或耳機。 HDMI 連接埠 HDMI(High-Definition Multimedia Interface,高畫質多媒 體介面)是未經壓縮全數位化的音效/影音訊號介面,提 供與 MHL(Mobile HI-Definition Link,行動高畫質連結技 術)相容的裝置,此連接埠支援 HDCP 標準的 HD DVD、 Blu-ray(藍光)與其他受保護的內容播放。 USB Type-A 電源輸出埠 此電源輸出埠適用的輸出電壓為 5V/1A。您也可以在使用 LED 投影機時透過此埠連接行動裝置來充電。 14 LED 投影機使用手冊
USB 3.1 Gen 2 Type-C™ DisplayPort/Power Delivery 複合 連接埠 使用 USB Type-C™ 變壓器將您的 LED 投影機連接至相容裝 置以串流多媒體內容。當電源連接至電源(DC)輸入埠 時,此電源輸出埠輸出電壓與電流可提供高達 5V/1.5A。 您也可以在使用 LED 投影機時透過此埠連接行動裝置來充 電。 說明:請確認使用經 USB-IF 認證的 USB 纜線,且符合 USB 3.
左視圖 電源(DC)輸入埠 將產品所附的電源變壓器插入插孔,可以充電也可以供應 投影機使用時的電力。 警告!此電源變壓器在使用時可能會發熱,請勿在上面覆蓋任 何物品,當它連接至電源插座時,請將其遠離您的身 體。 重要!請使用包裝盒內容物中的電源變壓器為 LED 投影機充 電。 通風孔 此通風孔讓冷空氣流入並將熱空氣排出 LED 投影機。 警告!請勿將紙張、書本、衣物、排線或其他物品阻擋到通風 孔,否則可能會發生過熱的情況。 16 LED 投影機使用手冊
右視圖 通風孔 此通風孔讓冷空氣流入並將熱空氣排出 LED 投影機。 警告!請勿將紙張、書本、衣物、排線或其他物品阻擋到通風 孔,否則可能會發生過熱的情況。 LED 投影機使用手冊 17
底視圖 三腳架插孔 您可以使用此插孔安裝三腳架來支撐 LED 投影機。 內建支撐架 LED 投影機內見的支撐架,提供您 4.5 度或 9.
延伸功能 此款 LED 投影機亦具備單機功能,該功能為在 LED 投影機使用電池模 式並按下 返回 / Splendid 按鈕時使用。 手電筒 使用此功能時,LED 投影機會顯示穩定的白光。 返回/Splendid 按鈕 請依照以下方式,將 LED 投影機當成手電筒使用: 1. 移除連接在 LED 投影機上的所有周邊裝置,然後按下電源鍵 開啟。 2. 按下 LED 投影機面板上的 按鈕,以執行 NO SIGNAL (無訊號)顯示。 3.
緊急照明燈模式 使用此功能時,LED 投影機會閃爍白光。 返回/Splendid 按鈕 請依照以下方式,將 LED 投影機當成緊急照明燈使用: 1. 移除連接在 LED 投影機上的所有周邊裝置,然後按下電源鍵 開啟。 2. 按下 LED 投影機面板上的 ,以執行 NO SIGNAL(無訊 號)顯示。 3.
LED 投影機遙控器 說明:產品樣式視機型而定。 電池盒 電池盒可讓您安裝一顆 CR2032 鈕扣型鋰電池,以提供 LED 投影機的遙控器使用。 說明:如欲了解更多關於電池盒的使用,請參考本使用手冊的 更 換電池 章節中的說明。 LED 投影機使用手冊 21
遙控器按鈕 這些額外的按鈕可以讓您在最遠 8 公尺內的距離操作 LED 投 影機。 電源 - 按下此按鈕可以開啟或關閉您的 LED 投影 機。 自動對焦 - 按下此按鈕可以自動對焦畫面。 返回 - 按下此按鈕可以回到上一個畫面。 梯形修正 - 按下此按鈕可以修正投影畫面失真變形 的影像角度。 輸入 - 按下此按鈕可以更換輸入來源。 降低音量 - 按下此按鈕可以減少音量大小。 增加音量 - 按下此按鈕可以增加音量大小。 增加對焦/向上 - 按下此按鈕可以增加對焦或向上 移。 降低對焦/向下 - 按下此按鈕可以減少對焦或向下 移。 向左 - 按下此按鈕可以向左移。 向右 - 按下此按鈕可以向右移。 主選單/確定 - 按下此按鈕可以開啟選單或確認選 單選擇。 說明:欲了解更多有關使用 LED 投影機的設定,請參考本使用手 冊 使用 OSD 選單 章節的說明。 22 LED 投影機使用手冊
更換電池 A. 移動電池盒上面的鎖扣至開啟的位置。 B. 接著順勢將電池盒朝箭頭方向拉出外部,以脫離電池槽。 C.
D.
第二章: 設定 第二章:設定p LED 投影機使用手冊 25
操作 LED 投影機 此便攜式 LED 投影機提供插入與播放裝置,讓您輕易地開啟多媒 體檔案,並從內建的 SonicMaster 喇叭聆聽音樂,以及享受透過 Wi-Fi 功能投影至螢幕上的觀賞體驗。 為了維護您的安全並保持本產品的品質,當操作 LED 投影機時, 請參考以下的步驟進行操作 LED 投影機。 連接 LED 投影機至電源變壓器 A. 將 AC/DC 電源線連接至電源變壓器。 B. 連接 AC(交流)電源線至電源插座。 C. 連接 DC(直流)電源線至 LED 投影機。 電源變壓器資訊: - 輸入電壓:100-240Vac - 輸入頻率:50-60Hz - 輸出電流:3.42A max.
重要! • 請使用產品內附的電源線來充電與提供 LED 投影機連接供電使 用。 • 請在 LED 投影機首次開機前,將電源變壓器連接妥當。強烈建 議您將 LED 投影機的電源變壓器連接至具有接地作用的電源插 座。 • 請選擇靠近 LED 投影機並方便連接的電源插座。 • 若要中斷 LED 投影機的主電源,請從電源插座上拔下 LED 投影 機的電源變壓器。 警告! 請閱讀以下有關 LED 投影機電池的注意事項: • 電池使用時效會因環境溫度、濕度以及 LED 投影機的實際使用 情況而定。 • 若自行將本裝置的電池移除或拆卸,可能會導致火災或化學燃 燒的危險。 • 請遵守人身安全警示標誌。 • 若更換不正確的電池型號,可能會導致爆炸的危險。 • 切勿丟棄在火中。 • 請勿試圖讓 LED 投影機電池短路。 • 請勿試圖拆解和重組電池。 • 若發現漏液情形,請停止使用。 • 電池與其組件必須正確回收或處置。 • 請將電池與其他小元件遠離兒童。 LED 投影機使用手冊 27
AC(交流)電源線需求 根據您所在的地區使用正確的 AC 電源插頭類型。 重要!若產品所附的 AC 電源線並不符合所在地區的規格,請與您的經 銷商連絡。 說明:強烈建議使用具備接地功能插頭的視訊來源裝置,以防止電壓突 波的訊號干擾。 28 適用澳洲與中國 適用美國、加拿大與台灣 適用歐洲 適用英國 LED 投影機使用手冊
連接 LED 投影機至裝置 A.
B.
C.
D. 32 USB 3.
E. USB 3.1 Gen 2 Type-C™ Power Delivery 輸出(5V/1.
調整 LED 投影機的高度 此 LED 投影機配備一組支撐架,可以協助您在投影時調整顯示螢 幕高度。 警告!將 LED 投影機放入手提包之前,請先確認已完全收回支撐架。 說明: • 將 LED 投影機擺放在平穩的表面上。 • 在 LED 投影機兩側保持至少 30 公分或更多的空間。 • 如需要特殊方式安裝,如將 LED 投影機懸掛在天花板上時,請諮詢 您的經銷商。 4.5o 9.
調整螢幕影像尺寸與距離對照表 請參考以下的表格來調整 LED 投影機投影的影像尺寸。 螢幕大小 LED 投影機 投影距離 螢幕尺寸 螢幕對角線 寬度 高度 投影距離 (吋) (公釐) (吋) (公釐) (吋) (公釐) (吋) (公釐) 60 1524 52.28 1328 29.41 747 59.06 1500 70 1778 61.02 1550 34.33 872 68.90 1750 80 2032 69.72 1771 39.21 996 78.74 2000 90 2286 78.43 1992 44.13 1121 88.58 2250 100 2540 87.17 2214 49.02 1245 98.43 2500 110 2794 95.87 2435 53.94 1370 108.27 2750 120 3048 104.61 2657 58.82 1494 118.
按下電源按鈕 3s 36 LED 投影機使用手冊
調整影像焦距 向上或向下按下 LED 投影機上的調焦按鈕,或是按下遙控器上的 對焦按鈕以調整影像焦距。 說明:請用靜態圖片來調整螢幕顯示。 OR LED 投影機使用手冊 37
LED 投影機使用手冊
第三章: 使用 OSD 選單 第三章: 使用 OSD 選單 LED 投影機使用手冊 39
說明:以下的擷取畫面僅供參考,畫面若有更新恕不另行通知。請依照 您 LED 投影機上顯示的為準。 第一次使用 LED 投影機 當您第一次使用 LED 投影機時,請參考以下的步驟操作。 說明:首次啟用前,請先確認您的 LED 投影機已連接至電源變壓器。 強烈建議當您的 LED 投影機在電源變壓器模式下,使用入牆式 插座。 1. 設定 LED 投影機並按下電源按鈕。 2. 向左或向右移動 LED 投影機的操縱桿以瀏覽可選擇的語言。 3. 當您選擇好欲顯示的語言後,輕按操縱桿中間(或是按下 遙控器上的 主選單/確認 按鈕)以設定 LED 投影機顯示的語 言。 4.
調整您的 LED 投影機設定 請參考以下的步驟操作以調整您的 LED 投影機設定。 1. 按下 LED 投影機的操縱桿中間(或是按下遙控器上的 主選單 /確認 按鈕)以啟用 OSD 選單裡的選項。 2. 向上或向下移動操縱桿(或是按下遙控器上的 增加對焦/向 上 或 降低對焦/向下 按鈕)以選擇您欲調整的選項。 3. 按下 LED 投影機的操縱桿中間(或是按下遙控器上的 主選單/確認 按鈕)以開啟選項的設定。 4. 向左或向右移動操縱桿(或是按下遙控器上的 左 或 右 按 鈕)以依據您的喜好調整設定。 5.
從 OSD 選單裡啟動程式 Image(影像) 此選單裡的選項可以讓您調整投影機的投影畫面。 • Splendid - 此選項可以選擇 LED 投影機的 Splendid 模式。 • Brightness(亮度) - 選擇此選項可以調整投影機投影畫面 的亮度。 • Contrast(對比) - 選擇此選項可以調整投影機投影畫面的 亮部與暗部區域。 • Saturation(飽和度) - 選擇此選項可以調整投影機投影畫 面的飽和度。 • Sharpness(清晰度) - 選擇此選項可以調整投影機投影畫 面的清晰度。 • Tint(色調) - 選擇此選項可以調整投影機投影畫面的色 調。 • Wall Color(投影牆面顏色) - 此選項可以讓您依照背景選擇 適當的顏色,並在投影時對投影畫面作顏色補償。 • Gamma - 選擇此選項可以調整投影機投影畫面的 Gamma。 42 LED 投影機使用手冊
Display(顯示) 此選單裡的選項可以讓您調整投影機的顯示畫面。 • Auto Focus(自動對焦) - 此選項可以讓您開啟或關閉自動 對焦功能。 • Projection Position(投影位置)- 此選項可以讓您依據目前 LED 投影機的方位來調整投影影像的位置。 • Auto Ceiling Detection(自動天花板偵測) - 此選項可以讓 您開啟或關閉自動天花板偵測功能。 • Keystone(梯形修正) - 選擇此選項可以修正投影影像的變 形角度。 • Quick Corner(全螢幕快速調整)- 選擇此選項可以調整投影 機投影畫面的四周角度。 • Aspect Ratio(影像比例)- 此選項可以讓您選擇投影機投影 畫面的顯示比例。 • Digital Zoom(數位縮放)- 此選項可以讓您放大、縮小與平 移投影機的投影畫面。 LED 投影機使用手冊 43
Input(輸入) 此選單裡的選項可以讓您選擇 LED 投影機的輸入來源。 • Auto Source(自動來源)- 此選項可以讓您開啟或關閉自動 來源。啟用此選項可以自動將連接的裝置掃描至您的 LED 投 影機。 • HDMI - 選擇此選單可以讓您從 HDMI 連接埠投影畫面。 • USB-A - 選擇此選單可以讓您連接至 USB Type-A 電源輸出埠 的行動裝置充電。 • USB-C - 選擇此選單可以讓您從 USB 3.
System(系統) 此選單裡的選項可以讓您設定 LED 投影機的系統項目。 • OSD Timeout(OSD 選單時間) - 此選項可以讓您以秒為單 位,當設定 OSD 選單進入休眠時,超過幾秒後未使用便會自 動消失。 • Sound(聲音) - 此選項可以讓您調整投影機的聲音設定。 • Power off Timeout(關機時間)- 本選項可讓您以秒為單 位,設定當 LED 投影機進入休眠時,超過幾秒後未使用便會 自動關機。 • Language(語言)- 本選項可讓您選擇 LED 投影機上的 OSD 選單所顯示的語言。 • Information(資訊)- 本選項顯示有關 LED 投影機的相關資 訊:目前已連接的輸入埠、LED 投影機的型號,以及目前正 在使用的 Splendid 模式。 • Reset All(全部重設)- 本選項可讓您將 LED 投影機回復至 預設值狀態。 • System Update(系統更新)- 本選項可讓您更新 LED 投影機 韌體。 說明:請至 http://www.asus.
關閉您的 LED 投影機 1. 按下電源按鈕。 2.
多國語言版本 請至華碩服務網 http://support.asus.
LED 投影機使用手冊
附錄 Appendices 附錄 LED 投影機使用手冊 49
FCC 聲明 本設備經過測試,符合美國聯邦通訊委員會規定第 15 條之 B 級 數位裝置限制。此類限制乃用於為住宅安裝之有害干擾提供合理 保護。本設備會產生、使用並發射無聲電波,如果未遵照說明安 裝與使用,可能會對無線電通訊造成有害干擾。但是,這並不保 證在特定的安裝中不會產生任何干擾。如果本設備確實會對無線 電或電視接收造成有害干擾(可透過關閉與開啟本設備電源來判 斷),建議使用者嘗試下列一種或多種方法來排除干擾: • 重新調整接收天線的方向或位置。 • 增加設備與接收器之間的距離。 • 將設備連接至與接收器電路不同的電源插座上。 • 或者向經銷商或經驗豐富的無線電 / 電視技術人員諮詢以獲 得協助。 本裝置符合美國聯邦通訊委員會規定第 15 條。操作時需符合以 下兩種狀況: 1. 本裝置不會引起有害的干擾,以及 2.
Compliance Statement of Innovation, Science and Economic Development Canada (ISED) This device complies with Innovation, Science and Economic Development Canada licence exempt RSS standard(s). Operation is subject to the following two conditions: (1) this device may not cause interference, and (2) this device must accept any interference, including interference that may cause undesired operation of the device.
Global Environmental Regulation Compliance and Declaration ASUS follows the green design concept to design and manufacture our products, and makes sure that each stage of the product life cycle of ASUS product is in line with global environmental regulations. In addition, ASUS disclose the relevant information based on regulation requirements. Please refer to http://csr.asus.com/english/Compliance.
限用物質名稱及含量列表 「產品之限用物質含有情況」之相關資訊,請參考下表。 設備名稱:投影機,型號(型式): S2 Equipment name Type designation (Type) 限用物質及其化學符號 Restricted substances and its chemical symbols 單元 Unit 鉛 汞 六價鉻 多溴聯苯 多溴二苯醚 Hexavalent Polybrominated Polybrominated Lead Mercury Cadmium chromium biphenyls diphenyl ethers (Pb) (Hg) 機殼 電路板 光學鏡片 LED 光源模組 風扇 鐵件 線材 遙控器 包裝 電池 鎘 ─ ─ ─ ○ ─ ○ ○ ○ ○ ○ ○ ○ ○ ○ ○ ○ ○ ○ ○ ○ (Cd) (Cr+6) (PBB) (PBDE) ○ ○ ○ ○ ○ ○ ○ ○ ○ ○ ○ ○ ○ ○ ○ ○ ○ ○ ○ ○ ○ ○ ○ ○ ○ ○ ○ ○ ○ ○ ○ ○ ○ ○ ○ ○ ○ ○ ○ ○ 備考 1. "超出 0.
S2 系列 LED 投影機規格 S2 顯示 投影鏡頭 視訊功能 音效功能 顯示技術 0.3” DLP® 光源 R/G/B LED 光源壽命 30,000 小時 (最大) 解析度 (原始) HD 720p (1280 x 720) 亮度(最大) 500 流明 對比度 400:1 (典型) 4,000:1 (DCR) 色彩飽和度 (NTSC) 24:00:00 顯示色彩 16.7 Million Colors 投射比 1.12:1 (40”@ 1m) (@16:9 ) 投影距離 / 尺寸 1.
訊號頻率 數位訊號頻率 S2 水平:37.8 ~ 79.9 KHz 垂直:50 ~ 60 Hz 開機 開機模式 ≤65 W 待機模式 <0.5 W 標準模式 ≤32dB 噪聲 輸入 / 輸出 機構設計 尺寸 重量 電腦訊號輸入 USB-C (DP Alt Mode), HDMI 音效輸出 耳機輸出孔 (3.5mm Mini-jack) USB 連接埠 Type-A 2.
支援電腦時脈 HDMI (電腦) 解析度 800 x 600 1024 x 768 1280 x 768 1280 x 800 1280 x 1024 1280 x 960 1440 x 900 1400X1050 1024x768@75Hz 1366x768 1680x1050 模式 SVGA_60 SVGA_75 XGA_60 XGA_75 1280 x 768_60 WXGA_60 SXGA_60 SXGA_75 1280 x 960_60 WXGA+_60 SXGA+_60 MAC19 HD_60 WSXGA+_60 更新率 (Hz) 60.317 75 60.004 75.029 59.87 59.81 60.02 75.025 60 59.887 59.978 74.93 59.79 59.95 水平頻率 (kHz) 37.879 46.875 48.363 60.023 47.776 49.702 63.981 79.976 60 55.935 65.317 60.241 47.71 62.29 時脈 (MHz) 40 49.5 65 78.75 79.5 83.