ASUS Tablet E-priručnik
SB12244 Decembar 2016 Treće izdanje Informacije o autorskim pravima Nijedan deo ovog uputstva, uključujući proizvode i softver koji su u njemu opisani, ne sme se reprodukovati, preneti, transkribovati, uskladištiti u sistemu za pronalaženje ili prevesti na bilo koji jezik ili na bilo koji način, osim dokumentacije koju kupac zadržava kao rezervnu kopiju, a bez prethodne pisane dozvole kompanije ASUSTeK COMPUTER INC. (“ASUS”).
Sadržaj Konvencije korišćene u ovom priručniku...................................................................................... 7 Briga i bezbednost................................................................................................................................. 7 1 Spremite svoj Zen! Delovi i funkcije............................................................................................................. 9 Postavljanje memorijske kartice............................................
3 Budite u kontaktu Upravljanje kontaktima..............................................................................................49 Otvorite aplikaciju Kontakti..............................................................................................................49 Podešavanja kontakata......................................................................................................................49 Podešavanje profila......................................................................
Šta sledi........................................................................................................................91 Dobijanje podsetnika za događaje................................................................................................91 Prihvatanje ili odbijanje pozivnica za događaje........................................................................92 Dobijanje upozorenja u vezi s događajem..................................................................................
PlayTo..........................................................................................................................114 Pokretanje aplikacije PlayTo.......................................................................................................... 114 8 Putovanje i mape Vremenska prognoza................................................................................................115 Pokretanje aplikacije Vremenska prognoza..............................................................
Konvencije korišćene u ovom priručniku Kako bismo istakli bitne informacije u okviru ovog priručnika, poruke smo predstavili na sledeći način: VAŽNO! Ova poruka sadrži informacije od vitalnog značaja koje morate pratiti kako biste obavili određeni posao. NAPOMENA: Ova poruka sadrži dodatne informacije i savete koji vam mogu pomoći pri obavljanju poslova.
Pravilno odlaganje Rizik od eksplozije ukoliko baterija nije pravilno zamenjena. Iskorišćene baterije odlažite prema uputstvima. NE bacajte ASUS tablet u običan otpad. Ovaj proizvod je dizajniran tako da omogući ispravno ponovno korišćenje delova i može da se reciklira. Simbol sa precrtanom kantom sa točkićima znači da proizvod (električna, elektronska oprema i dugmaste baterije koje sadrži živu) ne treba odlagati kao obično smeće. Proverite lokalne regulative vezane za uklanjanje elektronskih proizvoda.
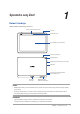
1 Spremite svoj Zen! 1 Spremite svoj Zen! Delovi i funkcije Uzmite uređaj i pokrenite ga za tili čas. Senzor ambijentalnog svetla Zvučnici Prednja kamera Panel dodirnog ekranapanel Taster za napajanje Zadnja kamera Dugme za podešavanje jačine zvuka Mikrofon Konektor za zvučnik/slušalice Micro USB 2.0 port Konektor za pribor Odeljak za mikro SIM/microSD karticu VAŽNO! • Održavajte uređaj, a naročito dodirni ekran, suvim sve vreme. Voda i druge tečnosti mogu izazvati kvar ekrana.
Postavljanje memorijske kartice Vaš ASUS tablet podržava microSD™, microSDHC™ i microSDXC™ memorijske kartice veličine od najviše 128 GB. NAPOMENA: Pojedine memorijske kartice možda nisu kompatibilne sa vašim ASUS Tabletom. Postarajte se da koristite samo kompatibilne memorijske kartice kako biste izbegli gubitak podataka i oštećenje uređaja, memorijske kartice ili oboje. OPREZ! Budite naročito pažljivi prilikom rukovanja memorijskom karticom.
2. Poravnajte i ubacite memorijsku karticu u konektor za memorijsku karticu. 3. Gurnite memorijsku karticu do kraja u prorez tako da se čvrsto smesti na svoje mesto. 4. Vratite nazad poklopac odeljka memorijske kartice. NAPOMENA: Posle instalacije formatirane memorijske kartice, možete da pristupite njenom sadržaju preko ASUS > File Manager (Upravljač datotekama) > Internal Storage (Interna memorija) > SD Card (SD kartica).
Uklanjanje memorijske kartice OPREZ! • Budite naročito pažljivi prilikom rukovanja memorijskom karticom. ASUS nije odgovoran za bilo koji gubitak podataka ili oštećenje memorijske kartice. • Pravilno izbacite memorijsku karticu da biste je bezbedno uklonili iz uređaja. Da biste izbacili memorijsku karticu, idite u Settings (Podešavanja) > Storage (Skladištenje) > Unmount external storage (Izbaci eksterno skladište). Da biste uklonili memorijsku karticu: 1.
2. Pritisnite memorijsku karticu da biste je izbacili, a zatim je izvucite. 3. Vratite nazad poklopac odeljka memorijske kartice.
Instaliranje mikro SIM kartice (na pojedinim modelima) Vaša mikro SIM kartica podržava WCDMA i EDGE/GSM opsege. Pojedini modeli podržavaju WCDMA, LTE i GSM mrežne opsege. NAPOMENA: Da biste izbegli oštećenje konektora, obavezno koristite standardnu mikro SIM karticu bez SIM adaptera ili koristite sekač. OPREZ! Budite naročito pažljivi prilikom rukovanja mikro SIM karticom. ASUS nije odgovoran za bilo koji gubitak ili oštećenje vaše mikro SIM kartice. Da biste instalirali mikro SIM karticu: 1.
2. Poravnajte i umetnite mikro SIM karticu u prorez za mikro SIM karticu. 3. Gurnite mikro SIM karticu celom dužinom u konektor sve dok dobro ne nalegne na svoje mesto. 4. Vratite nazad poklopac odeljka memorijske kartice.
Uklanjanje mikro SIM kartice (na pojedinim modelima) OPREZ! Budite naročito pažljivi prilikom rukovanja mikro SIM karticom. ASUS nije odgovoran za bilo koji gubitak ili oštećenje vaše mikro SIM kartice. Da biste uklonili mikro SIM karticu: 1. Okrenite uređaj kao što je prikazano, a zatim otvorite odeljak za mikro SIM/microSD karticu. OPREZ! 2. 16 • Pazite da ne oštetite poklopac odeljka i da ne povredite nokte prilikom uklanjanja poklopca.
3. Vratite nazad poklopac odeljka memorijske kartice. Punjenje ASUS tableta ASUS Tablet se isporučuje delimično napunjen, ali morate ga potpuno napuniti pre prvog korišćenja. Pročitajte sledeće važne napomene i mere opreza pre punjenja uređaja. VAŽNO! • Za punjenje ASUS Tableta koristite samo priloženi adapter za napajanje i mikro USB kabl. Korišćenjem nekog drugog adaptera za napajanje i kabla možete da oštetite uređaj.
Da biste napunili ASUS tablet: 1. Povežite micro USB kabl sa adapterom za napajanje. 2. Priključite adapter za napajanje u uzemljenu strujnu utičnicu. 3. Priključite micro USB konektor u ASUS tablet. VAŽNO! • Punite ASUS tablet osam (8) sati pre nego što ga budete prvi put koristili u režimu rada na bateriju. • Status napunjenosti baterije je naznačen sledećim ikonama: Mala 4.
Uključivanje ili isključivanje ASUS Tableta Uključivanje uređaja Da biste uključili uređaj, pritisnite i držite taster za napajanje sve dok se uređaj ne pokrene. Isključivanje uređaja Da bi isključili uređaj. 1. Ako je ekran isključen, pritisnite taster za napajanje da biste ga uključili. Ako je ekran zaključan, otključajte ekran uređaja. 2. Pritisnite i držite taster za napajanje i, kada to od vas bude zatraženo, tapnite na Power off (Isključi), pa tapnite na OK (Potvrdi).
Osnovne teme Istražite intuitivnu jednostavnost ASUS Zen UI 2,0 korisničkog interfejsa! ASUS Zen UI 2,0 korisnički interfejs je privlačan i intuitivan interfejs predviđen isključivo za ASUS tablete. Obezbeđuje vam posebne aplikacije, koje su integrisane u ili sa drugim aplikacijama, da bi vam ispunile vaše jedinstvene individualne potrebe i olakšale život, istovremeno vam omogućavajući da se zabavite sa vašim ASUS tabletom.
Prvo korišćenje Kada prvi put uključite ASUS Tablet, čarobnjak za podešavanje će vas provesti kroz proces podešavanja. Sledite uputstva na ekranu da biste izabrali jezik, izabrali metode unosa, podesili mobilnu mrežu i Wi-Fi, sinhronizovali naloge i konfigurisali usluge lokacije. Upotrebite Google ili ASUS nalog za podešavanje uređaja, a ako još uvek nemate Google ili ASUS nalog, nastavite i napravite ga.
Saveti za čuvanje snage baterije Napunjenost baterije prestavlja žilu kucavicu ASUS Tableta. Navodimo nekoliko saveza za čuvanje snage baterije koji pomažu u očuvanju snage baterije ASUS Tableta. – Zatvorite sve aktivne aplikacije koje se ne koriste. – Kada ne koristite uređaj, pritisnite taster za napajanje da biste ga stavili u režim spavanja. – Aktivirajte pametnu uštedu u aplikaciji „Power Saver”. – Podesi audio u pametni režim. – Smanjite osvetljenost ekrana.
Korišćenje ASUS Mobilne priključne stanice Sadržaj paketa ock eD obil SM ASU ASUS Mobilna priključna stanica E UID RG USE Uputstvo Za Korišćenje NAPOMENA: Ako je bilo koja stavka oštećena ili nedostaje, obratite se svom prodavcu.
Dvobojni indikator napunjenosti baterije Dvobojni LED omogućava vizuelnu indikaciju statusa napunjenosti baterije. Detalje potražite u sledećoj tabeli: Boja Stalno zeleno Status Stalno narandžasto Punjenje Trepćuće narandžasto Isključene lampice Nizak nivo baterije Potpuno napunjeno Režim rada na baterije Indikator tastature i zvuka Ovaj LED obezbeđuje vizuelnu indikaciju statusa uparivanja. Detalje potražite u sledećoj tabeli: Status Boja Trepćuće plavo 1.
Punjenje ASUS mobilne priključne stanice Da biste napunili ASUS mobilnu priključnu stanicu: 1. Povežite micro USB kabl sa adapterom za napajanje. 2. Priključite adapter za napajanje u uzemljenu strujnu utičnicu. 3. Priključite mikro USB konektor u ASUS mobilnu priključnu stanicu. NAPOMENA: Ulazni napon ASUS mobilne priključne stanice je DC 5,2V, 1,35A, 7W. VAŽNO! • Koristite samo adapter za napajanje i mikro USB kabl ZenPad 10 uređaja za punjenje ASUS mobilne priključne stanice.
Uparivanje vašeg ASUS tableta sa ASUS mobilnom priključnom stanicom Možete da koristite vašu ASUS mobilnu priključnu stanicu da biste se bežično povezali s vašim ASUS ZenPad 10 putem uparivanja preko Bluetootha. Pratite sledeće korake da biste saznali kako da uspostavite ovu vezu. 1. Uključite vašu ASUS mobilnu priključnu stanicu i njenu Bluetooth funkciju postavljanjem prekidača u krajnji desni položaj i držanjem tokom pet (5) sekundi. 2. Dodirnite obaveštenje da biste pokrenuli uparivanje.
Uparivanje vaših Bluetooth uređaja sa ASUS mobilnom priključnom stanicom Možete da koristite vašu ASUS mobilnu priključnu stanicu da biste se bežično povezali s vašim Bluetooth uređajima putem uparivanja preko Bluetootha. Pratite sledeće korake da biste saznali kako da uspostavite ovu vezu. 1. Uključite vašu ASUS mobilnu priključnu stanicu i njenu Bluetooth funkciju postavljanjem prekidača u krajnji desni položaj i držanjem tokom pet (5) sekundi. 2. Uključite Bluetooth funkciju na vašim uređajima. 3.
Spajanje ASUS tableta Da biste spojili ASUS tablet: 1. Postavite ASUS mobilnu priključnu stanicu na ravnu, stabilnu površinu. 2. Poravnajte ASUS tablet sa ASUS mobilnom priključnom stanicom. 3. Čvrsto umetnite ASUS tablet u zglob. VAŽNO! Kada je ASUS tablet spojen sa ASUS mobilnom priključnom stanicom, uvek podižite ceo sklop uređaja sa donje strane.
Vraćanje na prethodnu stranu. Aktivira režim spavanja. Uključuje/isključuje ugrađeni bežični LAN adapter. Smanjuje osvetljenje ekrana. Povećava osvetljenje ekrana. PgUp Snimanje slike radne površine. Fn PgUp Home Vraćanje na prethodnu numeru prilikom reprodukcije muzike. Fn Preskače na sledeću numeru tokom reprodukcije. Fn PgUp Home Isključivanje zvuka. PgUp Home Utišavanje zvuka. PgUp Home Pojačavanje zvuka. PgUp Home PgDp Otvaranje ekrana Settings (Podešavanja). PgUp Home Briše tekst.
Odvajanje ASUS tableta Da biste odvojili ASUS tablet: 1. Postavite ceo sklop na ravnu, stabilnu površinu. 2. Podignite ASUS tablet iz donjeg levog ugla da biste ga odvojili od ASUS mobilne priključne stanice.
Korišćenje dodirnog ekrana Koristite ove pokrete na dodirnom ekranu da biste pokretali aplikaciju, pristupili određenim podešavanjima i da biste se kretali na vašem ASUS tabletu. Pokretanje aplikacija ili biranje stavki Uradite bilo šta od sledećeg: • Da biste pokrenuli neku aplikaciju, samo je dodirnite. • Da biste izabrali stavku kao npr. u aplikaciji Upravljač datotekama, samo je dodirnite.
Kretanje kroz stranice ili ekrane Uradite bilo šta od sledećeg: • Prevucite prstom nalevo ili nadesno da biste prebacivali ekrane ili se kretali kroz galeriju slika. • Pomerajte prstom nagore ili nadole da biste se kretali kroz veb stranice ili listu stavki. Uvećavanje Razdvojite dva prsta na dodirnom panelu da biste uvećali sliku u Galeriji ili u Mapama ili uvećali sliku na veb stranici.
Umanjenje Spojite dva prsta na dodirnom panelu da biste umanjili sliku u Galeriji ili u Mapama ili umanjili sliku na veb stranici. ZenMotion Kada je vaš panel dodirnog ekrana isključen, pomoću ovih lakih i intuitivnih pokreta možete brzo da pokrećete aplikacije na vašem ASUS tabletu tako što ćete samo napisati jedno slovo.
Poglavlje 1: Spremite svoj Zen!
2 Nije svaki početak težak 2 Nije svaki početak težak NAPOMENA: Aplikacije prikazane na ekranu mogu da se razlikuju u zavisnosti od modela. Sledeći snimak ekrana je priložen samo kao referenca. Funkcije Zen početnog ekrana Početni ekran Dobijte podsetnike za važne događaje, ažuriranja aplikacija i sistema, vremensku prognozu i tekstualne poruke od osoba koje su vam bitne, direktno na početnom ekranu.
Razumevanje ikona Ove ikone se prikazuju na statusnoj traci i pružaju vam uvid u trenutni status ASUS Tableta. Mobilna mreža (na pojedinim modelima) Prikazuje jačinu signala mobilne mreže. Poruke Prikazuje da imate nepročitanu poruku. Wi-Fi Ova ikona prikazuje jačinu signala Wi-Fi veze. Trajanje baterije Ova ikona prikazuje status baterije ASUS Tableta. Mikro SD kartica Ova ikona prikazuje da je microSD kartica ubačena u ASUS Tablet.
Personalizacija početnog ekrana Dajte lični pečat početnom ekranu. Izaberite privlačan dizajn kao pozadinu, dodajte prečice za brzi pristup omiljenim aplikacijama i dodajte vidžete za brzi pregled važnih informacija. Možete i da dodate više stranica kako biste mogli da dodate više aplikacija ili vidžeta na početni ekran radi pristupanja njima ili njihovog pregleda. Prečice do aplikacija Prečice do aplikacija olakšavaju brz pristup često korišćenim ili omiljenim aplikacijama s početnog ekrana.
Grupisanje prečica do aplikacija u jednu fasciklu Kreirajte fascikle da biste organizovali prečice do aplikacija na početnom ekranu. 1. Na početnom ekranu, dodirnite i prevucite aplikaciju na drugu aplikaciju i pojaviće se fascikla. 2. Dodirnite novu fasciklu i dodirnite natpis Unnamed Folder (Neimenovana fascikla) da biste dodelili ime ovoj fascikli. Vidžeti Možete da postavite vidžete, male dinamičke aplikacije, na vaš početni ekran.
Pozadine Omogućava da vaše aplikacije, ikone i drugi Zen elementi borave na privlačno dizajniranoj pozadini. Možete da dodate prozirnu pozadinsku nijansu radi bolje čitljivosti i jasnoće. Možete i da izaberete animiranu pozadinu kako biste oživeli ekran.
Primena animirane pozadine Da biste primenili animiranu pozadinu: 1. Tapnite i držite praznu oblast na početnom ekranu i izaberite Wallpapers (Pozadine). 2. Izaberite gde želite pozadinu: samo na početnom ekranu, ili i na početnom ekranu i na zaključanom ekranu. 3. Izaberite animiranu pozadinu, pa tapnite na Apply (Primeni). NAPOMENA: Podešavanje pozadine možete da obavite i na ekranu > Settings (Podešavanja) > Display (Prikaz).
Podešavanje datuma i vremena Podrazumevano, datum i vreme koji se prikazuju na početnom ekranu se automatski sinhronizuju kada ste povezani na internet. Da biste promenili podešavanja vremena i datuma: 1. Otvorite ekran podešavanja na sledeći način: •• Otvorite brza podešavanja i zatim dodirnite •• Dodirnite > Settings (Podešavanja). . 2. Pomerite ekran Podešavanja nadole i izaberite Date & time (Datum i vreme). 3. Opozovite izbor Automatic date & time (Automatski datum i vreme). 4.
Brza podešavanja Tabla sa obaveštenjima brzih podešavanja pruža pristup određenim bežičnim funkcijama i podešavanjima ASUS Tableta pomoću samo jednog dodira. Svaka od ovih funkcija je predstavljena dugmetom. Da biste otvoriti tablu brzih podešavanja, prevucite nadole pomoću dva prsta iz gornjeg dela ASUS tableta. NAPOMENA: Plavo dugme ukazuje na to da je funkcija omogućena, dok sivo dugme ukazuje na onemogućenu funkciju.
Dodavanje ili uklanjanje dugmadi Da biste dodali ili uklonili postojeću dugmad sa table sa obaveštenjima ASUS brzih podešavanja: 1. Otvorite brza podešavanja pa tapnite na . 2. Tapnite na okvir pored funkcije koju želite da dodate ili uklonite sa table sa obaveštenjima ASUS brzih podešavanja. NAPOMENA: Označeni okvir ukazuje na to da dugmetu funkcije možete da pristupite putem table sa obaveštenjima ASUS brzih podešavanja dok neoznačeni okvir znači suprotno. 3. Tapnite na podešavanja.
Zaključani ekran Zaključani ekran se podrazumevano pojavljuje nakon uključivanja uređaja i tokom njegovog buđenja iz režima spavanja. Sa zaključanog ekrana možete da nastavite do Android® sistema uređaja prevlačenjem po dodirnom ekranu. Zaključani ekran uređaja možete i da prilagodite kako biste regulisali pristup podacima i aplikacijama na mobilnom uređaju.
Prilagođavanje dugmadi za brzi pristup Podrazumevano, zaključani ekran uključuje dugmad za brzi pristup za ove aplikacije: Razmena poruka i Kamera. Promenite ova podrazumevana podešavanja i prilagodite ovu dugmad za pokretanje drugih aplikacija na zaključanom ekranu pomoću sledećih koraka: 1. Otvorite brza podešavanja pa tapnite na . 2. Pomerite ekran Settings (Podešavanja) nadole i izaberite Lock screen (Zaključani ekran). 3. Dodirnite Quick Access (Brzi pristup). 4.
Glasovna pretraga Zadajte glasovne komande ASUS Tabletu i posmatrajte kako reaguje na njih putem aplikacije „Voice Search (Glasovna pretraga)”. Pomoću glasovne pretrage možete da izdajete glasovne komande radi ostvarivanja sledećeg: • Traženje podataka i informacija onlajn ili na ASUS Tabletu • Pokretanje aplikacija na ASUS Tabletu. • Dobijanje uputstava za vožnju do neke lokacije VAŽNO! ASUS Tablet mora da bude povezan sa internetom kako biste mogli da koristite ovu funkciju.
Prilagođavanje grupa rezultata glasovne pretrage Tableta Ako želite da podesite parametre za rezultate glasovne pretrage prikupljene sa Google naloga i iz podataka vašeg ASUS Tableta, to možete da uradite na sledeći način: 1. Na početnom ekranu ASUS Tableta tapnite na 2. Tapnite na > Voice Search (Glasovna pretraga). > Settings (Podešavanja).
3. Tapnite na Tablet search (Pretraga tableta). 4. Označite polja pored grupa za pretragu koje želite da obuhvatite kao izvore prilikom korišćenja aplikacije Voice Search (Glasovna pretraga).
3 Budite u kontaktu 3 Budite u kontaktu Upravljanje kontaktima Organizujte kontakte i ostanite s njima u vezi putem poziva, SMS poruka (na pojedinim modelima), e-pošte ili društvenih mreža. Grupišite svoje kontakte kao omiljene kontakte da biste brzo stupili u vezu s njima ili ih grupišite kao VIP kontakte da biste dobijali obaveštenje o svim budućim događajima ili nepročitanim porukama.
Dodirnite da biste prikazali svoje informacije o profilu Dodavanje kontakata Dodajte kontakte na uređaj, poslovne, Google ili druge naloge e-pošte i popunite važne kontakt informacije kao što su kontakt brojevi, adrese e-pošte, specijalni događaji za VIP kontakte i još toga. 1. Otvorite aplikaciju Kontakti 2. Izaberite Device (Uređaj). . NAPOMENA: • Takođe možete i da sačuvate kontakt na SIM karticu (na pojedinim modelima) ili nalog e-pošte.
Prilagođavanje profila kontakta Uredite informacije kontakta, dodajte fotografiju, podesite melodiju zvona ili snimite fotografiju kao naslovnu sliku profila kontakta. 1. Pokrenite aplikaciju Kontakti i izaberite kontakt čije informacije ili profil želite da uredite ili prilagodite. 2. Izvršite promene sa stranice profila kontakta.
Podesite VIP kontakte sa ekrana Groups (Grupe) Da biste podesili VIP kontakte sa ekrana Groups (Grupe): 1. Otvorite aplikaciju Kontakti. 2. Dodirnite 3. Na ekranu VIP kontakata, dodirnite 4. Izaberite kontakt ili kontakte koje želite grupišete kao VIP kontakte, zatim dodirnite Add (Dodaj). Kontakt ili kontakti su dodati na listu VIP kontakta. > VIP. . Podesite VIP kontakte sa ekrana VIP kontakata Da biste podesili VIP kontakte sa ekrana VIP kontakata: 1. Otvorite aplikaciju Kontakti. 2.
Dodavanje događaja VIP kontaktu Možete da dodate događaj VIP kontaktu kao što su godišnjica, rođendan i drugi važni događaji. 1. Pokrenite aplikaciju Kontakti, dodirnite kontakt kojem želite da dodate detalje događaja, zatim dodirnite . 2. Na ekranu informacija o kontaktu dodirnite Add another field (Dodaj drugo polje) > Events (Događaji). 3. Izaberite datum za događaj, zatim dodirnite Set (Podesi). 4. Uverite se da ste izabrali VIP u okviru polja grupe. Kada završite, dodirnite Done (Završeno). 5.
Označavanje omiljenih kontakata Podesite najčešće otvarane kontakte kao omiljene kako biste mogli da ih brzo pozivate iz aplikacije Contacts (Kontakti). 1. Pokrenite aplikaciju Kontakti na sledeći način: a. Na početnom ekranu, dodirnite aplikaciju ASUS > Contacts (Kontakti). b. Na ekranu Sve aplikacije, dodirnite aplikaciju Contacts (Kontakti). 2. Na ekranu aplikacije Kontakti, dodirnite i zatim dodirnite . 3. Označite polja za potvrdu kontakata koje želite da dodate kao omiljene. 4.
Uvoz kontakata Uvoz kontakata i njihovih odgovarajućih podataka iz jednog izvora kontakta na ASUS tablet, nalog e-pošte ili mikro SIM karticu. 1. Dodirnite ASUS > Contacts (Kontakti) i zatim dodirnite kontaktima). > Manage contacts (Upravljaj 2. Tapnite na Import/export (Unesi/Izbaci), pa izaberite neku od sledećih opcija: a. Uvoz sa SIM kartice (sa na određenim modelima) b. Import from storage (Unesi iz memorije) 3. Tapnite na nalog na koji želite da uvezete kontakte. a. Imejl nalog b. Uređaj c.
Društveno umrežavanje s kontaktima Integrisanje naloga za društvene mreže vaših kontakta olakšava vam pregled njihovih profila, novosti i fidova s društvenih mreža. Budite u toku sa aktivnostima kontakata u realnom vremenu. VAŽNO! Pre nego što integrišete naloge za društvene mreže vaših kontakata potrebno je da se prijavite na nalog za društvenu mrežu i sinhronizujete njegova podešavanja.
Pošaljite poruke i još toga Razmena poruka (sa na određenim modelima) Razmena poruka vam omogućava da šaljete poruke i odgovarate odmah li kasnije na važne poruke od kontakata na bilo kojoj od SIM kartica koje se nalaze u uređaju. Takodje, mozete poslati e-mailom vase poruke ili konverzaciju drugima. Pokretanje aplikacije Razmena poruka Uradite nešto od sledećeg s početnog ekrana, da biste pokrenuli aplikaciju Razmena poruka: • Dodirnite • Dodirnite > Messaging (Razmena poruka) Slanje poruka 1.
Prosleđivanje prepiski (sa na određenim modelima) Možete da prosledite poruke ili prepisku drugima, kao i da podesite upozorenje kako biste mogli da odgovorite na važne poruke u prikladno vreme. 1. Na Home screen (Početnom ekranu), dodirnite 2. Dodirnite prepisku i zatim dodirnite 3. Tapnite na Select All (Izaberi sve) ili na bilo koju poruku , pa tapnite na Forward (Prosledi). 4. U polju To (Kome) tapnite na kontakta. 5. Kada završite, izaberite SIM nalog sa kog želite da pošaljete poruku.
Povezivanje informacija vaših kontakata Kada dodate naloge društvene mreže ili e-pošte, podaci od ovih naloga se automatski sinhronizuju sa aplikacijom Contacts (Kontakti). U određenim slučajevima, neke informacije o kontaktu mogu se pojaviti na više mesta ili pod različitim varijacijama imena ili nadimka u aplikaciji Contacts (Kontakti). Možete ručno da povežete i ujedinite sve ove informacije i stavite ih na jedno mesto ili pod jedan profil. 1.
Registracija pomoću Google™ naloga Da biste se registrovali pomoću Google™ naloga: , pa tapnite na aplikaciju Omlet Chat. 1. Tapnite na 2. Na ekranu za registraciju dodirnite Connect a different account here (Poveži se ovde s drugim nalogom) i zatim dodirnite Google. 3. Dodirnite OK (Potvrdi) da biste koristili Google nalog koji ste registrovali za vaš uređaj. 4. Unesite svoje ime i tapnite na Get Started (Prvi koraci). 5.
Registracija pomoću Facebook® naloga Da biste se registrovali pomoću Facebook naloga: , pa tapnite na aplikaciju Omlet Chat. 1. Tapnite na 2. Na ekranu za registraciju dodirnite Connect a different account here (Poveži se ovde s drugim nalogom) i zatim dodirnite Facebook. Omlet Chat aplikacija će vas preusmeriti na ekran Facebook kako biste se prijavili na Facebook nalog. 3. Prijavite se na Facebook nalog i zatim dodirnite OK (Potvrdi). 4. Unesite svoje ime i tapnite na Get Started (Prvi koraci).
Korišćenje Omlet Chata Šaljite tekstualne i multimedijalne poruke za zabavan, kreativan i interaktivan razgovor. Da biste započeli razgovor: 1. Na ekranu aplikacije Omlet Chat, dodirnite zatim dodirnite Contacts (Kontakti). da biste prikazali meni aplikacije Omlet Chat i 2. Dodirnite kontakt s kojim želite da razgovarate i zatim dodirnite . Slanje poruke ćaskanja Da biste poslali poruku ćaskanja, unesite poruku u polje What's up (Šta ima novo), pa tapnite na .
Korišćenje aplikacija iz fioke U aplikaciji Omlet Chat nalaze aplikacije iz fioke koje pružaju dodatnu vrednost i koje vam omogućavaju da delite multimedijalne poruke za još više zabave i lični pečat. Da biste koristili ove aplikacije iz fioke, dodirnite u prepisci i zatim izaberite aplikaciju sa liste aplikacija iz fioke da biste poslali određenu multimedijalnu poruku.
Prikaz deljenih fotografija u aplikaciji Galerija Fotografije koje ste vi i vaši prijatelji podelili u sobi za ćaskanje aplikacije Omlet Chat odmah se čuvaju na vašem uređaju. Deljene fotografije možete da pogledate pomoću aplikacije Galerija. Da biste pogledali deljene fotografije: 1. Pokrenite aplikaciju Galerija na neki od sledećih načina: a. Na početnom ekranu, dodirnite aplikaciju ASUS > Gallery (Galerija). b. Na ekranu Sve aplikacije, dodirnite aplikaciju Gallery (Galerija). 2.
Prikaz svih deljenih fotografija Dodirnite All shared photos (Sve deljene fotografije) da biste prikazali sve fotografije koje ste delili vi i vaši kontakti iz aplikacije Omlet Chat. Prikaz deljenih fotografija po sobi za ćaskanje Dodirnite Chat room (Soba za ćaskanje) da biste prikazali fotografije deljene po sobi za ćaskanje ili društvenom hotspotu.
Prikaz deljenih fotografija po osobi koja ih je podelila Dodirnite Sharer (Osoba koja je podelila) da biste pogledali fotografije deljene po Omlet Chat kontaktu. Prikaz Omlet kontakata iz aplikacije Kontakti Pored povezivanja s Omlet kontaktima u aplikaciji Omlet Chat, takođe možete da prikažete i ćaskate s vašim Omlet kontaktima pomoću aplikacije Kontakti. Integracija Omlet kontakata u aplikaciju Kontakti vam olakšava pretragu i ćaskanje s Omlet kontaktima bez pokretanja aplikacije Omlet Chat.
2. Dodirnite padajuću listu Contacts to display (Kontakti za prikaz) da biste prikazali grupe kontakata. 3. Opozovite izbor svih grupa kontakata osim Omlet Chat i zatim dodirnite bilo koje mesto. Ekran aplikacije Kontakti prikazaće sve Omlet kontakte. 4. Dodirnite Omlet kontakt da biste izabrali i prikazali detalje kontakta ili direktno ćaskali s tim kontaktom.
Sinhronizacija aplikacije Omlet Chat sa oblakom Ako imate Dropbox®, Box® ili Baidu PCS nalog u oblaku, aplikacija Omlet Chat odmah bezbedno otprema vaše privatne razgovore i evidencije ćaskanja. Pre nego što aplikacija Omlet Chat otpremi vaše podatke, potrebno je da sinhronizujete nalog u oblaku sa aplikacijom Omlet Chat. Da biste to uradili: 1. U meniju aplikacije Omlet Chat dodirnite Settings (Podešavanja). 2.
4 Vaši najvažniji momenti 4 Vaši najvažniji momenti NAPOMENA: Sledeći snimak ekrana je priložen samo kao referenca. Zabeležite trenutke Otvaranje aplikacije Kamera Snimajte slike i video-snimke pomoću aplikacije Kamera ASUS Tableta. Aplikaciju Kamera možete da otvorite na neki od sledećih načina. Sa zaključanog ekrana Povlačite nadole dok se aplikacija Kamera ne pokrene. Sa početnog ekrana Tapnite na .
Prvo korišćenje aplikacije Kamera Dve uzastopne funkcije će se pojaviti da vam olakšaju prve korake kada prvi put pokrenete Kameru: „Tutorial (Vodič)” i „Image locations (Lokacije slika)”. Vodič Ako po prvi put koristite kameru ASUS Tableta, naići ćete na sledeći ekran vodiča nakon pokretanja aplikacije Camera (Kamera). Pratite sledeće korake da biste nastavili sa ovog ekrana. 1.
Početni ekran Kamere Kamera ASUS tableta opremljena je funkcijom automatske detekcije scene i automatske stabilizacije slike. Takođe poseduje funkciju stabilizacije video zapisa koja pomaže u sprečavanju potresa prilikom snimanja videa. Tapkajte na ikone da biste započeli sa korišćenjem kamere i istraživali slikovne i video funkcije ASUS Tableta.
Parametri slike Podesite izgled snimljenih slika konfigurisanjem parametara kamere na sledeći način. VAŽNO! Primenite parametre pre snimanja slika. 1. Na početnom ekranu kamere tapnite na > . 2. Pomerite sadržaj nadole i konfigurišite dostupne opcije. Slika Konfigurišite kvalitet slike pomoću ovih opcija. Režim snimanja U okviru ove opcije podesite brzinu okidača u režim Timer (Tajmer), omogućite Touch shutter (Dodirni okidač) ili promenite brzinu Burst (Okidanja).
Parametri videa Podesite izgled snimljenih video-snimaka konfigurisanjem parametara kamere na sledeći način. VAŽNO! Primenite parametre pre snimanja slika. 1. Na početnom ekranu kamere tapnite na > . 2. Pomerite sadržaj nadole i konfigurišite dostupne opcije. Slika Konfigurišite kvalitet videa pomoću ovih opcija. Focus & exposure (Fokus i ekspozicija) Omogućite Touch auto-exposure (Automatska ekspozicija na dodir) pod ovom opcijom.
Napredne funkcije kamere Istražite nove načine za snimanje slika ili videa i učinite uhvaćene trenutke zaista posebnima pomoću naprednih funkcija kamere ASUS Tableta. VAŽNO! Primenite parametre pre snimanja slika. Dostupne funkcija se mogu razlikovati u zavisnosti od modela. HDR Funkcija velikog dinamičkog opsega (High-dynamic-range, HDR) vam omogućava da pravite detaljnije slike u scenama sa slabim osvetljenjem i velikim kontrastom.
Slabo osvetljenje (sa na određenim modelima) Pomoću opcije PixelMaster, osetljivost vaše kamere na svetlost se povećava i do 400% da bi se poboljšalo smanjenje šuma i povećao kontrast boje i do 200%. Koristite ovaj režim da biste transformisali bilo koju temu u izuzetnu fotografiju ili vide—sa ili bez dovoljnog prirodnog osvetljenja. Snimanje slabo osvetljenih slika 1. Sa početnog ekrana aplikacije Camera (Kamera) dodirnite osvetljenje). 2.
Efekat Snimite fotografije pomoću različitih efekata kao što su Pixelize (Pikselizacija), Cartoon (Strip), Vintage (Stara fotografija), LOMO ili drugih efekata. NAPOMENA: Efekte je potrebno izabrati pre snimanja fotografije. Snimanje fotografija sa efektima 1. Sa ekrana aplikacije Camera (Kamera), dodirnite 2. Dodirnite 3. Dodirnite > Effect (Efekat) i izaberite efekat koji treba primeniti na fotografiju. da biste počeli snimanje fotografija. Primena efekata na fotografije 1.
GIF animacija Pravite GIF (Graphics Interchange Format – format za razmenu grafike) slike direktno sa kamere ASUS Tableta pomoću funkcije „GIF animacija”. Snimanje fotografija u režimu „GIF animacija” 1. Na početnom ekranu aplikacije Kamera tapnite na 2. Dugim pritiskom na 3. Izvršite željene izmene podešavanja GIF animacije. 4. Tapnite na > GIF animation (GIF animacija). počinjete rafalno snimanje fotografije za GIF animaciju. kada završite.
Snimanje fotografija u režimu „Pametno uklanjanje” > Smart remove (Pametno 1. Na početnom ekranu aplikacije Kamera tapnite na uklanjanje). 2. Dodirnite da biste počeli da snimate fotografije koje se mogu uređivati pomoću opcije Smart remove (Pametno uklanjanje). 3. Na snimljenoj fotografiji, dodirnite okvir oko otkrivenog pokretnog objekta da biste ga izbrisali. 4. Dodirnite da biste sačuvali fotografiju.
Korišćenje Galerije Pregledajte slike i reprodukujte video snimke na ASUS tabletu pomoću aplikacije Galerija. Ova aplikacija vam omogućava da uređujete, delite i brišete slike i video datoteke uskladištene na ASUS tabletu. Iz Galerije možete da pregledate slike kao projekciju slajdova ili da tapnete sliku ili video datoteku da biste je pregledali. Da biste pokrenuli Galeriju, tapnite na > Gallery (Galerija).
Prikaz lokacije fotografije Omogućite pristup lokaciji na ASUS tabletu i dobijte detalje lokacije na fotografijama. Detalji lokacije vaših fotografija uključuju mesto gde su snimljene fotografije, kao i mapu lokacije preko Google mapa ili Baidu servisa (samo u Kini). Da biste prikazali detalje fotografije: > Settings (Podešavanja) > Location (Lokacija). 1. Uključite pristup lokaciji u 2. Proverite da li ste podelili svoju lokaciju sa uslugom Google mape ili Baidu. 3.
Deljenje datoteka iz galerije 1. Na ekranu „Gallery (Galerija)” tapnite na direktorijum u kom se nalaze datoteke koje želite da delite. 2. Nakon otvaranja direktorijuma tapnite na 3. Tapnite na datoteke koje želite da delite. Kvačica će se pojaviti na slici koju izaberete. 4. Tapnite na da biste aktivirali izbor datoteka. , pa sa liste izaberite gde želite da delite slike. Brisanje datoteka iz galerije 1.
Upotreba funkcije MiniMovie (Mini film) Pretvorite fotografije u kreativnu projekciju slajdova pomoću funkcije MiniMovie (Mini film) aplikacije Galerija. Funkcija MiniMovie (Mini film) sadrži temu prezentacija projekcije slajdova koje odmah možete da primenite na izabrane fotografije. Da biste napravili mikrofilm od fascikle sa fotografijama: 1. Pokrenite aplikaciju Galerija i zatim dodirnite fotografijama. da biste izabrali lokaciju fascikle s 2. Izaberite fasciklu s fotografijama i zatim dodirnite 3.
Da biste napravili MiniMovie (Mini film) od izbora fotografija: 1. Pokrenite aplikaciju Galerija i zatim dodirnite da biste izabrali lokaciju fotografija. 2. Dodirnite 3. Nakon što izaberete fotografije, dodirnite MiniMovie (Mini film). 4. Izaberite temu MiniMovie (Mini film) koju želite da koristite za projekciju slajdova fotografija. da biste aktivirali izbor datoteka. Dodirnite bilo koju od ovih tema da biste pogledali njen pregled. 5.
Poglavlje 4: Vaši najvažniji momenti
5 Naporan rad traži predah 5 Naporan rad traži predah Pretraživač Vrhunski mehanizam pretraživača zasnovan na Chromium mehanizmu omogućava vam da surfujete internetom uz brzo učitavanje sadržaja. Njegov pregledan i intuitivan Zen interfejs zasnovan na tehnologiji ponovnog protoka teksta optimizuje veb-sadržaj kako bi se bolje uklopio na ekran ASUS tableta.
Deljenje stranice Podelite zanimljive stranice s ASUS tableta s drugima preko naloga e-pošte, naloga za skladištenje u oblaku, Bluetooth veze ili drugih aplikacija ASUS tableta. 1. Otvorite pretraživač. 2. Sa veb-stranice dodirnite > Share page (Deli stranicu). 3. Dodirnite nalog ili aplikaciju koju želite da koristite kao sredstvo za deljenje stranice.
Brisanje keša pretraživača Obrišite keš pretraživača da biste izbrisali privremene internet datoteke, veb-sajtove i kolačiće privremeno sačuvane na ASUS tabletu. Ovo pomaže da se skrati vreme učitavanja pretraživača. 1. Otvorite pretraživač. 2. Dodirnite > Settings (Podešavanja) > Privacy & security (Privatnost i bezbednost) > Clear cache (Obriši keš). 3. Kliknite na dugme OK (Potvrdi) u poruci za potvrdu. Email (E-pošta) Dodajte Exchange, Gmail, Yahoo! Mail, Outlook.
Dodavanje naloga e-pošte Ako nemate postojeći nalog e-pošte, možete da napravite nalog tako da možete da primate, čitate i šaljete e-poštu direktno sa ASUS tableta. 1. Na početnom ekranu tapnite na Email (Imejl) da biste pokrenuli aplikaciju Imejl. 2. Tapnite na > Settings (Podešavanja), pa dodajte imejl nalog. 3. Tapnite na dobavljača pošte kog želite da podesite. 4. Sledite uputstva da biste završili podešavanje novog imejl naloga. NAPOMENA: Možete i da pogledate korake od 3. do 5.
Kalendar Aplikacija Kalendar vam omogućava da vodite računa o važnim događajima pomoću ASUS Tableta. Zajedno sa pravljenjem događaja, takođe možete i da podešavate podsetnike ili pravite obaveštenje sa odbrojavanjem, kako ne biste zaboravili na važne događaje. Takođe snima događaje, kao što su rođendani i godišnjice koje ste podesili za VIP kontakte. Pravljenje događaja Da biste napravili događaj: 1. Tapnite na ASUS > Calendar (Kalendar). 2. Tapnite na 3.
Pravljenje događaja na nalogu Kada dodate onlajn naloge koje želite da sinhronizujete sa Kalendarom, ASUS Tablet možete da koristite za pravljenje obaveštenja za te onlajn naloge na sledeći način: 1. Tapnite na ASUS > Calendar (Kalendar). 2. Tapnite na New Event (Novi događaj) da biste započeli pravljenje novog događaja. 3. Na ekranu „New event (Novi događaj)”, tapnite na My Calendar (Moj kalendar) da biste pregledali sve naloge koji su trenutno sinhronizovani sa Kalendarom. 4.
Šta sledi Ne propustite važne događaje, zabavu na suncu, kao ni poruke/e-poštu/pozive od (na pojedinim modelima) od vaših VIP kontakata. Podesite kalendar događaja, omiljenih i VIP grupa ili ažuriranja vremenske prognoze kako biste dobijali obaveštenja i podsetnike o tome šta sledi. Pregledajte obaveštenja o tome šta sledi na zaključanom ekranu, tabli sa sistemskim obaveštenjima, vidžetu ili aplikaciji.
Prihvatanje ili odbijanje pozivnica za događaje Podesite nalog e-pošte u aplikaciji Imejl kako biste slali ili primali e-poštu kao što su pozivnice za događaje. Kada prihvatite pozivnicu u e-pošti, događaji će biti sinhronizovani sa aplikacijom Kalendar. NAPOMENA: Za detaljnije informacije pogledajte aplikacije Email (e-pošta) i Calendar (Kalendar). VAŽNO! Vaš ASUS tablet mora biti povezan s Wi-Fi mrežom da biste dobijali pozivnice u e-pošti ili upozorenja u vezi s događajem.
Dobijanje upozorenja u vezi s događajem Kada prihvatite pozivnicu za događaj, dobijaćete podsetnike za sve promene u vezi s događajem kao što su odlaganje, otkazivanje, promena lokacije događaja ili promena u rasporedu događaja. Ova upozorenja u vezi sa događajem objavljivaće se na zaključanom ekranu, tabli za sistemska obaveštenja i vidžetu ili aplikaciji Šta je sledeće. Upozorenje o početku događaja Nekoliko minuta pre početka događaja, dobićete podsetnik o tome da događaj uskoro počinje.
Upozorenje o promenjenom rasporedu događaja Dobićete upozorenje ako je događaj odložen, ako je došlo do promene u rasporedu ili ako je premešten na drugu lokaciju. Preuzimanje ažuriranja vremenske prognoze Dobijajte ažuriranja AccuWeather® vremenske prognoze u realnom vremenu, na svaki sat ili periode i do 12 sati, za vašu trenutnu lokaciju ili druge delove sveta.
Uraditi kasnije Steknite kontrolu i nad najmanje važnim stvarima u vašem užurbanom životu. Čak i kada ste previše zauzeti, odgovorite na e-poštu, SMS poruke (na pojedinim modelima), pozive (na pojedinim modelima), pročitajte vesti na mreži ili dodajte druge važne zadatke koje treba uraditi onda kada vam to bude zgodno.
Nastavljanje čitanja na mreži Možete da preuzmete stranice koje ste prethodno označili kao zadatke kasnijeg čitanja i nastavite čitanje na mreži onda kada vam to bude odgovaralo iz aplikacije Ostavite za kasnije. 1. Na početnom ekranu, dodirnite ASUS > Do It Later (Ostavite za kasnije). 2. Izaberite stranicu koju želite sada da pročitate i dodirnite Read now (Pročitaj sada). NAPOMENA: Za detaljnije informacije o podešavanju stranica kao zadataka kasnijeg čitanja pogledajte Čitanje stranica kasnije.
SuperNote Pretvorite hvatanje beležaka u zabavnu i kreativnu aktivnost pomoću aplikacije Supernote. Ova intuitivna aplikacija vam omogućava da pravite beleške organizovane po beležnicama direktnim pisanjem ili crtanjem na dodirnom ekranu. Tokom pravljenja beleški možete i da dodajete multimedijalne datoteke iz drugih aplikacija i delite ih putem društvenih mreža ili naloga za klaud skladištenje.
Pravljenje nove beležnice Da biste napravili novu datoteku pomoću aplikacije SuperNote, pratite sledeće korake: 1. Dodirnite ASUS > SuperNote, a zatim dodirnite 2. Izaberite šablon i započnite pisanje beleški. . Deljenje beležnice na klaudu Beležnicu možete da delite na klaudu na sledeći način: 1. Na početnom ekranu aplikacije SuperNote, dodirnite i držite beležnicu koju želite da delite. 2. Na iskačućem ekranu tapnite na Enable cloud sync (Omogući sinhronizaciju na klaud). 3.
File Manager (Menadžer datoteke) Korišćenje Menadžera datoteka vam omogućava da s lakoćom pronađete podatke na internom skladištu ASUS Tableta i povezanim eksternim uređajima za skladištenje i upravljate njima. Pristup internoj memoriji Da biste pristupili internoj memoriji: > File Manager (Menadžer datoteka). 1. Tapnite na 2. Tapnite na > Internal Storage (Interna memorija) da biste videli sadržaj ASUS Tableta, pa tapnite na stavku da biste je izabrali.
Klaud Pravite rezervnu kopiju podataka, sinhronizujte datoteke između različitih uređaja i bezbedno i privatno delite datoteke putem klaud naloga kao što su ASUS WebStorage, Disk, OneDrive i Dropbox. ASUS WebStorage Registrujte se ili prijavite na ASUS WebStorage i dobijte besplatno skladište u oblaku. Automatski otpremajte nove fotografije kako biste odmah mogli da ih delite, da sinhronizujete datoteke između različitih uređaja ili delite datoteke putem ASUS WebStorage naloga.
Prenos podataka Prenesite vaše podatke kao što su kontakti, događaji iz kalendara sa starog mobilnog uređaja na ASUS tablet preko Bluetooth tehnologije. Da biste koristili prenos podataka: 1. Uparite stari mobilni uređaj sa ASUS tabletom preko Bluetooth veze. NAPOMENA: Za detaljnije informacije o uparivanju uređaja pogledajte Uparivanje ASUS Tableta sa Bluetooth® uređajem. 2. Na ekranu Sve aplikacije, dodirnite Data transfer (Prenos podataka). 3.
ASUS Support Pronađite odgovore u FAQ-u (Najčešća pitanja) ili direktno komunicirajte s drugim Zen UI korisnicima da biste pronašli i delili rešenja o ZenUI 2.0 aplikacijama. Da biste pristupili ZenUI pomoći: > ASUS Support (ASUS podrška). 1. Dodirnite 2. Dodirnite ZenUI Tips, zatim izaberite aplikaciju za koju želite da pronađete odgovore.
6 Zabava Zabava 6 Korišćenje slušalica Steknite slobodu da radite druge stvari dok razgovarate ili uživajte u slušanju omiljene muzike koristeći slušalice. Povezivanje audio priključka Umetnite priključak slušalica od 3,5 mm u audio port uređaja. UPOZORENJE! • Ne umećite druge predmete u port za audio priključak. • Ne umećite kabl sa strujnim izlazom u port za audio priključak. • Duže slušanje zvuka velike jačine može da ošteti vaš sluh.
Muzika Aplikacija Muzika pretražuje muzičke datoteke na unutrašnjim i spoljašnjim skladištima na vašem ASUS tabletu. Možete da organizujete ove muzičke datoteke u plejlistu ili da ih dodate u red za sekvencijalno reprodukovanje. Pored toga, možete da vršite striming muzike s naloga u oblaku kao što su ASUS WebStorage, Dropbox, OneDrive i Drive. VAŽNO! Pre vršenja striminga muzike s naloga u oblaku, uverite se da je ASUS tablet povezan sa Wi-Fi ili mobilnom mrežom.
Druge opcije reprodukcije Tokom reprodukcije možete da dodirnete i izvršite neku od sledećih opcija u nastavku. Add to playlist (Dodaj na plejlistu) Dodirnite da biste dodali pesmu na postojeću plejlistu ili napravili novu na koju ćete dodati pesmu. Play To (Reprodukuj na) Dodirnite da biste skenirali i reprodukovali pesmu na druge uređaje u blizini. NAPOMENA: Za detaljnije informacije pogledajte Reprodukovanje na druge uređaje.
Strimovanje muzike iz oblaka Da biste strimovali muziku s naloga u oblaku: 1. Na početnom ekranu aplikacije Muzika dodirnite . 2. U okviru opcije Cloud Music (Muzika u oblaku), dodirnite nalog u oblaku odakle želite da strimujete muziku. 3. Odaberite pesmu i zatim je dodirnite da biste je reprodukovali. Pravljenje plejliste Preuzmite vaše omiljene pesme iz različitih izvora kao što su unutrašnje skladište, spoljašnje skladište ili nalog u oblaku i organizujte ih u plejlistu. 1.
Reprodukovanje na druge uređaje Koristite funkciju Reprodukuj na za strimovanje muzike sa ASUS tableta na druge Miracast ili DLNAkompatibilne uređaje u blizini. Da biste koristili Reprodukuj na: > PlayTo (Reprodukuj na). 1. U pesmi koja se trenutno reprodukuje dodirnite 2. Dodirnite uređaj na koji želite da strimujete muziku. Muzika s ASUS tableta će se reprodukovati ili strimovati na drugi uređaj. 3. Da biste zaustavili Reprodukuj na, dodirnite > Disconnect (Prekini vezu).
Poglavlje 6: Zabava
7 Ostanite na vezi 7 Ostanite na vezi Wi-Fi Wi-Fi tehnologija ASUS Tableta vas povezuje sa bežičnim svetom. Ažurirajte naloge na društvenim mrežama, pregledajte internet i razmenjujte podatke i poruke bežičnim putem pomoću ASUS Tableta. Omogućavanje Wi-Fi funkcije 1. Otvorite ekran podešavanja na sledeći način: •• Otvorite brza podešavanja i zatim dodirnite •• Dodirnite > Settings (Podešavanja). 2. . Prevucite Wi-Fi prekidač nadesno da biste uključili Wi-Fi.
Onemogućavanje Wi-Fi funkcije Da biste onemogućili Wi-Fi: 1. Otvorite ekran podešavanja na sledeći način: •• Otvorite brza podešavanja i zatim dodirnite •• Dodirnite > Settings (Podešavanja). 2. . Prevucite Wi-Fi prekidač nalevo da biste isključili Wi-Fi. NAPOMENA: Wi-Fi možete da onemogućite i na ekranu „Quick Settings (Brza podešavanja)”. Detalje o načinu otvaranja ekrana „Quick Settings (Brza podešavanja)” potražite u odeljku Brza podešavanja.
Uparivanje ASUS Tableta sa Bluetooth® uređajem Pre korišćenja Bluetooth funkcije ASUS Tableta u punoj meri, potrebno je da ga prvo uparite sa Bluetooth uređajem. ASUS Tablet automatski skladišti uparenu vezu sa Bluetooth uređajem. 1. Na ekranu „Settings (Podešavanja)” tapnite na Bluetooth da biste prikazali sve dostupne uređaje. VAŽNO! • Ako se uređaj koji želite da uparite ne nalazi na listi, proverite da li je njegova Bluetooth funkcija uključena i da li je vidljiv.
Privezivanje Kada Wi-Fi usluga nije dostupna, možete da koristite ASUS tablet kao modem ili da ga pretvorite u Wi-Fi hotspot da biste dobili internet pristup na laptopu, tabletu i drugim mobilnim uređajima. VAŽNO! Većina mobilnih operatera može da zahteva da imate tarifni paket za prenos podataka da biste mogli da koristite funkciju privezivanja. Obratite se svom mobilnom operateru da biste dobili informacije o raspoloživosti takvog tarifnog paketa.
4. Na ekranu privezivanja dodirnite Portable Wi-Fi hotspot (Prenosiva Wi-Fi pristupna tačka) da biste uključili Wi-Fi pristupnu tačku na ASUS tabletu. 5. Povežite druge uređaje sa hotspot vezom ASUS tableta na isti način na koji se povezujete sa Wi-Fi mrežom. Bluetooth privezivanje Omogućite Bluetooth na ASUS tabletu i koristite ga da se povežete s drugim uređajima pomoću aplikacije Share Link, kao i da se povežete sa štampačem. 1. Omogućite Bluetooth na ASUS tabletu i na drugom uređaju. 2.
PlayTo Aplikacija PlayTo vam omogućava da šaljete video snimak ekrana ASUS Tableta na monitor koji podržava striming. Na taj način eksterni monitor može da postane drugi monitor ili drugi ekran ASUS Tableta. VAŽNO! Eksterni ekran mora da poseduje Miracast™ ili DLNA® tehnologiju da bi podržavao PlayTo aplikaciju. Pokretanje aplikacije PlayTo Postoje dva načina da počnete da koristite PlayTo na ASUS Tabletu: Iz Brzih podešavanja 1.
8 Putovanje i mape Putovanje i mape 8 Vremenska prognoza Dobijte ažuriranja vremenske prognoze u realnom vremenu direktno na ASUS Tabletu koristeći aplikaciju za vremensku prognozu. Aplikacija Vremenska prognoza vam omogućava i da pregledate druge detalje o vremenskim prilikama širom sveta. Pokretanje aplikacije Vremenska prognoza Sa početnog ekrana pokrenite aplikaciju Vremenska prognoza koristeći jednu od sledećih opcija: •• Dodirnite > Weather (Vremenska prognoza).
Početni ekran Vremenske prognoze Podesite i preuzmite ažuriranja vremenske prognoze za vašu trenutnu lokaciju kao i za druge delove sveta. Možete da prikažete ažuriranja vremenske prognoze ili dnevnu vremensku prognozu na vidžetu ili aplikaciji Šta sledi i u aplikaciji Kalendar.
Sat Prilagodite podešavanja vremenske zone ASUS Tableta, podesite alarme i koristite ASUS Tablet kao štopericu pomoću aplikacije Sat. Pokretanje Sata Pokrenite aplikaciju Sat na neki od sledećih načina: > Clock (Sat). • Tapnite na • Na početnom ekranu ASUS Tableta tapnite na digitalni prikaz sata. Vreme u svetu Tapnite na da biste pristupili podešavanjima vremena u svetu na ASUS Tabletu. Dodirnite ovo da biste pristupili podešavanjima aplikacije Clock (Sat).
Alarm Tapnite na da biste pristupili podešavanjima alarma na ASUS Tabletu. Tapnite na ovo da biste izbrisali neki od prethodno podešenih alarma. Tapnite na ovo da biste podesili novo vreme alarma. Tapnite na ovo da biste pristupili podešavanjima funkcije alarma. Štoperica Tapnite na da biste koristili ASUS Tablet kao štopericu. Tapnite na ovo dugme da biste pokrenuli funkciju štoperice.
Tajmer Možete da podesite više opcija tajmera za ASUS Tablet. Da biste to uradili, pratite sledeće korake: Podešavanje tajmera 1. Tapnite na da biste pristupili funkciji tajmera na ASUS Tabletu. numerička tastatura 2. Koristite numeričku tastaturu za unos ciljnog vremena, pa tapnite na „Start (Pokreni)” da biste pokrenuli tajmer.
Poglavlje 8: Putovanje i mape
9 ZenLink ZenLink 9 Upoznavanje ZenLinka Ostanite na vezi uz pomoć ZenLinka, ekskluzivnog za ASUS, za maksimalnu produktivnost. Pomoću ovih ZenLink aplikacija možete da se povežete s drugim uređajima i delite i primate datoteke. ZenLink se sastoji od sledećih aplikacija: Share Link, PC Link i Remote Link NAPOMENA: Neke od ovih ZenLink aplikacija možda neće biti dostupne na vašem ASUS tabletu.
Aplikacija Share Link Delite i primajte datoteke, aplikacije ili medijski sadržaj sa Android mobilnih uređaja pomoću aplikacije Share Link (za ASUS mobilne uređaje) ili aplikacije SHAREit (za druge mobilne uređaje) preko Wi-Fi hotspota. Pomoću ove aplikacije možete da šaljete i primate datoteke koje su veće od 100 MB i možete da delite i primate više datoteka istovremeno. Share Link aplikacija šalje i prima datoteke brže nego preko Bluetooth veze. Deljenje datoteka 1.
Prijem datoteka Da biste primili datoteke: i zatim dodirnite aplikaciju Share Link. 1. Na početnom ekranu dodirnite 2. Dodirnite Receive file (Primi datoteku) da biste primili datoteke od pošiljaoca. Aplikacija PC Link Koristite računar da biste pristupili i kontrolisali ASUS tablet i njegove aplikacije preko aplikacije PC Link. Ona vam omogućava da kontrolišete ASUS tablet pomoću tastature i miša računara. NAPOMENA: Pre korišćenja aplikacije PC Link, ne zaboravite da instalirate PC Link na računar.
Značenje podešavanja aplikacije PC Link Kliknite na ovu ikonu da biste rotirali preslikani ekran ASUS tableta na ekranu računara. Kliknite na ovu ikonu da biste utišali ili pojačali ton. Kliknite na ovu ikonu da biste napravili snimak ekrana. Kliknite na ovu ikonu da biste probudili ASUS tablet ili ga stavili u režim spavanja. Kliknite na ovu ikonu da biste proverili ažuriranja aplikacije PC Link i dodelili putanju za snimke ekrana.
Aplikacija Remote Link Pretvorite vaš ASUS tablet u bežični uređaj za unos i alat za prezentaciju. Pomoću ove aplikacije, ASUS tablet možete da koristite kao tačped, dodirni ekran, laserski pokazivač za prezentaciju i kontroler za Windows® Media Player dok je povezan s računarom preko Bluetootha ili Wi-Fi-ja. NAPOMENA: • Pre korišćenja aplikacije Remote Link, ne zaboravite da instalirate Remote Link na računar. Idite na stranicu http://remotelink.asus.
Remote Link kontroler za prezentaciju Dodirnite da biste kontrolisali slajdove za prezentaciju na vašem računaru. Dodirnite i držite ovo dugme da biste aktivirali laserski pokazivač Dodirnite ovo dugme da biste prešli na sledeći slajd. Dodirnite ovo dugme da biste se vratili na prethodni slajd. Remote Link kontroler za Windows® Media Player Dodirnite da biste kontrolisali Windows® Media Player. Dodirnite ovo dugme da biste se vratili na prethodnu pesmu/muzičku datoteku.
Remote Link unos sa tastature Dodirnite glasom. da biste koristili unos sa stastature. Takođe možete da koristite mikrofon za unos Dodirnite ovo dugme da biste ukucali poruku putem glasovnog unosa. Dodirnite ovo dugme da biste poslali poruku na računar. Ukucajte poruku u ovo polje.
Poglavlje 9: ZenLink
10 Zen svuda Zen svuda 10 Posebni Zen alati Kalkulator Jedno prevlačenje i dodir dovoljni su za pokretanje aplikacije Kalkulator. Kada otvorite tablu brzih podešavanja, ikona aplikacije Kalkulator lako je vidljiva na vrhu liste. Dodirnite je da biste počeli sa izračunavanjem. Dodirnite ovo da biste omogućili Kalkulator.
Ekran kalkulatora 130 Poglavlje 10: Zen svuda
Aplikacija Quick Memo Quick Memo je alat za hvatanje beleški i daje vam slobodu da rukom pišete ili ukucate važne beleške koje morate da zapamtite. Posle pravljenja beleški, možete da ih podelite preko aplikacije Share Link i sajtova društvenih medija ili da ih pretvorite u zadatak unutar aplikacije Ostavite za kasnije. Pravljenje lepljive beleške Beleške iz aplikacije Quick Memo možete da pretvorite u lepljive beleške tako da ih možete videti bilo gde na vašem ASUS tabletu.
Snimač zvuka Snimajte audio datoteke pomoću ASUS Tableta omogućavanjem aplikacije Snimač zvuka. Pokretanje Snimača zvuka Da biste pokrenuli Snimač zvuka, tapnite na > Sound Recorder (Snimač zvuka). Tapnite na ovo da biste konfigurisali podešavanja Snimača zvuka.
Pauziranje snimanja Tokom pauziranog snimanja, možete izabrati da nastavite, izbrišete ili sačuvate snimak. Dodirnite da biste nastavili snimak Dodirnite da biste sačuvali snimak Dodirnite da biste izbrisali snimak Lista snimaka Sa liste snimaka možete da reprodukujete, preimenujete, podelite ili izbrišete sačuvanu datoteku audio snimka.Prikažite svoju listu snimaka s desne strane glavnog ekrana aplikacije Sound Recorder (snimač zvuka).
Audio Wizard AudioWizard vam omogućava da prilagodite zvučne režime vašeg ASUS tableta radi jasnijeg audio izlaza koji odgovara stvarnim slučajevima korišćenja. Korišćenje AudioWizarda Da biste koristili AudioWizard: 1. Tapnite na ASUS > AudioWizard. 2. U prozoru AudioWizarda, dodirnite zvučni režim koji želite da aktivirate.
Splendid Aplikacija ASUS Splendid vam omogućava da lako prilagodite podešavanja prikaza. Ona obogaćuje boju ekrana pomoću svojih unapred određenih režima boje ekrana. Upotreba Splendid režima Da biste koristili Splendid režim: 1. Sa početnog ekrana dodirnite ASUS > Splendid. 2. Izaberite neki od sledećih režima boje ekrana: Balance (Balansirani), Bluelight Filter (Filter plavog svetla), Vivid (Živopisni), i Customized (Prilagođeni).
Režim filtera plavog svetla Ovaj režim obezbeđuje blagi prikaz sličan izgledu papira koji smanjuje naprezanje očiju, za prijatan doživljaj čitanja na vašem ASUS tabletu. Tapnite da biste vratili fabrička podešavanja Pomerite da biste podesili temperaturu boje Režim živopisne slike Ovaj režim obezbeđuje preciznu unapred određenu boju koja obogaćuje boju ekrana vašeg ASUS tableta.
Prilagođeni režim Ovaj režim vam omogućava da podesite prikaz ekrana zasnovano na željenoj temperaturi boje, nijansi i zasićenju.
Ušteda energije Maksimalno uvećajte ili produžite snagu ASUS Tableta čak i kad je u stanju mirovanja ili dok je povezan sa mrežom. Pametno prilagodite podešavanja za često korišćene aktivnosti kao što su čitanje imejlova ili gledanje videa. Podešavanje čuvanja energije Maksimalno povećajte, optimizujte ili prilagodite snagu ASUS Tableta pametnim opcijama za ušteda energije. 1.
Prilagođavanje čuvanja energije Podesite nivo osvetljenosti za česte aktivnosti kao što su čitanje imejlova ili knjiga, gledanje videa, pregledanje veb-sajtova i slušanje muzike. Možete i da omogućite funkciju čuvanja energije za pojedine aplikacije ili da omogućite automatsko prekidanje mrežne veze kada ASUS Tablet spava. Da biste prilagodili ušteda energije: 1. Sa ekrana Power Saver (Ušteda energije), izaberite Customized mode (Prilagođeni način). 2.
Poglavlje 10: Zen svuda
11 Održavajte Zen 11 Održavajte Zen Održavanje uređaja ažurnim Održavajte ASUS Tablet u toku sa ažuriranjima sistema Android i nadograđenim aplikacijama i funkcijama. Ažuriranje sistema Da biste ažurirali ASUS Tablet: , pa tapnite na Settings (Podešavanja). 1. Tapnite na 2. Na ekranu podešavanja, povucite nadole i dodirnite opciju About (O aplikaciji). 3. Tapnite na System update (Ažuriranje sistema), pa tapnite na Check Update (Proveri ažuriranja).
Obezbeđivanje ASUS Tableta Koristite bezbednosne funkcije ASUS tableta da sprečite neovlašćeni pristup informacijama. Otključavanje ekrana Kada je ekran zaključan, možete ga otključati pomoću opcija za bezbedno otključavanje koje vam nudi ASUS Tablet. , pa tapnite na Settings (Podešavanja) > Lock Screen (Zaključani ekran). 1. Tapnite na 2. Tapnite na Screen lock (Zaključavanje ekrana), pa izaberite opciju za otključavanje ASUS Tableta.
PIN Unesite najmanje četiri cifre da biste podesili PIN. VAŽNO! Obavezno upamtite PIN koji ste napravili kako biste mogli da otključate uređaj. Pattern (Šablon) Prevucite prst po tačkama i napravite šablon. VAŽNO! Šablon mora da sadrži najmanje četiri tačke. Obavezno upamtite šablon koji ste napravili kako biste mogli da otključate uređaj.
Password (Lozinka) Unesite najmanje četiri znaka da biste napravili lozinku. VAŽNO! Obavezno upamtite lozinku koju ste napravili kako biste mogli da otključate uređaj. Konfigurisanje drugih opcija bezbednosti ekrana Pored režima zaključanog ekrana, možete takođe da uradite sledeće u prozoru zaključanog ekrana: • Quick Access (Brzi pristup): Prevucite prekidač „Quick Access (Brzi pristup)” na ON (UKLJUČENO) da biste pokretali aplikacije sa zaključanog ekrana.
Podešavanje identiteta ASUS tableta Zabeležite informacije o identitetu ASUS tableta kao što su serijski broj, IMEI (međunarodni identitet mobilne opreme) broj ili broj modela. Ovo je važno, pošto u slučaju da izgubite ASUS tablet, možete se obratiti mobilnom operateru i dostaviti informacije kako bi se zabranila neovlašćena upotreba vašeg ASUS tableta. Da biste prikazali informacije o identitetu ASUS tableta: i zatim dodirnite Settings (Podešavanja). 1. Dodirnite 2.
Poglavlje 11: Održavajte Zen
Dodatak Dodatak Dodaci Za model P023 Izjava Federalne komisije za komunikacije Ovaj uređaj saglasan je sa FCC pravilima, Delom 15, rad je podložan sledećim uslovima: • Ovaj uređaj ne može da izazove štetno ometanje. • Ovaj uređaj mora da prihvati bilo koje ometanje koje primi, uključujuči ometanje koje može da izazove neželjeni rad. Ova oprema je testirana i u saglsnosti je sa ograničenjima za Klasu B digitalnih uređaja shodno Delu 15 FCC pravila.
Informacije o RF izlaganju (SAR) Ovaj uređaj ispunjava zahteve vlade za izlaganje radio talasima. Ovaj uređaj je dizajniran i proizveden da ne prelazi granične vrednosti izloženosti radio frekventnim talasima (RF) koje je postavila Federalna komisija za komunikacije vlade SAD-a. Standard za izlaganje koristi jedinicu za merenje koja je poznata kao Specifična stopa absorbcije ili SAR. SAR ograničenje postavljeno od strane FCC-a je 1,6W/kg.
Upozorenje CE oznake CE oznaka za uređaje sa bežičnim LAN/Bluetooth-om Ova oprema je ispunjava zahteve Direktive 1999/5/EC Evropskog parlamenta i komisije od 9. marta, 1999. godine koji važi za opremu za radio i telekomunikacije i zajedničku saglasnost. Najveća CE SAR vrednost za uređaj je 0,081 W/kg. Informacije o izlaganju radio-talasima (SAR) - CE Ovaj uređaj ispunjava zahteve EU (1999/5/EC) vezane za ograničavanje izlaganja javnosti elektromagnetnim poljima zarad zaštite zdravlja.
EC Deklaracija o usklađenosti Ovaj proizvod je u saglasnosti sa propisima R&TTE Direktive 1999/5/EC. Deklaraciju o usklađenosti možete da preuzmete sa adrese https://www.asus.com/support. Zelena ASUS napomena ASUS je posvećen kreiranju proizvoda i pakovanja koji ne štete prirodnoj okolini i koji štite zdravlje korisnika dok minimalizuju uticaj na prirodnu sredinu. Smanjenja broja stranica uputstva u skladu je sa smanjenjem emisije ugljen dioksida.
ENERGY STAR complied product ENERGY STAR is a joint program of the U.S. Environmental Protection Agency and the U.S. Department of Energy helping us all save money and protect the environment through energy efficient products and practices. All ASUS products with the ENERGY STAR logo comply with the ENERGY STAR standard, and the power management feature is enabled by default. The monitor and computer are automatically set to sleep within 10 and 30 minutes of user inactivity.
Za model P021 Sprečavanje oštećivanja sluha Da biste sprečili oštećivanje sluha, ne slušajte zvuk velike jačine duži vremenski period. Za područje Francuske, slušalice za ovaj uređaj su usaglašene sa zahtevima o nivou zvučnog pritiska propisanim u odgovarajućim standardima EN 50332-1:2000 i/ili EN50332-2:2003, kao što se zahteva u članu francuskog zakona L.5232-1.
EC Deklaracija o usklađenosti Ovaj proizvod je u saglasnosti sa propisima R&TTE Direktive 1999/5/EC. Deklaraciju o usklađenosti možete da preuzmete sa adrese https://www.asus.com/support. “For DTS patents, see httppatents.dts.com. Manufactured under license from DTS Licensing Limited. DTS, DTS-HD, the Symbol, & DTS or DTS-HD and the Symbol together are registered trademarks, and DTS-HD Premium Sound is a trademark of DTS, Inc. c DTS, Inc. All Rights Reserved.
Zahtev za električnu bezbednost Proizvodi sa oznakama za električnu struju od do 6A i koji teže više od 3Kg moraju da koriste odgovarajuće, odobrene kablove za struju, jače od ili jednake: H05VV-F, 3G, 0,75mm2 ili H05VV-F, 2G, 0,75mm2. Obaveštenje o zaštitnom sloju VAŽNO! U cilju obezbeđivanja električne izolacije i osiguravanja električne bezbednosti, na uređaj je nanet zaštitni sloj kako bi se izolovao, osim na mesta gde se nalaze ulazni i izlazni portovi.
Upozorenje CE oznake 2200 CE oznaka za uređaje sa bežičnim LAN/Bluetooth-om Ova oprema je ispunjava zahteve Direktive 1999/5/EC Evropskog parlamenta i komisije od 9. marta, 1999. godine koji važi za opremu za radio i telekomunikacije i zajedničku saglasnost. Najveća CE SAR vrednost za uređaj je 1,140 W/kg. Korišćenje opreme je dozvoljeno u: AT EE IT NO BE ES IS PL BG FI LI PT CH FR LT RO CY GB LU SE CZ GR LV SI DE HU MT SK DK IE NL TR For DTS patents, see http://patents.dts.com.
Informacije o izlaganju radio-talasima (SAR) - CE Ovaj uređaj ispunjava zahteve EU (1999/5/EC) vezane za ograničavanje izlaganja javnosti elektromagnetnim poljima zarad zaštite zdravlja. Granice su deo sveobuhvatnih preporuka za zaštitu javnosti. Ove preporuke su razvile i proverile nezavisne naučne organizacije kroz redovne i temeljne procene naučnih istraživanja.
Ograničenje odgovornosti Može doći do određenih okolnosti gde, zbog greške kompanije ASUS ili onoga za šta je ona odgovorna, imate pravo na obeštećenje od strane kompanije ASUS.
Za model DA01 Izjava Federalne komisije za komunikacije Ovaj uređaj saglasan je sa FCC pravilima, Delom 15, rad je podložan sledećim uslovima: • Ovaj uređaj ne može da izazove štetno ometanje. • Ovaj uređaj mora da prihvati bilo koje ometanje koje primi, uključujuči ometanje koje može da izazove neželjeni rad. Ova oprema je testirana i u saglsnosti je sa ograničenjima za Klasu B digitalnih uređaja shodno Delu 15 FCC pravila.
EC Deklaracija o usklađenosti Ovaj proizvod je u saglasnosti sa propisima R&TTE Direktive 1999/5/EC. Deklaraciju o usklađenosti možete da preuzmete sa adrese https://www.asus.com/support. Ograničenje odgovornosti Može doći do određenih okolnosti gde, zbog greške kompanije ASUS ili onoga za šta je ona odgovorna, imate pravo na obeštećenje od strane kompanije ASUS.
Upozorenje CE oznake Isporučena verzija ovog uređaja ispunjava zahteve EEC direktiva 2004/108/EC “Elektromagnetna kompatibilnost” i 2006/95/EC “Direktiva niskog napona”. Zahtev za električnu bezbednost Proizvodi sa oznakama za električnu struju od do 6A i koji teže više od 3Kg moraju da koriste odgovarajuće, odobrene kablove za struju, jače od ili jednake: H05VV-F, 3G, 0,75mm2 ili H05VV-F, 2G, 0,75mm2. Namenjeno korišćenju isključivo sa I.T.E. opremom na UL spisku, iz serije ASUS Tableta.
EC Declaration of Conformity We, the undersigned, Manufacturer: ASUSTeK COMPUTER INC. Address: 4F, No. 150, LI-TE Rd., PEITOU, TAIPEI 112, TAIWAN Authorized representative in Europe: ASUS COMPUTER GmbH Address, City: HARKORT STR.
EC Declaration of Conformity We, the undersigned, Manufacturer: ASUSTeK COMPUTER INC. Address: 4F, No. 150, LI-TE Rd., PEITOU, TAIPEI 112, TAIWAN Authorized representative in Europe: ASUS COMPUTER GmbH Address, City: HARKORT STR.
EC Declaration of Conformity We, the undersigned, Manufacturer: ASUSTeK COMPUTER INC. Address: 4F, No. 150, LI-TE Rd., PEITOU, TAIPEI 112, TAIWAN Authorized representative in Europe: ASUS COMPUTER GmbH Address, City: HARKORT STR.
EC Declaration of Conformity We, the undersigned, Manufacturer: ASUSTeK COMPUTER INC. Address: 4F, No. 150, LI-TE Rd., PEITOU, TAIPEI 112, TAIWAN Authorized representative in Europe: ASUS COMPUTER GmbH Address, City: HARKORT STR.
Dodatak 165
Naziv modela: P023 / P021 / P01T / DA01 Proizvođač Adresa: Ovlašćeni predstavnik u Evropi: Adresa: 166 Dodatak ASUSTeK Computer Inc. 4F, No.150, LI-TE RD., PEITOU, TAIPEI 112, TAIWAN ASUS Computer GmbH HARKORT STR.