ASUS tablet E-handleiding (Voor model P028)
DU13368 Tweede editie Augustus 2017 COPYRIGHT-INFORMATIE Geen enkel deel van deze handleiding, met inbegrip van de producten en de software die hierin is beschreven, mag zonder de uitdrukkelijke schriftelijke toestemming van ASUSTeK COMPUTER INC. (“ASUS”) worden gereproduceerd, verzonden, getranscribeerd, opgeslagen in een retrievalsysteem of in enige taal worden vertaald in enige vorm of door enig middel, behalve documentatie die door de koper wordt gebruikt voor back-updoeleinden.
Inhoudsopgave In deze handleiding gebruikte conventies................................................................................... 7 Zorg en veiligheid.................................................................................................................................. 7 1 Basisprincipes Onderdelen en functies................................................................................................. 9 Een geheugenkaart installeren...................................................
3 Contact houden Contactpersonen beheren..........................................................................................55 De app Personen starten...................................................................................................................55 Contacts Settings.................................................................................................................................55 Uw profiel instellen....................................................................
Werk hard, speel harder De headset gebruiken.................................................................................................79 Een audiostekker aansluiten............................................................................................................79 Email.............................................................................................................................79 Een Gmail-account instellen...................................................................
7 Zen Overal Speciale Zenhulpmiddelen.........................................................................................91 Calculator................................................................................................................................................91 Quick Memo...........................................................................................................................................92 Geluids-recorder.........................................................
In deze handleiding gebruikte conventies Om belangrijke informatie in deze handleiding te markeren, worden berichten als volgt voorgesteld: BELANGRIJK! Dit bericht bevat essentiële informatie die moet worden opgevolgd om een taak te voltooien. OPMERKING: Dit bericht bevat aanvullende informatie en tips die kunnen helpen bij het voltooien van taken.
Goede verwijdering Ontploffingsgevaar als de batterij wordt vervangen door een onjuist type. Gooi lege batterijen weg in overeenstemming met de instructies. Gooi de ASUS tablet NIET bij het huishoudelijk afval. Dit product is ontworpen om een correct hergebruik van onderdelen en recycling mogelijk te maken. Het symbool met de doorgekruiste vuilnisbak geef aan dat het artikel (elektrisch, elektronische apparatuur en knoopbatterijen welke kwik bevatten) niet bij het gemeentelijk afval mogen worden afgeleverd.
1 Basisprincipes 1 Bereid uw Zen voor! Onderdelen en functies Leer uw apparaat kennen en maak het gebruiksklaar in een handomdraai. Model P00L Omgevingslichtsensor Audio-luidspreker Camera voor Touchscreen-paneel Voedingsknop Camera achter Volumeknop Microfoon Luidspreker-/headset-aansluiting USB type-C-poort Groef BELANGRIJK! • Houd het apparaat, vooral het aanraakscherm, altijd droog. Als water of andere vloeistoffen in aanraking komen met het scherm, kan het aanraakscherm schade oplopen.
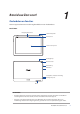
Model P028 Omgevingslichtsensor Audio-luidspreker Camera voor Touchscreen-paneel Voedingsknop Camera achter Volumeknop Microfoon Luidspreker-/headset-aansluiting USB type-C-poort MicroSD-kaartsleuf BELANGRIJK! 10 • Houd het apparaat, vooral het aanraakscherm, altijd droog. Als water of andere vloeistoffen in aanraking komen met het scherm, kan het aanraakscherm schade oplopen.
Een geheugenkaart installeren Uw ASUS Tablet ondersteunt een microSD™-, microSDHC™- en microSDXC™-geheugenkaart met een capaciteit tot 128 GB. OPMERKING: Sommige geheugenkaarten zijn mogelijk niet compatibel met uw ASUS tablet. Zorg dat u alleen compatibele geheugenkaarten gebruikt om gegevensverlies, schade aan uw apparaat of geheugenkaart, of beide te voorkomen. WAARSCHUWING! Wees extra voorzichtig wanneer u omgaat met een geheugenkaart.
2. Plaats een geheugenkaart uit op de geheugenkaartsleuf in de juiste richting en stop deze naar binnen. 3. Duw de geheugenkaart volledig in de sleuf tot deze stevig op zijn plaats zit. 4. Plaats de klep van de geheugenkaartsleuf terug. OPMERKING: Nadat u een geformatteerde geheugenkaart hebt geïnstalleerd, krijgt u toegang tot de inhoud via ASUS > File Manager(Bestandsbeheer) > MicroSD. Model P028 Een geheugenkaart installeren: 1.
De geheugenkaart verwijderen WAARSCHUWING! • Wees extra voorzichtig wanneer u omgaat met een geheugenkaart. ASUS is niet verantwoordelijk voor gegevensverlies of schade aan uw geheugenkaart. • Werp de geheugenkaart op de juiste manier uit om het veilig van het apparaat te verwijderen. Ga voor het uitwerpen van de geheugenkaart naar Settings (Instellingen) > Storage (Opslag) en tik op onder Portable storage (Draagbare opslag). Model P00L Een geheugenkaart verwijderen: 1.
2. Druk op de geheugenkaart om deze uit te werpen en trek de kaart er vervolgens uit. 3. Plaats de klep van de geheugenkaartsleuf terug. Model P028 Een geheugenkaart installeren: 1. 14 Druk op de geheugenkaart om deze uit te werpen en trek de kaart er vervolgens uit.
Een micro-SIM-kaart installeren (op bepaalde modellen) De micro SIM-kaartsleuf ondersteunt WCDMA banden. Bepaalde model ondersteunt WCDMA- en LTE- netwerkbanden. OPMERKING: Om schade aan de aansluiting te verhinderen, moet u ervoor zorgen dat u een standaard micro-SIM-kaart gebruikt zonder SIM-adapter of zonder het gebruik van een mes. WAARSCHUWING! Wees extra voorzichtig wanneer u omgaat met een micro-SIM-kaart. ASUS is niet verantwoordelijk voor gegevensverlies of schade aan uw micro-SIM-kaart.
2. Lijn een micro SIM-kaart uit en stop deze in de micro SIM-kaartsleuf. 3. Duw de micro-SIM-kaart volledig in de sleuf tot deze stevig op zijn plaats zit. 4. Plaats de klep van de geheugenkaartsleuf terug.
Een micro-SIM-kaart verwijderen (op bepaalde modellen) WAARSCHUWING! Wees extra voorzichtig wanneer u omgaat met een micro-SIM-kaart. ASUS is niet verantwoordelijk voor gegevensverlies of schade aan uw micro-SIM-kaart. Een micro-SIM-kaart verwijderen: 1. Richt uw apparaat als getoond en zoek vervolgens de groef en open de afdekking van de kaartsleuf. WAARSCHUWING! • Zorg dat u de klep van de sleuf of uw vingernagels niet beschadigt wanneer u de klep verwijdert.
2. Druk op de micro-SIM-kaart om deze uit te werpen en trek de kaart uit. 3. Plaats de klep van de geheugenkaartsleuf terug.
Uw ASUS tablet opladen Uw ASUS tablet wordt gedeeltelijk opgeladen geleverd. Laad het apparaat volledig op voordat u het voor de eerste keer gebruikt. Lees de volgende belangrijke OPMERKING en waarschuwingen voordat u uw apparaat oplaadt. BELANGRIJK! • Gebruik alleen de bijgeleverde voedingsadapter en USB-kabel voor het opladen van uw ASUS Tablet. Het gebruik van een andere wisselstroomadapter en kabel kan uw apparaat beschadigen.
Uw ASUS tablet opladen: 1. Verbind de USB Type-C-kabel met de stroomadapter. 2. Sluit de USB Type-C-aansluiting aan op uw ASUS Tablet. 3. Sluit de voedingsadapter aan op een geaard stopcontact. BELANGRIJK! 4. • Laad uw ASUS tablet gedurende acht (8) uur op voordat u het toestel de eerste keer in de batterijmodus gebruikt.
Tips voor het sparen van batterijvermogen De batterijlading is de levenslijn van uw ASUS tablet. Hier zijn enkele tips waarmee u het batterijvermogen van uw ASUS tablet kunt sparen. – Sluit alle geopende apps die niet in gebruik zijn. – Als u het apparaat niet gebruikt, drukt u op de voedingsknop om het apparaat in de slaapstand te zetten. – Schakel de energiebesparing in de app ASUS Mobile Manager in. – Stel de AudioWizard in op Smart Mode (Slimme modus). – Verlaag de helderheid van het scherm.
Uw ASUS tablet in- of uitschakelen Uw apparaat inschakelen Om uw apparaat in te schakelen, houdt u de voedingsknop ingedrukt tot het apparaat opstart. Uw apparaat uitschakelen Uw apparaat uitschakelen: 1. Als uw scherm is uitgeschakeld, drukt u op de voedingsknop om het apparaat uit te schakelen. Als uw scherm is vergrendeld, moet u het apparaatscherm ontgrendelen. 2. Houd de voedingsknop ingedrukt, tik op Uitschakelen wanneer u dat wordt gevraagd en tik op OK.
Eerste gebruik Als u uw ASUS-tablet voor de eerste keer inschakelt, volgt u de instructies op het scherm om uw taal te selecteren. Selecteer invoermethoden, stel uw mobiele netwerk, Wi-Fi in, synchroniseer accounts en configureer uw locatieservices. Gebruik uw Google- of ASUS-account om uw apparaat in te stellen. Als u nog geen Google- of ASUS-account hebt, kunt u er nu een maken.
ASUS ZenUI Verken de intuïtieve eenvoud van ASUS Zen UI. ASUS Zen UI is een charmante en intuïtieve interface, exclusief ontworpen voor ASUS tablets. U kunt gebruikmaken van speciale apps die in of bij andere apps zijn geïntegreerd zodat ze voldoen aan uw unieke persoonlijke behoeften en ze uw leven vergemakkelijken terwijl u plezier beleeft aan het gebruik van uw ASUS tablet. ZenUI FAQ Zoek antwoorden op FAQ’s (veelgestelde vragen) of geef uw feedback op het gebruikersforum.
Uw ASUS mobiele dock gebruiken (optioneel) Inhoud verpakking ASUS mobiele dock ock eD obil SM ASU E UID RG USE Gebruikershandleiding Micro-USB-kabel OPMERKING: Als een van de items beschadigd is of ontbreekt, neemt u contact op met uw verkoper.
Indicatie met twee kleuren voor batterijspanning Het tweekleurige LED biedt een visuele aanduiding van de laadstatus van de batterij. Raadpleeg de volgende tabel voor details. Kleur Constant groen Status Constant oranje Bezig met laden Knipperend oranje Batterij bijna op Lichten uit Batterijmodus Volledig geladen Toetsenbordindicator Het LED-lampje biedt een visuele aanduiding van de koppelstatus. Raadpleeg de volgende tabel voor details. Kleur Status Knipperend blauw 1.
Uw mobiel ASUS-dock opladen Uw mobiel ASUS-dock opladen: 1. Sluit de micro-USB-kabel aan op de voedingsadapter. 2. Sluit de micro USB-aansluiting aan op uw mobiel ASUS-dock. 3. Stop de voedingsadapter in een geaard stopcontact. OPMERKING: Zorg dat u de voedingsadapter aansluit op het juiste stopcontact met het correcte ingangsvermogen.
Uw ASUS-tablet koppelen met het mobiele ASUS-dock U kunt uw mobiele ASUS-dock gebruiken om een draadloze verbinding te maken met uw ASUS ZenPad 10 via Bluetooth-koppeling. Raadpleeg de volgende stappen om te leren hoe u deze verbinding tot stand kunt brengen. 1. Schakel uw mobiele ASUS-dock en de Bluetooth-functie in door de schakelaar helemaal naar rechts te duwen en vijf (5) seconden ingedrukt te houden. 2. Tik op de melding om het koppelen te starten.
Uw Bluetooth-apparaten koppelen met het mobiele ASUS-dock U kunt uw mobiele ASUS-dock gebruiken om een draadloze verbinding te maken met uw Bluetooth-apparaten via Bluetooth-koppeling. Raadpleeg de volgende stappen om te leren hoe u deze verbinding tot stand kunt brengen. 1. Schakel uw mobiele ASUS-dock en de Bluetooth-functie in door de schakelaar helemaal naar rechts te duwen en vijf (5) seconden ingedrukt te houden. 2. Schakel de Bluetooth-functie van uw apparaten in. 3.
Uw ASUS tablet koppelen Uw ASUS tablet koppelen: 1. Plaats het mobiele dock van ASUS op een plat en stabiel oppervlak. 2. Lijn uw ASUS tablet uit op het mobiele dock van ASUS. 3. Stop het ASUS tablet stevig in het scharnier. BELANGRIJK! Neem altijd de volledige apparaatassemblage uit de onderkant wanneer uw ASUS tablet is gekoppeld aan het mobiele dock van ASUS.
Returns to previous page. Activeert de slaapmodus. Schakelt de interne draadloze LAN tussen AAN en UIT. Verlaagt de helderheid van het scherm. Verhoogt de helderheid van het scherm. PgUp Slaat de bureaubladafbeelding op. Fn PgUp Home Gaat bij het afspelen van muziek terug naar het vorige nummer. Fn PgUp PgDp Home Begint met afspelen van muziek uit uw speellijst. Gaat verder metEnd of pauzeert het afspelen van de huidige muziek.
Uw ASUS tablet loskoppelen Uw ASUS tablet loskoppelen: 1. Plaats de volledige assemblage op een plat en stabiel oppervlak. 2. Til uw ASUS-tablet op vanaf de linkerbenedenhoek om deze los te maken van het mobiele ASUS-dock.
Het aanraakscherm gebruiken Gebruik deze gebaren op het aanraakscherm voor het starten van apps, openen van enkele instellingen en navigeren door uw ASUS tablet. Apps starten of items selecteren Voer een van de volgende bewerkingen uit: • Voor het starten van een app tikt u er gewoon op. • Voor het selecteren van een item, zoals in de app Bestandsbeheer, tikt u er gewoon op.
Door pagina's of schermen lopen Voer een van de volgende bewerkingen uit: • Veeg met uw vinger naar links of rechts om over te schakelen tussen schermen of om door de afbeeldingen in Gallery (Galerij) te bladeren. • Scroll met uw vinger omhoog of omlaag door webpages of lijst met items. Inzoomen Spreid uw twee vingers open op het aanraakscherm om in te zoomen op een afbeelding in Gallery (Galerie) of Maps (Kaarten) of om in te zoomen op een webpagina.
Uitzoomen Breng uw twee vingers samen op het aanraakscherm om uit te zoomen op een afbeelding in Gallery (Galerie) of Maps (Kaarten) of om uit te zoomen op een webpagina. ZenMotion Wanneer uw aanraakscherm uit is, kunt u met deze eenvoudige en intuïtieve bewegingen in een oogwenk apps starten op uw ASUS Tablet door gewoon een alfabet te schrijven.
Hoofdstuk 1: Bereid uw Zen voor!
2 Nergens is het zo goed als thuis Nergens is het zo goed als thuis 2 OPMERKING: De schermafbeeldingen in deze handleiding zijn uitsluitend informatief bedoeld. Zen beginschermfuncties Beginscherm Ontvang herinneringen aan belangrijke gebeurtenissen, app- en systeemupdates, weersvoorspellingen en tekstberichten van mensen die belangrijk zijn voor u, direct vanaf uw beginscherm. Veeg dit gebied omlaag om System notifications (Systeemmeldingen) en Quick settings (Snelinstellingen) weer te geven.
Pictogrammen begrijpen Deze pictogrammen worden weergegeven in de statusbalk en begeleiden u bij de huidige status van uw ASUS tablet. Mobiel netwerk (op bepaalde modellen) Toont de signaalsterkte van uw mobiel netwerk. Wifi Dit pictogram toont de signaalsterkte van uw wifi-verbinding. Wifi-hotspot Dit pictogram toont dat de wifi-hotspot van uw ASUS tablet is ingeschakeld. Levensduur batterij Dit pictogram toont de batterijstatus van uw ASUS tablet.
Uw startscherm aanpassen Zet uw persoonlijke stempel op uw startscherm. Selecteer een aantrekkelijk ontwerp als achtergrond, voeg snelkoppelingen toe voor snelle toegang tot uw favoriete apps en voeg widgets toe voor een snel overzicht van belangrijke info. U kunt ook meer pagina’s toevoegen zodat u meer apps of widgets kunt toevoegen en snel kunt openen of controleren op uw beginscherm.
Uw app-snelkoppelingen groeperen in een map Maak mappen om uw app-snelkoppelingen te ordenen op uw startscherm. 1. Tik en sleep een app op uw startscherm op een andere app en er verschijnt een map. 2. Tik op de nieuwe map en tik op Naamloze map om een naam toe te wijzen aan deze map. Achtergronden Plaats uw apps, pictogrammen en andere Zen-elementen op een aantrekkelijk ontworpen achtergrond.
Een geanimeerde achtergrond toepassen Een geanimeerde achtergrond toepassen: 1. Tik en houd een leeg gebied op uw beginscherm vast en selecteer Achtergronden. 2. Tik op Live Wallpaper (Live achtergrond) en selecteer een bewegende achtergrond om deze op het startscherm te installeren. 3.
De datum en tijd instellen De datum en tijd die op uw startscherm worden weergegeven, worden standaard automatisch gesynchroniseerd wanneer u verbinding maakt met internet. De datum- en tijdsinstellingen wijzigen: 1. Open het scherm Instellingen door één van de volgende bewerkingen uit te voeren: •• Start Snelle instellingen en tik dan op •• Tik op > Instellingen. . 2. Schuif omlaag in het scherm Instellingen en selecteer Datum en tijd. 3.
Snelle instellingen Het meldingspaneel van Snelle instellingen biedt toegang met één tik tot enkele draadloze functies en instellingen van uw ASUS tablet. Al deze functies worden voorgesteld door een knop. Om het paneel Quick settings (Snelinstellingen) te starten, veegt u omlaag vanaf de bovenkant van uw ASUS-tablet. OPMERKING: Een blauwe knop geeft aan dat de functie momenteel is ingeschakeld. Een grijze knop wijst op een uitgeschakelde functie.
Knoppen toevoegen of verwijderen Om bestaande knoppen toe te voegen aan of te verwijderen van het meldingspaneel van ASUS Snelle instellingen: 1. Start Snelle instellingen en tik op 2. Tik en houd ingedrukt om een knop te slepen om toe te voegen of te verwijderen van het meldingenpaneel van ASUS Snelle instellingen. . Systeemmeldingen gebruiken In de systeemmeldingen kunt u de laatst uitgevoerde updates en systeemwijzigingen zien die zijn uitgevoerd op uw ASUS tablet.
Weer en tijd Weer Ontvang weerupdates in real time, direct vanaf uw ASUS tablet met de weerapp. Met de app Weather kunt u ook andere weerdetails uit de hele wereld controleren. De app Weer starten Start de app Weer vanaf uw beginscherm met één van de volgende opties: •• Tik op > Weer. •• Tik vanaf het beginscherm van uw ASUS Tablet op het weerpictogram. Beginscherm Weer U kunt updates over het weer instellen en ophalen voor uw huidige locatie en voor andere delen van de wereld.
De weerupdates ontvangen Ontvang AccuWeather®-updates in real time, elk uur of tot 12 uur, voor uw huidige locatie of voor andere delen van de wereld. U kunt plannen maken voor maximaal zeven (7) dagen met de 7-daagse weersvoorspelling of u kunt gepaste kledij kiezen op basis van de AccuWeather RealFeel®-temperatuur. U kunt ook de UV-index of luchtvervuilingsindex in real time bekijken, zodat u de nodige beschermende maatregelen kunt treffen tegen schadelijke UV-stralen of luchtverontreinigende stoffen. 1.
Klok Pas de tijdzone-instellingen van uw ASUS tablet aan, stel een alarm in en gebruik uw ASUS tablet als stopwatch met de app Klok. De klok starten Start de app Klok met een van de volgende opties: > Klok. • Tik op • Tik op het beginscherm van uw ASUS tablet op de digitale klokweergave. Wereldklok Tik op om de wereldklokinstellingen te openen vanaf uw ASUS tablet. Tik hierop om toegang te krijgen tot de instellingen van de app Clock (Klok).
Wekker Tik op om de instellingen voor de wekker van uw ASUS Tablet te openen. Tik hierop om een nieuwe alarmtijd in te stellen. Tik hierop om een van de eerder ingestelde wektijden te verwijderen. Tik hierop om de instellingen voor de wekkerfunctie te openen. Stopwatch Tik op om uw ASUS tablet te gebruiken als een stopwatch. Tik op deze knop om de stopwatchfunctie te starten.
Timer Tik op om de timerfunctie van uw ASUS tablet te openen. Tik hier om toegang te krijgen tot de instellingen van de timerfunctie Tik hierop om het timerlabel te hernoemen. Tik hierop om oudere instellingen van de timer te verwijderen Tik hierop om de beltonen voor de timer in te stellen Tik hier om de timer te starten Tik hier om een nieuwe timer in te stellen OPMERKING: U kunt meerdere timeropties instellen voor uw ASUS tablet.
Scherm vergrendelen Het vergrendelingsscherm verschijnt standaard na het inschakelen van uw apparaat of nadat u het hebt geactiveerd uit de slaapmodus. Vanaf het vergrendelingsscherm kunt u doorgaan naar het Android®-systeem van uw apparaat door over uw aanraakscherm te vegen. Het vergrendelingsscherm van uw apparaat kan ook worden aangepast om de toegang tot uw mobiele gegevens en apps te regelen.
De knoppen voor snelle toegang aanpassen Berichten en Camera. Volg de onderstaande stappen om deze standaardinstellingen te wijzigen en deze knoppen aan te passen om andere apps op het vergrendelingsscherm te starten. . 1. Start Snelle instellingen en tik op 2. Schuif omlaag in het scherm Instellingen en selecteer Scherm vergrendelen. 3. Tik op Snelle toegang. 4. Selecteer onder het scherm Snelle toegang welke knop u wilt aanpassen. 5.
Gesproken zoekopdracht Gebruik spraakopdrachten op uw ASUS tablet en kijk hoe de tablet luistert en actie onderneemt via de app Gesproken zoekopdracht. Met Gesproken zoekopdracht kunt u spraakopdrachten invoeren om het volgende te bekomen: • Gegevens en informatie online of op uw ASUS tablet zoeken • Apps op uw ASUS tablet starten • Een routebeschrijving vragen om naar een locatie te gaan BELANGRIJK! Het ASUS-tablet moet met internet zijn verbonden om een paar van deze functies te gebruiken.
Resultaten van spraak zoeken aanpassen vanaf de Tablet-zoekgroep Als u de parameters wilt instellen voor de resultaten van spraak zoeken verzameld van uw Googleaccount en de gegevens van uw ASUS tablet, doet u dat met de volgende stappen: > Gesproken zoekopdracht. 1. Tik op het beginscherm van uw ASUS tablet op 2. Zorda uw spraakzoekopdrachten worden getoond, tikt u op 3.
Hoofdstuk 2: Nergens is het zo goed als thuis
3 Contact houden 3 Contact houden Contactpersonen beheren Organiseer uw contactpersonen en blijf gemakkelijk in contact met hen. U kunt uw contacten ook synchroniseren met uw e-mail- of sociale netwerkaccounts, informatie van contacten koppelen voor gemakkelijke toegang op één locatie of de contacten waarmee u contact wilt houden filteren. De app Personen starten Tik vanaf uw Startscherm op > Contacts (Contactpersonen).
Contactpersonen toevoegen Voeg contactpersonen toe aan uw apparaat en vul belangrijkere contactinformatie in zoals, nummers van contactpersonen, e-mailadressen, speciale evenementen voor VIP’s en meer. 1. Start de app Personen en tik dan op 2. Selecteer Apparaat. . OPMERKING: • U kunt de contactpersoon ook opslaan in uw e-mailaccount. • Als u geen e-mailaccount hebt, tikt u op Nieuw account toevoegen en maakt u een nieuwe account. 3.
Uw VIP's instellen Groepeer uw contacten als VIP’s om op de hoogte te blijven van komende jubileums, verjaardagen en andere belangrijke gebeurtenissen. Uw VIP instellen vanaf het scherm Groepen Uw VIP instellen vanaf het scherm Groups (Groepen): 1. Start de app Personen. 2. Tik op 3. en selecteer de contacten die u wilt groeperen als VIP’s en tik dan op Tik op contacten worden toegevoegd aan uw VIP-lijst. > VIP. .
Een gebeurtenis toevoegen aan een VIP-contact U kunt een gebeurtenis toevoegen aan een VIP-contact, zoals een jubileum, een verjaardag en andere belangrijke gebeurtenissen. 1. Start de app Personen, tik op het contact waaraan u een gebeurtenisgegeven wilt toevoegen en tik dan op . 2. Tik op het infoscherm van het contact op Nog een veld toevoegen > Afspraken. 3. Selecteer de datum voor de gebeurtenis en tik dan op Instellen. 4. Als u klaar bent, tikt u op .
Contactpersonen importeren Importeer uw contacten en hun respectieve gegevens van één contactbron naar uw ASUS-tablet, e-mailaccount of een micro-SIM-kaart. 1. Start de Contacts-app en tik dan op > Manage contacts (Contactpersonen beheren). 2. Tik op Import/Export (Importeren/exporteren) en selecteer dan van waar u contacten wilt importeren. 3. Tik om te selecteren waar u de contacten wilt opslaan. 4. Plaats een vinkje voor het selecteren van de contacten die u wilt importeren.
Sociaal netwerken met uw contacten Het integreren van de sociale netwerkaccounts van uw contacten maakt het voor u gemakkelijker hun profielen, nieuws en sociale feeds weer te geven. Blijf in real time op de hoogte van de activiteiten van uw contacten. BELANGRIJK! Voordat u sociale netwerkaccounts van uw contacten kunt integreren, moet u zich aanmelden bij uw sociale netwerkaccount en de instellingen ervan synchroniseren.
Berichten verzenden Messenger Met Messenger kunt u belangrijke berichten van uw contacten op een van uw SIM-kaarten die op uw ASUS-tablet zijn geïnstalleerd, verzenden, onmiddellijk beantwoorden of beantwoorden op een later tijdstip. U kunt uw berichtenthreads of conversaties ook via e-mail verzenden naar anderen om ze op de hoogte te houden.
Een bericht doorsturen U kunt een bericht doorsturen naar anderen. 1. Tik vanaf het startscherm van de Messenger-app om de berichtenthread te openen. 2. Tik en houd de berichten van de thread vast en tik dan op 3. Tik op 4. Tik op wanneer u klaar bent om het bericht te verzenden. Als u meer dan één geïnstalleerde SIM-kaart hebt, selecteert u vooraf de SIM-account van waar u uw bericht zult verzenden. De conversatie wordt doorgestuurd als een MMS-bericht (Multimedia Messaging Service).
4 Uw dierbare momenten 4 Uw dierbare momenten Momenten vastleggen De app Camera starten Maak foto’s en neem video’s op met de app Camera van de ASUS tablet. Raadpleeg de onderstaande stappen om de app Camera te openen. Vanaf het vergrendelingsscherm Sleep omlaag tot de app Camera is gestart. Vanaf het beginscherm Tik op . De volumetoets gebruiken Terwijl uw ASUS tablet in de slaapstand is, dubbelklikt u op de volumetoets om deze te activeren en onmiddellijk de app Camera te starten.
Beginscherm Camera De camera van uw ASUS tablet is uitgerust met een automatische scènedetectie en functie voor de automatische beeldstabilisatie. De camera beschikt ook over een videostabilisatiefunctie die helpt beverige beelden te voorkomen tijdens video-opname. Tik op de pictogrammen om te starten met het gebruik van uw camera en om de videofuncties van uw ASUS tablet. te verkennen.
Camera-instellingen Pas het uiterlijk van uw opgenomen beelden aan door de camera-instellingen te configureren met de onderstaande stappen. BELANGRIJK! Pas eerst de instellingen toe voordat u opnamen maakt. 1. Tik vanaf het startscherm van de Camera-app op 2. Schuif omlaag en configureer de beschikbare opties. > . Video-instellingen Pas het uiterlijk van uw opgenomen video's aan door de camera-instellingen te configureren met de onderstaande stappen.
Geavanceerde camerafuncties Verken nieuwe manieren voor het vastleggen van beelden of video's en leg speciale momenten vast met behulp van de geavanceerde camerafuncties van uw ASUS tablet. BELANGRIJK! Pas eerst de instellingen toe voordat u opnamen maakt. Beschikbare functies kunnen verschillen per model of volgens de camera voor/achter. HDR Met de functie HDR (High-dynamic-range) kunt u gedetailleerde beelden opnemen voor scènes met weinig licht en een hoog contrast.
Nacht Gebruik de functie Nacht van uw ASUS tablet om goed belichte foto’s te maken, zelfs ‘s nachts of bij omstandigheden met een lage belichting. OPMERKING: Houd uw handen stil voordat en terwijl de ASUS tablet het beeld opneemt om wazige resultaten te voorkomen. Nachtopnamen maken 1. Tik vanaf het beginscherm van de app Camera op 2. Tik op > Nacht. om te beginnen met het maken van de nachtfoto's. Velddiepte Maak macro-opnamen met een zachte achtergrond met de optie Depth of field (Velddiepte).
Effect Maak foto’s met verschillende effecten, zoals Pixelize (Omzetten in pixels), Cartoon, Vintage, LOMO of andere effecten. OPMERKING: Het effect moet worden geselecteerd voordat u de foto maakt. Foto’s met effect maken 1. Tik vanaf het beginscherm van de app Camera op 2. Tik op 3. Tik op > Effect en selecteer een effect dat u wilt toepassen op de foto. om te beginnen met het maken van foto’s. Effecten toepassen op foto’s 1. Tik op de miniatuur om de foto te selecteren. 2.
Selfie Panorama Legt selfies vast vanuit verschillende hoeken met Selfie Panorama. Vastgelegde beelden worden automatisch samengevoegd met deze functie. Selfie Panorama-foto’s maken 1. Schakel van het startscherm van de Camera-app naar de camera vooraan en tik op 2. Tik op > Selfie Panorama. en pan dan uw ASUS Tablet naar links of rechts om het beeld vast te leggen.
Panorama Leg beelden vanuit verschillende hoeken vast met Panorama. Beelden die zijn opgenomen vanuit een groothoekperspectief worden met deze functie automatisch samengevoegd tot één panoramafoto. Panoramafoto’s vastleggen 1. Tik vanaf het beginscherm van de app Camera op 2. Tik op > Panorama. en pan dan uw ASUS Tablet naar links of rechts om het landschap vast te leggen.
Tijd terugspoelen Na het selecteren van Time Rewind (Tijd terugspoelen) begint uw sluiter enkele seconden voor en nadat u feitelijk op de sluiterknop drukt een reeks foto’s te maken. Hierdoor krijgt u een tijdlijn van afbeeldingen waar u het beste beeld kunt kiezen om op te slaan in uw Galerie. Time Rewind-foto’s vastleggen > Tijd terugspoelen. 1. Tik vanaf het beginscherm van de app Camera op 2. Tik op 3. De Time Rewind-viewer (Tijd terugspoelen) verschijnt op het scherm bovenop een gemaakte foto.
Volle glimlach Leg de perfecte glimlach of de gekste gezichtsuitdrukking van een reeks foto’s vast met de functie Volle glimlach. Met deze functie kunt u vijf opeenvolgende foto’s maken na het indrukken van de ontspanknop waarbij de gezichten op het beeld automatisch worden gedetecteerd ter vergelijking. Elke lach-foto’s maken > Volle glimlach. 1. Tik vanaf het beginscherm van de app Camera op 2. Tik op om te starten met het maken van foto’s die kunnen worden bewerkt met All Smiles (Elke lach). 3.
De galerie gebruiken Bekijk foto’s en speel video’s af op uw ASUS tablet met de app Galerij. Met deze app kunt u ook foto- en videobestanden die in uw ASUS tablet zijn opgeslagen, bewerken, delen of verwijderen. Vanaf Galerij kunt u foto’s weergeven in een diavoorstelling of kunt u tikken om het geselecteerde foto- of videobestand weer te geven. Om de galerie te starten, tikt u op > Galerie.
De fotolocatie bekijken Schakel de locatietoegang op uw ASUS tablet in en verkrijg de locatiegegevens op uw foto's. De locatiegegevens van uw foto bevatten het gebied waar de foto's zijn gemaakt, evenals een kaart van de locatie via Google Maps of Baidu (alleen in China). De gegevens van een foto weergeven: 1. Start de Gallery-app en selecteer de foto waarvan u de details wilt weergeven. 2. Tik op de foto en tik vervolgens op 74 Hoofdstuk 4: Uw dierbare momenten .
Bestanden van de galerie delen 1. Tik vanaf het startscherm van de app Gallery (Galerie) op de map die de bestanden die u wilt delen bevat. 2. Tik na het openen van de map op 3. Tik op de bestanden die u wilt delen. Er verschijnt een vinkje bovenaan in het beeld dat u selecteert. 4. Tik op om de bestandsselectie te activeren. en selecteer in de lijst waar u de beelden wilt delen. Bestanden verwijderen uit de galerie. 1.
MiniMovie gebruiken Maak een creatieve diavoorstelling van uw foto's met de MiniMovie-functie van de Galerie. MiniMovie bevat een thema van diavoorstellingspresentaties die u onmiddellijk kunt toepassen op geselecteerde foto's. Om een MiniMovie te maken van een fotomap: > Albums. 1. Tik vanaf het startscherm van de app Gallery (Galerie) op 2. Selecteer de fotomap en tik dan op > Auto MiniMovie. 3. Selecteer het MiniMovie-thema dat u wilt gebruiken voor uw fotodiavoorstelling.
Om een MiniMovie maken van een selectie van foto's: .> All photos (Alle foto’s) 1. Tik vanaf het startscherm van de app Gallery (Galerie) op 2. Tik op 3. Tik op MiniMovie na het selecteren van uw foto's. 4. Selecteer het MiniMovie-thema dat u wilt gebruiken voor uw fotodiavoorstelling. 5. om de diavoorstelling op te slaan of te Tik na het selecteren van een thema op delen. U krijgt toegang tot uw opgeslagen diavoorstellingen via ASUS > File Manager (Bestandsbeheer) > Videos (Video’s) > MiniMovie.
Hoofdstuk 4: Uw dierbare momenten
5 Werk hard, speel harder 5 Werk hard, speel harder De headset gebruiken Wanneer u een headset gebruikt, kunt u genieten van de vrijheid om andere dingen te doen terwijl u een gesprek voert of uw favoriete muziek beluistert. Een audiostekker aansluiten Stop de 3,5 mm headsetaansluiting in de audiopoort van uw apparaat. WAARSCHUWING! • Stop geen andere objecten in de audio-aansluiting. • Stop geen kabel met elektrische stroomuitgang in de audiopoort.
Later doen Taken toevoegen Maak belangrijke taken om uw werk of sociale activiteiten te organiseren in uw professioneel of sociaal leven. 1. Tik vanaf het beginscherm op ASUS > Do It Later (Doe het later). 2. Tik op 3. Selecteer een contact waarnaar u later een bericht wilt sturen of vul de benodigde informatie in om de taak toe te voegen. 4. Tik op Gereed wanneer u klaar bent. en selecteer of .
SuperNote Maak van het nemen van notities een leuke en creatieve activiteit met SuperNote. Met deze gebruiksvriendelijke app kunt u notities maken die geordend zijn per notebook, door direct op het aanraakscherm te schrijven of te tekenen. Tijdens het maken van notities kunt u ook multimediabestanden van andere apps toevoegen en ze delen via sociale netwerken of uw Cloudopslagaccount. Een nieuw notitieboekje aanmaken Om nieuwe bestanden te maken met SuperNote, raadpleegt u de volgende stappen: 1.
Pictogrammen begrijpen Afhankelijk van de geselecteerde invoermodus verschijnen deze pictogrammen terwijl u notities maakt op SuperNote. Selecteer dit type modus wanneer u het toetsenbord op het scherm wilt gebruiken voor het invoeren van uw notities. Selecteer deze schrijfmodus wanneer u uw notities wilt neerkrabbelen of schrijven. Selecteer deze tekenmodus wanneer u tekeningen of krabbels wilt maken.
Bestandsbeheer Via Bestandsbeheer kunt u uw gegevens gemakkelijk zoeken en beheren in het interne geheugen van uw ASUS tablet en aangesloten externe opslagapparaten. De interne opslag openen Toegang krijgen tot het interne opslagapparaat: 1. Tik op > Bestandsbeheer. 2. Tik op > Internal storage (Interne opslag) om de inhoud van uw ASUS-tablet te zien. Het externe opslagapparaat openen Toegang verkrijgen tot het externe opslagapparaat: 1. Plaats de microSD-kaart in uw ASUS tablet. 2.
De cloud Maak een back-up van uw gegevens, synchroniseer bestanden tussen verschillende apparaten en deel bestanden veilig en persoonlijke via een cloud-account, zoals ASUS WebStorage, Drive, OneDrive en Dropbox. WebStorage Registreer of meld u aan bij WebStorage en ontvang gratis cloud-opslagruimte. Upload automatisch nieuw gemaakte foto’s om ze onmiddellijk te delen, synchroniseer bestanden tussen verschillende apparaten of deel bestanden via uw WebStorage-account.
6 Plezier en amusement 6 Plezier en amusement Wifi De wifi-technologie van uw ASUS tablet zorgt dat u verbonden bent met de draadloze wereld. Met uw ASUS tablet kunt u uw sociale media-accounts bijwerken, surfen op internet of gegevens en berichten draadloos uitwisselen. Wifi inschakelen 1. Open het scherm Instellingen door één van de volgende bewerkingen uit te voeren: •• Start Snelle instellingen en tik dan op •• Tik op > Instellingen. 2. .
Wifi uitschakelen 1. Open het scherm Instellingen door één van de volgende bewerkingen uit te voeren: •• Start Snelle instellingen en tik dan op •• Tik op > Instellingen. 2. . Schuif de wifi-schakelaar naar links om wifi uit te schakelen. OPMERKING: U kunt wifi ook uitschakelen via het scherm Snelle instellingen. Raadpleeg het hoofdstuk Snelle instellingen voor informatie over het starten van het scherm Snelle instellingen.
Uw ASUS tablet koppelen met een Bluetooth-apparaat Voordat u de Bluetooth-functies van uw ASUS tablet optimaal kunt gebruiken, moet u deze eerst koppelen met het Bluetooth-apparaat. De ASUS tablet slaat automatisch de koppelingsverbinding van het Bluetooth-apparaat op. 1. Schakel de Bluetooth van uw ASUS-tablet in om het zichtbaar te maken voor andere Bluetooth-apparaten. 2. Tik op het scherm Instellingen op Bluetooth om alle beschikbare apparaten weer te geven.
Vliegtuigmodus De Airplane mode (Vliegtuigmodus) schakelt draadloze communicatie uit, zodat u uw ASUS-tablet veilig in een vliegtuig kunt gebruiken. Airplane mode (Vliegtuigmodus) inschakelen 1. Open het scherm Instellingen door één van de volgende bewerkingen uit te voeren: •• Start Snelle instellingen en tik dan op •• Tik op > Instellingen. 2. . Tik op More (Meer) en schuif de knop voor Airplane mode (Vliegtuigmodus) naar rechts om deze in te schakelen.
USB-tethering Schakel USB-tethering in op uw ASUS-tablet en deel de internetverbinding ervan met andere apparaten. 1. Sluit uw ASUS-tablet aan op een ander apparaat met een USB-kabel. 2. Wanneer het bericht Use USB for file transfer (USB gebruiken voor bestandsoverdracht), tikt u op Yes (Ja). Open het scherm Instellingen door één van de volgende bewerkingen uit te voeren: 3. •• Start Snelle instellingen en tik dan op •• Tik op > Instellingen. 4. .
Bluetooth tethering Schakel Bluetooth-tethering in op uw ASUS-tablet en deel de internetverbinding ervan met andere apparaten. 1. Schakel Bluetooth in op uw ASUS tablet en op het andere apparaat. 2. Koppel beide apparaten. OPMERKING: Raadpleeg voor meer details, de paragraafUw ASUS-tablet koppelen met een Bluetoothapparaat. 3. Tik op het scherm Instellingen op More (Meer) > Tethering & portable hotspot (Tethering en draagbare hotspot) en schuif dan Bluetooth tethering aan.
7 Zen Overal 7 Zen Overal Speciale Zenhulpmiddelen Calculator U hebt slechts één veeg en één tik nodig om uw calculator te starten. Als u het paneel Snelle instellingen opent, is het Calculatorpictogram zichtbaar bovenaan in de lijst. Tik erop om te starten met uw berekeningen. Tik hierop om Calculator in te schakelen.
Quick Memo Quick Memo is een hulpprogramma voor het maken van notities dat u de vrijheid biedt iets neer te krabbelen of om belangrijke notities die u moet onthouden, te typen. Na het maken van notities kunt u ze delen via Share Link en sociale mediasites of u kunt ze omvormen tot een taak binnen Do It Later (Doe het later). Om Quick Memo (Snelmemo) te starten, tikt u op > Quick Memo (Snelmemo).
Geluids-recorder Neem audiobestanden op met uw ASUS tablet door de app Sound Recorder in te schakelen. Om de geluidsopname te starten, tikt u op > Geluids-recorder. Tik hierop om de instellingen voor Sound Recorder aan te passen. Tik hierop om de audio-opname te starten.
Een opname pauzeren Tijdens een gepauzeerde opname, kunt u kiezen om de opname te hervatten, te verwijderen of op te slaan. Tik om de opname te hervatten Tik om de opname op te slaan Tik om de opname te verwijderen Opnamelijst Vanaf de opnamelijst kunt u een opgeslagen audio-opnamebestand afspelen, hernoemen, delen of verwijderen. Geef uw opnamelijst weer aan de rechterkant van het hoofdscherm Geluidsrecorder.
Audio Wizard Met AudioWizard kunt u de geluidsmodi van uw ASUS tablet aanpassen voor een zuiverdere audiouitvoer die past bij de huidige gebruiksscenario’s. AudioWizard gebruiken AudioWizard gebruiken: 1. Open Snelle instellingen en tik dan AudioWizard 2. Tik in het venster Audiowizard op de geluidsmodus die u wilt activeren. Indien ingeschakeld, schakelt de ASUS tablet automatisch naar de beste audiokwaliteit voor de momenteel uitgevoerde ASUS-app.
Balansmodus Deze modus biedt een gebalanceerde kleurweergave op uw ASUS Tablet. Tikken om in te stellen op de fabrieksinstellingen Verplaatsen voor het aanpassen van de kleurtemperatuur Modus Blauw-lichtfilter Deze modus is bedoeld om belasting van de ogen te verminderen voor een comfortabele leeservaring op uw ASUS-tablet.
Levendige modus Deze modus biedt een fijn afgestemde kleurvoorinstelling die de schermkleur van uw ASUS Tablet verrijkt. Tikken om in te stellen op de fabrieksinstellingen Verplaatsen voor het aanpassen van de kleurtemperatuur Aangepaste modus Met deze modus kunt u de schermweergave aanpassen op basis van de kleurtemperatuur, tint en verzadiging van uw voorkeur.
Energiebesparing Maximaliseer of breid het vermogen van uw ASUS tablet maximaal uit, zelfs als deze inactief is of terwijl de tablet verbonden blijft met uw netwerk. U kunt de voedingsinstellingen voor uw frequente activiteiten, zoals het lezen van e-mails of het bekijken van video’s, slim aanpassen. Energiebesparing instellen Optimiseer het vermogen van uw ASUS-tablet volgens uw behoeften, met enkele slimme opties voor energiebesparing. > Mobile Manager > Power Saver (Energiebesparing). 1. Tik op 2.
8 Behoud uw Zen 8 Behoud uw Zen Uw apparaat up-to-date houden Houd uw ASUS tablet in de lus van Android-systeemupdates en bijgewerkte apps en functies. Uw systeem bijwerken > Instellingen. 1. Tik op 2. Schuif in het scherm Settings (Instellingen) omlaag en tik vervolgens op About (Info). 3. Tik op Systeemupdate en tik vervolgens op Update controleren.
Uw ASUS tablet beveiligen Gebruik de beveiligingsfuncties van uw ASUS Tablet om onbevoegde gegevenstoegang te voorkomen. Uw scherm ontgrendelen Wanneer het scherm is vergrendeld, kunt u het openen met de opties voor de beveiligingsontgrendeling van de ASUS tablet. > Instellingen > Scherm vergrendelen. 1. Tik op 2. Tik op Schermvergrendeling en selecteer vervolgens een optie voor het ontgrendelen van uw ASUS tablet.
Patroon Schuif uw vinger over de punten en maak een patroon. BELANGRIJK! U kunt een patroon maken met een minimum van vier punten. Zorg dat u het patroon onthoudt dat u hebt gemaakt voor het ontgrendelen van uw apparaat. PIN Voer minstens vier cijfers in om een pincode in te stellen.
Wachtwoord Voer minstens vier tekens in om een wachtwoord te maken. BELANGRIJK! Zorg dat u het wachtwoord onthoudt dat u hebt gemaakt voor het ontgrendelen van uw apparaat. De andere schermbeveiligingsfuncties configureren Naast de modus van schermvergrendeling kunt u ook het volgende doen in het venster Lock screen (Schermvergrendeling). • Snelle toegang: Tik hierop om de snelle toegang tot het vergrendelingsscherm te bewerken.
De identiteit van uw ASUS-tablet kennen Zorg dat u de identiteit van uw ASUS-tablet kent, zoals het serienummer of modelnummer. Dit is belangrijk, want als u uw ASUS tablet verliest, kunt u contact opnemen met uw mobiele provider en de informatie opgeven om ongemachtigd gebruik van uw ASUS tablet te blokkeren via een zwarte lijst. De identiteit van uw ASUS tablet weergeven: > Instellingen. 1. Tik op 2. Schuif in het scherm Settings (Instellingen) omlaag en tik vervolgens op About (Info).
Hoofdstuk 8: Behoud uw Zen
BIJLAGEN Bijlagen Mededelingen Kennisgeving green ASUS ASUS doet zijn best om milieuvriendelijke producten en verpakkingsmaterialen te maken uit belang van de gezondheid van de consument terwijl de invloed op het milieu minimaal blijft. De vermindering van het aantal handleidingpagina’s resulteert in vermindering van de uitstoot van koolstofdioxide.
Voor model P00L Naleving Richtlijn voor Radioapparatuur van de EU Vereenvoudigde EU-conformiteitsverklaring Hierbij verklaart ASUSTek Computer Inc. dat de radioapparatuur van type P00L voldoet aan Richtlijn 2014/53/EU. De volledige tekst van de EU-verklaring van conformiteit is beschikbaar op https://www.asus.com/support/.
De WiFi op 5150-5350MHz zal beperkt zijn tot binnengebruik voor in de tabel vermelde landen: AT BE BG CZ DK EE FR DE IS IE IT EL ES CY LV LI LT LU HU MT NL NO PL PT RO SI SK TR FI SE CH UK HR Informatie RF-blootstelling Dit ASUS-product is getest en voldoet aan toepasselijke Europese SAR-limieten. De SAR-limiet is 2,0 W/Kg in landen die de limiet instellen met een gemiddelde over 10 gram weefsel.
Preventie van gehoorverlies Om mogelijk gehoorverlies te voorkomen, mag u niet gedurende langere perioden luisteren met een hoog volume. Voor Frankrijk is de hoofdtelefoon/oortelefoon voor dit apparaat compatibel met de vereisten voor het geluidsdrukniveau, vastgelegd in de toepasselijke standaarden EN 50332-1:2013 en/of EN50332-2:2013, vereist door het Franse artikel L.5232-1. For DTS patents, see http://patents.dts.com. Manufactured under license from DTS Licensing Limited.
Veiligheidsinformatie batterij 1. Niet demonteren, openen, samenpersen, buigen of vervormen, doorprikken of verscheuren. 2. De batterij niet wijzigen of opnieuw fabriceren, niet proberen om vreemde objecten in de batterij te stoppen, de batterij niet onderdompelen of blootstellen aan water of andere vloeistoffen, niet blootstellen aan vuur, ontploffings- of andere gevaren. 3.
Voor model P028 FCC-verklaring (Federal Communications Commission) Dit apparaat voldoet aan Deel 15 van de FCC-voorschriften. Het gebruik is onderhevig aan de volgende twee voorwaarden: • Dit apparaat mag geen schadelijke storing veroorzaken en • Dit apparaat moet elke ontvangen storing aanvaarden, met inbegrip van storing die ongewenste werking kan veroorzaken. Dit apparaat werd getest en voldoet aan de beperkingen voor een klasse B digitaal apparaat, in naleving van deel 15 van de FCC-voorschriften.
Informatie over RF-blootstelling (SAR) Dit apparaat voldoet aan de eisen van de overheid voor blootstelling aan radiogolven. Dit apparaat is ontworpen en gefabriceerd om de emissielimieten voor blootstelling aan energie van radiofrequentie (RF), ingesteld door de Federal Communications Commission van de NoordAmerikaanse overheid, niet te overschrijden. De blootstellingnorm past een meeteenheid toe die bekend staat als de specifieke absorptiesnelheid of SAR.
Naleving Richtlijn voor Radioapparatuur van de EU Vereenvoudigde EU-conformiteitsverklaring Hierbij verklaart ASUSTek Computer Inc. dat de radioapparatuur van type P028 voldoet aan Richtlijn 2014/53/EU. De volledige tekst van de EU-verklaring van conformiteit is beschikbaar op https://www.asus.com/support/.
De WiFi op 5150-5350MHz zal beperkt zijn tot binnengebruik voor in de tabel vermelde landen: AT BE BG CZ DK EE FR DE IS IE IT EL ES CY LV LI LT LU HU MT NL NO PL PT RO SI SK TR FI SE CH UK HR Informatie RF-blootstelling Dit ASUS-product is getest en voldoet aan toepasselijke Europese SAR-limieten. De SAR-limiet is 2,0 W/Kg in landen die de limiet instellen met een gemiddelde over 10 gram weefsel.
Preventie van gehoorverlies Om mogelijk gehoorverlies te voorkomen, mag u niet gedurende langere perioden luisteren met een hoog volume. Voor Frankrijk is de hoofdtelefoon/oortelefoon voor dit apparaat compatibel met de vereisten voor het geluidsdrukniveau, vastgelegd in de toepasselijke standaarden EN 50332-1:2013 en/of EN50332-2:2013, vereist door het Franse artikel L.5232-1. For DTS patents, see http://patents.dts.com. Manufactured under license from DTS Licensing Limited.
Veiligheidsinformatie batterij 1. Niet demonteren, openen, samenpersen, buigen of vervormen, doorprikken of verscheuren. 2. De batterij niet wijzigen of opnieuw fabriceren, niet proberen om vreemde objecten in de batterij te stoppen, de batterij niet onderdompelen of blootstellen aan water of andere vloeistoffen, niet blootstellen aan vuur, ontploffings- of andere gevaren. 3.
Voor model DK02 Naleving Richtlijn voor Radioapparatuur van de EU Vereenvoudigde EU-conformiteitsverklaring Hierbij verklaart ASUSTek Computer Inc. dat de radioapparatuur van type ASUS_P00M voldoet aan Richtlijn 2014/53/EU. De volledige tekst van de EU-verklaring van conformiteit is beschikbaar op https://www.asus.com/support/.
CE-markering Vereiste spanningsveiligheid Product met een elektrisch stroombereik tot 6A en een gewicht van meer dan 3 kg moeten goedgekeurde voedingskabels gebruiken die groter zijn dan of gelijk aan: H05VV-F, 3G, 0.75mm2 of H05VV-F, 2G, 0.75mm2. Voor gebruik met UL-goedgekeurde I.T.E., alleen ASUS tablets-serie.
Modelnaam: P00L (Z301ML, Z301MFL, M1001ML, M1001MFL, R1001ML, R1001MFL) P028 (Z301M, Z301MF, M1001M, M1001MF, R1001M, R1001MF) DK02 Fabrikant: Adres: Erkende vertegenwoordiger in Europa: Adres: 118 Bijlagen ASUSTeK Computer Inc. 4F, No.150, LI-TE RD., PEITOU, TAIPEI 112, TAIWAN ASUS Computer GmbH HARKORT STR.