ASUS Tablet E-priručnik
CR10438 Srpanj 2015 Prvo izdanje AUTORSKO PRAVO Niti jedan dio ovog priručnika, uključujući u njemu opisane proizvode i softver, ne smije se bez izričite pismene suglasnosti tvrtke ASUSTeK COMPUTER INC. (u daljnjem tekstu: ASUS) reproducirati, prenositi, prepisivati, pohranjivati u sustavu gdje se mu se može ponovo pristupiti ili prevoditi na bilo koji jezik, u bilo kojem obliku ili na bilo koji način, osim dokumentacije koju prodavatelj čuva u svrhu izrade sigurnosne kopije.
Sadržaj Konvencije koje se koriste u ovom priručniku............................................................................. 7 Briga i sigurnost...................................................................................................................................... 7 1 Pripremite vaš Zen! Dijelovi i funkcije........................................................................................................... 9 Ugradnja memorijske kartice..............................................
Upravljanje kontaktima..............................................................................................54 Pokretanje aplikacije Kontakti.........................................................................................................54 Postavke kontakata..............................................................................................................................54 Priprema vašeg profila......................................................................................
Dodavanje računa u kalendar....................................................................................................... 102 Stvaranje događaja s vašeg računa............................................................................................ 103 Omogućavanje podsjetnika na događaje upozorenjem.................................................... 103 Aplikacija What’s Next...............................................................................................
Bluetooth®..................................................................................................................124 Omogućavanje Bluetooth® veze.................................................................................................. 124 Uparivanje ASUS tableta s Bluetooth® uređajem.................................................................. 125 Raskidanje veze ASUS tableta s Bluetooth® uređajem........................................................
Konvencije koje se koriste u ovom priručniku U svrhu naglašavanja ključnih informacija u ovom priručniku, poruke su predstavljene na sljedeći način: VAŽNO! Ova poruka sadrži bitne informacije koje za dovršenje zadatka treba pročitati. NAPOMENA: Ova poruka sadrži dodatne informacije i savjete koji mogu pomoći u izvođenju zadataka.
Propisno zbrinjavanje Opasnost od eksplozije baterije ako se zamijeni nepropisanom vrstom. Dotrajale baterije zbrinite sukladno uputama. ASUS Tablet NEMOJTE odlagati u komunalni otpad. Dijelove ovog proizvoda moguće je ponovo koristiti i reciklirati. Simbol prekriženog koša za otpatke označava da se proizvod (električna i elektronička oprema te baterije koje sadrže živu) ne smije odlagati zajedno s komunalnim otpadom. Elektroničke proizvode odložite prema važećim lokalnim propisima.
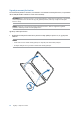
1 Pripremite vaš Zen! 1 Pripremite vaš Zen! Dijelovi i funkcije Uzmite svoj uređaj i pokrenite ga u tren oka. Zvučnici Prednja kamera Mikro USB 2.0 priključak Utor za zvučnik / slušalice Stražnja kamera Gumb za glasnoću Gumb napajanja Žlijeb Ploča ekrana osjetljivog na dodir Mikrofon VAŽNO! Uređaj, a posebno dodirni zaslon, uvijek moraju biti suhi. Voda i ostale tekućine mogu uzrokovati kvar dodirnog zaslona.
Ugradnja memorijske kartice Vaš ASUS Tablet podržava microSD™, microSDHC™ i microSDXC™ memorijske kartice, s kapacitetom do 128 GB (do 64 GB na modelima samo s Wi-Fi mrežom). NAPOMENA: Neke memorijske kartice neće biti kompatibilne s ASUS tabletom. Pobrinite se da koristite samo kompatibilne kartice kako biste spriječili gubitak podataka, oštećenje uređaja ili memorijske kartice ili oboje. OPREZ! Postupajte s oprezom pri korištenju memorijske kartice.
2. Centrirajte i stavite memorijsku karticu u utor za memorijsku karticu. 3. Gurnite memorijsku karticu do kraja u utor da čvrsto sjedne na mjesto. 4. Postavite stražnji poklopac natrag na mjesto. NAPOMENA: Nakon instaliranja formatirane memorijske kartice, njezinom sadržaju možete pristupiti iz ASUS > File Manager (Upravitelj datoteka) > Internal storage (Unutarnja pohrana) > SD Memory Card (SD memorijska kartica).
Uklanjanje memorijske kartice OPREZ! • Postupajte s oprezom pri korištenju memorijske kartice. ASUS ne odgovara za gubitak podataka i oštećenja nastala na memorijskoj kartici. • Izbacite memorijsku karticu na propisani način kako biste je sigurno uklonili iz uređaja. Za izbacivanje memorijske kartice, idite u Početak > Sve aplikacije > Postavke > Pohranjivanje > Unmount external storage (Odvoji vanjski medij za pohranu). Vađenje memorijske kartice: 1.
3. Postavite stražnji poklopac natrag na mjesto.
Ugradnja micro SIM kartice (na odabranim modelima) Utor za micro SIM karticu podržava mrežne opsege LTE, WCDMA i EDGE/GSM. NAPOMENA: Da ne dođe do oštećivanje priključka, obvezno koristite standardnu micro SIM karticu bez SIM adaptera ili uporabe rezača. OPREZ! Budite iznimno pažljivi kod rukovanja micro SIM karticom. Tvrtka ASUS ne odgovara ni za kakve gubitke ili oštećenja na micro SIM kartici. Ugradnja micro SIM kartice: 1.
2. Poravnajte i umetnite micro SIM karticu u utor za micro SIM karticu. 3. Pritisnite micro SIM karticu do kraja u utor tako da čvrsto ne sjedne na svoje mjesto. 4. Postavite stražnji poklopac natrag na mjesto.
Uklanjanje micro SIM kartice (na odabranim modelima) OPREZ! Budite iznimno pažljivi kod rukovanja micro SIM karticom. Tvrtka ASUS ne odgovara ni za kakve gubitke ili oštećenja na micro SIM kartici. Za uklanjanje micro SIM kartice: 1. Nađite žlijeb u donjem desnom kutu i povucite stražnji poklopac prema van, te ga potpuno uklonite. OPREZ! 2. 16 • Pazite kako ne biste oštetili stražnji poklopac ili ozlijedili prste dok skidate poklopac.
3. Postavite stražnji poklopac natrag na mjesto. Punjenje ASUS Tableta ASUS tablet isporučuje se djelomično napunjen, ali vi ga morate potpuno napuniti prije prve upotrebe. Pročitajte sljedeće važne napomene i mjere opreza prije punjenja uređaja. VAŽNO! • Koristite isključivo isporučeni AC adapter i mikro USB kabel za punjenje ASUS tableta. Korištenjem drugog AC adaptera napajanja i kabela možete oštetiti svoj uređaj.
Za punjenje ASUS Tablet: 1. Spojite mikro USB kabel na adapter napajanja. 2. Priključite adapter napajanja u uzemljenu utičnicu. 3. Ukopčajte mikro USB priključak u ASUS Tablet. VAŽNO! • ASUS Tablet punite osam (8) sati prije prve upotrebe u baterijskom na režimu rada. • Stanje baterije predstavljeno je sljedećim ikonama: Slaba 4. Ne puni se Puni se Puna Kada je uređaj do kraja napunjen, odspojite USB kabel iz ASUS tableta prije odvajanja AC adaptera napajanja iz električne utičnice.
Uključivanje i isključivanje ASUS tableta Uključivanje uređaja Za uključivanje uređaja pritisnite i zadržite gumb za uključivanje do pokretanja uređaja. Isključivanje uređaja Isključivanje uređaja: 1. Ako se isključio zaslon, pritisnite gumb za uključivanje da se on uključi. Ako je zaslon zaključan, otključajte ga. 2. Pritisnite i zadržite gumb za uključivanje, a zatim kada se pojavi odgovarajuća poruka, dodirnite Isključi i zatim dodirnite U redu.
Osnovno Istražite intuitivnu jednostavnost ASUS Zen UI 2.0! ASUS Zen UI 2.0 je šarmantno i intuitivno sučelje isključivo za ASUS tablete. Ono vam donosi posebne aplikacije koje su integrirane ili dolaze s drugim aplikacijama i koje su prilagođene vašim osobnim potrebama i koje vam olakšavaju život uz istodobnu zabavu s ASUS tabletom. ASUS podrška Pronađite odgovore na ČPP (često postavljana pitanja) ili na korisničkom forumu podijelite svoja iskustva.
Prva upotreba Pri prvom uključivanju ASUS tableta, čarobnjak za postavljanje će vas voditi kroz postupak postavljanja. Pratite upute na zaslonu za izbor jezika, izbor način unosa, postavljanje mobilne mreže i Wi-Fi mreže, sinkroniziranje računa i konfiguriranje usluga povezanih s vašom lokacijom. Koristite svoj Google ili ASUS račun u postavljanju uređaja, a ako još nemate Google ili ASUS račun, izradite ga.
Savjeti za očuvanje energije baterije Napunjenost baterije znači život za vaš ASUS tablet. Evo nekoliko savjeta za očuvanje energije baterije koji će vam pomoći u očuvanju napunjenosti baterije vašeg ASUS tableta. – Zatvorite sve pokrenute aplikacije koje se ne koriste. – Kada ga ne koristite, pritisnite gumb za uključivanje/isključivanje kako biste uređaj postavili u stanje mirovanja. – Aktivirajte funkciju Smart Saving (Pametna štednja) u aplikaciji Power Saver. – Zvuk postavite u pametni način rada.
Korištenje dodirnog zaslona Koristite ove geste na dodirnom zaslonu za pokretanje aplikacija, pristup nekim postavkama i navigaciju kroz ASUS Tablet. Pokretanje aplikacija ili odabiranje stavki Učinite jedno od sljedećeg: • Za pokretanje aplikacije jednostavno kucnite na nju. • Za odabir stavke, primjerice u aplikaciji File Manager, jednostavno kucnite na nju.
Kretanje kroz stranice ili zaslone Učinite jedno od sljedećeg: • Prevucite prst ulijevo ili udesno za prebacivanje između zaslona ili za prelistavanje kroz Galeriju slika. • Listajte prstom gore ili dolje za prolaženje kroz mrežne stranice ili popis stavki. Povećavanje zumom Raširite dva prsta na dodirnoj ploči za povećavanje slike zumom u aplikacijama Gallery ili Maps ili ako zumom želite povećati internetsku stranicu.
Smanjivanje zumom Primaknite dva prsta na dodirnoj ploči za smanjivanje zumom slike u aplikacijama Gallery ili Maps ili ako zumom želite smanjiti internetsku stranicu. ZenMotion Kad je ploča dodirnog zaslona isključena, uz ove jednostavne i intuitivne geste možete brzo pokretati aplikacije na ASUS tabletu jednostavnim upisivanjem slova.
Poglavlje 1: Pripremite vaš Zen!
2 Svugdje je lijepo, ali doma je najljepše Svugdje je lijepo, ali doma je najljepše 2 NAPOMENA: Stvarno prikazane aplikacije na zaslonu razlikuju se ovisno o modelu. Sljedeća snimka zaslona služi samo kao referenca. Funkcije Zen Home Početni zaslon Na početnom zaslonu dobit ćete podsjetnike za važne događaje, aplikacije i ažuriranja sustava, vremensku prognozu i tekstualne poruku od osoba koje su vam zaista važne.
Razumijevanje ikona Ove ikone se prikazuju u traci statusa i upoznaju vas s trenutnim stanjem vašeg ASUS tableta. Mobilna mreža (na odabranim modelima) Predstavlja jačinu signala mobilne mreže. Poruke Prikazuje da imate nepročitanu poruku. Wi-Fi Ova ikona predstavlja jačinu signala Wi-Fi veze. Vijek baterije Ova ikona predstavlja stanje baterije ASUS tableta. MicroSD kartica Ova ikona predstavlja da je microSD kartica umetnuta u ASUS tablet.
Prilagodba početnog zaslona Ostavite trag svoje osobnosti na početnom zaslonu. Odaberite privlačan dizajn kao svoju pozadinu, dodajte prečace radi brzog pristupa omiljenim aplikacijama i dodajte widgete za brzi pregled važnih podataka. Možete dodati i još stranica kako biste mogli dodati i brzo pristupiti ili pregledati više aplikacija i widgeta na početnom zaslonu. Prečaci aplikacija Prečice aplikacija olakšavaju brzi pristup često korištenim ili omiljenim aplikacijama na početnom zaslonu.
Grupiranje prečaca aplikacija u mapi Izradite mape za organiziranje prečaca aplikacija na početnom zaslonu. 1. Na početnom zaslonu dodirnite i odvucite aplikaciju na drugu aplikaciju i mapu i pojavit će se mapa. 2. Dodirnite novu mapu i dodirnite Unnamed Folder (Neimenovana mapa) radi dodjele naziva toj mapi. Widgeti Na početni zaslon možete stavljati miniaplikacije, koje su male dinamičke aplikacije.
Pozadinske slike Neka vaše aplikacije, ikone i Zen elementi leže na privlačno dizajniranoj pozadini. Možete dodati prozirnu nijansu u pozadinu, radi čitljivosti i jasnoće. Osim toga, možete odabrati i animiranu pozadinu, ako želite oživiti svoj zaslon.
Primjena animirane pozadine Primjena animirane pozadine: 1. Dodirnite i zadržite prazno područje na početnom zaslonu i odaberite Pozadinske slike. 2. Odaberite gdje želite da bude pozadina: na početnom zaslonu ili na početnom i zaslonu za zaključavanje. 3. Odaberite animiranu pozadinu pa dodirnite Apply (Primjeni). NAPOMENA: Postavke pozadine možete namjestiti i u > Postavke > Prikaz.
Dodavanje prečaca U laganom načinu rada, na početni zaslon možete dodati do dvanaest (12) prečaca za aplikacije. 1. Prstom prijeđite na desni dio početnog zaslona, a zatim dodirnite . 2. Na zaslonu All apps (Sve aplikacije) odaberite aplikaciju koju želite dodati na popis. Uklanjanje prečaca Učinite sljedeće: 1. Dodirnite pa odaberite aplikaciju ili aplikacije koje želite ukloniti s popisa. 2. Dodirnite Delete (Izbriši) ako želite izbrisati prečac za aplikaciju.
Postavljanje datuma ili vremena Prema zadanim postavkama, datum i vrijeme prikazani na početnom zaslonu automatski će se sinkronizirati kada ste povezani s internetom. Promjena postavki datuma i vremena: 1. Pokrenite zaslon Postavke na jedan od sljedećih načina: •• Pokrenite Brze postavke i zatim dodirnite •• Dodirnite . > Postavke. 2. Povucite zaslon Postavke prema dolje i odaberite Date & time (Datum i vrijeme). 3. Odznačite Automatic date & time (Automatski datum i vrijeme). 4.
Brze postavke Obavijesna ploča za brze postavke je sredstvo za pristup određenim bežičnim funkcijama i postavkama vašeg ASUS tableta uz samo jedan dodir. Svaku od tih funkcija predstavlja odgovarajući gumb. Ploču Quick settings (Brze postavke) pokrenut ćete tako da dvama prstima prijeđete dolje s vrha ASUS tableta. NAPOMENA: Plavi gumb označava da je funkcija trenutno omogućena, dok sivi gumb označava onemogućenu funkciju.
Dodavanje i uklanjanje gumba Ako želite dodati ili ukloniti postojeće gumbe iz ASUS obavijesne ploče za brze postavke: 1. Pokrenite brze postavke i zatim dodirnite 2. Dodirnite okvir pored funkcije ako je želite dodati ili ukloniti iz ASUS obavijesne ploče za brze postavke. . NAPOMENA: Označen okvir označava da je gumbu određene funkcije moguće pristupiti putem ASUS obavijesne ploče za brze postavke, dok neoznačen okvir znači suprotno. 3.
Zaslon za zaključavanje Prema zadanim postavkama, zaslon za zaključavanje pojavljuje se nakon uključivanja uređaja i za vrijeme njegova buđenja iz stanja mirovanja. Sa zaslona za zaključavanje ćete u sustav Android® vašeg uređaja ući prijelazom prsta preko ploči dodirnog zaslona. Zaslon za zaključavanje vašeg uređaja može se prilagoditi za reguliranje pristupa podacima i aplikacijama na vašem mobilnom uređaju.
Prilagođavanje gumba za brzi pristup Po zadanim postavkama, zaslon zaključavanja sadrži gumbe za brzi pristup ovim aplikacijama: Poruke i Kamera. Uz pomoć sljedećeg postupka promijenite zadane postavke i prilagodite ove gumbe za pokretanje drugih aplikacija na zaslonu zaključavanja: . 1. Pokrenite brze postavke i zatim dodirnite 2. Pomaknite zaslon Postavke prema dolje i odaberite Lock screen (Jezik i unos). 3. Dodirnite Quick Access (Brzi pristup). 4.
Govorno pretraživanje Aplikacija Voice Search vam omogućava stvaranje glasovnih naredbi za ASUS tablet, gledanje kako ih on sluša i korištenje izvršavanje radnji. Koristeći Voice Search možete stvarati glasovne naredbe kako biste činili nešto od sljedećeg: • Pretraživanje podataka i informacija na mreži li na vašem ASUS tabletu • Pokretanje aplikacija na ASUS tabletu • Dobijanje uputa do određene lokacije VAŽNO! ASUS tablet mora biti povezan s internetom da bi mogao koristiti ovu funkciju.
Prilagodba rezultata govornog pretraživanja iz grupe za pretraživanja tableta Ako želite postaviti parametre za rezultate glasovnog pretraživanja prikupljene s vašeg Google računa i za rezultate u vezi ASUS tableta, to možete učinite prema sljedećim uputama: 1. Na početnom zaslonu vašeg ASUS tableta dodirnite 2. Dodirnite 40 > Postavke. Poglavlje 2: Svugdje je lijepo, ali doma je najljepše > Glas. pretraživanje.
3. Kucnite Pretraživanje tableta. 4. Kvačicom označite okvir grupa za pretraživanje koje želite uključiti kao izvor kada koristite Voice Search (Glasovno pretraživanje).
Poglavlje 2: Svugdje je lijepo, ali doma je najljepše
3 Ostanite u vezi 3 Ostanite u vezi Način poziva (samo na odabranim modelima) Upućivanje poziva ASUS tablet nudi vam brojne načine upućivanja poziva. Možete zvati prijatelje s popisa kontakata, koristiti pametno biranje za brzo upućivanje poziva ili unijeti broj za brzo pozivanje radi unosa kontakta koji često zovete. NAPOMENA: Organizirajte kontakte u aplikaciji Kontakti. Više pojedinosti potražite u Upravljanje kontaktima.
Upiti za potvrdu lokalnog broja Potvrdni upit za lokalni broj možete ubaciti iza biranja glavnog broja. 1. Upišite glavni broj u aplikaciji Phone. 2. Dodirnite i držite # radi ubacivanja potvrdnog upita, koji je označen točka-zarezom (;). 3. Kada se od vas zatraži, dodirnite Yes (Da) radi potvrde lokalnog broja. Automatsko biranje lokalnog broja Iza biranja glavnog broja možete ubaciti kratku ili dugu pauzu i nakon toga će se lokalni broj birati automatski. 1. Upišite glavni broj u aplikaciji Phone.
Brzo biranje kontakata Odredite tipke brzog biranja za brzo pozivanje kontakata koje zovete često jednim dodirom jedne tipke u aplikaciji Phone. NAPOMENA: Po zadanim postavkama tipka 1 rezervirana je za govornu poštu. Govornu poštu možete dohvatiti dodirom tipke 1 ako ste se pretplatili na tu uslugu kod mobilnog operatera. Izrada unosa za brzo biranje Izradite unose za brzo biranje s brojevima 2 do 9 za vaše kontakte koje često zovete. 1.
Biranje kućnog broja Kada ste na putovanju u inozemstvu, omogućivanjem i konfiguriranjem postavki za biranje kućnog broja, pozivanje vašeg kućnog broja bit će lakše i jednostavnije. NAPOMENA: Korištenje usluga roaminga prouzročit će dodatne troškove. Raspitajte se kod mobilnog operatera prije korištenja usluge roaminga. 1. Pokrenite zaslon Postavke na jedan od sljedećih načina: •• Pokrenite Brze postavke i zatim dodirnite •• Dodirnite . > Postavke. 2.
Primanje poziva Dodirni zaslon ASUS tableta će zasvijetliti kada postoji dolazni poziv. Prikaz dolaznog poziva također se razlikuje ovisno o stanju ASUS tableta. Javljanje na pozive Dva su načina javljanja na poziv, ovisno o stanju ASUS tableta. • Ako je uređaj aktivan, dodirnite Answer (Javljanje)ili za odbijanje poziva dodirnite Decline (Otkloni). • Ako je uređaj zaključan, odvucite na radi javljanja ili na radi odbijanja poziva.
Blokiranje poziva Broj ili poziv iz dnevnika poziva možete dodati na popis za blokiranje. za prikaz dnevnika poziva. 1. U aplikaciji Phone dodirnite 2. Odaberite broj koji želite blokirati, dodirnite blokiranje) i zatim dodirnite OK (U redu). > Add to block list (Dodaj na popis za Spremanje poziva u Kontakti Broj iz dnevnika poziva možete dodati na popis kontakata. za prikaz dnevnika poziva. 1. U aplikaciji Phone dodirnite 2.
Druge mogućnosti poziva Za vrijeme aktivnog poziva, dodirnite kada je poziv u tijeku. i dodirnite bilo koju od mogućih mogućnosti poziva Mikrofon Uključuje i isključuje mikrofon za aktivni poziv. Kada je mikrofon isključen ili je utišan, moći ćete čuti pozivatelja, ali on neće čuti vas. Zvučnik Uključuje i isključuje zvučnik. Poziv na čekanju Stavlja se aktivni poziv na čekanje.
Upravljanje s više poziva ASUS tablet nudi vam pogodnost upućivanja ili preuzimanja dva poziva. Konferencijski poziv također možete podesiti kako bi odgovarao poslovnim sastancima, zajedničkim linijama i drugim grupnim pozivima. Javljanje na drugi poziv Dok razgovarate na ASUS tabletu, možete začuti zvučni signal koji označava drugi dolazni poziv. Dodirnite Answer (Javljanje) na dodirnom zaslonu ako želite prihvatiti dolazni poziv za vrijeme aktivnog poziva.
Priprema konferencijskog poziva ASUS tablet zajedno s GSM mogućnošću može pripremiti konferencijski poziv za najviše pet (5) osoba. Za vrijeme poziva možete dodati više kontakata i spojiti pozive u jedan konferencijski poziv. 1. Zovite kontakt ili birajte broj. Pričekajte dok se druga osoba ne javi na vaš poziv. 2. Kada se javi na poziv, dodirnite konferencijski poziv. 3. Dodirnite 4. Dodirnite ako želite dodati drugi kontakt i zatim dodirnite za spajanje poziva s trenutnim konferencijskim pozivom.
Upravljanje konferencijskim pozivom Za vrijeme konferencijskog poziva kontakt možete odvojiti od konferencijske grupe radi privatnog razgovora ili kontakt možete odvojiti od konferencijskog poziva. 1. Na zaslonu za konferencijski poziv dodirnite Manage conference call (Upravljanje konferencijskim pozivom) radi otvaranja popisa kontakata u konferencijskom pozivu. 2. Ako želite ukloniti kontakt iz konferencijskog poziva, dodirnite od konferencijskog poziva, dodirnite 3. 52 Dodirnite .
Snimanje poziva ASUS tablet omogućuje snimanje razgovora za buduće potrebe ili informacije. 1. Zovite kontakt ili birajte broj. 2. Dodirnite za snimanje poziva. VAŽNO! Prije snimanja poziva od druge strane zatražite dopuštenje za snimanje. 3. Za prekid snimanja dodirnite . Ova se ikona pojavljuje u traci za obavijesti sustava. 4. Povucite prema dolje gornji lijevi kut zaslona i zatim dodirnite obavijest Call recording saved (Spremljena snimka poziva) radi pregleda snimljenog razgovora.
Upravljanje kontaktima Organizirajte kontakte i jednostavno ostanite s njima u vezi putem poziva (samo na odabranim modelima), SMS poruka (samo na odabranim modelima), e-pošte ili društvenih mreža. Grupirajte kontakte kao Omiljeni radi brzog pristupa do njih ili ih grupirajte kao VIP osobe i primajte obavijesti o svim predstojećim događajima, propuštenim pozivima ili nepročitanim porukama.
Dodirnite za pregled podataka o vašem profilu Dodavanje kontakata Dodajte kontakte vašem uređaju, korporacijskim, Google ili drugim računima za e-poštu i popunite još više važnih podataka za kontakt kao što su brojevi kontakata, adrese e-pošte, posebni događaji za VIP osobe i još punog toga. 1. Pokrenite aplikaciju Kontakti i zatim dodirnite 2. Odaberite Device (Uređaj). . NAPOMENE: • Također možete spremiti kontakt na SIM karticu (na odabranim modelima) ili računu e-pošte.
Dodavanje lokalnog broja broju kontakta Broju kontakta možete dodati pozivni broj. 1. Na zaslonu Dodavanje kontakta popunite sva potrebna polja. 2. U polju Telefon, upišite glavnu liniju i zatim dodirnite ili i dodajte kućni broj. NAPOMENE: 3. 56 • Koristite , kao separator glavne linije i kućnog broja kada želite preskočiti glasovni upit. • Koristite ; kao separator glavne linije i kućnog broja kada želite prvo potvrditi lokalni i onda nastaviti s pozivom.
Prilagodba profila kontakta Uredite podatke kontakta, dodajte fotografiju, postavite zvuk zvona ili snimite fotografiju kao naslovnicu profila vašeg kontakta. 1. Pokrenite aplikaciju Contacts (Kontakti) i zatim odaberite kontakt čije podatke ili profil želite urediti ili prilagoditi. 2. Promjene izvodite na stranici profila kontakta.
Postavljanje VIP kontakata na zaslonu Groups (Grupe) Postupak postavljanja VIP kontakta na zaslonu Groups (Grupe): 1. Pokrenite aplikaciju Kontakti. 2. Dodirnite 3. Na zaslonu VIP osobe dodirnite 4. Odaberite kontakt ili kontakte koje želite grupirati kao VIP osobe i zatim dodirnite Add (Dodaj). Kontakt ili kontakti će biti dodani popisu VIP osoba. 58 > VIP. Poglavlje 3: Ostanite u vezi .
Postavljanje VIP kontakata na zaslonu Groups (Grupe) Postupak postavljanja VIP kontakta na zaslonu Groups (Grupe): 1. Pokrenite aplikaciju Kontakti. 2. Dodirnite 3. Na zaslonu VIP osobe dodirnite 4. Odaberite kontakt ili kontakte koje želite grupirati kao VIP osobe i zatim dodirnite Add (Dodaj). Kontakt ili kontakti će biti dodani popisu VIP osoba. . . Dodavanje događaja VIP kontaktu VIP kontaktu možete dodati događaje poput obljetnice, rođendana i drugih važnih događaja. 1.
Označavanje omiljenih kontakata Aplikacija Contacts omogućava da kao favorite postavite kontakte koje često koristite kako biste ih brzo mogli pronaći. 1. Pokrenite aplikaciju Contacts (Kontakti) na jedan od sljedećih načina: a. Na početnom ekranu dodirnite ASUS > Contacts (Kontakti). b. Na zaslonu Sve aplikacije dodirnite aplikaciju Contacts (Kontakti). 2. Na zaslonu Kontakti dodirnite aplikaciju 3. Označite okvire kontakata koje želite dodati u omiljene kontakte. 4.
Uvoz kontakata Uvezite kontakte i njihove odgovarajuće podatke iz jednog izvora kontakata u ASUS tablet, račun za e-poštu ili micro SIM karticu. 1. Dodirnite Asus > Contacts (Kontakti) i zatim aplikaciju > Manage contacts (Upravljanje kontaktima). 2. Kucnite Uvoz/Izvoz i zatim odaberite jednu od sljedećih mogućnosti uvoza: a. Uvoz sa SIM kartice (samo na odabranim modelima) b. Uvoz s uređaja za pohranu 3. Dodirnite račun s kojeg želite uvesti svoje kontakte: a. Račun e-pošte b. Uređaj c.
Upravljanje popisom za blokiranje Blokiranje kontakata ili brojeva Izradite popis blokiranih kontakata ili brojeva kako biste izbjegli primanje neželjenih poziva ili poruka. Blokirani pozivi i poruke spremat će se u arhivu popisa za blokiranje. 1. Dodirnite Asus > Contacts (Kontakti) i zatim aplikaciju kontaktima) > Blocked list (Popis blokiranih). 2.
Sinkroniziranje vašeg računa na društvenoj mreži Sinkronizirajte vaš račun na društvenoj mreži kako biste dodali račune na društvenoj mreži vaših kontakata na ASUS tablet. 1. Pokrenite zaslon Postavke na jedan od sljedećih načina: •• Pokrenite Brze postavke i zatim dodirnite •• Dodirnite . > Postavke. 2. Na zaslonu Postavke dodirnite vaš račun društvene mreže u odjeljku Računi. 3. Označite Contacts (Kontakti) ako želite sinkronizirati račune društvene mreže vaših kontakata. 4.
Postavke poziva (samo na odabranim modelima) Konfiguriranje postavki dolaznih i odlaznih poziva, zabrane poziva, biranje kućnog broja i još puno toga. 1. Pokrenite zaslon Postavke na jedan od sljedećih načina: •• Pokrenite Brze postavke i zatim dodirnite •• Dodirnite 2. . > Postavke. Dodirnite Call settings (Postavke poziva) i zatim odaberite jednu od ovih postavki koje želite pripremiti. Postavke dolaznog poziva Zvuk zvona telefona Postavite zvuk zvona za SIM karticu.
Slanje poruka i još puno više Razmjena poruka (samo na odabranim modelima) Razmjena poruka vam omogućuju slanje, brzi odgovor ili odgovor u drugo vrijeme, za važne poruke od vaših kontakata s bilo koje SIM kartice instalirane u uređaj. Također možete e-poštom slati razgovore s raspravom ili razgovore s drugima kako biste ih čuvali u krugu. Pokretanje aplikacije Razmjena poruka Na početnom zaslonu učinite nešto od sljedećeg za pokretanje aplikacije Messaging.
Prosljeđivanje niti s porukom (samo na odabranim modelima) Drugima možete proslijediti razgovor s raspravom ili razgovor i postaviti upozorenje kako biste mogli odgovoriti na važne poruke u odgovarajuće vrijeme. 1. Na Home screen (Početni zaslon) dodirnite 2. Dodirnite nit poruke i zatim dodirnite > Forward SMS conversation (Proslijedi SMS razgovor). 3. Kucnite Odaberi sve ili bilo koju od poruka iz razgovora, zatim kucnite Proslijedi. 4. U polju Prima, kucnite 5.
Povezivanje podataka o vašim kontaktima Ako ste dodali račun vaše društvene mreže ili e-pošte, podaci s tih računa automatski će se sinkronizirati s aplikacijom Contacts. U nekim slučajevima određeni podaci o kontaktu bit će prikazani na više mjesta ili pod različitim imenima ili nadimcima u aplikaciji Contacts. Sve te podatke možete ručno povezati i objediniti te ih smjestiti na jedno mjesto ili profil. 1.
Omlet Chat Omlet Chat je otvorena aplikacija za razmjenu poruka i dijeljenje na mobilnoj vezi koja vam omogućuje čavrljanje s prijateljima na mreži. Ona vam također omogućuje upravljanje podacima njihovim sigurnim spremanjem u vaše privatne račune u oblaku. NAPOMENA: • Aplikacija Omlet Chat je dostupna samo u nekim zemljama. • Prilikom prve upotrebe morate posjetiti Play Store i ažurirati Omlet Chat. Morate imati Google račun za ažuriranje Omlet Chat.
Korištenje Google™ računa Registriranje uz pomoć Google™ računa: , a zatim dodirnite aplikaciju Omlet Chat. 1. Dodirnite 2. Na zaslonu Prijava dodirnite Connect a different account here (Ovdje se povežite s drugim računom) i zatim dodirnite Google. 3. Dodirnite OK (U redu) za korištenje Google računa koji je registriran s vašim uređajem. 4. Unesite vaše ime pa dodirnite Get Started (Pokreni). 5.
Korištenje Facebook® računa Registriranje uz pomoć Facebook računa: , a zatim dodirnite aplikaciju Omlet Chat. 1. Dodirnite 2. Na zaslonu Prijava dodirnite Connect a different account here (Ovdje se povežite s drugim računom) i zatim dodirnite Facebook. Aplikacija Omlet Chat će vas odvesti na zaslon za prijavu na Facebook račun. 3. Prijavite se na Facebook račun i zatim dodirnite OK (U redu). 4. Unesite vaše ime pa dodirnite Get Started (Pokreni). 5.
Korištenje čavrljanja Omlet Šaljite tekstualne i multimedijske poruke i uživajte u zabavnoj, kreativnoj i interaktivnoj konverzaciji. Pokretanje razgovora: 1. Na zaslonu Omlet Chat dodirnite Contacts (Kontakti). 2. Dodirnite kontakt s kojim želite čavrljati i zatim dodirnite za prikaz izbornika za Omlet Chat i zatim dodirnite . Slanje poruke putem čavrljanja Za slanje poruke putem čavrljanja upišite svoju poruku u polje What’s up (Što je novo) pa dodirnite .
Korištenje aplikacije ladice Omlet Chat odlikuje se aplikacijama ladice s dodanom vrijednošću, što vam omogućuje dijeljenje multimedijskih poruka, donosi više zabave i osobnih kontakata. Ako želite koristiti aplikacije ladice, dodirnite u niti za čavrljanje i zatim odaberite aplikaciju na popisu aplikacije ladice radi slanja određene multimedijske poruke. Dodirnite za slanje vaše trenutne adrese s isječkom karte Dodirnite za slanje slike s vašeg ASUS tableta.
Pregled dijeljenih fotografija u aplikaciji Gallery Fotografije koje vi i vaši prijatelji dijelite u aplikacijama Omlet Chat odmah se spremaju na vašem uređaju. Dijeljene fotografije možete vidjeti u aplikaciji Gallery. Pregled dijeljenih poveznica: 1. Pokrenite aplikaciju Galerija na jedan od sljedećih načina: a. Na početnom zaslonu dodirnite aplikaciju ASUS > Gallery (Galerija). b. Na zaslonu Sve aplikacije dodirnite aplikaciju Gallery. 2.
Pregled svih dijeljenih fotografija Dodirnite All shared photos (Sve dijeljene fotografije) za pregled svih fotografija koje ste podijelili vi ili kontakti u aplikaciji Omlet Chat. Pregled dijeljenih fotografija prema sobi za čavrljanje Dodirnite Chat room (Soba za čavrljanje) kako bi se prikazale dijeljene fotografije prema sobi za čavrljanje ili društvenom aktivnom mjestu.
Pregled dijeljenih fotografija prema djelitelju Dodirnite Sharer (Djelitelj) za pregled fotografija koje je podijelio kontakt iz aplikacije Omlet Chat. Pregled Omlet kontakata u aplikaciji Kontakti Osim povezivanja s Omlet kontaktima u aplikaciji Omlet Chat, možete i pregledavati i čavrljati s Omlet kontaktima pomoću aplikacije Kontakti. Integracija Omlet kontakata u aplikaciji Kontakti olakšava vam traženje i čavrljanje sa Omlet kontaktima čak i bez pokretanja aplikacije Omlet Chat.
2. Dodirnite padajući popis Contacts to display (Kontakti za prikaz) kako bi se prikazale grupe kontakata. 3. Odznačite sve grupe kontakata osim Omlet Chat i zatim dodirnite bilo gdje. Na zaslonu aplikacije Contacts (Kontakti) prikazuju se svi Omlet kontakti. 4. Dodirnite Omlet kontakt ako želite odabrati i pregledati pojedinosti o istom ili izravno čavrljati s tim kontaktom.
Sinkroniziranje aplikacije Omlet Chat s oblakom Ako imate račun na usluzi Dropbox®, Box® ili Baidu PCS Cloud, aplikacija Omlet Chat će na siguran način odmah poslati vaše privatne razgovore i dnevnike čavrljanja. Prije nego aplikacija Omlet Chat pošalje podatke, sinkronizirajte vaš račun za oblak s aplikacijom Omlet Chat. To ćete učiniti ovako: 1. U izborniku Omlet Chat dodirnite Postavke. 2. Dodirnite Cloud Storage (Pohrana u oblak), a zatim odaberite jednu od sljedećih usluga oblaka: a. Dropbox b.
Poglavlje 3: Ostanite u vezi
Vaši dragocjeni trenuci 4 Vaši dragocjeni trenuci 4 NAPOMENA: Sljedeća snimka zaslona služi samo kao referenca. Snimanje trenutaka Pokretanje aplikacije Camera Uz pomoć aplikacije Camera na ASUS tabletu možete snimati slike i videozapise. Za otvaranje aplikacije Camera možete koristiti bilo koji od koraka u nastavku. Sa zaslona za zaključavanje Povlačite dolje do pokretanja aplikacije Camera. S početnog zaslona Dodirnite .
Prvo korištenje aplikacije Camera Nakon prvog pokretanja aplikacije Camera, prikazat će se dvije uzastopne funkcije za pomoć u početku s radom: Tutorial (Vodič) i Image locations (Lokacije slika). Vodič Ako prvi put koristite kameru na ASUS tabletu, nakon pokretanja aplikacije Camera prikazat će se sljedeći zaslon vodiča. Za nastavak s ovog zaslona postupajte prema sljedećim uputama. 1.
Početni zaslon kamere Kamera vašeg ASUS tableta opremljena je funkcijom automatskog prepoznavanja prizora i funkcijom automatskog stabiliziranja slike. Kamera ima i funkciju stabilizacije video zapisa koja sprječava trešnju tijekom snimanja videa. Dodirivanje ikona započnite s korištenjem kamere i istraživanjem funkciji slike i videozapisa na vašem ASUS tabletu.
Postavke slike Izgled snimljenih slika prilagodit ćete konfiguriranjem postavki kamere prema uputama iz nastavka. VAŽNO! Prije snimanja slika prvo primijenite postavke. 1. Na početnom zaslonu kamere dodirnite > . 2. Pomaknite se dolje i konfigurirajte dostupne mogućnosti. Slika Kvalitetu slike ćete konfigurirati pomoću sljedećih mogućnosti.
Postavke videozapisa Izgled snimljenih videozapisa prilagodit ćete konfiguriranjem postavki kamere prema uputama iz nastavka. VAŽNO! Prije snimanja slika prvo primijenite postavke. 1. Na početnom zaslonu kamere dodirnite > . 2. Pomaknite se dolje i konfigurirajte dostupne mogućnosti. Slika Kvalitetu videozapisa ćete konfigurirati pomoću sljedećih mogućnosti. Fokus i ekspozicija U okviru ove mogućnosti omogućite Touch auto-exposure (Automatska ekspozicija dodirom).
Napredne funkcije kamere Istražite nove načine snimanja slika ili videozapisa i snimite posebne trenutke pomoću naprednih funkciji kamere na ASUS tabletu. VAŽNO! Prije snimanja slika prvo primijenite postavke. Dostupnost funkciji razlikuje se među modelima. HDR Funkcija High-dynamic-range (HDR) omogućava snimanje slika s više pojedinosti u prizorima sa slabim osvjetljenjem i velikim kontrastom.
Slaba rasvjeta (samo na odabranim modelima) Uz pomoć aplikacije PixelMaster, osjetljivost fotoaparata na svjetlo povećava se i za 400%, čime se poboljšava smanjenje šuma i povećava kontrast boja za do 200%. Koristeći ovaj način rada bilo koji predmet snimanja možete pretvoriti u sjajnu fotografiju ili video zapis — sa ili bez obilnog prirodnog svjetla. Snimanje fotografija uz slabu rasvjetu 1. Na početnom zaslonu aplikacije Camera dodirnite 2. Dodirnite > Low light (Slaba rasvjeta).
Effect (Efekt) Snimajte fotografije koristeći različite efekte, kao što su Pixelize (Pikselizacija), Cartoon (Crtani film), Vintage (Starinski), LOMO i ostali. NAPOMENA: Efekt odaberite prije snimanja fotografije. Snimanje fotografija s efektima > Effect (Efekt) 1. Na zaslonu aplikacije Camera dodirnite 2. Dodirnite 3. Dodirnite i odaberite efekt koji želite primijeniti na fotografiju. za početak snimanja fotografija. Primjena efekata na fotografije 1.
GIF animacija Funkcija GIF animation (GIF animacija) omogućuje izradu GIF (Graphics Interchange Format) slike izravno pomoću kamere ASUS tableta. Snimanje fotografija funkcijom GIF animation (GIF animacija) 1. Na početnom zaslonu aplikacije Camera dodirnite 2. Pritisnite i dugo zadržite > GIF Animation (GIF animacija). ako želite početi snimati niz fotografija za GIF animaciju. 3. Namjestite postavke GIF animacije na željene vrijednosti. 4. Dodirnite po završetku.
Vraćanje vremena Kada odaberete Time Rewind (Vraćanje vremena), zatvarač će početi snimati brzi niz fotografija dvije sekunde prije nego pritisnete gumb zatvarača. Kao rezultat toga, dobit ćete kronološki prikaz slika na kojemu možete odabrati najbolju sliku za spremanje u galeriju. NAPOMENA: Funkcija vraćanja vremena može se koristiti samo na stražnjoj kameri. Snimanje fotografija uz funkciju Time Rewind 1. Na početnom zaslonu aplikacije Camera dodirnite 2. Dodirnite > Time Rewind (Vraćanje vremena).
All Smiles (Svi osmjesi) Pomoću funkcije All Smiles (Svi osmjesi) možete snimiti savršen osmijeh ili najluđi izraz lica na širokom rasponu fotografiju. Ova funkcija omogućava snimanje pet uzastopnih fotografija nakon pritiska gumba zatvarača i automatski otkriva lica na slici radi usporedbe. Snimanje fotografija funkcijom All smiles (Svi osmjesi) 1. Na početnom zaslonu aplikacije Camera dodirnite > All smiles (Svi osmjesi). za početak snimanja fotografija koje je moguće urediti pomoću funkcije All 2.
Korištenje galerije Gledajte slike i reproducirajte videozapise na ASUS Tablet pomoću aplikacije Galerija. Ova aplikacije također vam omogućuje uređivanje, dijeljenje ili brisanje slika i video datoteka pohranjenih na ASUS Tablet. Iz aplikacije Galerija možete prikazati slike u dijaprojekciji ili kucnite za pregled odabrane slike ili video datoteke. Za pokretanje galerije dodirnite > Galerija.
Pregledavanje lokacije fotografija Omogućite pristup lokaciji na ASUS tabletu i dobit ćete pojedinosti o lokaciji vaših fotografija. Pojedinosti o lokaciji vaše fotografije uključuju područje snimanja fotografije, kartu lokacije dostupne na usluzi Google Map ili Baidu (samo u Kini). Pregled pojedinosti o fotografiji: > Postavke > Pojedinosti. 1. Uključite pristup lokaciji u 2. Provjerite dijelite li svoju lokaciju s Google Map ili Baidu. 3.
Dijeljenje datoteka iz galerije 1. Na zaslonu Gallery (Galerija) dodirnite mapu u kojoj se nalaze datoteke koje želite dijeliti. 2. Nakon otvaranja mape dodirnite 3. Dodirnite datoteke koje želite podijeliti. U vrhu odabrane slike pojavit će se znak kvačice. 4. Dodirnite za aktiviranje odabira datoteka. i zatim odaberite s popisa gdje želite dijeliti slike. Brisanje datoteka iz galerije 1. Na zaslonu Gallery (Galerija) dodirnite mapu u kojoj se nalaze datoteke koje želite izbrisati. 2.
Objavljivanje fotografija na zidu s događajima iz kalendara Omogućavanjem ove funkcije u aplikaciji Gallery moći ćete pregledavati fotografije izravno iz događaja u kalendaru. Na taj način odmah možete grupirati snimljene fotografije prema njihovom specifičnom nazivu događaja. 1. Nakon preuzimanja fotografija s ASUS tableta, pokrenite aplikaciju Gallery. 2. Dodirnite 3.
Korištenje funkcije MiniMovie Pretvorite fotografije u kreativnu dijaprojekciju koristeći funkciju MiniMovie u sklopu aplikacije Gallery. MiniMovie sadrži temu dijaprojekcijskih prezentacija koje možete odmah promijeniti na odabrane fotografije. Ako želite izraditi MiniMovie iz mape s fotografijama, postupite na sljedeći način: kako biste odabrali lokaciju vaše mape s 1. Pokrenite aplikaciju Gallery i zatim dodirnite fotografijama. 2. Odaberite mapu s fotografijama i zatim dodirnite MiniMovie). 3.
Kako biste MiniMovie stvorili iz izbora fotografija, postupite na sljedeći način: 1. Pokrenite aplikaciju Gallery i zatim dodirnite 2. Dodirnite 3. Nakon odabira fotografija, dodirnite MiniMovie. 4. Odaberite MiniMovie temu koju želite koristiti za dijaprojekciju fotografija. kako biste odabrali lokaciju vaših fotografija. za aktiviranje odabira datoteka. Dodirnite bilo koju od ovih tema ako želite vidjeti njen pregled. 5. Nakon odabira teme, kucnite kako bi se spremila dijaprojekcija.
Poglavlje 4: Vaši dragocjeni trenuci
5 Radite puno, igrajte se još više Radite puno, igrajte se još više 5 Pretraživač Najmoderniji Chromium sustav vašeg preglednika omogućava pretraživanja interneta uz veliku brzinu učitavanja. Njegovo čisto i intuitivno Zen sučelje koje se zasniva na tehnologiji prilagodbe zaslonu optimizira internetske sadržaje kako bi bili što bolje prilagođeni zaslonu vašeg ASUS tableta.
Dijeljenje stranice Dijelite zanimljive stranice s ASUS tableta s drugima putem računa e-pošte, računa spremišta u oblaku, funkcije Bluetooth ili drugih aplikacija na ASUS tabletu. 1. Pokrenite preglednik. 2. Na internetskoj stranici dodirnite 3. Dodirnite račun ili aplikaciju koju želite koristiti kao medij u dijeljenju stranice. > Share page (Dijeli stranicu).
Pametno mrežno čitanje Vaš ASUS tablet automatski omogućava način Smart Reader na stranicama koje sadrže mnogo stavki koje možda smatrate nepotrebnima i smetnjama, kao što su reklamni natpisi, ikone i stavke izbornika.Te stavke možete ukloniti i čitati samo osnovni sadržaj stranice. NAPOMENA: Način Smart Reader podržava stranice Wikipedia, CNN, ESPN, BCC i NY Times.
Pražnjenje predmemorije preglednika Ispraznite predmemoriju preglednika i tako izbrišite privremene internetske datoteke, internetske stranice i kolačiće koji su privremeno pohranjeni na ASUS tabletu. Tako ćete povećati brzinu učitavanja preglednika. 1. Pokrenite preglednik. 2. Dodirnite > Postavke > Privacy & security (Privatnost i sigurnost) > Clear cache (Isprazni predmemoriju). 3. Kliknite OK (U redu) na potvrdnoj poruci. E-pošta Dodajte Exchange, Gmail, Yahoo! Mail, Outlook.
Dodavanje računa e-pošte Ako još nemate račun e-pošte, možete ga izraditi kako biste izravno s ASUS tableta mogli primati, čitati i slati poruke e-pošte. 1. Na početnom zaslonu dodirnite E-pošta da se pokrene aplikacija Email. 2. Dodirnite 3. Dodirnite davatelja usluge e-pošte kojeg želite postaviti. 4. Pratite upute koje slijede za dovršetak postavljanja vašeg novog računa e-pošte. > Postavke, a zatim dodajte račun e-pošte.
Kalendar Aplikacija Calendar omogućavanja praćenje važnih događaja pomoću ASUS tableta. Osim stvaranja događaja, možete postavljati i podsjetnike i izraditi obavijest uz odbrojavanje kako ne biste zaboravili niti jedan važan događaj. Tako se pohranjuju i događaji, kao što su rođendani i godišnjice, koji ste postavili za vaše VIP kontakte. Izrada događaja Postupak izrade događaja: 1. Dodirnite ASUS > Kalendar. 2. Dodirnite 3. Na zaslonu Novi događaj unesite sve potrebne podatke u vezi događaja. 4.
Stvaranje događaja s vašeg računa Nakon dodavanja mrežnih računa koje želite sinkronizirati s aplikacijom Calendar, ASUS tablet ćete moći koristiti i za izradu obavijesti za te mrežne račune - pratite sljedeće upute: 1. Dodirnite ASUS > Kalendar. 2. Dodirnite Novi događaj da započnete sa stvaranjem novog događaja. 3. Na zaslonu Novi događaj dodirnite My Calendar (Moj kalendar) kako biste pregledali sve račune koji su trenutno sinkronizirani s aplikacijom Calendar. 4.
Aplikacija What’s Next Nemojte propustiti važne događaje, zabavne aktivnosti na suncu ili poruke/e-poštu/pozive (na odabranim modelima) od VIP kontakata. Postavite svoj kalendar događaja, favorite i VIP grupe ili postavke za novosti o vremenskoj prognozi kako biste dobijali upozorenja i podsjetnike o tome što dolazi sljedeće. Pregledajte svoja What’s Next upozorenja na zaslonu za zaključavanje u ploči za obavijesti sustava i u widgetu ili aplikaciji What’s Next.
Prihvaćanje i odbijanje pozivnica za događaje Postavite svoj račun e-pošte u aplikaciji Email kako biste mogli slati i primati poruke e-pošte kao što su pozivnice za događaje. Ako prihvatite pozivnicu putem e-pošte, događaji će se sinkronizirati s aplikacijom Calendar. NAPOMENA: Dodatne pojedinosti pronaći ćete u Email (e-pošta) i Calendar (Kalendar). VAŽNO! Vaš ASUS tablet mora biti povezan s Wi-Fi mrežom kako biste mogli primati pozivnice putem e-pošte ili upozorenja vezana uz događaje.
Primanje upozorenja za događaje Kada primite pozivnicu za događaj, dobit ćete i podsjetnike za bilo kakvu promjenu u vezi događaja, recimo, za odgodu, otkazivanje, promjenu lokacije ili promjenu rasporeda. Ta upozorenja za događaje objavljuju se na zaključanom zaslonu, u ploči s obavijestima sustava i miniaplikaciji ili aplikaciji What’s Next. Pokrenite upozorenje za događaj Nekoliko minuta prije događaja, dobit ćete podsjetnik o skorom početku događaja.
Upozorenje o promijenjenom terminu održavanja događaja Dobit ćete upozorenje ako je događaj odgođen, ako mu je promijenjen termin ili ako je preseljen na drugu lokaciju. Primanje ažuriranja o vremenu Primajte ažuriranja usluge AccuWeather® za vašu trenutnu lokaciju ili druge dijelove svijeta, u stvarnom vremenu, svaki sat ili svakih najviše 12 sati.
Aplikacija Do It Later Vodite računa i o najtrivijalnijim stvarima iz vašeg užurbanog života. Čak i ako ste prezauzeti, možete odgovarati na poruke e-pošte, SMS poruke (na odabranim modelima), pozive (na odabranim modelima), čitati vijesti na internetu ili dodavati druge važne planirane zadatke kada vam to odgovara.
Uzvratni poziv odmah (samo na odabranim modelima) Ako ste ranije važan poziv postavili kao zadatak za kasniji uzvratni poziv, u sklopu aplikacije Do It Later moći ćete mu pristupiti i ostvariti uzvratni poziv kada ćete imati vremena. 1. Na početnom zaslonu dodirnite Asus > Do It Later (Učini to kasnije). 2. Odaberite poziv koji želite uzvratiti i zatim dodirnite Call now (Pozovi odmah).
Supernote Aplikacije Supernote bilježenje napomena pretvara u zabavnu i kreativnu aktivnost. Ova intuitivna aplikacija omogućava izradu bilješki izravnim pisanjem ili crtanjem na dodirnom zaslonu, koje će biti organizirane prema bilježnici. Prilikom stvaranja bilješki, možete dodati i multimedijske datoteke iz drugih aplikacija i podijeliti ih putem društvenih mreža ili računa za pohranu u oblaku.
Stvaranje nove bilježnice Ako želite izraditi nove datoteke koristeći Supernote, pratite sljedeće upute: 1. Dodirnite ASUS > SuperNote i zatim dodirnite . 2. Odaberite predložak i počnite zapisivati bilješke. Dijeljenje bilježnice u oblaku Svoj ćete bilježnicu podijeliti u oblaku prema sljedećim uputama: 1. Na početnom zaslonu aplikacije Supernote, dodirnite i zadržite bilježnicu koju želite podijeliti. 2. Na skočnom zaslonu dodirnite Enable cloud sync (Omogući sinkronizaciju s oblakom). 3.
File Manager (Upravitelj datoteka) File Manager (Upravitelj datoteka) omogućuje vam jednostavno lociranje i upravljanje podacima na unutarnjoj pohrani ASUS tableta i na priključenim vanjskim uređajima za pohranu. Pristup unutarnjem uređaju za pohranu Pristup unutarnjem uređaju za pohranu: > File Manager (Upravitelj datoteka). 1. Dodirnite 2. > Internal storage (Unutarnja pohrana) za prikaz sadržaja ASUS tableta, a Dodirnite zatim dodirnite stavku za njen odabir.
Oblak Račun za oblak, kao što su ASUS WebStorage, Drive, OneDrive i Dropbox, omogućava da arhivirate podatke, sinkronizirate podatke s različitim uređajima i na siguran i privatan način dijelite datoteke. ASUS WebStorage Registrirajte se za prijavu na uslugu ASUS WebStorage koja vam osigurava besplatan prostor u spremištu u oblaku. ASUS WebStorage račun omogućava automatsko slanje novih snimljenih fotografija radi brzog dijeljenja, sinkronizaciju datoteka s različitim uređajima i dijeljenja datoteka.
Prijenos podataka Bluetooth tehnologija omogućava da sa starog mobilnog uređaja na ASUS tablet prebacite podatke kao što su kontakti i unosi u kalendar. Korištenje prijenosa podataka: 1. Uparite stari mobilni uređaj s ASUS tabletom putem funkcije Bluetooth. NAPOMENA: Više pojedinosti o uparivanju uređaja pronaći ćete u odjeljku Uparivanje ASUS tableta s Bluetooth® uređajem. 2. Na zaslonu Sve aplikacije dodirnite Data transfer (Prijenos podataka). 3.
ASUS podrška Odgovore o ZenUI 2.0 aplikacijama ćete pronaći u ČPP (često postavljana pitanja) ili u izravnoj interakciji s ostalim korisnicima, a zatim ih slobodno možete podijeliti. Kako pristupiti pomoći za ZenUI: 1. Dodirnite > ASUS Support (Podrška). 2. Dodirnite ZenUI Apps (ZenUI aplikacije), a zatim odaberite aplikaciju za koju želite pronaći odgovore.
Poglavlje 5: Radite puno, igrajte se još više
6 Zabava i razonoda 6 Zabava i razonoda Korištenje naglavnih slušalica Naglavne slušalice daju vam slobodu da radite druge stvari za vrijeme telefonskog poziva ili da uživate u omiljenoj glazbi. Priključivanje audio priključka Utaknite priključak naglavnih slušalica od 3,5 mm u ulaz za zvuk na vašem uređaju. UPOZORENJE! • U ulaz za zvuk nemojte uključivati druge predmete. • U ulaz za zvuk nemojte uključivati kabel s dovodom električnog napajanja.
Igranje igara Nabavite najnovije igre na internetu i podijelite ih na računima društvenim mreža pomoću aplikacije Play Games. Možete se pridružiti u igru za više igrača i prateći ljestvice uživati u natjecateljskom duhu igara. VAŽNO! Prijavite se u vaš Google račun kako biste maksimalno iskoristili funkcije aplikacije Play Games. Korištenje aplikacije Play Games Korištenje aplikacije Play Games: 1. Dodirnite Google > Igre Play. 2. Dodirnite mogućnost koju želite koristiti.
Aplikacija Music Aplikacija Glazba automatski traži glazbene datoteke u unutarnjoj i vanjskoj memoriji vašeg ASUS tableta. Te glazbene datoteke možete organizirati u obliku popisa izvođenja ili ih dodati u red čekanja za reprodukciju prema redoslijedu. Osim toga, glazbu možete prenositi s računa za oblak kao što su ASUS WebStorage, Dropbox, OneDrive i Drive. VAŽNO! Prije prijenosa glazbe iz računa za oblak, provjerite je li vaš ASUS tablet povezan s Wi-Fi ili mobilnom mrežom.
Ostale mogućnosti reprodukcije Za vrijeme reprodukcije možete dodirnuti nastavku. i iskoristiti bilo koju od sljedećih mogućnosti u Add to playlist (Dodaj Dodirnite ako pjesmu želite dodati na postojeći popis izvođenja ili izradite na popis izvođenja) novi popis na koji ćete dodati željenu pjesmu. Play To (Reproduciraj Dodirnite ako želite potražiti i reproducirati pjesmu na nekom od drugih na) obližnjih uređaja. NAPOMENA: Pojedinosti ćete pronaći u odjeljku Reprodukcija na drugim uređajima.
Prijenos glazbe iz oblaka Prijenos glazbe iz vašeg računa za oblak. 1. Na početnom zaslonu aplikacije Music dodirnite 2. U Cloud Music (Glazba u oblaku) dodirnite račun za oblak iz kojeg želite prenositi glazbu. 3. Odaberite pjesmu i zatim je dodirnite za početak reprodukcije. . Izrada popisa izvođenja Pristupite svojim omiljenim pjesmama s različitih izvora - unutarnje memorije, vanjske memorije ili računa za oblak - i organizirajte ih u popis izvođenja. . 1.
Reprodukcija na ostalim uređajima Funkciju PlayTo koristite za prijenos glazbe sa ASUS tableta na druge obližnje uređaje kompatibilne s tehnologijom Miracast ili DLNA. Korištenje funkcije PlayTo: > PlayTo. 1. U sklopu pjesme koja se trenutno reproducirati dodirnite 2. Dodirnite uređaj na koji želite prenijeti reprodukciju glazbe. Glazba s ASUS tableta reproducirat će se ili prenositi na drugom uređaju. 3.
7 Ostati povezan 7 Ostati povezan Wi-Fi Tehnologija Wi-Fi vašeg ASUS tableta povezuje vas sa bežičnim svijetom. Koristeći ASUS tablet možete ažurirati svoje račune društvenih mreža, pretraživati internet ili razmjenjivati podatke i poruke bežičnim putem. Omogućavanje Wi-Fi veze 1. Pokrenite zaslon Postavke na jedan od sljedećih načina: •• Pokrenite Brze postavke i zatim dodirnite •• Dodirnite 2. . > Postavke. Povucite sklopku za Wi-Fi udesno da uključite Wi-Fi.
Onemogućavanje Wi-Fi veze Onemogućavanje Wi-Fi veze: 1. Pokrenite zaslon Postavke na jedan od sljedećih načina: •• Pokrenite Brze postavke i zatim dodirnite •• Dodirnite 2. . > Postavke. Pomaknite sklopku Wi-Fi ulijevo da uključite Wi-Fi. NAPOMENA: Wi-Fi vezu možete onemogućiti i na zaslonu Quick Settings (Brze postavke). Upute za pokretanje zaslona Quick Settins (Brze postavke) pronaći ćete u odjeljku Quick Settings (Brze postavke).
Uparivanje ASUS tableta s Bluetooth® uređajem Da biste funkciju Bluetooth na ASUS tabletu mogli koristiti u cijelom opsegu, prvo ga morate upariti s Bluetooth uređajem. ASUS tablet automatski pohranjuje vezu za uparivanje Bluetooth uređaja. 1. Na zaslonu Postavke dodirnite Bluetooth kako bi se prikazali dostupni uređaji. VAŽNO! • Ako uređaj koji želite upariti nije na popisu, omogućite njegovu funkciju Bluetooth, nakon čega će ona postati vidljiva.
Dijeljenje internetske veze Ako Wi-Fi usluga nije dostupna, možete koristiti ASUS tablet kao modem ili ga pretvoriti u Wi-Fi aktivno mjesto za pristup internetu putem prijenosnog računala, tableta i drugih mobilnih uređaja. VAŽNO! Većina mobilnih operatera za korištenje funkcije dijeljenja internetske veze zahtjeva ugovaranje posebne tarife za podatke. Obratite se operateru mobilne mreže i ugovorite tarifu za podatke.
4. Na zaslonu Dijeljenje veze i prijenosni pristup dodirnite Prijenosna Wi-Fi žarišna točka kako biste uključili Wi-Fi aktivno mjesto na vašem ASUS tabletu. 5. Druge uređaje ćete s vezom aktivnog mjesta ASUS tableta povezati na isti način kao sa Wi-Fi mrežom. Dijeljenje Bluetooth veze Omogućite Bluetooth na ASUS tabletu i koristite ga za povezivanje s drugim uređajima pomoću aplikacije Share Link ili za povezivanje s pisačem. 1. Aktivirajte Bluetooth na ASUS tabletu i drugom uređaju. 2.
Aplikacija PlayTo Aplikacija PlayTo vam omogućava zaslonsku prezentaciju ASUS tableta na zaslonu koji podržava prijenos podataka. Na taj način vanjskom zaslonu omogućavate da postane dvojni monitor ili drugi zaslona za vaš ASUS tablet. VAŽNO! Vaš vanjski zaslon mora imati tehnologiju Miracast™ ili DLNA® za podršku aplikacije PlayTo. Pokretanje aplikacije PlayTo Postoje dva načina za početak korištenja aplikacije PlayTo s uređaja ASUS tablet: Iz brzih postavki 1.
8 Putovanja i karte 8 Putovanja i karte Aplikacija Weather Aplikacija za vremenske prilike omogućava primanje novosti o vremenskim prilikama u stvarnom vremenu, izravno sa ASUS tableta. Pomoću aplikacije Weather, možete provjeriti i ostale podatke o vremenu diljem svijeta. Pokretanje aplikacije Vrijeme Na početnom zaslonu pokrenite aplikaciju Weather na jedan od sljedećih načina: •• Dodirnite > Weather (Vrijeme). •• Na početnom zaslonu ASUS tableta dodirnite ikonu za vrijeme.
Početni zaslon aplikacije Weather Postavite vašu trenutnu lokaciju i primajte ažuriranja o vremenu za istu, ali i za druge dijelove svijeta. Ažuriranja o vremenu i dnevnu vremensku prognozu možete vidjeti u miniaplikaciji ili aplikaciji What’s Next te u aplikaciji Calendar. NAPOMENA: Više pojedinosti potražite u: Primanje ažuriranja o vremenu.
Aplikacija Clock Aplikacija Clock omogućava da prilagodite postavke vremenske zone za ASUS tablet, postavite alarme i koristite ASUS tablet kao štopericu. Pokretanje aplikacije Clock Pokrenite aplikaciju Clock koristeći bilo koju od sljedećih mogućnosti: > Sat. • Dodirnite • Na početnom zaslonu ASUS tableta dodirnite prikaz digitalnog sata. Svjetski sat Dodirnite za pristup postavkama svjetskog sata na ASUS tabletu. Dodirnite ovo da dodate novi grad u oznaku na karti za svjetski sat.
Sat s alarmom Kucnite za pristup postavkama svjetskog sata na ASUS tabletu. Dodirnite ovo da izbrišete neki od prethodno postavljenih alarma. Dodirnite ovo za postavljanje novog vremena alarma. Dodirnite ovo za pristup postavkama značajke sata s alarmom. Štoperica Dodirnite da koristite ASUS tablet kao štopericu. Dodirnite ovaj gumb za pokretanje značajke štoperice.
Tajmer Možete postaviti više mogućnosti tajmera za vaš ASUS tablet. To ćete učiniti prema uputama iz nastavka: Podešavanje tajmera 1. Dodirnite da pristupite funkciji tajmera za ASUS tablet. numerička tipkovnica 2. Koristeći numeričku tipkovnicu, unesite željeno vrijeme i dodirnite gumb za početak kako bi se pokrenuo tajmer.
Poglavlje 8: Putovanja i karte
9 ZenLink 9 ZenLink Upoznavanje sa funkcijom ZenLink Uz funkciju ZenLink, specifičnu za ASUS, ostat ćete povezani i maksimalno produktivni. Pomoću sljedećih ZenLink aplikacija možete se povezati s drugim uređajima radi dijeljenja i primanja datoteka. ZenLink sastoji se od sljedećih aplikacija: Share Link, PC Link i Remote Link NAPOMENA: neke ZenLink aplikacije možda neće biti dostupne na vašem ASUS tabletu.
Share Link Dok koristite aplikaciju Share Link, putem Wi-Fi aktivnog mjesta možete dijeliti i primati datoteke, aplikacije i medijske sadržaje pomoću Android mobilnih uređaja (za ASUS mobilne uređaje). Pomoću ove aplikacije možete slati i primati datoteke veće od 100 MB i dijeliti ili primati više datoteka u isto vrijeme. Aplikacija Share Link šalje i prima datoteke brže nego Bluetooth. Dijeljenje datoteka i zatim dodirnite ZenLink > Share Link. 1. Na početnom zaslonu dodirnite 2.
Primanje datoteka Primanje datoteka: i zatim dodirnite Share Link. 1. Na početnom zaslonu dodirnite 2. Dodirnite Receive file (Primi datoteku) kako biste mogli primati datoteke od pošiljatelja. PC Link Koristite računalo za pristup i upravljanje ASUS tabletom i njegovim aplikacije pomoću funkcije PC Link. Ona omogućava upravljanje ASUS tabletom pomoću tipkovnice i miša računala. NAPOMENA: Prije korištenja funkcije PC Link, instalirajte je na računalo. Idite na http://pclink.asus.
Razumijevanje postavki aplikacije PC Link Kliknite ovu ikonu za zaokretanje zrcalno prikazanog zaslona ASUS tableta na zaslonu računala. Kliknite ovu ikonu za smanjivanje ili povećavanje glasnoće. Kliknite ovu ikonu za snimanje snimke zaslona. Kliknite ovu ikonu za aktiviranje ASUS tableta ili stavljanje u stanje mirovanja. Kliknite ovu ikonu za traženje ažuriranja za PC Link i dodjelu putanje za vašim snimkama zaslona.
Remote Link Pretvorite vaš ASUS tablet u uređaj za bežični unos i alat za prezentacije. Ova aplikacija vam omogućava da vaš ASUS tablet koristite kao dodirnu površinu, dodirni zaslon, laserski pokazivač za prezentacije i kontroler programa Windows® Media Player dok je povezan s računalom putem Bluetooth ili Wi-Fi veze. NAPOMENE: • Prije korištenja aplikacije Remote Link, instalirajte je na računalo. Idite na http://remotelink.asus.com i preuzmite PC Link te ga instalirajte na računalo.
Kontroler prezentacije Remote Link Dodirnite za upravljanje slajdovima prezentacije na računalu. Dodirnite i zadržite ovaj gumb kako bi se aktivirao laserski pokazivač Dodirnite ovaj gumb za pomicanje na sljedeći slajd. Dodirnite ovaj gumb za povratak na prethodni slajd. Remote Link kontroler programa Windows® Media Player Dodirnite za upravljanje programom Windows® Media player. Dodirnite ovaj gumb za povratak na prethodnu pjesmu/glazbenu datoteku.
Unos pomoću tipkovnice za Remote Link Dodirnite za unos tipkovnicom. Za unos glasom koristite ikonu mikrofona. Dodirnite ovaj gumb za unos poruke glasom. Dodirnite ovaj gumb za slanje poruke na računalo. U ovo polje unesite poruku.
Poglavlje 9: ZenLink
10 Zen bilo gdje 10 Zen bilo gdje Posebni Zen alati Kalkulator Za pokretanje aplikacije Calculator (Kalkulator) potreban je samo jedan prijelaz prstom i jedno kucanje. Kada otvorite ploču s brzim postavkama, ikona kalkulatora bit će na vrhu popisa. Dodirnite je kako biste započeli s izračunima. Dodirnite kako biste aktivirali kalkulator.
Zaslon kalkulatora 144 Poglavlje 10: Zen bilo gdje
Quick Memo Quick Memo je alat za stavljanje zabilješki koji vam daje mogućnost švrljanja i bilježenje važnih napomena koje morate zapamtiti. Nakon stvaranja napomena, možete ih podijeliti putem aplikacije Share Link i društvenih stranica ili ih pretvoriti u zadatak u sklopu aplikacije Do It Later. Stvaranje istaknute napomene Zabilješku iz aplikacije Quick Memo možete pretvoriti u istaknutu napomenu koja će uvijek biti prikazana na vašem ASUS tabletu.
Aplikacija Sound Recorder Ako omogućite aplikaciju Sound Recorder, moći ćete snimati audio datoteke pomoću ASUS tableta. Pokretanje aplikacije Sound Recorder Za pokretanje aplikacije Sound Record dodirnite > Snimanje zvuka. Dodirnite za prilagodbu postavki za Sound Recorder. Dodirnite ovo za početak snimanja zvuka.
Pauziranje snimanja Kada je snimanje pauzirano, možete nastaviti, izbrisati ili spremiti snimku. Dodirnite za brisanje snimke Dodirnite za nastavak snimanja Dodirnite za spremanje snimke Popis snimaka Recording List (Popis snimaka) vam omogućava reproduciranje, preimenovanje, dijeljenje i brisanje spremljene datoteke sa snimljenim zvukom. U dnu glavnog zaslona programa za snimanje zvuka nalazi se popis vaših snimaka.
Audio Wizard AudioWizard omogućuje prilagodbu načina rada zvuka vašeg ASUS Tablet, za jasniji audio izlaz koji odgovara stvarnim scenarijima primjene. Korištenje aplikacije AudioWizard Za korištenje aplikacije AudioWizard: 1. Dodirnite ASUS > Audio Wizard (Čarobnjak za zvuk). 2. U prozoru AudioWizard (Čarobnjak za zvuk) dodirnite način zvuka koji želite aktivirati i zatim dodirnite Done (Gotovo) za spremanje i izlaz.
Aplikacija Splendid ASUS Splendid omogućava jednostavno podešavanje postavki prikaza. Obogaćuje boje na vašem zaslonu koristeći zadane načine boja na zaslonu. Korištenje aplikacije Splendid Kako se koristi aplikacija Splendid: 1. Na početnom zaslonu dodirnite ASUS > Splendid. 2. Odaberite bilo koji od sljedećih načina boja na zaslonu: Balance (Uravnoteženo), Reading (Čitanje), Vivid (Živo) i Customized (Prilagođeno).
Način rada za čitanje Ovaj način osigurava blagi prikaz sličan papiru koji smanjuje naprezanje očiju i omogućava ugodno čitanje na ASUS tabletu. Dodirnite za način čitanja Image and text (Slika i tekst) Dodirnite za način čitanja Text only (Samo tekst) Način Vivid (Živo) Ovaj način donosi fino ugođene unaprijed postavljene boje koje obogaćuju boje na zaslonu vašeg ASUS tableta.
Način Customized (Prilagođeno) Ovaj način omogućava podešavanje prikaza zaslona prema željenoj temperaturi boje, nijansi i zasićenosti. Pomicanjem prilagodite temperaturu boje Pomicanjem prilagodite nijansu Dodirnite za vraćanje na tvorničke postavke Pomicanjem prilagodite zasićenost NAPOMENA: Način prikaza zaslona u aplikaciji Splendid možete namjestiti i u ploči Quick settings (Brze postavke).
Aplikacija Power Saver Maksimalno iskoristite ili povećajte napajanje ASUS tableta, čak i kada je u stanju mirovanja ili ako je neprekidno povezan s mrežom. Pametno prilagodite postavke napajanja za često aktivnosti kao što je čitanje e-pošte i gledanje video zapisa. Postavljanje aplikacije Power Saver Maksimalno povećajte, optimizirajte ili prilagodite napajanje ASUS tableta pomoću mogućnosti za pametnu uštedu energije. 1.
Prilagodba aplikacije Power Saver Postavite razinu svjetlinu za česte aktivnosti kao što je čitanje e-pošte ili knjiga, pregledavanje video zapisa, pregledavanja internetskih stranica i slušanje glazbe. Osim toga, funkciju uštede energije možete omogućiti za određene aplikacije ili možete omogućiti automatsko raskidanje veze s mrežom kada je ASUS tablet u stanju mirovanja. 1. U Power Saver (Štednja energije) označite Customized mode (Prilagođeni način rada) i zatim kucnite . 2.
Poglavlje 10: Zen bilo gdje
11 Održavajte vaš Zen 11 Održavajte vaš Zen Održavanje uređaja u tijeku s ažuriranjima Održavajte svoj ASUS tablet u tijeku s ažuriranjima za sustav Android, aplikacije i funkcije. Ažuriranje sustava , a zatim Postavke. 1. Dodirnite 2. Na zaslonu Postavke pomaknite se dolje kako bi se prikazale ostale stavke, a zatim dodirnite About (Više o). 3. Dodirnite System update (Ažuriranje sustava) i zatim dodirnite Check Update (Potraži ažuriranje).
Osiguravanja ASUS tableta Pomoću sigurnosnih funkcija ASUS tableta spriječit ćete neovlaštene pristup podacima. Otključavanje zaslona Kada je zaslon zaključan, otvorit ćete ga pomoću mogućnosti za sigurnosno otključavanje koje nudi ASUS tablet. , a zatim Postavke > Lock Screen (Zaslon za zaključavanje). 1. Dodirnite 2. Dodirnite Screen lock (Zaključavanje zaslona) i zatim odaberite mogućnost za otključavanje ASUS tableta.
PIN Upišite barem četiri broja kako biste postavili PIN. VAŽNO! Svakako zapamtite PIN koji za otključavanje uređaja koji ste izradili. Uzorak Pomičite prst po točkama i izradite obrazac. VAŽNO! Obrazac se može izraditi s najmanje četiri točke. Svakako zapamtite obrazac za otključavanje uređaja koji ste izradili.
Zaporka Upišite barem četiri znaka kako biste postavili lozinku. VAŽNO! Svakako zapamtite lozinku koji za otključavanje uređaja koju ste izradili. Konfiguriranje ostalih sigurnosnih funkciji zaslona Osim načina zaključavanja zaslona, u prozoru Screen security (Sigurnost zaslona) možete izvršiti i sljedeće: • Quick Access (Brzi pristup): Povucite sklopku za brzi pristup u ON (Uključeno) ako želite pokrenuti aplikacije na zaslonu za zaključavanje.
Postavljanje identifikacijskih podataka za ASUS tablet Morate znati identifikacijske podatke vašeg ASUS tableta kao što su serijski broj, IMEI broj (međunarodni identifikacijski broj mobilne opreme) i broj modela. To je važno u slučaju gubitka ASUS tableta jer tada možete kontaktirati svog mobilnog operatera i od njega zatražiti onemogućavanje neovlaštenog korištenja vašeg ASUS tableta. Prikaz identifikacijskih podataka o ASUS tabletu: 1. Dodirnite All Apps (Sve aplikacije) i zatim Postavke. 2.
Dodatak Dodatak Dodaci Za model P022 Podaci o RF izloženosti (SAR) Ovaj uređaj zadovoljava vladine zahtjeve o izloženosti radio valovima. Ovaj uređaj je dizajniran i proizveden tako da ne prekoračuje granice izloženosti utjecaju radio frekvencijske (RF) energije, koje je postavila Federalna komisija za komunikacije vlade SAD-a. Standard izloženosti koristi jedinicu za mjerenje, poznatu pod nazivom Specific Absorption Rate (Specifična stopa apsorpcije) ili SAR.
Izjava o IC upozorenju Uređaj može automatski prekinuti prijenos u slučaju nedostatka podataka za odašiljanje ili u slučaju kvara u radu. Ne zaboravite da svrha toga nije zabrana prijenosa upravljačkih ili signalnih podataka ili korištenje ponovljenih kodova kada to tehnologija zahtijeva. Uređaj i njegove antene ne smiju se nalaziti na istom mjestu ili raditi zajedno s bilo kojom drugom antenom ili prijemnikom, osim s ispitanim ugrađenim radio uređajima.
Ograničenje odgovornosti U određenim situacijama zbog nedostatka za koji je odgovorna tvrtka ASUS ili drugih obveza, možete imati pravo na naknadu štete od tvrtke ASUS.
Prevencija gubitka sluha Kako biste spriječili moguće oštećenje sluha ne slušajte zvuk predugo na razini visoke jačine zvuka. À pleine puissance, l’écoute prolongée du baladeur peut endommager l’oreille de l’utilisateur. U Francuskoj, slušalice/ušne slušalice za ovaj uređaj sukladne su zahtjevima u pogledu zvučnog tlaka iz važećih standarda EN 50332-1:2013 i/ili EN50332-2:2013 koje propisuje francuski zakon L.5232-1.
Sigurnosni zahtjev u vezi s napajanjem Proizvodi nazivne električne struje do 6 A teži od 3 kg moraju koristiti odobrene kabele za napajanje veće ili jednake: H05VV-F, 3G, 0,75 mm2 ili H05VV-F, 2G, 0,75 mm2. ASUS usluge zbrinjavanja / preuzimanja rabljenih proizvoda ASUS programi preuzimanja i recikliranja rabljenih proizvoda proizlaze iz naše orijentacije na najviše standarde za zaštitu okoliša.
Propisno zbrinjavanje Opasnost od eksplozije baterije ako se zamijeni nepropisanom vrstom. Dotrajale baterije zbrinite sukladno uputama. ATTENTION! Danger d’explosion lorsque la batterie est remplacée de façon incorrecte. NE odlažite bateriju zajedno s komunalnim otpadom. Simbol prekrižene kante za otpatke označava da se baterija ne smije odlagati zajedno s komunalnim otpadom. ASUS Tablet NEMOJTE odlagati u komunalni otpad. Dijelove ovog proizvoda moguće je ponovo koristiti i reciklirati.
Za model P024 EZ izjava o sukladnosti Ovaj proizvod sukladan propisima R&TTE direktive 1999/5/EZ. Izjava o sukladnosti može se preuzeti na http://support.asus.com. Ograničenje odgovornosti U određenim situacijama zbog nedostatka za koji je odgovorna tvrtka ASUS ili drugih obveza, možete imati pravo na naknadu štete od tvrtke ASUS.
Prevencija gubitka sluha Kako biste spriječili moguće oštećenje sluha ne slušajte zvuk predugo na razini visoke jačine zvuka. À pleine puissance, l’écoute prolongée du baladeur peut endommager l’oreille de l’utilisateur. U Francuskoj, slušalice/ušne slušalice za ovaj uređaj sukladne su zahtjevima u pogledu zvučnog tlaka iz važećih standarda EN 50332-1:2013 i/ili EN50332-2:2013 koje propisuje francuski zakon L.5232-1.
Sigurnosni zahtjev u vezi s napajanjem Proizvodi nazivne električne struje do 6 A teži od 3 kg moraju koristiti odobrene kabele za napajanje veće ili jednake: H05VV-F, 3G, 0,75 mm2 ili H05VV-F, 2G, 0,75 mm2. ASUS usluge zbrinjavanja / preuzimanja rabljenih proizvoda ASUS programi preuzimanja i recikliranja rabljenih proizvoda proizlaze iz naše orijentacije na najviše standarde za zaštitu okoliša.
Dodatak 169 4F, No. 150, LI-TE Rd., PEITOU, TAIPEI 112, TAIWAN ASUS COMPUTER GmbH HARKORT STR. 21-23, 40880 RATINGEN GERMANY Address: Authorized representative in Europe: Address, City: Country: Declaration Date: 06/07/2015 Year to begin affixing CE marking: 2015 CE marking 0682 Signature : __________ Position : CEO Name : Jerry Shen (EC conformity marking) Regulation (EU) No. 617/2013 Regulation (EC) No. 642/2009 2011/65/EU-RoHS Directive Regulation (EC) No.
Naziv modela: P022 / P024 Proizvođač: Adresa: Ovlašteni predstavnik u Evropi: Adresa: 170 Dodatak ASUSTeK Computer Inc. 4F, No.150, LI-TE RD., PEITOU, TAIPEI 112, TAIWAN ASUS Computer GmbH HARKORT STR.