MB166C Portable USB Monitor User Guide
Table of contents Notices.......................................................................................................... iii Safety information........................................................................................ v Care & cleaning........................................................................................... vii Takeback services..................................................................................... viii 1.1 Welcome!..................................
Notices Federal Communications Commission Statement This device complies with Part 15 of the FCC Rules. Operation is subject to the following two conditions: • This device may not cause harmful interference, and • This device must accept any interference received including interference that may cause undesired operation. This equipment has been tested and found to comply with the limits for a Class B digital device, pursuant to Part 15 of the FCC Rules.
Declaration of Conformity This device complies with the requirements set out in the Council Directive on the Approximation of the Laws of the Member States relating to Electromagnetic Compatibility (2014/30/EU), Low-voltage Directive (2014/35/EU), ErP Directive (2009/125/EC) and RoHS directive (2011/65/EU).
Safety information • Before setting up this Portable USB Monitor, carefully read all the documentation that came with the package. • To prevent fire or shock hazard, never expose this Portable USB Monitor to rain or moisture. • Never try to open this Portable USB Monitor cabinet. • Before using this Portable USB Monitor, make sure all cables are correctly connected and the power cables are not damaged. If you detect any damage, contact your dealer immediately.
ALWAYS ensure the product is not overhanging the edge of the supporting furniture. ALWAYS educate children about the dangers of climbing on furniture to reach the product or its controls. ALWAYS route cords and cables connected to your product so they cannot be tripped over, pulled or grabbed. NEVER place a product in an unstable location. NEVER place the product on tall furniture (for example, cupboards or bookcases) without anchoring both the furniture and the product to a suitable support.
Care & cleaning • Cleaning. Turn your monitor off and unplug the cable. Clean the monitor surface with a lint-free, non-abrasive cloth. Stubborn stains may be removed with a cloth dampened with mild cleaner. • Avoid using a cleaner containing alcohol or acetone. Use a cleaner intended for use with the LCD. Never spray cleaner directly on the screen, as it may drip inside the monitor and cause an electric shock.
Takeback services ASUS recycling and takeback programs come from our commitment to the highest standards for protecting our environment. We believe in providing solutions for our customers to be able to responsibly recycle our products, batteries and other components as well as the packaging materials. Please go to http://csr.asus.com/english/Takeback.htm for detail recycling information in different region.
1.1 Welcome! Thank you for purchasing the ASUS® Portable USB Monitor! The latest ASUS Portable USB Monitor provides great portability and simplicity to your daily life, enhancing both of your viewing experience and style. 1.2 Package contents Check your package for the following items: Portable USB Monitor Quick Start Guide Warranty Card USB Type-C Cable Protective Sleeve • If any of the above items is damaged or missing, contact your retailer immediately.
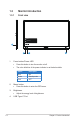
1.3 Monitor introduction 1.3.1 Front view Menu Brightness 4 3 1. 2. Power button/Power LED • Press this button to turn the monitor on/off. • The color definition of the power indicator is as the below table. 1-2 Description Blue ON Amber Standby mode Dark OFF Press this button to enter the OSD menu. Brightness • 4. Status Menu button • 3. 1 2 Adjust the energy level of brightness.
1.3.2 QuickFit Function The QuickFit function contains two patterns: (1) Grid (2) Photo size. Grid pattern: Facilitates designers and users to organize content and layout on one page and achieve a consistent look and feel. Alignment grid 1 will be rotated automatically if auto rotation is enabled. Alignment Grid1 • Alignment Grid1 Alignment Grid1 Alignment Grid1 1. Auto rotation function is only working under Windows OS by installing DisplayWidget software. Alignment Grid2 2.
2.1 Monitor standing positions You can stand up the monitor by several positions with the protective sleeve.
2.2 Connect the USB monitor with system Type-C Please make sure the host system connected supports USB Type C “DisplayPort™ Alt Mode ” & USB Type C cable is correctly connected between USB monitor and the host system.
3.1 OSD (On-Screen Display) menu 3.1.1 How to reconfigure S Splendid ASUS MB166C sRGB Mode Type C 1920x1080@60Hz Standard Mode sRGB Mode Scenery Mode Theater Mode Game Mode Night View Mode Reading Mode Darkroom Mode 1. Press the MENU button to activate the OSD menu. 2. Press the button to toggle between options in the Menu. As you move from one icon to another, the option name is highlighted. 3. To select the highlighted item on the menu press the 4.
3.1.2 1. OSD Function Introduction Splendid This function contains eight sub-functions that you can select for your preference. S Splendid ASUS MB166C sRGB Mode Type C 1920x1080@60Hz Standard Mode sRGB Mode Scenery Mode Theater Mode Game Mode Night View Mode Reading Mode Darkroom Mode • Standard Mode: This is the best choice for document editing with SPLENDID™ Video Intelligence Technology. • sRGB Mode: This is the best choice for viewing photos and graphics from PCs.
2. Blue Light Filter Adjust the energy level of blue light emitted from LED backlight. Blue Light Filter S ASUS MB166C sRGB Mode Type C 1920x1080@60Hz Level 0 Level 1 Level 2 Level 3 Level 4 • Level 0: No change. • Level 1~4: The higher the level,the more blue light will be reduced. • When Blue Light Filter is activated,the default settings of Standard Mode will be automatically imported. • Between Level 1 to Level 3, the Brightness function is user-configurable. • Level 4 is optimized setting.
3. Color Select the image color you like from this function. S Color ASUS MB166C sRGB Mode Type C 1920x1080@60Hz Brightness Contrast Saturation Color Temp. Skin Tone • Brightness: The adjusting range is from 0 to 100. • Contrast: The adjusting range is from 0 to 100. • Saturation: The adjusting range is from 0 to 100. • Color Temp.: Contains three preset color modes (Cool, Normal, Warm) and User Mode. • Skin Tone: Contains three color modes including Reddish, Natural, and Yellowish.
4. Image You can adjust the image Sharpness, Trace Free, Aspect Control, VividPixel and ASCR from this main function. S Image ASUS MB166C sRGB Mode Type C 1920x1080@60Hz Sharpness Trace Free Aspect Control VividPixel A SCR • Sharpness: Adjusts the picture sharpness. The adjusting range is from 0 to 100. • Trace Free: Speeds up the response time by Over Drive technology. The adjusting range is from lower 0 to faster 100. • Aspect Control: Adjusts the aspect ratio to “Full”, “4:3”.
5. System Setup Adjusts the system configuration. S ASUS MB166C sRGB Mode Type C 1920x1080@60Hz System Setup S plendid Demo Mode Auto Rotation GamePlus QuickFit ECO Mode OSD Setup Language More S ASUS MB166C sRGB Mode Type C 1920x1080@60Hz System Setup Key Lock OFF Information Power Indicator Power Key Lock All Reset 3-6 • Splendid Demo Mode: Activate the demo mode for the Splendid function. • Auto Rotation: To enable/disable rotate image automatically.
• GamePlus: The GamePlus Function provides a toolkit and creates a better gaming environment for users when playing different types of games. Particularly, Chrosshair function is specially designed for new gamers or beginners interested in First Person Shooter (FPS) games. To active GamePlus: • Select ON to enter the GamePlus main menu. • Press to select between Chrosshair, Timer and Display Alignment function. • Press exit. • For the latest version of DisplayWidget software, please go to www.asus.
GamePlus main menu GamePlus Crosshair Timer Display Alignment (Practive Mode) GamePlus-Crosshair GamePlus-Timer Position 3-8 • QuickFit: See page 1-3 for details. • ECO Mode: Activate the ecology mode for power saving. • OSD Setup: Adjusts the OSD Timeout, DDC/CI, and Transparency of the OSD screen.
• Language: Select OSD language. The selections are: English, French, German, Spanish, Italian, Dutch, Russian, Poland, Czech, Croatia, Hungary, Romania, Portugal, Turkey, Simplified Chinese, Traditional Chinese, Japanese, Korean, Persian, Thai and Indonesian. • More: Return the next page of System Setting. • Key Lock: Disable all key functions. Pressing the menu button for more than five seconds to disable key lock function. • Information:Displays the monitor information.
6. Shortcut Selecting this option allows you to set shortcut key. S ASUS MB166C sRGB Mode Type C 1920x1080@60Hz Shortcut Blue Light Filter Splendid Brightness Contrast Auto Rotation Color Temp. QuickFit GamePlus • 7. Shortcut : User can select from “Blue Light Filter” “Splendid”, “Brightness”, “Contrast”, “Auto Rotation”, “Color Temp.”, “QuickFit”, “GamePlus” and set as shortcut key. MyFavorite Load/Save all settings on the monitor.
3.2 Specifications Model MB166C Panel Size 15.6” (16:9, 39.62cm) wide screen Resolution 1920 x 1080 Brightness (Typ.) 250 cd/m2 Contrast (Typ.) 800:1 Display Colors 262 K Digital Input DisplayPort™ Alt Mode for USB Type-C™ Colors Black Power Consumption ≦8W Operating Temp. 0° ~ 40° Phys. Dimension (WxHxD) 360.14 x225.64x11.8 mm Box Dimension (WxHxD) 434 x 290 x 76 mm Net Weight (Esti.) 0.8kg Gross Weight (Esti.) 1.
3.3 Troubleshooting (FAQ) Problem Possible Solution Power LED is not ON • Press the button to check if the monitor is in the ON mode. • Check if the USB Type-C cable is properly connected to the monitor and the computer. The power LED lights amber • Check if the monitor and the computer are in and there is no screen image the ON mode. • Make sure the USB Type-C cable is properly connected between the Portable USB Monitor and the computer.
After connecting with the USB Type-C source device, the power LED lights continuously blinking or showing ASUS logo repeatly • Insufficient power supply from source USB Type-C devices. Please follow below steps: • Press the left function key, and then connect the USB Type-C cable. This operation will enable built-in safe mode. After displaying ASUS logo, please release the Blue Light Filter button. After ASUS Logo disappearing, there is “safe mode” message OSD showing up.
3.4 Supported Timing List PC Supported Primary Timing Resolution Refresh Rate Horizontal Frequency 640x480 60Hz 31.469kHz 800x600 60Hz 37.879kHz 1024x768 60Hz 48.363kHz 1280x960 60Hz 60kHz 1280x1024 60Hz 63.981kHz 1440x900 1680x1050 1920x1080 60Hz 60Hz 60Hz 55.935kHz 65.29kHz 67.5kHz Resolution Refresh Rate Horizontal Frequency 640x350 70Hz 31.469kHz 720x400 70Hz 31.