MQ16AH ASUS ZenScreenTM OLED Gebruikshandleiding
Inhoudsopgave Opmerkingen................................................................................................ iii Veiligheidsinformatie.................................................................................. iv Onderhoud en reiniging............................................................................... v Terugneemdienst......................................................................................... vi 1.1 Welkom!......................................................
Opmerkingen Kennisgeving van Federal Communications Commission Dit apparaat voldoet aan Deel 15 van de FCC-voorschriften. Bediening ervan dient te geschieden conform de volgende twee voorwaarden: • Dit apparaat mag geen schadelijke interferentie veroorzaken, en • Dit apparaat moet alle ontvangen interferentie accepteren, waaronder interferentie die een ongewenste werking kan veroorzaken.
Veiligheidsinformatie iv • Alle documentatie die bij de verpakking is geleverd zorgvuldig doorlezen, alvorens deze draagbare USB-monitor in te stellen. • Deze draagbare USB-monitor niet blootstellen aan regen of vocht om gevaar op brand of schokken te vermijden. • Probeer de kast van de draagbare USB-monitor nooit te openen. • Controleer, alvorens deze draagbare USB-monitor te gebruiken, of alle kabels goed zijn aangesloten en of de stroomkabels niet beschadigd zijn.
Onderhoud en reiniging • • Reinigen. Schakel uw monitor uit en haal de stroomkabel uit het stopcontact. Reinig het oppervlak van de monitor met een pluisvrije, niet schurende doek. Hardnekkige vlekken kunnen worden verwijderd met een doek bevochtigd in een mild reinigingsmiddel. Vermijd het gebruik van een reinigingsmiddel met alcohol of aceton. Gebruik een reinigingsmiddel bestemd voor gebruik met een LCDscherm.
Terugneemdienst Het ASUS recycling en terugneemprogramma is een gevolg van onze toewijding aan de hoogste normen voor mileubescherming. We geloven in het leveren van oplossingen voor onze klanten zodat deze onze producten, batterijen en andere onderdelen op een verantwoorde wijze kunnen recyclen, evenals de verpakkingsmaterialen. Ga naar http://csr.asus.com/english/Takeback.htm voor details over recycle-informatie in verschillende regio's.
1.1 Welkom! Hartelijk dank voor het aanschaffen van de ASUS® draagbare USBmonitor! De nieuwste ASUS draagbare USB-monitor zorgt voor draagbaarheid en eenvoud in uw dagelijks leven door zowel uw kijkervaring als stijl uit te breiden. 1.
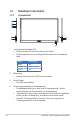
1.3 Inleiding tot de monitor 1.3.1 Vooraanzicht 1 2 3 4 7 5 6 5 8 9 1. 2. Voedingsknop/Voedings-LED • Druk op de knop om de monitor aan en uit te zetten. • De kleurendefinitie van de voedingsindicator staat in de onderstaande tabel. 1-2 Aan Amberkleurig Stand-by-modus Donker Uit Druk op deze knop om het OSD-menu te openen. Knop Sluiten • 4. Beschrijving Blauw Menuknop • 3. Status Het OSD-menu afsluiten.
5. USB Type-C poort 6. USB Type-C-poort (alleen opladen) 7. Oortelefoon 8. Mini-HDMI-poort 9.
1.3.2 QuickFit-functie De QuickFit-functie bevat twee patronen: (1) Raster (2) Fotogrootte. • Alignment Grid1 Alignment Grid1 Alignment Grid1 Rasterpatronen: Maken het ontwerpers en gebruikers gemakkelijk om inhoud en opmaak op een pagina te ordenen en een consequent uiterlijk te bieden. Uitlijnraster 1 draait automatisch als automatisch draaien is ingeschakeld. Alignment Grid1 1. De functie automatisch draaien werkt alleen onder Windows door de DisplayWidget-software te installeren.
2.1 Staande standen monitor U kunt met de slimme kap de monitor in verschillende standen rechtop zetten.
2.2 Verbind de USB-monitor met het system A Type-C-poort met DP-signaalu itgan g Type-C HDMI of B Type-C-poort met DP-signaalu itgan g Indien PC Type C-stroomuitgang te laag is, wordt het aanbevolen om de inbox-adapter aan te sluiten.
• USB-monitor werkt door het verkrijgen van stroom van PC/NB wanneer de monitoradapter niet is aangesloten. Indien de USB-monitor een lage stroomuitgang van PC/NB detecteert, wordt de “helderheid” van de monitor vastgezet op “tot 50 of 80 afhankelijk van hoeveel ingangsvermogen wordt gedetecteerd”. Dit gedrag kan vermijden dat de monitor direct wordt uitgeschakeld vanwege gebrek aan stroom. Voor een hogere helderheid moet u de monitoradapter aansluiten.
2.3 Aankondigingen Omdat dit product en de daarmee verbonden slimme kap magneten bevatten, bestaat de kans op schade van de harde schijf in de computer en van voorwerpen die gevoelig zijn voor magneten. Zet het scherm nooit op de computer als deze in gebruik is (ingeschakeld of stand-by), anders kan de harde schijf worden beïnvloed met als gevolg permanent gegevensverlies, of het computerscherm wordt uitgeschakeld als gevolg van het automatische beschermingsmechanisme van de computer.
3.1 OSD (On-Screen Display) menu 3.1.1 Opnieuw configureren ASUS MQ16AH Standaard HDMI 1080p 60Hz Splendid Standaard sRGB Landschap Theater Spel Nacht Leesmodus Darkroom Mode 1. Druk op de MENU-knop om het OSD-menu te activeren. 2. Druk op de knop / om te schakelen tussen de opties in het Menu. Terwijl u van het ene naar het volgende pictogram gaat, wordt de naam van de optie gemarkeerd. 3. Druk op de knop 4. Druk op de knop 5.
3.1.2 1. Kennismaken met de OSD-functie Splendid Deze functie bevat acht subopties die u kunt selecteren naar uw voorkeur. Splendid ASUS MQ16AH Standaard HDMI 1080p 60Hz Standaard sRGB Landschap Theater Spel Nacht Leesmodus Darkroom Mode • Standaard: Dit is de beste keuze voor het bewerken van documenten met de SPLENDID™-videoverbeteringstechnologie. • sRGB: Dit is de beste keuze voor het weergeven van foto's en afbeeldingen van pc's.
2. Blauwlichtfilter Pas het energieniveau aan van het blauwe licht dat werd uitgestraald vanaf de LED-achtergrondverlichting. Blauwlichtfilter ASUS MQ16AH Standaard HDMI 1080p 60Hz Max Min • Blauwlichtfilter: In deze functie kunt u het blauwlichtfilter aanpassen van Min tot max. Min: geen wijzigingen; Max: Hoe hoger het niveau, des te minder blauw licht wordt verspreid. Wanneer blauwlichtfilter is geactiveerd, worden de standaardinstellingen van de standaard modus automatisch geïmporteerd.
3. Kleur Selecteer de beeldkleur die u wilt met deze optie. ASUS MQ16AH Standaard HDMI 1080p 60Hz Kleur Helderheid Contrast Kleurverzadiging Kleur Huidskleur 3-4 • Helderheid: Het afstembereik is van 0 tot 100. Wanneer HDR is ingeschakeld, kan de helderheid niet worden aangepast. • Contrast: Het afstembereik is van 0 tot 100. • Kleurverzadiging: Het afstembereik is van 0 tot 100. • Kleur: Bevat drie vooringestelde kleurmodi (Koel, Normaal, Warm) en één Gebruiker modus.
4. Beeldinst U kunt de Scherpte, Beeldaspect aanpassen, VividPixel, ASCR en HDR vanaf deze hoofdfunctie aanpassen. Beeldinst ASUS MQ16AH Standaard HDMI 1080p 60Hz Scherpte Beeldaspect aanpassen VividPixel ASCR HDR • Scherpte: Past de scherpte van het beeld aan. Het afstembereik is van 0 tot 100. • Beeldaspect aanpassen: Hiermee past u de hoogte-breedteverhouding aan naar "Volledig scherm", "4:3".
5. Ingangsselectie Selecteer de ingangsbron uit ingangssignaal HDMI, Type-C 1,Type-C 2.
6. Systeem-instelling Stemt de systeemconfiguratie af. Systeem-instelling ASUS MQ16AH Standaard HDMI 1080p 60Hz Splendid Demo Mode Automatisch Draaien OLED-Instelling Volume GamePlus QuickFit OSD-Instelling Taal Systeem-instelling ASUS MQ16AH Standaard HDMI 1080p 60Hz Toetsvergrendeling Informatie Voedingsindicator Aan Nabijheidssensor Slot voedingsknop Reset alles • Splendid Demo Mode: Activeert de demomodus voor de Splendidfunctie.
• GamePlus: De functie GamePlus biedt een gereedschapskist en maakt een betere gaming-omgeving voro gebruikers bij het spelen van verschillende soorten games. Met name de functie Dradenkruis is speciaal ontworpen voor nieuwe gamers of beginners die ge?teresseerd zijn in First Person Shooter (FPS) games. GamePlus activeren: • Selecteer AAN om het hoofdmenu van GamePlus te openen. • Druk op de knop / om te kiezen tussen de functies Richtkruis, Timer en Beeldschermuitlijning.
• Nabijheidssensor: Ingebedde nabijheidssensor vraagt de monitor om de energiebesparende modus te schakelen wanneer het detecteert dat de gebruiker langer dan een minuut weg is en hervat de normale werking wanneer de gebruiker terug komt. De functie is geoptimaliseerd wanneer de afstand tussen de gebruiker en de monitor binnen 50 cm is. En vermijd enige obstakels voor de nabijheidssensor aan de voorrand.
7. MyFavorite U kunt de Snelkoppeling en Aangep. Instelling aanpassen vanuit deze hoofdfunctie. MyFavorite ASUS MQ16AH Standaard HDMI 1080p 60Hz Snelkoppeling Aangep. Instelling 3-10 • Snelkoppeling: De gebruiker kan kiezen uit “Blauwlichtfilter”, “Splendid”, “Helderheid”, “Contrast”, “Automatisch Draaien”, “Ingangsselectie” en deze instellen als snelkoppeling. De standaardinstelling is Ingangsselectie. • Aangep. Instelling: U kunt uw instelling naar gelang uw favoriet doen.
3.2 Specificaties Model MQ16AH Paneelgrootte 15,6” (16:9, 39,62cm) breedbeeld Resolutie 1920 x 1080 Helderheid (std.) 360 nits (typ.), 400 nits (max.) Contrast (std.) 100000:1 Weergavekleuren 1073.7M (10bit) DisplayPort™ Alt-modus voor USB Type-C™ HDMI via Mini-HDMI Digitale ingang Kleur Grijs Energieverbruik ≦ 15 W 0° ~ 40° Bedrijfstemperatuur Fys.
3.3 Probleemoplossing (Veelgestelde vragen) Probleem Mogelijke oplossing Stroom-LED brandt niet • Druk op de knop om te controleren of de monitor aan staat. • Controleer of de USB Type-C-kabel goed is aangesloten op de monitor en de computer. De stroom-LED brandt • Controleer of de monitor en de computer aan amberkleurig en er is geen staan. schermbeeld • Zorg er voor dat de USB Type-C-kabel goed is aangesloten op de draagbare USB-monitor en de computer. • Controleer de signaalkabel op gebogen pennen.
Probleem Na het aansluiten op het bronapparaat van USB Type-C, knippert de voedings-LED herhaaldelijk of wordt het ASUS-logo herhaaldelijk weergegeven Mogelijke oplossing • Onvoldoende voeding van bronapparaten van het USB Type-C. Volg de onderstaande stappen: • Druk op de knop Omhoog en sluit dan de USB Type-C-kabel aan. Deze bewerking zal de ingebouwde veilige modus inschakelen. Laat de knop Omhoog los nadat het ASUSlogo is verschenen.
3.