MQ16AH ASUS ZenScreenTM OLED Användarhandbok
Innehållsförteckning Meddelanden................................................................................................ iii Säkerhetsinformation.................................................................................. iv Underhåll och rengöring.............................................................................. v Återtagningstjänster.................................................................................... vi 1.1 Välkommen!.............................................
Meddelanden Meddelande från Federal Communications Commission Denna enhet uppfyller del 15 av FCC-reglerna. Användning får ske under följande två villkor: • Enheten får inte orsaka skadliga störingar och • Denna enhet måste acceptera alla mottagna störningar, inklusive störningar som kan orsaka oönskade funktioner. Denna utrustning har testats och befunnits överensstämma med gränserna för en digital enhet av Klass B, enligt del 15 av FCC-reglerna.
Säkerhetsinformation iv • Innan denna bärbara USB-bildskärm installeras, läs noga igenom all dokumentation som medföljde förpackningen. • För att förebygga eld eller elektriska stötar, utsätt aldrig denna bärbara bildskärm för regn eller fukt. • Försök aldrig att öppna den bärbara USB-bildskärmens hölje. • Innan du använder den bärbara USB-bildskärmen måste alla kablar vara korrekt anslutna och strömkablarna utan skador. Om du upptäcker någon skada, kontakta omedelbart din återförsäljare.
Underhåll och rengöring • Rengöring. Stäng av skärmen och dra ur nätsladden. Rengör skärmytan med en dammfri, mjuk trasa. Svåra fläckar kan tas bort med en tygduk som är fuktad med ett milt rengöringsmedel. • Undvik att använda ett rengöringsmedel som innehåller alkohol eller aceton. Använd rengöringsmedel avsedda för användning på LCDskärmar. Spruta aldrig rengöringsmedel direkt på skärmen eftersom det kan droppa in i skärmen och orsaka elektriska stötar.
Återtagningstjänster ASUS återvinnings- och återtagningsprogram kommer från vårt åtagande mot de högsta normerna för att skydda vår miljö. Vi tror på att tillhandahålla lösningar för våra kunder så att de kan ta ansvar för återvinning av våra produkter, batterier och andra komponenter samt förpackningsmaterial. Gå till http://csr.asus.com/english/Takeback.htm för detaljerad återvinningsinformation i en annan region.
1.1 Välkommen! Tack för att du har valt ASUS® bärbara USB-skärm! Den senaste bärbara USB-skärmen från ASUS ger en utmärkt bärbarhet och enkelhet i ditt dagliga liv, och förbättrar både din visningsupplevelse och stil. 1.
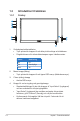
1.3 Introduktion till skärmen 1.3.1 Frontvy 1 2 3 4 7 5 6 5 8 9 1. 2. Strömbrytare/strömindikator • Tryck på den här knappen för att sätta på eller stänga av bildskärmen. • Färgdefinitionerna för strömindikatorlampan anges i tabellen nedan. 1-2 PÅ Gul Standbyläge Mörk AV Tryck på den här knappen för att öppna OSD-menyn (bildskärmsmenyn). Close (stäng)-knapp • 4. Beskrivning Blå Menu-knapp (Meny) • 3. Status Avsluta OSD-menyn.
5. USB Type-C-port 6. USB Type-C-port (endast laddning) 7. Hörlurar 8. Mini HDMI-port 9.
1.3.2 QuickFit-funktionen QuickFit-funktionen har två mönster: (1) Rutnät (2) Fotostorlek. • Alignment Grid1 Alignment Grid1 Alignment Grid1 Rutnätsmönster: underlättar för designers och användare att organisera innehåll och layouter på en sida och uppnå ett konsekvent utseende och känsla. Justeringsnät 1 roteras automatiskt om automatisk rotering är aktiverad. Alignment Grid1 1. Automatisk rotering fungerar enbart under Windows OS genom att installera DisplayWidget-program. Alignment Grid2 2.
2.1 Skärmens ställägen Du kan ställa skärmen i flera lägen med smartskyddet.
2.2 Anslut USB-skärmen till systemet A Typ-C-port m ed DP-signalutg ån g Type-C HDMI eller B Typ-C-port m ed DP-signalutg ån g Om PC Type C-strömförsörjningen är för låg rekommenderas du att ansluta den medföljande adaptern.
• USB-skärmen fungerar genom att ta emot ström från PC/NB när bildskärmsadaptern inte är inkopplad. Om USB-skärmen upptäcker låg effekt från PC/NB kommer skärmens "ljusstyrka" att vara fixerad till "upp till 50 eller 80 beroende på hur mycket ingångseffekt som upptäcks". Detta beteende kan undvika att skärmen stängs av omedelbart på grund av strömbrist. Om du vill ha högre ljusstyrka kan du koppla in bildskärmsadaptern så att systemet kan justera ljusstyrkan till maximalt värde igen.
2.3 Meddelanden Eftersom denna produkt och medföljande smartskydd innehåller en magnet i strukturen, kan det finnas en risk för att skada datorns hårddisk och föremål som är känsliga för en magnet. Placera inte produkten på datorn när datorn används (påslagen eller i pausläge) för att inte hårddisken ska påverkas och riskera permanent förlust av data eller att datorskärmen stängs av på grund av datorns automatiska skyddsmekanism.
3.1 Skärmmeny (OSD) 3.1.1 Hur man konfigurerar om ASUS MQ16AH Splendid Standard Mode HDMI 1080p 60Hz Standard Mode sRGB Mode Scenery Mode Theater Mode Game Mode Night View Mode Reading Mode Darkroom Mode 1. Tryck på knappen MENU (Meny) för att aktivera OSD-menyn. 2. Tryck på / för att växla mellan alternativen i menyn. När du flyttar från en ikon till en annan markeras alternativets namn. 3. Tryck på knappen menyn. 4. Tryck på 5.
3.1.2 1. Introduktion för funktioner i skärmmenyn Splendid (Fantastisk) Den här funktionen har åtta underfunktioner som du kan välja mellan beroende på dina preferenser. Splendid ASUS MQ16AH Standard Mode HDMI 1080p 60Hz Standard Mode sRGB Mode Scenery Mode Theater Mode Game Mode Night View Mode Reading Mode Darkroom Mode • Standard Mode (standardläge): Detta är det bästa valet för redigering av dokument med SPLENDID™-videoförbättringsteknik.
2. Blue Light Filter (Filter för blått ljus) Justera energinivån för blått ljus som avges från LEDbakgrundsbelysning. Blue Light Filter ASUS MQ16AH Standard Mode HDMI 1080p 60Hz Max Min • Blue Light Filter (Blåljusfilter): I den här funktionen kan du justera blått ljus-filtret från Min till Max. Min: inga ändringar; Max: Ju högre nivå, desto mindre spridning av blått ljus. När Blåljusfilter aktiveras kommer standardinställningarna för Standardläge att importeras automatiskt.
3. Color (Färg) Välj den bildfärg som du gillar i denna funktion. Color ASUS MQ16AH Standard Mode HDMI 1080p 60Hz Brightness Contrast Saturation Color Temp. Skin Tone 3-4 • Brightness (Ljusstyrka): Justeringsintervallet är från 0 till 100. När HDR är aktiverat kan ljusstyrkan inte justeras. • Contrast (kontrast): Justeringsintervallet är från 0 till 100. • Saturation (Mättnad): Justeringsintervallet är från 0 till 100. • Color Temp.
4. Image (Bild) Du kan justera bildskärpa, Aspect Control (bildförhållandekontroll), VividPixel, ASCR och HDR från denna huvudfunktion. Image ASUS MQ16AH Standard Mode HDMI 1080p 60Hz Sharpness Aspect Control VividPixel ASCR HDR • Sharpness (skärpa): Justerar bildens skärpa. Justeringsintervallet är från 0 till 100. • Aspect Control (bildförhållandekontroll): Justera bildförhållandet till "Full", "4:3".
5. Input Select (Ingångsval) Välj ingångskälla från HDMI, Type-C 1 och Type-C 2.
6. System Setup (Systeminställning) Justerar systemkonfigurationen. System Setup ASUS MQ16AH Standard Mode HDMI 1080p 60Hz ASUS MQ16AH Standard Mode HDMI 1080p 60Hz Splendid Demo Mode Auto Rotation OLED Setup Volume GamePlus QuickFit OSD Setup Language System Setup Key Lock Information Power Indicator On Proximity Sensor Power Key Lock All Reset • Splendid Demo Mode (Splendid demoläge): Aktrivera demoläget för Splendid-funktionen.
• GamePlus: GamePlus-funktionen erbjuder ett verktyg och skapar en bättre spelmiljö när du spelar olika typer av spel. Crosshair (Hårkors)-funktionen är särskilt utformad för nya spelare eller nybörjare intresserade av förstapersonsskjutare (FPS)-spel. För att aktivera GamePlus: • Välj ON (på) för att gå till GamePlus-huvudmenyn. • Tryck på / för att välja mellan Crosshair (Hårkors), Timer och Display Alignment (Skärmanpassning)-funktionen. • Tryck på för att bekräfta den funktion du väljer.
• Proximity Sensor (Närhetssensor): Den inbyggda närhetssensorn uppmanar skärmen att växla till energisparläge när den upptäcker att användaren är borta i mer än en minut och återupptar normal drift när användaren kommer tillbaka. Funktionen optimeras när avståndet mellan användaren och skärmen är inom 50 cm. Och undvik alla hinder framför närhetssensorn på den främre ramen.Observera: Sensorns känslighet kan påverkas av det omgivande ljuset, färgen på användarens kläder och skärmens användningsvinkel.
7. MyFavorite Man kan justera Shortcut (Genväg) och Customized Setting (Anpassad inställning) från denna huvudfunktion. MyFavorite ASUS MQ16AH Standard Mode HDMI 1080p 60Hz Shortcut Customized Setting 3-10 • Shortcut (snabbknapp): Användaren kan välja mellan “Blue Light Filter” (Blått ljus-filter), “Splendid” (Fantastisk), “Brightness” (Ljusstyrka), “Contrast” (Kontrast), Auto Rotation (Automatisk rotation), "Input Select" (Ingångsval) och ställa in som kortkommando.
3.2 Specifikationer Modell MQ16AH Panelstorlek 15,6" (16:9, 39,62 cm) bredbild Upplösning 1920 x 1080 Ljusstyrka (typ.) 360nits (typ.), 400nits (max.) Kontrast (typ.) 100000:1 Skärmfärger 1073.7M (10bit) DisplayPort™ Alt-läge för USB Type-C™ HDMI via Mini HDMI Digital inmatning Färger Grå Strömförbrukning ≦ 15 W 0° ~ 40° Drifttemperatur Fys. Mått (BxHxD) 358,70 x 226,15 x 8,95 mm Förpackningens mått (BxHxD) 552 x 125 x 394 mm Nettovikt (ca.) 0,65 kg Bruttovikt (ca.
3.3 Felsökning (FAQ) Problem Möjlig lösning Strömindikatorn är inte PÅ • Tryck på -knappen för att kontrollera om skärmen är PÅ. • Kontrollera om USB Type-C-kabeln är korrekt ansluten till skärmen och datorn. Strömindikatorn lyser gult och • Kontrollera att skärmen och datorn är PÅ. ingen bild syns • Kontrollera att USB Type-kabeln är ordentligt ansluten mellan den bärbara USB-skärmen och datorn. • Inspektera signalkabeln och kontrollera att ingen av stiften är böjda.
Problem Möjlig lösning Efter anslutningen till källenheten med USB Type-C, kommer strömindikatorerna att blinka kontinuerligt eller visa ASUS-logotypen upprepade gånger • Otillräcklig strömförsörjning från källenheter med USB Type-C. Följ nedanstående steg: • Tryck på Upp-knappen och anslut sedan USB Type-C-kabeln. Åtgärden aktiverar det inbyggda säkerhetsläget. När ASUSlogotypen visas släpper du Upp-knappen. När ASUS-logotypen försvinner visas ett OSD-meddelande om "säkert läge".
3.