LED projector E-Manual B1M
DRAFT 2 12/17/12 E7777 December 2012 COPYRIGHT AND WARRANTY INFORMATION No part of this manual, including the products and software described in it, may be reproduced, transmitted, transcribed, stored in a retrieval system, or translated into any language in any form or by any means, except documentation kept by the purchaser for backup purposes, without the express written permission of ASUSTeK COMPUTER INC. (“ASUS”).
DRAFT 2 12/17/12 Table of Contents About this manual.............................................................................................. 5 Conventions used in this manual................................................................ 6 Typography.......................................................................................................... 6 Safety precautions.............................................................................................. 7 Using your LED projector......
DRAFT 2 12/17/12 Chapter 3: Using your LED projector Launching programs from the onscreen display menu......................32 Control panel grid...........................................................................................33 Using your LED projector for the first time..............................................34 Accessing your LED projector’s settings...................................................35 Using the Media Center.................................................................
DRAFT 2 12/17/12 About this manual This manual provides information about the hardware and software features of your LED projector through the following chapters: Chapter 1: Knowing your LED Projector This chapter details the parts of your LED projector and its accompanying remote control. Chapter 2: Setting up This chapter shows you how to set up your LED projector and use its parts for input device connection.
DRAFT 2 12/17/12 Conventions used in this manual To highlight key information in this manual, some text are presented as follows: IMPORTANT! This message contains vital information that must be followed to complete a task. NOTE: This message contains additional information and tips that can help complete tasks. DRAFT 2 12/17/12 WARNING! This message contains important information that must be followed to keep you safe while performing tasks and prevent damage to your LED projector's data and components.
DRAFT 2 12/17/12 Safety precautions Using your LED projector Refer to the manual and take note of the safety instructions before operating your LED projector. • Follow the notes and warnings stated in the user manual. • Do not place your LED projector on uneven or unstable surfaces. • Do not use your LED projector in smoky environments. Smoke residue may cause build-up on critical parts and damage the LED projector or decrease its performance.
DRAFT 2 12/17/12 DRAFT 2 12/17/12 Caring for your LED projector • Switch off then unplug the LED projector from the power outlet before cleaning it. • When cleaning the LED projector’s housing, use a clean soft cloth dampened with water or a mix of water and neutral detergent. Wipe it dry using a soft dry cloth. • Ensure that the lens is cool before cleaning it. Gently wipe the lens using a lens cleaning paper. Do not touch the lens with your hands.
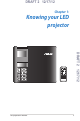
DRAFT 2 12/17/12 Chapter 1: Knowing your LED projector DRAFT 2 12/17/12 Chapter 1: Knowing your LED projector LED projector E-Manual
DRAFT 2 12/17/12 Features DRAFT 2 12/17/12 Top view Focus ring The focus ring allows you to adjust the image focus of your LED projector.
DRAFT 2 12/17/12 Control panel buttons The control panel buttons allow you to navigate the onscreen display menu. Individually, these buttons also correspond to a specific LED projector setting as indicated below.
DRAFT 2 12/17/12 Front view DRAFT 2 12/17/12 Air vents The air vents allow cool air to enter and warm air to exit the LED projector. WARNING! Ensure that paper, books, clothing, cables, or other objects do not block any of the air vents or else overheating may occur. AV-IN Lens The lens projects video or image files onscreen from your input device. WARNING! Do not touch the lens using your hands or any sharp object. Lens cover The lens cover protects the lens from scratches and possible dirt build-up.
DRAFT 2 12/17/12 Rear view AV-IN DRAFT 2 12/17/12 Infrared (IR) sensor The IR sensor detects signal from your LED projector’s remote control, allowing you to access the LED projector’s control panel from a distance of up to 7 meters. Headphone output jack port The headphone output jack port allows you to connect your LED projector to amplified speakers or headphones. Audio/video input jack port Insert a composite AV cable into this port to connect your audio/video equipment to the LED projector.
DRAFT 2 12/17/12 HDMI port This port is for the HDMI (High-Definition Multimedia Interface) connector and is HDCP compliant for HD DVD, Blu-ray, and other protected content playback. VGA port This port allows you to connect your LED projector to other VGA-compatible devices. USB 2.0 port The USB 2.0 (Universal Serial Bus 2.0) port is compatible with USB 2.0 or USB 1.1 devices such as flash disk drives, external HDDs, speakers, cameras, and other file sources.
DRAFT 2 12/17/12 Right side DRAFT 2 12/17/12 Kensington® lock port The Kensington® lock port allows you to secure your LED projector using Kensington® compatible LED projector security products. Air vents 120 The air vents allow cool air to enter and warm air to exit the LED projector. o WARNING! Ensure that paper, books, clothing, cables, or other objects do not block any of the air vents or else overheating may occur.
DRAFT 2 12/17/12 Left side Power (DC) input port Insert the bundled power adapter into this port to charge the battery pack and supply power to your LED projector. DRAFT 2 12/17/12 AV-IN WARNING! The adapter may become warm to hot while in use. Do not cover the adapter and keep it away from your body while it is connected to a power source. Air vents The air vents allow cool air to enter and warm air to exit your LED projector.
DRAFT 2 12/17/12 Bottom view DRAFT 2 12/17/12 Built-in stand This LED projector comes with a built-in stand that allows you to adjust the height of the projector by either 5 degrees or 9.5 degrees. Tripod socket Connect the LED projector to a tripod using this socket.
DRAFT 2 12/17/12 DRAFT 2 12/17/12 LED projector remote control Control panel buttons The control panel buttons allow you to navigate the onscreen display menu. Individually, these buttons also correspond to a specific LED projector setting. NOTE: For more details on using the control panel buttons, refer to the Using the onscreen display menu section in this manual. Battery compartment The battery compartment allows you to use a CR2025 lithium coin battery to power your LED projector’s remote control.
DRAFT 2 12/17/12 Replacing the battery A. Move the battery compartment’s latch to the right to unlock the battery holder. B. Pull down the battery holder and remove it completely out of the battery compartment.
DRAFT 2 12/17/12 DRAFT 2 12/17/12 20 C. Remove the old battery then insert the new CR2025 lithium coin battery into the battery holder with the positive side (+) facing up. D. Slide the battery holder back into the battery compartment. Push it all the way in until you hear a soft click, indicating that the battery compartment is locked back in place.
DRAFT 2 12/17/12 Chapter 2: Setting up DRAFT 2 12/17/12 AV-IN Chapter 2: Setting up LED projector E-Manual 21
DRAFT 2 12/17/12 Operating your LED projector This portable LED projector allows you to plug and play your devices so you can easily open multimedia files, hear audio straight from its built-in SonicMaster speakers, and experience using Wi-Fi to project onscreen. For your safety and to maintain the quality of this unit, refer to the following steps when operating your LED projector. 1. Connect the LED projector to the power adapter. A. Connect the AC/DC power cord to the power adapter. B.
DRAFT 2 12/17/12 AC power cord requirements Use the correct AC plug type according to your current location. IMPORTANT! Contact your sales dealer if the AC power cord bundled with your LED projector does not match your local power source. NOTE: We highly recommend that you use a video source device that also uses a grounding type plug to prevent signal interference due to voltage fluctuations. for U.S.A., Canada, and Taiwan for Continental Europe for U.K.
DRAFT 2 12/17/12 2. Connect the LED projector to your device using the appropriate port. A. Headphone output jack port and audio/video input jack port. DRAFT 2 12/17/12 AV-IN B. Memory card reader AV-IN NOTE: For details on how to launch files from a memory card, refer to the Launching the Media Center section in this manual.
DRAFT 2 12/17/12 C. HDMI port AV-IN DRAFT 2 12/17/12 D.
DRAFT 2 12/17/12 D. USB 2.0 port DRAFT 2 12/17/12 AV-IN Compatible USB 2.0 input devices: USB cable flash drive Wi-Fi dongle NOTE: For details on using the USB 2.0 port to launch supported file formats, refer to the Launching the Media Center section in this manual.
DRAFT 2 12/17/12 4. Adjust the height of the LED projector. Your LED projector comes with a built-in stand that helps adjust the image height onscreen. WARNING! Ensure that the built-in stand is fully retracted before placing the LED projector inside the projector bag. NOTES: • Place the LED projector on a stable flat surface. • Keep a space of 30 cm or more between the sides of the LED projector.
DRAFT 2 12/17/12 Screen size and projection distance table Adjust the LED projector’s distance from the screen using the table below. screen size LED projector projection distance DRAFT 2 12/17/12 Screen size - 16:10 28 Projection distance (inches) (millimeters) (meters) 30 762 0.58 40 1016 0.78 60 1524 1.16 80 2032 1.55 100 2540 1.94 120 3048 2.33 140 3556 2.71 160 4064 3.
DRAFT 2 12/17/12 3. Press the power button.
DRAFT 2 12/17/12 5. Adjust the image focus. Move the focus ring to the left or to the right to adjust the image focus. DRAFT 2 12/17/12 NOTE: Use a still image when adjusting the onscreen display.
DRAFT 2 12/17/12 Chapter 3: Using the onscreen display menu DRAFT 2 12/17/12 Chapter 3: Using your LED projector LED projector E-Manual 31
DRAFT 2 12/17/12 Launching programs from the onscreen display menu The onscreen display menu contains a set of programs and settings designed to maximize your use of the LED projector. You can navigate inside the onscreen display menu using the control panel buttons on your LED projector or its accompanying remote control. DRAFT 2 12/17/12 To launch options or programs shown on the onscreen display menu, just refer to the control panel grid shown as below.
DRAFT 2 12/17/12 Control panel grid The control panel grid guides you through the process of using the control panel buttons to launch active options inside your onscreen display menu. It represents the 8 buttons surrounding the button on the control panel.
DRAFT 2 12/17/12 Using your LED projector for the first time DRAFT 2 12/17/12 Refer to the following steps when using your LED projector for the first time. 34 1. Set up your LED projector then press the power button. Wait for a few minutes until the ASUS welcome screen appears. 2. Using the control panel buttons, select the language for your LED projector. 3. In the Direct Mode control panel grid, select either Normal Mode or Demo Mode.
DRAFT 2 12/17/12 Accessing your LED projector’s settings Aside from using the control panel buttons to navigate the onscreen display menu, you can also use each of these buttons to launch the following LED projector settings: IMPORTANT! Press Projector Setting on the control panel grid to use these functions in the Media Center. Power Press this button to turn the LED projector on or off. Brightness DRAFT 2 12/17/12 Press this button to adjust the brightness of your projection onscreen.
DRAFT 2 12/17/12 Contrast Press this button to set the difference between lighten or darken your projection onscreen. Media Center Press this button to launch the Media Center. NOTE: For more details, refer to the Using the Media Center section in this manual. Input DRAFT 2 12/17/12 Press this button to scan the connected devices to your LED projector. Splendid Press this button to activate either of the following display modes: Standard, Blackboard, Whiteboard, Dynamic, sRGB, Theatre, Scenary.
DRAFT 2 12/17/12 Image Setting Press this button to access the following image settings: Color Temperature - This option allows you to adjust the light temperature of your LED projector according to the following options: Low, Medium, High. • Color Adjustment - This option allows you to adjust the color of your screen according to the following settings: Auto, RGB, YUV. • Color Enhance - This option allows you to enhance the colors of your projected image.
DRAFT 2 12/17/12 Image Position DRAFT 2 12/17/12 Press this button to access the following image position settings: 38 • Auto Keystone - This option allows you to automatically adjust the alignment of your image. • Horizontal Positioning - This option allows you to shift the image’s position horizontally. • Projector Position - This option allows you to adjust the position of the projected image based from the location of your LED projector.
DRAFT 2 12/17/12 • Aspect Ratio - This option allows you to change the projection of your display according to the following aspect ratios: AUTO, 4:3, 16:9, and 16:10. • Digital Zoom - This option allows you to zoom in or zoom out your projected display. It also allows you to pan your image to the following directions: left, right, up, or down. • Phase - This option allows you to adjust the number of lines emitted by the computer’s signal so that the LED projector relative to the computer’s signal.
DRAFT 2 12/17/12 Setting DRAFT 2 12/17/12 Press this button to access the following LED projector settings: 40 • Information - This option shows you the following information about your LED projector: currently used input port, LED projector’s model name, and currently used Splendid mode. • Reset All - This option allows you to reset all the settings you have currently set up for your LED projector.
DRAFT 2 12/17/12 Using the Media Center Show photos, play videos, listen to audio music, and view documents using your LED projector’s Media Center. Through the Media Center, you can also access the Wi-Fi capabilities of your LED projector and connect to USB-enabled input devices. Launching the Media Center The Media Center automatically launches after the LED projector detects an SD card, external drive, or Wi-Fi dongle connection.
DRAFT 2 12/17/12 Opening files from the SD Card or USB Drive Photo Supported image file formats: • JPG • JPEG • BMP To open an image file: 1. Connect your input device to the LED projector. 2. Turn on the LED projector to launch the Media Center’s onscreen display menu. DRAFT 2 12/17/12 3. Select the input device you wish to access. 4. Select Photo. 5. Refer to the control panel grid to help you browse and select the file from your input device. 6. Press to open the selected folder or file. 7.
DRAFT 2 12/17/12 Video Supported video formats: • MOV • MP4 • AVI • MKV • MPG • MPEG • WMV DRAFT 2 12/17/12 To open a video file: 1. Connect your input device to the LED projector. 2. Turn on the LED projector to launch the Media Center’s onscreen display menu. 3. Select the input device you wish to access.
DRAFT 2 12/17/12 4. Select Video. 5. Refer to the control panel grid to help you browse and select the file from your input device. 6. Press to open the selected folder or file. 7. After opening the file, press on the control panel to DRAFT 2 12/17/12 launch the video file’s control panel grid.
DRAFT 2 12/17/12 Audio Supported audio formats: • MP3 • MP1 • MP2 • WMA • AAC • ADPCM-WAV • PCM-WAV DRAFT 2 12/17/12 To project images, refer to the following steps: 1. Connect your device to the LED projector. 2. Turn on the LED projector to launch the Media Center’s onscreen display menu. 3. Select the input device you wish to access. 4. Select Music.
DRAFT 2 12/17/12 5. Refer to the control panel grid to help you browse and select the file from your input device. Press 6. Press to open the selected folder or file. 7. After opening the file, press on the control panel to DRAFT 2 12/17/12 launch the audio file’s control panel grid.
DRAFT 2 12/17/12 Document Supported document formats: • PDF • DOC • DOCX • XLS • PPT • PPTX • TXT DRAFT 2 12/17/12 To view documents, refer to the following steps: 1. Connect your device to the LED projector. 2. Turn on the LED projector to launch the Media Center’s onscreen display menu. 3. Select the input device you wish to access. 4. Select Document.
DRAFT 2 12/17/12 5. Refer to the control panel grid to help you browse and select the file from your input device. Press 6. Press to open the selected folder or file. 7. After opening the file, press on the control panel to DRAFT 2 12/17/12 launch the Document control panel grid.
DRAFT 2 12/17/12 EZLink This feature allows you to project from input devices, such as laptops and desktop computers, using a USB cable. DRAFT 2 12/17/12 To project files using EZLINK USB, you need to install the EZ USB CD in your input device’s operating system. For Windows®: 1. Connect your LED projector to your device using a USB cable. 2. Turn on your input device and go to My Computer. 3. Select EZ USB CD > EZ_USB_installer.
DRAFT 2 12/17/12 Using EZLink to project from your input device Turn on your input device then connect to the LED projector using a USB cable. 2. Turn on the LED projector. If the Media Center does not automatically launch, press on the control panel. 3. Select EZLink. Wait for the USB icon to appear onscreen to verify that the LED projector was successfully connected to your input device. 4.
DRAFT 2 12/17/12 WiFi This feature enables wireless connections to your LED projector from input devices equipped with Wi-Fi capabilities like laptops and mobile phones. IMPORTANT! A Wi-Fi dongle is required to enable this feature. Inside WiFi Display by AP mode Using this mode, you can establish a one-to-one connection between your input device and your LED projector.
DRAFT 2 12/17/12 Installing the EZ Display app You need to install the EZ Display app so you can project from your input device using WiFi. Download this application online using any of the following options: • If you are using an Android OS, download EZ Display from Google Play Store. • If you are using an iOS, download EZ Display from iStore. • If you are using a Windows OS, download the EZ display app from the link that appears after connecting to the Wi-Fi dongle.
DRAFT 2 12/17/12 6. Select Projector. 7. Tap the EZ Display feature you would like to use. EZ Remote - This feature allows you to use your mobile phone as a remote control for your LED projector. Pix Viewer - This feature allows you to project photos from your input device. Web - This feature allows you to project browsing the internet from your input device. Live Cam - This feature enables you to project using the camera from your input device.
DRAFT 2 12/17/12 Using Display by Client mode 1. Connect the Wi-Fi dongle to your LED projector to launch the Media Center. NOTE: If the Media Center does not automatically launch, press then select EZLINK-WIFI 2. Select Display by Client mode. 3. Press to scroll up or Wi-Fi hotspots then press to scroll down the list of available to select the Wi-Fi hotspot you would like to connect to. DRAFT 2 12/17/12 4. Press to launch the onscreen display menu’s keyboard.
DRAFT 2 12/17/12 Appendices Appendices DRAFT 2 12/17/12 Appendices LED projector E-Manual 55
DRAFT 2 12/17/12 Federal Communications Commission Statement DRAFT 2 12/17/12 This equipment has been tested and found to comply with the limits for a class B digital device, pursuant to Part 15 of the Federal Communications Commission (FCC) rules. These limits are designed to provide reasonable protection against harmful interference in a residential installation.
DRAFT 2 12/17/12 Canadian Department of Communications Statement This digital apparatus does not exceed the Class B limits for radio noise emissions from digital apparatus set out in the Radio Interference Regulations of the Canadian Department of Communications. This class B digital apparatus complies with Canadian ICES-003.
DRAFT 2 12/17/12 DRAFT 2 12/17/12 58 LED projector E-Manual