Komputer desktop PC ASUS BM1845, BM1645/MD250 BM1845 BM1645/MD250 Podręcznik użytkownika
PL7753 POLSKI Wydanie drugie Grudzień 2012 Copyright © 2012 ASUSTeK Computer Inc. Wszelkie prawa zastrzeżone. Żadnej z części tego podręcznika, włącznie z opisem produktów i oprogramowania, nie można powielać, przenosić, przetwarzać, przechowywać w systemie odzyskiwania danych lub tłumaczyć na inne języki, w jakiejkolwiek formie lub w jakikolwiek sposób, za wyjątkiem wykonywania kopii zapasowej dokumentacji otrzymanej od dostawcy, bez wyraźnego, pisemnego pozwolenia ASUSTeK COMPUTER INC. (“ASUS”).
Spis treści Uwagi ........................................................................................................... 5 POLSKI Informacje dotyczące bezpieczeństwa........................................................... 8 Konwencje wykorzystywane w tym podręczniku............................................ 9 Gdzie można znaleźć więcej informacji.......................................................... 9 Zawartość opakowania......................................................................
Spis treści Konfiguracja ustawienia zabezpieczeń dysku twardego, poprzez użycie POLSKI BIOS ......................................................................................................... 50 Rozdział 6 Połączenie z Internetem Rozdział 7 Używanie narzędzi Połączenie przewodowe............................................................................... 51 ASUS AI Suite II............................................................................................ 59 ASUS Webstorage......
Uwagi Serwis odbioru POLSKI Programy recyklingu i odbioru ASUS wynikają z naszego zaangażowania w zapewnienie najwyższych norm ochrony środowiska. Wierzymy w oferowanie naszym klientom rozwiązań umożliwiających odpowiedzialny recykling naszych produktów, baterii oraz pozostałych elementów jak również materiałów opakowaniowych. Szczegółowe informacje o recyklingu dla poszczególnych regionów znajdują się na stronie http://csr.asus.com/english/Takeback. htm.
IC: Oświadczenie zgodności z normą kanadyjską POLSKI Zgodność ze specyfikacjami kanadyjskiej normy ICES-003 klasa B. To urządzenie jest zgodne z normą RSS 210 Industry Canada. To urządzenie klasy B spełnia wszystkie wymagania kanadyjskich przepisów dotyczących urządzeń powodujących zakłócenia. To urządzenie jest zgodne z licencją Industry Canada poza standardem(i) RSS.
Uwagi dotyczące urządzenia RF CE: Oświadczenie o zgodności z przepisami Wspólnoty Europejskiej POLSKI To urządzenie jest zgodne z Wymaganiami ekspozycji RF 1999/519/EC, Zalecenia Rady z 1 lipca 1999 dotyczące ograniczenia ekspozycji ludności na pola elektromagnetyczne (0 - 300 GHz). To urządzenie bezprzewodowe jest zgodne z Dyrektywą R&TTE. Używanie radia bezprzewodowego To urządzenie jest ograniczone do używania wewnątrz pomieszczeń, podczas działania w paśmie częstotliwości 5,15 do 5,25 GHz.
Informacje dotyczące bezpieczeństwa POLSKI Przed czyszczeniem należy odłączyć zasilanie prądem zmiennym i urządzenia peryferyjne. Komputer dekstop PC należy czyścić używając czystego, celulozowego tamponu lub szmatki zwilżonej w detergencie bez właściwości ścierających, z dodatkiem kilku kropel ciepłej wody, a nadmiar wilgoci należy usunąć suchą szmatką. • NIE NALEŻY umieszczać urządzenia na nierównych lub niestabilnych powierzchniach roboczych.
Konwencje wykorzystywane w tym podręczniku NIEBEZPIECZEŃSTWO/PRZESTROGA: Informacje, zapobiegające odniesieniu obrażeń podczas wykonywania zadania. OSTRZEŻENIE: Informacje, które mają zapobiegać uszkodzeniu komponentów podczas wykonywania zadania. POLSKI Aby zapewnić prawidłowe działanie określonych działań należy zwracać uwagę na występujące w tym podręczniku następujące symbole. WAŻNE: Instrukcje, które NALEŻY wykonać, aby zakończyć zadanie.
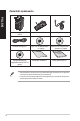
Zawartość opakowania POLSKI Komputer desktop PC ASUS Klawiatura��� x1 Mysz��� x1 Przewód zasilający x1 Płyta DVD ze sterownikami x1 (opcja) Płyta DVD do odzyskiwania systemu x1 (opcja) Installation Guide Oprogramowanie do nagrywania Nero 9 DVD x1 (opcja) Podręcznik instalacji x1 Karta gwarancyjna x1 • Jeśli jakiekolwiek z wymienionych wyżej elementów będą uszkodzone lub nie będzie ich w opakowaniu należy skontaktować się ze sprzedawcą.
Rozdział 1 POLSKI Rozpoczęcie Witamy! Dziękujemy za zakupienie komputera desktop PC ASUS! Komputer desktop PC ASUS udostępnia najnowsze rozwiązania, bezkompromisową niezawodność i dedykowane użytkownikowi narzędzia. Wszystkie te wartości są zawarte w zadziwiającej, futurystycznej i stylowej obudowie. Przed rozpoczęciem ustawień komputera desktop PC ASUS należy przeczytać kartę gwarancyjną ASUS. Poznanie komputera Ilustracje służą wyłącznie jako odniesienie.
Napęd optyczny. Napęd optyczny obsługuje płyty DVD-RW / CD-RW / DVDROM. POLSKI Przycisk wysuwania napędu optycznego. Naciśnij ten przycisk, aby wysunąć tacę dysku napędu optycznego. Wnęka napędu optycznego (pusta). Umożliwia instalację dodatkowego napędu optycznego. Dioda LED dysku twardego. Ta dioda LED świeci podczas działania dysku twardego. Przycisk zasilania. Naciśnij ten przycisk, aby włączyć komputer. Port mikrofonu . Ten port umożliwia podłączenie mikrofonu. Port słuchawek .
BM1645/MD250 POLSKI Panel przedni 1 10 Gniazda czytnika kart 9 8 2 3 Przedni port USB 2.0 5 Przedni port USB 2.0 6 4 Przedni port USB 3.0 3 Przedni port USB 3.0 4 5 6 7 2 x wnęka 5,25 cala na napęd dysków optycznych. Wnęki napędu dysków optycznych 5,25 cala, są przeznaczone do urządzeń DVD-ROM / CD-RW / DVDRW 5,25 cala. Port mikrofonu (różowy). Ten port umożliwia podłączenie mikrofonu. Port słuchawek (jasnozielony). Ten port służy do podłączania słuchawek lub głośnika. Porty USB 2.0.
Dioda LED dysku twardego. Ta dioda LED świeci podczas działania dysku twardego. POLSKI Dioda LED zasilania. Ta dioda LED świeci po włączeniu komputera. Przycisk zasilania. Naciśnij ten przycisk, aby włączyć komputer. 2 x wnęka napędu 3,5 cala. Wnęki napędu 3,5 cala są przeznaczone do dysków twardych/czytników kart pamięci 3,5 cala. Panel tylny 1 2 5 10 11 3 7 4 22 6 8 9 Tylny port USB 2.0 1 Tylny port USB 2.0 2 Tylny port USB 3.0 2 Tylny port USB 3.0 1 Tylny port USB 2.0 3 Tylny port USB 2.
Szczeliny wentylacyjne. Zapewniają przepływ powietrza. POLSKI NIE NALEŻY blokować tych szczelin obudowy. Należy zawsze zapewnić prawidłową wentylację komputera. Klawiatura PS/2/Port combo myszy (purpurowy/ zielony�� ��������� ). To jest port dla klawiatury lub myszy PS/2. Porty USB 2.0. Te porty Universal Serial Bus 2.0 (USB 2.0) umożliwiają podłączenie takich urządzeń USB 2.0 jak mysz, drukarka, skaner, kamera, PDA i inne. Port optyczny S/PDIF_OUT.
Port wyjścia na głośnik tylny (czarny). ���������������������������������������� Ten port służy do podłączania głośników tylnych w konfiguracji audio 4, 6 i 8-kanałowego. POLSKI Port wyjścia na głośnik boczny (szary). ������������������������������ Ten port służy do podłączania głośników bocznych w konfiguracji audio 8-kanałowego. Port mikrofonu (różowy). Ten port umożliwia podłączenie mikrofonu. Port wyjścia liniowego (jasnozielony). Ten port służy do podłączania słuchawek lub głośnika.
Ustawienia komputera POLSKI Ta część zawiera opis podłączania do komputera głównych urządzeń, takich jak zewnętrzny monitor, klawiatura, mysz i przewód zasilający. Używanie wbudowanych portów wyjścia wyświetlania Podłącz monitor do wbudowanego portu wyjścia wyświetlania. W celu podłączenia zewnętrznego monitora, z wykorzystaniem wbudowanych portów wyjścia wyświetlania: 1. Podłącz posiadany monitor do portu VGA, portu DVI-D lub portu wyświetlacza komputera. 2. Podłącz monitor do źródła zasilania.
Podłączenie klawiatury USB i myszy USB Podłącz klawiaturę USB i mysz USB do portów USB na panelu tylnym komputera. POLSKI DVI HDMI Podłączenie przewodu zasilającego Podłącz jeden koniec przewodu zasilającego do złącza zasilania na panelu tylnym komputera, a drugi koniec do źródła zasialnia.
WŁĄCZANIE/WYŁĄCZANIE komputera W tej części znajduje się opis włączania/wyłączania komputera po wykonaniu ustawień komputera. POLSKI WŁĄCZANIE komputera W celu WŁĄCZENIA komputera: 1. �������������� WŁĄCZ monitor. 2. ���������������������������� Włącz przełącznik zasilania. 3. ������������������������������������������ Naciśnij przycisk zasilania na komputerze. Przycisk zasilania BM1845 BM1645/MD250 4.
POLSKI 20 Rozdział 1: Rozpoczęcie
Rozdział 2 POLSKI Używanie Windows® 7 Pierwsze uruchomienie Przy pierwszym uruchomieniu komputera, wyświetlany jest szereg ekranów, umożliwiających wykonanie podstawowych ustawień systemu operacyjnego Windows® 7. W celu pierwszego uruchomienia: 1. Włącz komputer. Zaczekaj kilka minut na wyświetlenie ekranu Konfigurowanie systemu Windows®. 2. Na rozwijanej liście wybierz język. Kliknij Dalej. 3. Na rozwijanej liście, wybierz Kraj lub region, Czas i waluta oraz Układ klawiatury. Kliknij Dalej. 4.
Używanie pulpitu Windows® 7 POLSKI Kliknij ikonę Start o Windows® 7. > Pomoc i obsługa techniczna w celu uzyskania dalszych informacji Używanie menu Start Menu Start daje dostęp do programów, narzędzi i innych użytecznych elementów komputera. Udostępnia także więcej informacji o Windows® 7 poprzez funkcję Pomoc i obsługa techniczna. Uruchamianie elementów z menu Start W celu uruchamiania elementów z menu Start: 1. Na pasku zadań Windows®, kliknij ikonę Start 2.
Przypinanie elementów na liście szybkiego dostępu POLSKI Po kliknięciu prawym przyciskiem ikony na pasku zadań, uruchomiona zostanie lista szybkiego dostępu, zapewniając szybki dostęp do łączy powiązanych z programami lub elementami. Do listy szybkiego uruchamiania można przypiąć takie elementy, jak ulubione strony sieci web, często odwiedzane foldery lub napędy albo ostatnio odtwarzane pliki multimedialne. Aby przypiąć elementy do listy szybkiego uruchamiania: 1.
Używanie obszaru powiadomień Domyślnie, w obszarze powiadomień znajdują się następujące trzy ikony: POLSKI Powiadomienie Centrum akcji Kliknij tę ikonę, aby wyświetlić wszystkie komunikaty alarmu/powiadomienia i uruchomić Centrum akcji Windows®. Połączenie sieciowe Ta ikona wyświetla stan połączenia i siłę sygnału przewodowego lub bezprzewodowego połączenia sieciowego. Głośność Kliknij tę ikonę, aby wyregulować głośność.
Eksploracja plików i folderów 1. Uruchom Eksplorator Windows®. 2. W panelu nawigacji lub widoku, przeglądaj lokalizację danych. 3. Kliknij na pasku łączy strzałkę, aby wyświetlić zawartość napędu lub foldera. POLSKI W celu eksploracji plików i folderów: Dostosowanie widoku pliku/foldera W celu dostosowania widoku pliku/foldera: 1. Uruchom Eksplorator Windows®. 2. W panelu nawigacji, wybierz lokalizację danych. 3. Na pasku narzędziowym, kliknij ikonę Widok 4.
Dodawanie nowego foldera Aby dodać nowy folder: POLSKI 1. Uruchom Eksplorator Windows®. 2. Kliknij na pasku narzędziowym Nowy folder. 3. Wprowadź nazwę dla nowego foldera. Można kliknąć prawym przyciskiem w dowolnym miejscu panela Widok, kliknąć Nowy > Folder. Kopia zapasowa plików Ustawienia kopii zapasowej Aby ustawić kopię zapasową: 1. Kliknij > Wszystkie programy > Konserwacja > Kopia zapasowa i przywracanie. 2. Kliknij Konfiguruj kopię zapasową. Kliknij Dalej. 3.
Zabezpieczenie komputera Używanie Centrum akcji Windows® 7 POLSKI Centrum akcji Windows® 7 udostępnia powiadomienia o alarmach, informacje o bezpieczeństwie, informacje o konserwacji systemu i opcję automatycznego rozwiązywania problemów oraz naprawiania niektórych, powszechnych problemów dotyczących komputera. Powiadomienia można dostosować. Dalsze, szczegółowe informacje są dostępne w tym rozdziale, w części Dostosowanie ikon i powiadomień.
Ustawienie hasła użytkownika W celu ustawienia hasła użytkownika: POLSKI 1. Wybierz użytkownika, dla którego ma zostać utworzone hasło. 2. Wybierz Utwórz hasło. 3. Wprowadź hasło i potwierdź je. Wprowadź podpowiedź do hasła. 4. Po zakończeniu, kliknij Utwórz hasło. Uaktywnianie programu antywirusowego W komputerze preinstalowany jest program Trend Micro Internet Security. Jest to program antywirusowy innej firmy, chroniący komputer przed atakami wirusów. Można go zakupić oddzielnie.
Rozdział 3 POLSKI Używanie Windows® 8 Pierwsze uruchomienie Przy pierwszym uruchomieniu komputera, wyświetlany jest szereg ekranów, umożliwiających wykonanie podstawowych ustawień systemu operacyjnego Windows® 8. W celu pierwszego uruchomienia: 1. Włącz komputer. Zaczekaj kilka minut na wyświetlenie ekranu Konfigurowanie systemu Windows®. 2. Uważnie przeczytaj warunki licencji.
Używanie interfejsu użytkownika w Windows® POLSKI Windows® jest dostarczany z interfejsem użytkownika (UI) wykorzystującym kafelki, co umożliwia organizację i łatwy dostęp do aplikacji Windows® z ekranu Start. Zawiera on następujące funkcje, które można używać podczas pracy z komputerem Desktop PC. Ekran startowy Ekran startowy pojawia się, po pomyślnej rejestracji konta użytkownika. Ekran ten pomaga w organizacji wszystkich programów i aplikacji w jednym miejscu.
Hotspoty POLSKI Ekranowe hotspoty umożliwiają uruchamianie programów i dostęp do ustawień komputera Desktop PC. Funkcje tych hotspotów można uaktywnić poprzez użycie touchpada. Hotspoty w uruchomionych aplikacjach Hotspoty na ekranie startowym Sprawdź funkcje hotspotów na następnej stronie.
Hotspot POLSKI górny, lewy róg Akcja Zaczekaj na wskaźnik myszy, a następnie kliknij miniaturkę ostatniej aplikacji, aby powrócić do tej aplikacji. Po uruchomieniu więcej niż jednej aplikacji, przesuń w dół, aby pokazać wszystkie uruchomione aplikacje. dolny, lewy róg Z ekranu uruchomionych aplikacji: Zaczekaj na wskaźnik myszy, a następnie kliknij miniaturkę ostatniej aplikacji, aby powrócić do tej aplikacji.
Praca z aplikacjami ������� Windows® Użyj touchpada komputera lub klawiatury do uruchomienia i dostosowania aplikacji. POLSKI Uruchamianie aplikacji • �������������������������������������������������������������������������������������� Ustaw wskaźnik myszy nad aplikacją, a następnie kliknij lewym przyciskiem lub stuknij raz, aby ją uruchomić.
Dostęp do ekranu All Apps (Wszystkie aplikacje) POLSKI Na ekranie All Apps (Wszystkie aplikacje), można skonfigurować ustawienia aplikacji lub przypiąć aplikację do ekranu Start lub do paska zadań trybu Desktop (Pulpit). Uruchomienie ekranu All Apps (Wszystkie aplikacje) Kliknij prawym przyciskiem ekran Start lub naciśnij (Wszystkie aplikacje). + i kliknij ikonę All Apps Przypinanie aplikacji na ekranie Start 34 1. Uruchom ekran All Apps (Wszystkie aplikacje). 2.
Charms bar (pasek Charms) POLSKI Charms bar (pasek Charms) to pasek narzędziowy, który można uruchomić z prawej strony ekranu. Składa się z kilku narzędzi, które pozwalają na udostępnianie aplikacji i zapewniają szybki dostęp do dostosowywania ustawień komputera Desktop PC. pasek Charms Uruchamianie Charms bar (pasek Charms) Po wywołaniu, Charms bar (pasek Charms) pojawia się początkowo jako zestaw białych ikon. Obraz powyżej pokazuje pasek Charms, wyglądający jak po uaktywnieniu.
Elementy Charms bar (pasek Charms) Search (Szukaj) POLSKI To narzędzie umożliwia wyszukiwanie plików, aplikacji lub programów w komputerze Desktop PC. Share (Udostępnij) To narzędzie umożliwia udostępnianie aplikacji przez strony sieci społecznościowej lub e-mail. Start To narzędzie przywraca wyświetlacz do widoku ekranu Start. Z ekranu Start, można także użyć tego narzędzia do powrotu do ostatnio otwartej aplikacji.
Funkcja Snap (Migawka) POLSKI Funkcja Snap (Przyciąganie) wyświetla obok siebie dwie aplikacje, umożliwiając pracę lub przełączanie pomiędzy aplikacjami. Do używania funkcji Snap (Migawka) wymagana jest rozdzielczość co najmniej 1366 x 768 pikseli. Pasek Snap (Migawka) Używanie funkcji Snap (Przyciąganie) Aby używać Snap (Przyciąganie): 1. Użyj myszy lub klawiatury komputera Desktop PC do uaktywnienia menu ekranowego Snap (Przyciąganie). Używając myszy a) Kliknij aplikację w celu jej uruchomienia.
Inne skróty klawiaturowe POLSKI Używając klawiatury, można także użyć następujących skrótów, pomocnych w uruchamianiu aplikacji i nawigacji w Windows®8. Przełączanie pomiędzy ekranem Start, a ostatnio uruchomioną aplikacją. + + + + + + + + + + + + + + 38 Uruchomienie pulpitu. Uruchomienie okna Computer (Komputer) na pulpicie. Otwieranie panela File search (Wyszukaj pliki). Otwieranie panela Share (Udostępnij).
+ <-> + <,> + + Uruchamianie lupy i powiększanie ekranu. Zmniejszanie ekanu. POLSKI + <+> Umożliwia podgląd pulpitu. Otwieranie Narrator Settings (Ustawienia Narratora). Włączenie funkcji drukowania ekranu. Wyłączanie komputera Desktop PC W celu wyłączenia komputera Desktop PC: Aby wyłączyć komputer Desktop PC wykonaj jedną z następujących czynności: • Na pasku Charms bar, kliknij Settings (Ustawienia) > Power (Zasilanie) > Shut down (Wyłącz), aby wykonać normalne wyłączenie.
Przechodzenie do konfiguracji BIOS POLSKI BIOS (Podstawowy system wejścia i wyjścia) przechowuje ustawienia sprzętowe wymagane do uruchomienia systemu w komputerze Desktop PC. W normalnych okolicznościach, domyślne ustawienia BIOS są stosowane do większości warunków, aby zapewnić optymalne działanie. Nie należy zmieniać domyślnych ustawień BIOS, poza następującymi sytuacjami: • Podczas uruchamiania systemu, na ekranie pojawia się komunikat błędu z żądaniem uruchomienia programu konfiguracji BIOS.
Rozdział 4 POLSKI Podłączanie urządzeń do komputera Podłączanie urządzenia pamięci masowej USB Ten komputer desktop PC udostępnia porty USB 2.0/1.1 I USB 3.0 na panelu przednim i tylnym. Porty USB umożliwiają podłączanie urządzeń USB, takich jak urządzenia pamięci masowej. W celu podłączenia urządzenia pamięci masowej USB: • Wstaw urządzenie pamięci masowej USB do komputera. Przednie i tylne porty USB 2.0 i USB 3.0 można włączać indywidualnie z programu konfiguracji BIOS.
Aby odłączyć urządzenie pamięci USB w systemie Windows® 7: 1. POLSKI Kliknij w obszarze powiadamiania Windows komputera, a następnie kliknij Eject USB2.0 FlashDisk (Wysuń FlashDisk USB2.0) lub Eject USB3.0 FlashDisk (Wysuń FlashDisk USB3.0), jeśli używany jest napęd flash USB3.0 albo urządzenia zgodne z USB3.0. 2. ��������������������������� Po wyświetleniu komunikatu Sprzęt może być bezpiecznie usunięty, odłącz od komputera urządzenie pamięci masowej USB.
Podłączanie mikrofonu i głośników POLSKI Ten komputer desktop PC jest dostarczany z portami mikrofonu i portami głośników na panelach przednim i tylnym. Porty We/Wy audio na panelu tylnym, umożliwiają podłączenie 2-kanałowych, 4-kanałowych, 6-kanałowych i 8-kanałowych głośników stereo.
Podłączanie 2-kanałowych głośników POLSKI WEJŚCIA AUDIO Podłączanie 4-kanałowych głośników WEJŚCIA WEJŚCIA AUDIO AUDIO Tył 44 Przód Rozdział 4: Podłączanie urządzeń do komputera
POLSKI Podłączanie 6-kanałowych głośników WEJŚCIA WEJŚCIA WEJŚCIA AUDIO AUDIO AUDIO Tył Przód Centralny/ Subwoofer Podłączanie 8-kanałowych głośników Tył WEJŚCIA AUDIO Przód WEJŚCIA AUDIO Centralny/ Boczne Subwoofer ASUS BM1845, BM1645/MD250 45
POLSKI 46 Rozdział 4: Podłączanie urządzeń do komputera
Rozdział 5 POLSKI Używanie komputera Prawidłowa postawa podczas używania komputera desktop PC Podczas używania komputera desktop PC należy utrzymywać prawidłową postawę, aby zapobiec zmęczeniu nadgarstków, rąk oraz innych stawów lub mięśni. W tej części znajdują się wskazówki dotyczące unikania fizycznego dyskomfortu i możliwych obrażeń, podczas używania i pełnego korzystania z komputera desktop PC.
Używanie napędu optycznego (wyłącznie w wybranych modelach) POLSKI 2 1 3 Wkładanie dysku optycznego Aby włożyć dysk optyczny: 1. Przy włączonym systemie, naciśnij przycisk wysuwania poniżej pokrywy wnęki napędu, aby otworzyć tacę. 2. Włóż dysk do napędu optycznego stroną z etykietą skierowaną do góry. 3. Pchnij tacę w celu jej zamknięcia. 4. Wybierz program z okna Autoodtwarzanie w celu dostępu do plików.
Konfiguracja portów USB z wykorzystaniem BIOS POLSKI Przednie i tylne porty USB 2.0 i USB 3.0 można włączać z programu konfiguracji BIOS. Aby wyłączyć lub włączyć przednie i tylne porty USB 2.0 i 3.0: 1. Naciśnij , aby przejść do programu konfiguracji BIOS Setup podczas uruchamiania. 2. Na ekranie konfiguracji BIOS, kliknij Advanced (Zaawansowane) > USB Configuration (Konfiguracja USB). 3. Wybierz port USB do włączenia lub wyłączenia. 4.
Konfiguracja ustawienia zabezpieczeń dysku twardego, poprzez użycie BIOS POLSKI W celu zabezpieczenia dysku twardego, można ustawić hasło w programie konfiguracji BIOS. Aby ustawić hasło dostępu do dysku twardego w programie konfiguracji BIOS: 1. Naciśnij , aby przejść do programu konfiguracji BIOS Setup podczas uruchamiania. 2. Na ekranie BIOS Setup EZ Mode (Tryb EZ programu konfiguracji BIOS), kliknij Exit (Zakończ) > Advanced Mode (Tryb zaawansowany).
Rozdział 6 POLSKI Połączenie z Internetem Połączenie przewodowe Użyj kabla RJ-45 do podłączenia komputera do modemu DSL/kablowy lub do lokalnej sieci komputerowej (LAN). P dem DSL/kablowy Aby połączyć przez modem DSL/kablowy: 1. Skonfiguruj modem DSL/kablowy. Sprawdź dokumentację dostarczoną z modemem DSL/kablowy. 2. Podłącz jeden koniec kabla RJ-45 do portu LAN (RJ-45) na panelu tylnym komputera, a drugi koniec do modemu DSL/kablowy. DVI HDMI Modem DVI HDMI Kabel 45 RJ-45RJ cable 3.
Połączenie przez lokalną sieć komputerową (LAN) W celu połączenia przez LAN: POLSKI 1. Podłącz jeden koniec kabla RJ-45 do portu LAN (RJ-45) na panelu tylnym komputera, a drugi koniec do portu LAN. DVI HDMI DVI HDMI LAN Kabel cable RJ 45 RJ-45 2. Włącz komputer. 3. Skonfiguruj niezbędne ustawienia połączenia z Internetem. • Dalsze, szczegółowe informacje znajdują się w części Konfiguracja połączenia sieciowego.
Konfiguracja połączenia sieciowego Konfiguracja opcji w systemie Windows® 7 1. Przejdź do Start > Control Panel (Panel sterowania) > Network and Sharing Center (Centrum sieci i udostępniania). 2. Na ekranie Network and Sharing Center (Centrum sieci i udostępniania), kliknij Change Adapter settings (Zmień ustawienia adaptera). 3. Kliknij prawym przyciskiem używaną kartę LAN i wybierz Properties (Właściwości). 4.
Kontynuuj następne czynności, jeśli używane jest połączenie PPPoE. POLSKI 8. Powróć do Centrum sieci i udostępniania, a następnie kliknij Ustaw nowe połączenie lub sieć. 9. Wybierz Connect to the Internet (Połącz z Internetem) i kliknij Next (Dalej). 10. Wybierz Broadband (PPPoE) [Połączenie szerokopasmowe (PPPoE)] i kliknij Next (Dalej).
Wprowadź User name (Nazwa użytkownika), Password (Hasło) oraz Connection name (Nazwa połączenia). Kliknij Connect (Połącz). POLSKI 11. 12. Kliknij Close (Zamknij), aby zakończyć konfigurację. 13. Kliknij ikonę sieci na pasku narzędziowym i kliknij utworzone połączenie. 14. Wprowadź nazwę użytkownika i hasło. Kliknij Connect (Połącz), aby połączyć z Internetem. Konfiguracja statycznego połączenia sieciowego IP W celu konfiguracji statycznego połączenia sieciowego IP: 1.
Konfiguracja opcji w systemie Windows® 8 Konfiguracja dynamicznego połączenia sieciowego IP/PPPoE POLSKI W celu konfiguracji dynamicznego połączenia sieciowego IP/PPPoE lub statycznego połączenia IP: 56 1. Na ekranie Start, kliknij Desktop (Pulpit), aby uruchomić Desktop Mode (Tryb Pulpit). 2. Na pasku zadań Windows®, kliknij prawym przyciskiem ikonę sieci i kliknij Open Network and Sharing Center (Otwórz centrum sieci i udostępniania). 3.
Kliknij Obtain an IP address automatically (Uzyskaj adres IP automatycznie) i kliknij OK. POLSKI 6. Kontynuuj następne czynności, jeśli używane jest połączenie PPPoE. 7. Powróć do Centrum sieci i udostępniania, a następnie kliknij Ustaw nowe połączenie lub sieć. 8. Wybierz Connect to the Internet (Połącz z Internetem) i kliknij Next (Dalej).
Wybierz Broadband (PPPoE) [Połączenie szerokopasmowe (PPPoE)] i kliknij Next (Dalej). 11. Wprowadź User name (Nazwa użytkownika), Password (Hasło) oraz Connection name (Nazwa połączenia). Kliknij Connect (Połącz). POLSKI 9. 12. Kliknij Close (Zamknij), aby zakończyć konfigurację. 13. Kliknij ikonę sieci na pasku narzędziowym i kliknij utworzone połączenie. 14. Wprowadź nazwę użytkownika i hasło. Kliknij Connect (Połącz), aby połączyć z Internetem..
Rozdział 7 POLSKI Używanie narzędzi Płyta DVD ze sterownikami i płyta DVD do odzyskiwania systemu mogą nie wchodzić w skład pakietu.������������������������������������������������������������������������ Dalsze, szczegółowe informacje dotyczące opcji przywracania w systemach Windows®7 i Windows®8, znajdują się w tym rozdziale, w części Przywracanie systemu.
Narzędzia Menu Tool (Narzędzie) zawiera panele EPU, Probe II, Sensor Recorder. POLSKI EPU EPU to narzędzie to efektywne energetycznie narzędzie, które spełnia różne potrzeby związane z przetwarzaniem komputerowym. Narzędzie to udostępnia kilka trybów, które można wybrać w celu oszczędzania energii systemu. Wybór trybu Automatyczny spowoduje automatyczne przełączenie trybów w zależności od bieżącego stanu systemu.
Probe II POLSKI Probe II to narzędzie, które monitoruje istotne komponenty komputera i wykrywa oraz alarmuje użytkownika o wszelkich problemach dotyczących tych komponentów. Probe II wykrywa między innymi obroty wentylatora, temperaturę CPU i napięcie systemu. Dzięki temu narzędziu można mieć pewność, że komputer będzie zawsze w dobrym stanie. Uruchamianie Probe II Po instalacji AI Suite II z pomocniczego dysku DVD, uruchom Probe II klikając Narzędzia > Probe II na pasku menu głównego AI Suite II.
Sensor Recorder POLSKI Program Sensor Recorder umożliwia monitorowanie zmian napięcia systemu, temperatury i obrotów wentylatora oraz zapisywanie zmian. Uruchamianie programu Sensor Recorder Po instalacji AI Suite II z pomocniczego dysku DVD, kliknij Narzędzia > Sensor Recorder na pasku menu głównego AI Suite II w celu uruchomienia PC Probe. Konfiguracja programu Sensor Recorder Kliknij zakładki Napięcie/Temperatura/Obroty wentylatorai wybierz sensory do monitorowania.
Monitorowanie POLSKI Część Monitorowanie obejmuje panele Sensor i Częstotliwość CPU. Sensor Panel Sensor wyświetla bieżące wartości sensora systemu, takie jak obroty wentylatora, temperatura CPU i napięcia. Kliknij Monitor > Sensor na pasku menu głównego AI Suite II w celu uruchomienia panela Sensora. Częstotliwość CPU Panel Częstotliwość CPU wyświetla bieżącą częstotliwość CPU i wykorzystanie CPU.
Aktualizacja BIOS przez plik BIOS W celu aktualizacji BIOS przez plik BIOS: POLSKI 1. Na ekranie ASUS Update, wybierz Aktualizuj BIOS z pliku, a następnie kliknij Dalej. 2. Zlokalizuj plik BIOS w oknie Otwórz, kliknij Otwórz i kliknij Dalej. 3. Użytkownik może zdecydować, czy zmienić logo uruchamiania BIOS. Kliknij Tak, aby zmienić logo uruchamiania lub Nie, aby kontynuować. 4. Wykonaj instrukcje ekranowe w celu dokończenia procesu aktualizowania.
Informacje systemowe • Kliknij zakładkę MB aby wyświetlić szczegółowe informacje o producencie płyty głównej, nazwie produktu, wersji i BIOS. • Kliknij zakładkę CPU aby pokazać szczegółowe informacje o procesorze i pamięci cache. • Kliknij zakładkę Memory (Pamięć), a następnie wybierz gniazdo pamięci, aby sprawdzić szczegółowe informacje dotyczące modułu pamięci zainstalowanego w odpowiednim gnieździe.
ASUS Webstorage ASUS WebStorage to aplikacja pamięci masowej i usługa chmury, która umożliwia zapisywanie, synchronizację, udostępnianie i dostęp do plików w dowolnym czasie i miejscu. POLSKI Upewnij się, że w komputerze zainstalowano najnowsze oprogramowanie ASUS WebStorage PC Suite. W celu uzyskania dalszych szczegółów, odwiedź naszą stronę sieci web, pod adresem http://www.asuswebstorage.com. Instalacja webstorage W celu instalacji webstorage: Włóż pomocniczy dysk DVD do napędu optycznego.
MySyncFolder Do zapisu zaktualizowanych plików do MySyncFolder w celu łatwego dostępu i udostępniania wszystkich typów plików, bez ograniczenia lokalizacji urządzenia. • Kalendarz ASUS WebStorage automatycznie synchronizuje najbardziej aktualne zdarzenia kalendarza do wszystkich komputerów osobistych, co zapewnia dokłądne wiadomości o zdarzeniach, bez względu na to, który komputer PC jest używany.
Uruchomienie WebStorage w systemie Windows® 8 W celu uruchomienia WebStorage w systemie Windows® 8 należy wykonać następujące czynności: POLSKI • Kliknij ikonę ASUS WebStorage w obszarze powiadamiania Windows®. • Kliknij ikonę ASUS WebStorage na ekranie Start. Używanie usługi chmury WebStorage • W celu dostępu do plików online należy sprawdzić, czy dostępne jest konto ASUS WebStorage. Jeśli konto nie jest dostępne należy je założyć.
Dodawanie plików do MySyncFolder Aby dodać pliki do MySyncFolder: 2. Kliknij prawym przyciskiem na ekranie, aby uruchomić pasek ustawień. Kliknij POLSKI 1. , a następnie wybierz akcję do wykonania: a. Kliknij Note taking (Wykonanie notatki), aby zapisać notatki. b. Kliknij Snapshot (Zrzut ekranu), aby wykonać zdjęcia. c. Kliknij Video record (Nagranie wideo), aby nagrać wideo. d. Kliknij Audio record (Nagranie audio), aby nagrać audio. 3. Wprowadź nazwę pliku i kliknij Save (Zapisz).
Backed-up Data (Kopia zapasowa danych) POLSKI Ten folder umożliwia otwarcie plików, skopiowanych z komputera. Umożliwia także oznaczenie plików jako ulubione i udostępnianie plików przez e-mail lub łącze, poprzez stronę ASUS WebStorage. • ASUS WebStorage zapisuje nazwę komputera i odzwierciedla ją w folderze Backed-up Data (Kopia zapasowa danych) jako nazwę foldera kopii zapasowej. • Ścieżki i nazwy kopii zapasowej zawartości, są takie same jak ścieżki i nazwy zawartości w komputerze.
My Collection (Moja kolekcja) POLSKI Ten folder umożliwia przesyłanie ulubionych zawartości, bez konieczności ich synchronizacji z komputerem. Można także wykonywać notatki, zdjęcia, wideo i nagrywać audio oraz przesyłać bezpośrednio do tego foldera. Przesyłanie plików Aby przesłać pliki: 1. Kliknij , aby uruchomić folder My Collection (Moja kolekcja). 2. Kliknij , a następnie zlokalizuj plik do przesłania. 3. Kliknij Open (Otwórz), aby przesłać plik do foldera My Collection (Moja kolekcja).
Dostosowanie zawartości foldera My Collection (Moja kolekcja) POLSKI Zawartość tego foldera można dostosować, wykonując takie czynności jak zmiana nazwy, oznaczenie jako ulubione, udostępnianie przez e-mail lub połączenie przez stronę ASUS WebStorage. Aby dostosować zawartość foldera My Collection (Moja kolekcja): 1. Kliknij prawym przyciskiem plik lub folder, aby wybrać i uruchomić pasek ustawień. 2. W celu zmiany nazwy pliku lub folderu, kliknij następnie kliknij 3.
Starred (Zaznaczone gwiazdką) POLSKI Ten folder umożliwia łatwy dostęp i przeglądanie zawartości, zaznaczonej jako ulubione. Z tego foldera można także usuwać zawartości. Usunięcie pliku lub foldera Aby usunąć plik lub folder: 1. Kliknij 2. Kliknij prawym przyciskiem plik lub folder, aby wybrać i uruchomić pasek ustawień. , aby uruchomić folder Starred (Zaznaczone gwiazdką). 3. Kliknij , aby usunąć plik lub folder.
Recent changes (Ostatnie zmiany) POLSKI Ten folder umożliwia podgląd zawartości zapisanej w folderach MySyncFolder, Backed-up Data (Kopia zapasowa danych) i My Collection (Moja kolekcja). Umożliwia także dostosowanie takich elementów ostatnich zawartości, jak zmiana nazwy, usuwanie, zaznaczanie jako ulubione i udostępnianie przez e-mail lub łącze, poprzez stronę ASUS WebStorage. Dostosować można jedynie zawartości zapisane w folderach MySyncFolder i My Collection (Moja kolekcja).
Recent photos (Ostatnie zdjęcia) POLSKI Ten folder umożliwia podgląd zdjęć zapisanych w folderach MySyncFolder, Backedup Data (Kopia zapasowa danych) i My Collection (Moja kolekcja). Umożliwia także dostosowanie takich elementów ostatnich zdjęć, jak zmiana nazwy, usuwanie, zaznaczanie jako ulubione i udostępnianie przez e-mail lub łącze, poprzez stronę ASUS WebStorage. Dostosować można jedynie zdjęcia zapisane w folderach MySyncFolder i My Collection (Moja kolekcja).
Recent music (Ostatnia muzyka) POLSKI Ten folder umożliwia podgląd plików z muzyką zapisanych w folderach Backed-up Data (Kopia zapasowa danych) i My Collection (Moja kolekcja). Umożliwia także dostosowanie takich elementów plików z muzyką, jak zmiana nazwy, usuwanie, zaznaczanie jako ulubione i udostępnianie przez e-mail lub łącze, poprzez stronę ASUS WebStorage. Dostosować można jedynie pliki z muzyką zapisane w folderze My Collection (Moja kolekcja).
My shared link (Moje udostępnione łącza) POLSKI Ten folder umożliwia przeglądanie i dostęp do zawartości połączonych ze stroną ASUS WebStorage. Dostosować można jedynie zawartości zapisane w folderach MySyncFolder i My Collection (Moja kolekcja). Przeglądanie udostępnionych łączy Aby przeglądać udostępnione łącza: , aby uruchomić folder My shared link (Moje udostępnione łącza). 1. Kliknij 2. Kliknij plik lub folder, do przeglądania. 3. Kliknij , aby przejść do głównego ekranu.
Przywracanie systemu Opcje przywracania w systemie Windows® 7 POLSKI Korzystanie z partycji przywracania systemu Partycja przywracania systemu, umożliwia szybkie przywrócenie oprogramowania komputera desktop PC, do oryginalnego stanu działania. Przed użyciem partycji przywracania systemu należy skopiować pliki danych (takie jak pliki PST Outlook) do urządzeń pamięci masowej USB lub do napędu sieciowego i zanotować wszelkie dostosowane ustawienia konfiguracji (takie jak ustawienia sieci).
Wybierz OK, aby potwierdzić przywracanie systemu. POLSKI 4. Przywracanie spowoduje nadpisanie dysku twardego. Przed przywróceniem systemu należy upewnić się, że wykonana została kopia zapasowa ważnych danych. 5. Wykonaj instrukcje ekranowe w celu dokończenia procesu przywracania. Podczas procesu przywracania NIE NALEŻY wyjmować dysku przywracania, bez instrukcji wyjęcia, w przeciwnym razie partycje będą nieużyteczne.
Usuwanie wszystkiego i ponowna instalacja Windows POLSKI Przywrócenie oryginalnych, fabrycznych ustawień komputera PC, można wykonać poprzez użycie opcji Remove everything and reinstall (Usuń wszystko i zainstaluj ponownie) w PC Settings (Ustawienia PC). Aby użyć tę opcję, sprawdź czynności poniżej. Przed użyciem tej opcji należy wykonać kopię zapasową danych. Dokończenie tego procesu może trochę potrwać. 80 1. Uruchom pasek Charms bar. 2.
ASUS Easy Update 1. W obszarze powiadamiania Windows®, kliknij prawym przyciskiem ikonę ASUS Easy Update. 2. Wybierz Schedule (Harmonogram), aby ustawić jak często ma być wykonywana aktualizacja systemu. 3. Wybierz Update (Aktualizuj) w celu uaktywnienia aktualizacji. 4. Kliknij OK, aby wyświetlić elementy do pobrania. 5. Sprawdź element(y) do pobrania, a następnie kliknij OK.
ASUS Secure Delete POLSKI ASUS Secure Delete uniemożliwia odzyskanie usuniętych plików, poprzez prosty interfejs przeciągnij i upuść, chroniąc bezpieczeństwo danych. Aby używać ASUS Secure Delete: 1. W celu uruchomienia ASUS Secure Delete należy wykonać jedną z następujących czynności: W Windows® 7: • Kliknij skrót ASUS Secure Delete na pulpicie Windows®, • Kliknij Start > All Programs (Wszystkie programy) > ASUS > ASUS Secure Delete. W Windows® 8: • Kliknij skrót ASUS Secure Delete • 2.
Zaznacz Delete the files listed in the recycle bin (Usuń pliki z kosza), aby trwale usunąć wszystkie pliki znajdujące się w koszu. 5. Kliknij Clear (Usuń), a następnie kliknij OK w komunikacie potwierdzenia, aby trwale usunąć wszystkie pliki z okna usuwania i kosza (jeśli zostały wybrane w czynności 3). ASUS BM1845, BM1645/MD250 POLSKI 4.
Nero 9 POLSKI Nero 9 umożliwia tworzenie, kopiowanie, nagrywanie, edycję, udostępnianie i aktualizację różnych rodzajów danych. Instalacja Nero 9 W celu instalacji Nero 9: 1. Włóż do napędu optycznego dysk DVD Nero 9. 2. Jeśli włączona jest funkcja Aut oodtwarzanie, pojawi się automatycznie menu główne. Jeśli Autoodtwarzanie jest wyłączone, kliknij dwukrotnie plk SeupX.exe w głównym katalogu dysku DVD Nero 9. 3. W menu głównym, kliknij Nero 9 Essentials. 4.
Rozdział 8 POLSKI Rozwiązywanie problemów Rozwiązywanie problemów Ten rozdział prezentuje niektóre potencjalne problemy i możliwe rozwiązania. ? ? Nie można włączyć zasilania mojego komputera i nie świeci dioda LED zasilania LED na panelu przednim • Sprawdź, czy komputer jest prawidłowo podłączony. • Sprawdź, czy działa gniazdko ścienne. • Sprawdź, czy jest włączony zasilacz. Sprawdź część WŁĄCZANIE/ WYŁĄCZANIE komputera w Rozdziale 1. Mój komputer zawiesza się.
? Nie działają przyciski strzałek keypada numerycznego. POLSKI ? ? ? ? 86 Sprawdź, czy jest wyłączona dioda LED Number Lock. Jeśli dioda LED Number Lock jest włączona, przyciski keypada numerycznego można używać wyłącznie do wprowadzania liczb. Aby używać przycisków strzałek keypada numerycznego, naciśnij przycisk Number Lock w celu wyłączenia diody LED. Brak obrazu na monitorze. • Sprawdź, czy włączone jest zasilanie monitora.
? POLSKI W Windows® 7: ������������������������������������ Funkcja Przywracanie systemu Windows® umożliwia przywrócenie lub cofnięcie zmian ustawień systemu komputera, bez wpływu na osobiste dane, takie jak dokumenty lub zdjęcia. Dalsze, szczegółowe informacje znajdują się w części Przywracanie systemu w Rozdziale 2.
? Moje głośniki nie wytwarzają dźwięku. • POLSKI • • • Upewnij się, że głośniki są podłączone do portu wyjścia liniowego (jasnozielony) na panelu przednim lub na panelu tylnym. Sprawdź, czy głośnik jest podłączony do źródła zasilania prądem elektrycznym i czy jest włączony. Wyreguluj głośność głośnika. Upewnij się, że nie są wyciszone dźwięki systemu komputera. • Jeśli są wyciszone, ikona głośności wygląda jak systemu, kliknij ? ? • .
Problem Brak zasilania (Wyłączony wskaźnik zasilania) Możliwa przyczyna Akcja Nieprawidłowe napięcie zasilania • U staw przełącznik napięcia zasilania komputera, na napięcie wymagane w danym regionie. • Wyreguluj ustawienia napięcia. Upewnij się, że przewód zasilający jest odłączony od gniazda zasilania. Komputer nie jest włączony. Naciśnij przycisk zasilania na panelu przednim, aby upewnić się, że komputer jest włączony. Nieprawidłowo podłączony przewód zasilający komputera.
LAN Problem POLSKI Możliwa przyczyna Akcja Niepodłączony kabel LAN. Podłącz do komputera kabel LAN. Problemy dotyczące kabla LAN Nie można uzyskać dostępu do Internetu Komputer nie jest prawidłowo podłączony do routera lub huba. Ustawienia sieci Problemy spowodowane programem antywirusowym Problemy związane ze sterownikiem Upewnij się, że jest włączona dioda LED LAN. Jeśli nie, wypróbuj inny kabel LAN. Jeśli dalej nie działa, skontaktuj się z punktem serwisowym ASUS.
Problem Za wolne działanie systemu System często zawiesza się lub zatrzymuje. Możliwa przyczyna Akcja Zbyt wiele uruchomionych programów. Zamknij niektóre programy. Atak wirusa komputerowowego • U żyj programu antywirusowego do wyszukania wirusów i naprawy komputera. • Zainstaluj ponownie system operacyjny. Awaria dysku twardego • Wyślij uszkodzony dysk twardy do punktu serwisowego ASUS w celu naprawy. • Wymień dysk twardy na nowy.
CPU Problem POLSKI Za duży hałas po włączeniu komputera. Możliwa przyczyna Akcja Uruchamianie komputera. Jest to normalne. Po właczeniu zasilania komputera, wentylator działa z pełną szybkością. Obroty wentylatora zwalniają po przejściu do systemu operacyjnego. Zmienione zostały ustawienia BIOS. Przywróć domyślne ustawienia BIOS. Stara wersja BIOS Wymieniony został wentylator CPU. Zaktualizuj BIOS do najnowszej wersji. Odwiedź stronę pomocy technicznej ASUS, pod adresem http://support.asus.
ASUSTeK COMPUTER INC. (Asia Pacific) 15 Li-Te Road, Peitou, Taipei, Taiwan 11259 Telefon +886-2-2894-3447 Faks +886-2-2890-7798 E-mail info@asus.com.tw Strona internetowa www.asus.com.tw POLSKI Adres Pomoc techniczna Telefon +86-21-38429911 Wsparcie online support.asus.com ASUS COMPUTER INTERNATIONAL (Ameryka) Adres 800 Corporate Way, Fremont, CA 94539, USA Telefon +1-510-739-3777 Faks +1-510-608-4555 Strona internetowa usa.asus.
POLSKI 94 Rozdział 8: Rozwiązywanie problemów