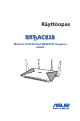
Käyttöopas BRT-AC828 Wireless-AC2600 Dual WAN VPN -langaton reititin failov er SSD
FI11131 Ensimmäinen painos Juli 2016 Copyright © 2016 ASUSTeK Computer Inc. Kaikki oikeudet pidätetään. Tämän ohjekirjan mitään osaa, mukaan lukien siinä kuvatut tuotteet ja ohjelmistot, ei saa kopioida, siirtää, kirjata, varastoida hakujärjestelmään tai kääntää millekään kielelle missään muodossa tai millään keinoin, lukuun ottamatta ostajan varmuuskopiona säilyttämää asiakirjaa, ilman erillistä kirjallista lupaa ASUSTeK Computer Inc.:ltä (“ASUS”).
Sisältö 1 1.1 1.2 1.3 1.4 1.5 1.6 Langattoman reitittimen esittely Tervetuloa!.......................................................................................6 Pakkauksen sisältö........................................................................6 Langaton reitittimesi...................................................................7 Reitittimen sijoittaminen........................................................ 10 Langattoman reitittimen asettaminen...............................
Sisältö 3.2 3.3 4 4.1 Vierasverkon luominen............................................................ 32 USB-sovelluksen käyttö........................................................... 34 Lisäasetusten määrittäminen Langattoman............................................................................... 36 4.1.1 4.1.2 4.1.3 4.1.4 4.1.5 4.2 LAN.................................................................................................. 45 4.2.1 4.2.2 4.2.3 4.2.4 4.3 LAN IP................
Sisältö 4.6.3 Avainsanasuodatin................................................................65 4.6.4 Verkkopalvelut-suodatin.....................................................66 4.6.5 IPv6-palomuuri.......................................................................67 4.7 Järjestelmänvalvonta................................................................ 68 4.7.1 Käyttötila...................................................................................68 4.7.2 Järjestelmä......................
1 Langattoman reitittimen esittely 1.1 Tervetuloa! Kiitos, kun valitsit langattoman ASUS BRT-AC828 -reitittimen! ASUS BRT-AC828, Wireless-AC2600 dual-wan VPN -korkean suorituskyvyn reitittimellä on reaaliaikainen kaksois-wan ja Hardware NAT/ MU-MIMO -tuki, joka antaa parhaan NATsuorituskyvyn muihin verrattuna. Monitoimi-USB-portti mahdollistaa tulostimen, kiintolevyn ja 3G/4G:n jakamisen; VPNvalmius, laitteiston salauskone ja IPSec-tuki.
1.3 Langaton reitittimesi Virran LED-valo Pois: Ei virtaa. Päällä: Laite on valmis. Vilkkuu hitaasti: Pelastustila LAN 1~8 LED Off (Pois päältä): Ei virtaa tai ei fyysistä yhteyttä. On (Päällä): Fyysinen yhteys lähiverkkoon (LAN). 2.4GHz LED Pois: Ei 2,4GHz-signaalia. Päällä: Langaton järjestelmä on valmis. Vilkkuu: Lähettää tai vastaanottaa tietoja langattomalla yhteydellä. 5GHz LED Pois: Ei 5GHz -signaalia. Päällä: Langaton järjestelmä on valmis.
USB-LED Pois päältä: • Ei USB-laitetta liitettynä. • Käytöstä poistaminen on suoritettu loppuun. Vilkkuu: • Vilkkuu 0,2 sekunnin välein: USB-laite lähettää tietoja. • Vilkkuu 1,4 sekunnin välein: Käytöstä poistaminen on aloitettu. • Vilkkumista 0,3 sekunnin välein seuraa kolme 0,1-sekunnin vilkuntaa: Käytöstä poistaminen on käynnissä. Vikasieto-LED Pois päältä: V ikasietotila on otettu pois käytöstä tai vikasietotila on käytössä, mutta ei aktiivinen.
HUOMAA: • Käytä vain laitteen toimitukseen kuuluvaa verkkolaitetta. Muiden verkkolaitteiden käyttö voi vahingoittaa laitetta. • Tekniset tiedot: Verkkolaite Tasavirtalähtö: +19 V maks. 2.37A/3.
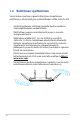
1.4 Reitittimen sijoittaminen Varmistaaksesi parhaan signaalin lähetyksen langattoman reitittimen ja siihen liitettyjen verkkolaitteiden välillä, tarkista, että: • • • • • Asetat langattoman reitittimen keskelle aluetta saadaksesi maksimipeittoalueen verkkolaitteille. Pidät laitteen vapaana metalliesteistä ja poissa suorasta auringonpaisteesta. Pidät laiteen etäällä 802.
1.5 Langattoman reitittimen asettaminen Verkon asettamiseksi tarvitset yhden tai kaksi tietokonetta, jotka ovat seuraavien järjestelmävaatimusten mukaisia: • Ethernet RJ-45 (LAN) -portti (10Base-T/100Base-TX /1000Base-TX) • IEEE 802.11b/g/n langaton toiminnallisuus • Asennettu TCP/IP-palvelu • Web-selain, kuten Microsoft Internet Explorer, Mozilla Firefox, Apple Safari tai Google Chrome HUOMAA: • Jos tietokoneessa ei ole sisäistä langatonta liitettävyyttä, asenna IEEE 802.
1.6 Kiinnitysvalinnat Laatikosta otettuna langaton ASUS-reititin on suunniteltu asetettavaksi koholla olevalle tasaiselle tasolle, kuten arkistokaappi tai kirjahylly. Voit kiinnittää reitittimen seinään käyttämällä VESA-yhteensopivaa kiinnikettä tai palvelinräkkiin käyttämällä alumiinijalustaa. 1.6.1 VESA-kiinnitys Reitittimen kiinnittäminen seinään käyttämällä VESAkiinnikettä: HUOMAUTUKSET: • VESA-kiinnike on ostettava erikseen. • Vain VESA-kiinnike, jonka reikämitta on 10x10 cm on tuettu. 1.
2. Kiinnitä kokoonpano seinään. wall seinä 1.6.2 Alumiininen jalustakiinnike Reitittimen kiinnittäminen palvelinräkkiin käyttämällä alumiinijalustaa: HUOMAUTUS: Alumiinikiinnike on ostettava erikseen. 1. Liu’uta reititin alumiinijalustaan. I/O-puoli 2. Ruuvitalttaa käyttämällä (vääntömomenttiarvo: 4 kg) kiinnitä alumiinijalusta kahdella M3xL9/M4xL9ruuvilla.
3. Käytä palvelinpaketin neljää ruuvia reititinkokoonpanon kiinnittämiseen palvelinräkkiin. 4. Liitä jatketut antennikaapelit kahteen alumiinijalustan reikään. 5. Asenna toimitukseen kuuluvat antennit reititinkokoonpanoon.
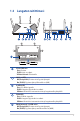
1.7 Reitittimen asetukset TÄRKEÄÄ! • Käytä langallista yhteyttä langattoman reitittimen asentamiseen välttääksesi mahdolliset langattoman asetuksen ongelmat. • Ennen kuin asetat langattoman ASUS-reitittimen, toimi seuraavasti: • Jos korvaat ennestään olemassa olevan reitittimen, poista se verkosta. • Irrota aiemman modeemiasetuksen kaapelit/johdot. Jos modeemissa on vara-akku, poista myös se. • Käynnistä tietokone uudelleen (suositeltava). 1.7.
2. Liitä tietokone toimitukseen kuuluvalla verkkokaapelilla langattoman reitittimen LAN-porttiin. TÄRKEÄÄ! Varmista, että LAN LED -valo vilkkuu. 3 Liitä modeemi toisella verkkokaapelilla langattoman reitittimen WAN1-porttiin. 4. Liitä modeemin verkkolaite DC-IN-porttiin ja liitä se virtalähteeseen. 1.7.2 Langaton yhteys Laptop Wall Power Outlet BRT-AC828 WAN Power Modem Langattoman reitittimen asettaminen langattomalla yhteydellä: 1.
3. Liitä modeemin verkkolaite DC-IN-porttiin ja liitä se virtalähteeseen. 4. Asenna IEEE 802.11a/b/g/n/ac WLAN -sovitin tietokoneeseen. HUOMAUTUKSIA: • Katso lisätietoja langattomaan verkkoon liittämisestä WLANsovittimen käyttöoppaasta. • Katso lisätietoja suojausasetusten asettamisesta tämän käyttöoppaan luvusta 3 Setting up the wireless security settings (Langattoman suojauksen määrittäminen). 1.8 Antennien asentaminen Antennien asentaminen: 1.
2. Kohdista esiintyöntyvä holkin osa liukuhylsyn uurrokseen ja työnnä holkki paikalleen. Muotoilun tarkoitus on estää antennia pois paikaltaan säädettäessä sen asentoa. Holkin säätäminen: 1. Vedä holkki ulos liukuhylsystä. 2. Säädä holkki haluttuun asentoon ja työnnä se sisään liukuhylsyn uurrokseen.
2 Näin pääset alkuun 2.1 Verkkokäyttöliittymään kirjautuminen (Graafinen käyttöliittymä) Langaton ASUS-reititin käyttää web-pohjaista käyttöliittymää, joka mahdollistaa reitittimen määrittämisen tavallisilla webselaimilla, kuten Internet Explorer, Mozilla Firefox, Apple Safari tai Google Chrome. HUOMAUTUS: mukaan. Ominaisuudet voivat vaihdella laiteohjelmistoversion Verkkokäyttöliittymään kirjautuminen: 1.
2.2 Internet-pika-asetus (QIS) automaattisella tunnistuksella Quick Internet Setup (QIS) (Internet-pika-asetus) -toiminto ohjaa sinua internet-yhteyden nopeassa asetuksessa. HUOMAUTUS: Kun asetat internet-yhteyttä ensimmäistä kertaa, paina langattoman reitittimen Reset (Nollaa) -painiketta nollataksesi sen tehtaan oletusasetuksiin. QIS-toiminnon ja automaattisen tunnistuksen käyttäminen: 1. Kirjaudu sisään graafiseen web-käyttöliittymään. QIS-sivu käynnistyy automaattisesti.
2. Langaton reititin havaitsee automaattisesti onko internetpalveluntarjoajan yhteystyyppi Dynamic IP (Dynaaminen IP), PPPoE, PPTP, L2TP vai Static IP (Staattinen IP). Näppäile tarvittavat tiedot internet-palveluntarjoajan yhteystyyppiä varten. TÄRKEÄÄ! Hanki internet-palveluntarjoajaltasi tarvittavat tiedot internet-yhteystyypistäsi.
HUOMAUTUKSIA: • Internet-palveluntarjoajan yhteystyypin auto-detection (Automaattinen tunnistus) tapahtuu, kun määrität langattoman reitittimen ensimmäistä kertaa, tai kun langaton reititin nollataan oletusasetuksiinsa. • Jos QIS ei onnistu tunnistamaan internet-yhteystyyppiäsi, napsauta Skip to manual setting (Siirry manuaaliseen asetukseen) ja määritä yhteysasetukset manuaalisesti. 3. Määritä langattoman verkon nimi (SSID) ja suojausavain langattomalle 2,4 GHz / 5 GHz -yhteydelle.
2.3 Yhdistäminen langattomaan verkkoon Kun olet asettanut langattoman reitittimen QIS-sivulla, voi yhdistää tietokoneen tai muita älylaitteita langattomaan verkkoosi. Yhdistääksesi verkkoosi: 1. Napsauta tietokoneessa ilmoitusalueen verkkokuvaketta tuodaksesi näkyviin käytettävissä olevat langattomat verkot. 2. Valitse luettelosta verkko, johon haluat muodostaa yhteyden ja napsauta sitten Connect (Yhdistä). 3.
3 Yleisten asetusten konfigurointi 3.1 Verkkokartan käyttäminen Verkkokartta antaa määrittää verkon suojausasetukset, hallita verkkoasiakkaita ja valvoa USB-laitteita.
3.1.1 Langattoman suojauksen asettaminen Voidaksesi suojata langattoman verkkosi valtuuttamattomalta käytöltä, sinun on määritettävä reitittimen suojausasetukset. Langattoman verkon suojausasetusten asettaminen: 1. Siirry navigointipaneelista kohtaan General (Yleinen) > Network Map (Verkkokartta). 2. Valitse Network Map (Verkkokartta) -näytössä System status (Järjestelmän tila) -kuvake tuodaksesi näkyviin langattoman verkon suojausasetukset, kuten SSID, suojaustaso ja salausasetukset.
3. Näppäile Wireless name (Langattoman verkon nimi) (SSID) -kentässä langattoman verkkosi ainutkertainen nimi. 4. Valitse avattavasta Authentication Method (Todennusmenetelmä) -luettelosta langattoman verkkosi salausmenetelmä. Jos valitset todennusmenetelmäksi WPA-Personal tai WPA-2 Personal, näppäile WPA-PSK-avain tai turvallisuussalasana. TÄRKEÄÄ! IEEE 802.11n -standardi kieltää käyttämästä korkeaa läpimenoa, kun yksittäislähetyksen salauksena on WEP- tai WPA-TKIP.
3.1.2 Verkkoasiakkaiden hallinta Verkkoasiakkaiden hallinta: 1. Siirry navigointipaneelista General (Yleinen) > Network Map (Verkkokartta) -välilehdelle. 2. Valitse Verkkokartta-näyttö Client Status (Asiakkaan tila) -kuvaketta tuodaksesi näkyviin verkkoasiakkaan tiedot. 3. Voit estää asiakkaan pääsyn verkkoosi valitsemalla asiakkaan ja napsauttamalla Block (Estä) -painiketta.
3.1.3 USB-laitteen valvonta ASUS BRT-AC828:ssa on USB 2.0 -portti USB-laitteiden tai USBtulostimen tiedostojen ja tulostimen asiakaslaitteiden kanssa verkossasi. HUOMAUTUS: 28 • Voidaksesi käyttää tätä ominaisuutta, sinun on liitettävä USBtallennusväline, kuten USB-kiintolevy tai USB-flash-asema, langattoman reitittimen takapaneelin USB 2.0 -porttiin. Varmista, että USB-tallennuslaite on alustettu ja osioitu oikein. Katso lisätietoja Plug-n-Share-levytukiluettelosta osoitteesta http://event.asus.
TÄRKEÄÄ! Sinun on luotava ensin jakamistili ja sen käyttöoikeudet salliaksesi muiden verkkoasiakkaiden käyttää USB-laitetta FTP-sivustolla / kolmannen osapuolen FTP-asiakasapuohjelmalla, Palvelinkeskuksella, Samballa tai AiCloudilla. Katso lisätietoja tämän käyttöoppaan kohdasta 3.5.Using the USB Application (3.5. USB-sovelluksen käyttö) ja 3.6 Using AiCloud (3.6 AiCloudin käyttö). USB-laitteen valvonta: 1. Siirry navigointipaneelista kohtaan General (Yleinen) > Network Map (Verkkokartta). 2.
USB-levyn turvallinen poistaminen TÄRKEÄÄ: USB-levyn virheellinen poistaminen voi vahingoittaa tietoja. USB-levyn turvallinen poistaminen: 1. Siirry navigointipaneelista kohtaan General (Yleinen) > Network Map (Verkkokartta). 2. Napsauta oikeassa yläkulmassa > Eject USB disk (Poista USB-levy). Kun USB-levy on poistettu, USB-tilana näkyy Unmounted (Otettu pois käytöstä).
3.1.4 M.2 SSD:n valvonta Reitittimen takana oleva M.2-liitäntä mahdollistaa M.2 SSD-moduulin liittämisen, mikä mahdollistaa suuremman tallennuskapasiteetin ja nopeamman siirtonopeuden. M.2 SSD:n valvonta: 1. Siirry navigointipaneelista kohtaan General (Yleinen) > Network Map (Verkkokartta). 2. Valitse verkkokarttanäytössä M.2 SSD -tila -kuvake näyttääksesi M.2 SSD:n tiedot. yllä olevan näytön oikeassa yläkulmassa poistaaksesi M.2 SSD:n. Älä käytä reitittimen takana olevaa USB-poistopainiketta M.
3.2 Vierasverkon luominen Vierasverkko tarjoaa internet-yhteyttä käyttäville tilapäisille vieraille mahdollisuuden käyttää erillisiä SSID-tunnuksia tai verkkoja käyttämättä yksityistä verkkoasi. HUOMAUTUS: BRT-AC828 tukee enintään kuutta SSID:tä (kolme 2,4G Hz:in ja kolme 5 GHz:in SSID:tä). Vierasverkon luominen: 1. Siirry navigointipaneelista kohtaan General (Yleinen) > Guest Network (Vierasverkko). 2. Napsauta Vierasverkko-näytöllä Ghz:in vierasverkon.
3. Määritä tilapäisen verkon langattoman verkon nimi Network Name (Verkkonimi) (SSID) -kohdassa. 4. Valitse Todennusmenetelmä. 5. Valitse enimmäismäärä vieraita, joiden on sallittu käyttää vierasverkkoa. 6. Määritä Käyttöaika tai valitse Unlimited access (Rajoittamaton käyttö). 7. Valitse rajoittaaksesi käytän vain internetiin, intranetiin tai VLAN:iin. 8. Valitse otetaanko MAC-suodin käyttöön tai pois käytöstä. 9. Kun olet valmis, napsauta Apply (Käytä).
3.3 USB-sovelluksen käyttö USB-sovellukset-toiminnossa on AiDisk-, Palvelinkeskus-, Verkkotulostinpalvelin -alavalikot. TÄRKEÄÄ! Voidaksesi käyttää palvelintoimintoja, sinun on liitettävä USB-tallennusväline, kuten USB-kiintolevy tai USB-flash-asema, langattoman reitittimen takapaneelin USB 2.0 -porttiin. Varmista, että USB-tallennuslaite on alustettu ja osioitu oikein. Katso lisätietoja tiedostojärjestelmätukitaulukosta ASUS-web-sivustolta osoitteesta http://event.asus.com/2009/networks/disksupport/.
• Käyttäjänimi / Salasana: 3G/4G-verkkopalveluntarjoaja toimittaa käyttäjänimen ja salasanan. • USB-sovitin: Valitse USB 3G / 4G -sovitin avattavasta luettelosta. Jollet ole varma USB-sovittimen mallista, tai jos mallia ei ole valintaluettelossa, valitse Auto (Automaattinen). 4. Napauta Apply (Käytä). HUOMAUTUS: Reititin käynnistyy uudelleen asetusten käyttöön ottamiseksi.
4 Lisäasetusten määrittäminen 4.1 Langattoman 4.1.1 Yleistä Yleinen-välilehdellä voi määrittää langattoman verkon perusasetukset. Langattoman verkon perusasetusten määrittäminen: 1. Siirry navigointipaneelista General (Yleinen) > Wireless (Langaton) > General (Yleinen)-välilehdelle. 2. Valitse langattoman verkon taajuuskaistaksi 2,4 GHz tai 5 GHz.
3. Määritä SSID:lle (Service Set Identifier) tai langattomalle verkolle ainutkertainen nimi, joka koostuu 32 merkistä. WiFi-laitteita voi yksilöidä ja yhdistää langattomaan verkkoon määritetyllä SSID:llä. Tietopalkilla olevat SSID:t päivitetään heti, kun uudet SSID:t on tallennettu asetuksiin. HUOMAUTUS: Voit määrittää SSID-nimet 2,4 GHz tai 5 GHz n taajuuskaistoille. 4. Valitse Hide SSID (Piilota SSID) -kentässä Yes (Kyllä) estääksesi langattomia laitteita tunnistamatta SSID-nimeäsi.
4.1.2 WPS WPS (Wi-Fi Protected Setup) on langaton suojausstandardi, joka mahdollistaa laitteiden helpon liittämisen langattomaan verkkoon. Voit määrittää WPS-toiminnon PIN-koodilla tai WPSpainikkeella. HUOMAUTUS: Varmista, että laitteet tukevat WPS:ää. WPS:n ottaminen käyttöön langattomassa verkossasi: 1. Siirry navigointipaneelista Advanced Settings (Lisäasetukset) > Wireless (Langaton) > WPS-välilehdelle. 2. Siirrä Enable WPS (Ota WPS käyttöön) -kentässä liukusäädin ON (PÄÄLLÄ)-kohtaan. 3.
Huomautus: WPS tukee tunnistamista Open System -, WPA-Personal- ja WPA2-Personal-varmennuksella. WPS ei tue langatonta verkkoa, joka käyttää Jaettu avain -, WPA-Enterprise-, WPA2-Enterprise- ja RADIUSsalausmenetelmää. 3. Valitse WPS-menetelmäkentässä Painike tai Asiakkaan PINkoodi. Jos valitset Painike-valinnan, siirry vaiheeseen 4. Jos valitset Asiakkaan PIN-koodi, siirry vaiheeseen 5. 4. Voit asettaa WPS:n reitittimen WPS-painikkeella toimimalla näiden ohjeiden mukaisesti: a.
4.1.3 WDS (Silta) Silta tai WDS (Wireless Distribution System) antaa langattoman ASUS-reitittimen muodostaa yhteyden muihin langattomiin tukiasemiin yksinomaisesti, estäen muita langattomia laitteita tai asemia käyttämästä langatonta ASUS-reititintä. Sitä voidaan pitää myös langattomana toistimena, jossa langaton ASUS-reititin kommunikoi toisen tukiaseman ja muiden langattomien laitteiden kanssa. Langattoman sillan asettaminen: 1.
3. Valitse AP Mode (Tukiasematila) -kentässä jokin näistä valinnoista: • AP Only (Vain Tukiasema): Ottaa langattoman siltatoiminnon pois käytöstä. • WDS Only (Vain WDS): Ottaa käyttöön langaton silta -ominaisuuden, mutta estää muita langattomia laitteita/ asemia muodostamasta yhteyttä reitittimeen. • HYBRID (Hybridi): Ottaa käyttöön langaton silta -ominaisuuden, mutta antaa muiden langattomien laitteiden/asemien muodostaa yhteyden reitittimeen.
4.1.4 Langaton MAC-suodatin Langaton MAC-suodatin tarjoaa hallinnan paketeille, joitta lähetetään määrättyihin MAC (Media Access Control) -osoitteisiin langattomassa verkossasi. Langattoman MAC-suodattimen asettaminen: 1. Siirry navigointipaneelista Advanced Settings (Lisäasetukset) > Wireless (Langaton) > Wireless MAC Filter (Langaton MAC-suodatin)-välilehdelle. 2. Valitse Frequency (Taajuus) -kentässä taajuuskaista, jota haluat käyttää langattomalla MAC-suodattimella. 3.
4.1.5 Professional Professional-näyttö tarjoaa lisämääritysvalintoja. HUOMAUTUS: On suositeltavaa, että käytät tällä sivulla oletusarvoja. Voit määrittää Professional (Henkilökohtaiset) -näytössä seuraavaa: • Band (Kaista): Valitse taajuuskaista, jolla ammattilaisasetukia käytetään. • Enable Radio (Ota radio käyttöön): Ota langaton verkko käyttöön valitsemalla Yes (Kyllä). Ota langaton verkko pois käytöstä valitsemalla No (ei).
• Verkkovierailuavustaja: Verkkomäärityksissä, joissa on useita tukiasemia tai langaton toistin, langattomia asiakkaita ei toisinaan voi yhdistää automaattisesti parhaaseen käytettävissä olevaan tukiasemaan, koska ne ovat vielä yhdistettyinä pää-langattomaan reitittimeen. Ota tämä asetus käyttöön, jotta asiakas voi katkaista yhteyden pää-langattomaan reitittimeen, jos signaalivoimakkuus on alle määrätyn kynnyksen, ja muodostaa yhteyden voimakkaampaan signaaliin.
• Enable TX Bursting (Ota TX-jakaminen käyttöön): Enable TX Bursting (Ota TX-jakaminen käyttöön) parantaa lähetysnopeutta langattoman reitittimen ja 802.11g-laitteiden välillä. • Enable WMM APSD (Ota Enable WMM APSD käyttöön): Ota WMM APSD (Wi-Fi Multimedia Automatic Power Save Delivery) käyttöön parantaaksesi virranhallintaa langattomien laitteiden välillä. Valitse Disable (Ota pois käytöstä) kytkeäksesi WMM APSD:n pois päältä. • USB 3.
LAN IP -asetusten mukauttaminen: 1. Siirry navigointipaneelista Advanced Settings (Lisäasetukset) > LAN > LAN IP -välilehdelle. 2. Mukauta IP address (IP-osoite) ja Subnet mask (Aliverkon peite). 3. Kun olet valmis, napsauta Apply (Käytä). 4.2.2 DHCP-palvelin Langaton reitittimesi käyttää DHCP-palvelinta IP-osoitteen automaattiseen määrittämiseen verkossasi. Voit määrittää IPosoitealueen ja käyttölupa-ajan asiakkaille verkossasi.
DHCP-palvelimen määrittäminen: 1. Siirry navigointipaneelista Advanced Settings (Lisäasetukset) > LAN > DHCP Server (DHCP-palvelin) -välilehdelle. 2. Rastita Enable the DHCP Server (Otetaanko DHCP-palvelin käyttöön) -kentässä kohta Yes (Kyllä). 3. Syötä Domain Name (Toimialuenimi) -tekstiruutuun langattoman reitittimen toimialueen nimi. 4. Näppäile IP Pool Starting Address (IP-ryhmän aloitusosoite) -kentässä aloitus-IP-osoite. 5.
4.2.3 Route (Reitti) Jos verkossasi on käytössä useampia kuin yksi langaton reititin, voit määrittää reititystaulukon jakaaksesi saman internet-palvelun. HUOMAUTUS: On suositeltavaa, ettet muuta oletusreititysasetuksia, jollei sinulla ole edistynyttä tietoutta reititystaulukoista. LAN-reititystaulukon määrittäminen: 1. Siirry navigointipaneelista Advanced Settings (Lisäasetukset) > LAN > Route (Reitti) -välilehdelle. 2. Valitse Enable static routes (Ota staattiset reitit käyttöön) -kentässä Yes (Kyllä). 3.
4.2.4 IPTV Langaton reititin tukee yhteyttä IPTV-palveluihin ISP- tai LANyhteydellä. IPTV-välilehti tarjoaa määritysasetukset, joita tarvitaan IPTV:n, VoIPin, monilähetyksen ja UDP:n asettamiseen palvelullesi. Ota yhteys ISP-palveluntarjoajaasi saadaksesi palveluusi liittyvät erityistiedot.
4.3 WAN 4.3.1 Internet Connection (Internet-yhteys) Internet Connection (Internet-yhteys) -näytöllä voi määrittää useiden WAN-yhteystyyppien asetukset. WAN-yhteysasetusten määrittäminen: 1. Siirry navigointipaneelista Advanced Settings (Lisäasetukset) > WAN > Internet Connection (Internetyhteys) -välilehdelle. 2. Määritä seuraavat alla olevat asetukset. Kun olet valmis, napsauta Apply (Käytä). • WAN Connection Type (WAN-yhteystyyppi): Valitse internet-palveluntarjoajatyyppi.
• Enable NAT (Ota NAT käyttöön): NAT (Network Address Translation) on järjestelmä, jossa käytetään yhtä julkista IP:tä (WAN IP) tarjoamaan internet-käyttö verkkoasiakkaille yksityisellä IP-osoitteella LAN-verkossa. Kunkin verkkoasiakkaan yksityinen IP-osoite tallennetaan NAT-taulukkoon ja sitä käytetään saapuvien datapakettien reitittämiseen.
MAC Address (MAC-osoite): MAC (Media Access Control) -osoite on verkkolaitteesi yksilöivä tunnus. Jotkut internetpalveluntarjoajat valvovat palveluihinsa yhdistettävien verkkolaitteiden MAC-osoitteita ja hylkäävät kaikki tunnistamattomat laitteet, jotka yrittävät muodostaa yhteyden. Välttääksesi rekisteröimättömästä MAC-osoitteesta johtuvat yhteysongelmat, voit: • Ottaa yhteyttä internet-palveluntarjoajaasi ja päivittää internet-palveluntarjoajasi palveluun liittyvän MACosoitteen.
4.3.2 Kaksois-WAN Langaton ASUS-reititin tarjoaa kaksois-WAN-tuen. Voit asettaa kaksois-WAN-ominaisuuden kumpaan tahansa näistä kahdesta tilasta: • Vikasietotila: Valitse tämä tila käyttääksesi toissijaista WANyhteyttä varaverkkoyhteytenä. • Kuormatasapainotila: Valitse tämä tila optimoidaksesi kaistanleveyden, minimoidaksesi vasteajan ja estääksesi datan ylikuormituksen sekä ensisijaisella että toissijaisella WAN-yhteydellä.
4.3.3 Port Trigger (Portin käynnistys) Porttialueen käynnistys avaa edeltä käsin määritetyn saapuvan portin rajoitetuksi ajaksi aina, kun lähiverkon asiakas muodostaa lähtevän yhteyden määritettyyn porttiin. Porttien sallimista käytetään seuraavissa tilanteissa: • Useampi kuin yksi paikallinen asiakas tarvitsee portinsiirtoa samalle sovellukselle eri aikana. • Sovellus vaatii erityiset saapuvat portit, jotka ovat muita kuin lähtevät portit. Port Trigger (Portin käynnistys) -toiminnon asettaminen: 1.
4. Näppäile Trigger Port List (Portin käynnistys -luettelo) -taulukkoon seuraavat tiedot: • Description (Kuvaus): Anna palvelulle lyhyt nimi tai kuvaus. • Trigger Port (Sallittu portti): Määritä sallittu portti avataksesi saapuvan portin. • Protocol (Protokolla): Valitse protokolla, TCP tai UDP. • Incoming Port (Saapuva portti): Määritä saapuva portti vastaanottaaksesi saapuvaa dataa internetistä. • Protocol (Protokolla): Valitse protokolla, TCP tai UDP. 5.
4.3.4 Virtuaalinen palvelin / Portinsiirto Portinsiirto on menetelmä verkkoliikenteen ohjaamiseen internetistä lähiverkossa olevan laitteen tain useiden laitteiden määrättyyn porttiin tai porttialueelle. Portinsiirron asettaminen reitittimellä sallii verkon ulkopuolella olevien tietokoneiden käyttää määrättyjä, verkossa olevan tietokoneen tarjoamia palveluita.
3. Valitse Famous Server List (Suosittu palvelin -luettelo) -kentässä palvelutyyppi, jota haluat käyttää. 4. Valitse Famous Game List (Suosittu peli -luettelo) -kentässä suosittu peli, jota haluat käyttää. Tämä kohde listaa portin, joka vaaditaan, jotta valitsemasi suosittu online-peli toimisi oikein. 5. Näppäile Port Forwarding List (Portinsiirtoluettelo) -taulukossa seuraavat tiedot: • Service Name (Palvelunimi): Anna palvelunimi.
• Local Port (Paikallinen portti): Syötä erityinen portti vastaanottaaksesi siirrettyjä paketteja. Jätä tämä kenttä tyhjäksi, jos haluat ohjata saapuvat paketit määritetylle porttialueelle. • Protocol (Protokolla): Valitse protokolla. Jollet ole varma, valitse BOTH (Molemmat). 6. Napsauta Add (Lisää) syöttääksesi portin käynnistystiedot luetteloon. Napsauta Delete (Poista) -painiketta poistaaksesi portin käynnistyssyötteen luettelosta. 7. Kun olet valmis, napsauta Apply (Käytä).
4.3.5 DMZ Virtuaalinen DMZ paljastaa yhden asiakkaan internetille sallien tämän asiakkaan vastaanottaa kaikki lähiverkkoosi ohjatut saapuvat paketit. Saapuva liikenne internetistä yleensä hylätään ja reititetään määrätylle asiakkaalle vain, jos portinsiirto tai portin käynnistys on määritetty verkossa. DMZ-määrityksessä yksi verkkoasiakas vastaanottaa kaikki saapuvat paketit.
4.3.6 DDNS DDNS:n (Dynamic DNS) asettaminen mahdollistaa reitittimen käytön verkkosi ulkopuolelta toimitukseen kuuluvalla ASUS DDNS -palvelulla tai muulla DDNS-palvelulla. DDNS:n asettaminen: 1. Siirry navigointipaneelista Advanced Settings (Lisäasetukset) > WAN > DDNS-välilehdelle. 2. Määritä seuraavat alla olevat asetukset. Kun olet valmis, napsauta Apply (Käytä). • Enable the DDNS Client (Ota DDNS-asiakas käyttöön): Ota DDNS käyttöön käyttääksesi ASUS-reititintä DNS-nimellä WAN IP -osoitteen asemesta.
• Enable wildcard (Ota yleismerkki käyttöön): Ota yleismerkki käyttöön, jos DDNS-palvelu vaatii sitä. HUOMAUTUKSIA: DDNS-palvelu ei toimi näissä olosuhteissa: • Kun langaton reititin käyttää yksityistä WAN IP -osoitetta (192.168.x.x, 10.x.x.x tai 172.16.x.x), kuten keltaisella tekstillä on ilmaistu. • Reititin voi olla verkossa, joka käyttää useita NAT-taulukoita 4.3.7 NAT-ohitus NAT-ohitus sallii Virtual Private Network (VPN) -liitännän kulkemaan reitittimen läpi verkkoasiakkaille.
4.4 IPv6 Tämä langaton reititin tukee IPv6-osoitteen määritystä, järjestelmää, joka tukee useita IP-osoitteita. Tämä standardi ei ole vielä laajalti käytettävissä. Ota yhteys internet-palveluntarjoajaasi, jos internet-palvelusi tukee IPv6:tta. IPv6:n asettaminen: 1. Siirry navigointipaneelista Advanced Settings (Lisäasetukset) > IPv6-välilehdelle. 2. Valitse Connection Type (Yhteystyyppi). Määritysvalinnat vaihtelevat valitun yhteystyypin mukaan. 3. Syötä IPv6:n LAN- ja DNS-asetukset. 4.
4.5 VPN-palvelin VPN (Virtual Private Network) tarjoaa turvallisen tiedonsiirron etätietokoneeseen tai etäverkkoon käyttämällä julkista verkko, kuten internetiä. HUOMAUTUS: Ennen kuin asetat VPN-yhteyden, tarvitset käytettävän VPN-palvelimen IP-osoitteen tai toimialuenimen. VPN-palvelimen asettaminen käyttöön: 1. Siirry navigointipaneelista Advanced Settings (Lisäasetukset) > VPN Server (VPN-palvelin)-välilehdelle. 2. Valitse Enable VPN Server (Ota VPN-palvelin käyttöön) -kentässä Yes (Kyllä). 3.
4.6 Palomuuri Langaton reititin voi toimia verkkosi laitteiston palomuurina. HUOMAUTUS: Palomuuritoiminto on käytössä oletuksena. 4.6.1 Yleistä Peruspalomuuriasetusten asettaminen: 1. Siirry navigointipaneelista Advanced Settings (Lisäasetukset) > Firewall (Palomuuri) > General (Yleinen) -välilehdelle. 2. Valitse Enable Firewall (Ota palomuuri käyttöön) -kentässä Yes (Kyllä). 3.
URL-suodattimen asettaminen: 1. Siirry navigointipaneelista Advanced Settings (Lisäasetukset) > Firewall (Palomuuri) > URL Filter (URLsuodatin) -välilehdelle. 2. Valitse Enable URL Filter (Ota URL-suodatin käyttöön) -kentässä Enabled (Käytössä). 3. Syötä URL ja napsauta -painiketta. 4. Napsauta Apply (Käytä). 4.6.3 Avainsanasuodatin Avainsanasuodatin estää tiettyjä avainsanoja käyttävien websivustojen käytön. Avainsanasuodattimen asettaminen: 1.
3. Anna sana tai lause ja napsauta Add (Lisää) -painiketta. 4. Napsauta Apply (Käytä). HUOMAUTUKSIA: • Salasanasuodatin perustuu DNS-kyselyyn. Jos verkkoasiakas on jo käyttänyt web-sivustoa, kuten http://www.abcxxx.com, web-sivusto ei enää ole estetty (Järjestelmän DNS-välimuisti tallentaa aiemmin vieraillut web-sivustot). Ratkaistaksesi tämän ongelman, tyhjennä DNS-välimuisti ennen salasanasuodattimen asetusta. • HTTP-pakkauksella pakattuja web-sivuja ei voi suodattaa.
Verkkopalvelut-suodattimen asettaminen: 1. Siirry navigointipaneelista Advanced Settings (Lisäasetukset) > Firewall (Palomuuri) > Network Service Filter (Verkkopalvelut-suodatin) -välilehdelle. 2. Valitse Ota Verkkopalvelut-suodatin käyttöön -kentässä Yes (Kyllä). 3. Valitse Suodatintaulukkotyyppi. Black List (Kielletytluettelo) estää määritetyt verkkopalvelut. White List (Sallitut-luettelo) rajoittaa käytön vain määritettyihin verkkopalveluihin. 4.
4.7 Järjestelmänvalvonta 4.7.1 Käyttötila Käyttötilasivu antaa sinun valita verkollesi asianmukaisen tilan. Käyttötilan asettaminen: 1.Siirry navigointipaneelista Advanced Settings (Lisäasetukset) > Administration (Järjestelmänvalvonta) > Operation Mode (Käyttötila) -välilehdelle. 2.
3. Napsauta Apply (Käytä). HUOMAUTUS: Reititin käynnistyy uudelleen, kun muutat tiloja. 4.7.2 Järjestelmä System (Järjestelmä) -sivu antaa määrittää langattoman reitittimen asetuksia. Järjestelmäasetusten asettaminen: 1. Siirry navigointipaneelista Advanced Settings (Lisäasetukset) > Administration (Järjestelmänvalvonta) > System (Järjestelmä) -välilehdelle. 2. Voit määrittää seuraavat asetukset.
• Only allow specific IP (Salli vain määritetyt IP-osoitteet): Napsauta Yes (Kyllä), jos haluat määrittää määrättyjä IPosoitteita laitteille, joiden on sallittu käyttää langattoman reitittimen graafisen käyttöliittymän asetuksia WAN-verkossa. • Asiakasluettelo: Syötä niiden verkko laitteiden WAN IP -osoitteet, joiden on sallittua käyttää langattoman reitittimen asetuksia. Tätä luetteloa käytetään, jos napsautat Yes (kyllä) Only allow specific IP (Salli vain määritetty IP-osoite) -kohdassa. 3.
4.7.4 Asetusten palauttaminen/tallentaminen/ siirtäminen Voit palauttaa/tallentaa/siirtää asetukset seuraavasti: 1. Siirry navigointipaneelista Advanced Settings (Lisäasetukset) > Administration (Järjestelmänvalvonta) > Restore/Save/Upload Setting (Palauta/Tallenna/Siirrä/ Siirrä asetus) -välilehdelle. 3. Valitse tehtävät, jotka haluat suorittaa: • Jos haluat palauttaa oletusasetukset, valitse Restore (Palauta) ja napsauta kehotettaessa OK.
4.8 Järjestelmäloki Järjestelmäloki sisältää tallennetut verkkotoimintasi. HUOMAUTUS: Järjestelmäloki nollautuu, kun reititin käynnistetään uudelleen tai sammutetaan. Järjestelmälokin tarkasteleminen: 1. Siirry navigointipaneelista Advanced Settings (Lisäasetukset) > System Log (Järjestelmäloki) -välilehdelle. 2.
5 Apuohjelmat HUOMAA: • Lataa ja asenna langattoman reitittimen apuohjelmia ASUS-websivustolta: • Device Discovery v1.4.7.1 kohdassa http://dlcdnet.asus.com/pub/ ASUS/LiveUpdate/Release/Wireless/Discovery.zip • Firmware Restoration v1.9.0.4 kohdassa http://dlcdnet.asus.com/ pub/ASUS/LiveUpdate/Release/Wireless/Rescue.zip • Windows Printer Utility v1.0.5.5 kohdassa http://dlcdnet.asus. com/pub/ASUS/LiveUpdate/Release/Wireless/Printer.zip • Pääohjelmat eivät ole tuettuja MAC OS -käyttöjärjestelmässä.
5.2 Firmware Restoration Firmware Restoration -apuohjelmaa käytetään langattomassa ASUS-reitittimessä epäonnistuneen laiteohjelmistopäivityksen jälkeen. Tämä apuohjelma siirtää laiteohjelmistotiedoston langattomaan reitittimeen. Toimenpide kestää kolmesta neljään minuuttia. TÄRKEÄÄ: Käynnistä pelastustila ennen kuin käytät Firmware Restoration -apuohjelmaa. HUOMAUTUS: Tämä toiminto ei ole tuettu MAC OS -käyttöjärjestelmässä. Pelastustilan käynnistäminen ja Firmware Restoration -apuohjelman käyttö: 1.
3. Käytä seuraavaa TCP/IP-asetusten asettamiseksi: IP-osoite: 192.168.1.x Aliverkon peite: 255.255.255.0 4. Napsauta tietokoneen työpöydällä Start (Käynnistä) > All Programs (Kaikki ohjelmat) > Asus Utility BRT-AC828 Wireless Router (ASUS-apuohjelma Langaton BRT-AC828-reititin) > Firmware Restoration. 5. Napsauta Browse (Selaa) nvaigoidaksesi laiteohjelmistotiedostoon ja napsauta sitten Upload (Siirrä).
6 Vianmääritys Tässä luvussa tarjotaan ratkaisuja ongelmiin, joita voi kohdata käyttäessä reititintä. Jos kohtaat ongelmia, joita ei ole mainittu tässä luvussa, ota yhteys ASUS-tekniseen tukeen osoitteessa: http://support.asus.com/ saadaksesi lisää tuotetietoja ASUSteknisen tuen yhteystiedot. 6.1 Perusvianetsintä Jos reitittimessä ilmenee ongelmia, kokeile tämän luvun perusohjeita ennen kuin etsit lisää ratkaisuja. Päivitä laiteohjelmisto uusimpaan versioon. 1. Käynnistä verkkokäyttöliittymä.
Tarkista, onko Ethernet-kaapelit liitetty oikein. • Kun Ethernet-kaapeli, joka liittää reitittimen ja modeemin, on liitetty oikein, WAN LED -merkkivalo palaa. • Kun Ethernet-kaapeli, joka liittää käynnissä olevan tietokoneen ja reitittimen, on liitetty oikein, vastaava LAN LED -merkkivalo palaa. Tarkista vastaako tietokoneen langaton asetus tietokoneen asetusta. • Kun liität tietokoneen reitittimeen langattomasti, varmista, että SSID (langattoman verkon nimi, salausmenetelmä ja salasana ovat oikein.
6.2 Usein kysyttyä (FAQ) En voi käyttää reitittimen graafista käyttöliittymää webselaimella • • • Jos tietokoneesi on langallinen, tarkista Ethernetkaapeliyhteys ja LED-tila, kuten kuvattu edellisessä osassa. Varmista, että käytät oikeita kirjautumistietoja. Oletussisäänkirjautumisnimi ja salasana ovat "admin/admin". Varmista, että Caps Lock -näppäin on pois käytöstä, kun annat kirjautumistiedot. Poista web-selaimesta evästeet ja tiedostot. Toimi Internet Explorer 8:ssa näiden ohjeiden mukaisesti: 1.
Asiakas ei voi luoda langatonta yhteyttä reitittimeen. HUOMAUTUS: Jos sinulla on ongelmia 5 Ghz -verkon yhdistämisessä, varmista, että langaton laitteesi tukee 5 Ghziä, tai että siinä on kaksoiskaistaominaisuudet. • • Kantaman ulkopuolella: • Siirrä reititin lähemmäs langatonta asiakasta. • Kokeile reitittimen antennien säätämistä parhaaseen suuntaan, kuten kuvattiin osassa 1.4 Positioning your router (1.4 Reitittimen sijoittaminen). DHCP-palvelin on otettu pois käytöstä: 1.
• SSID on piilotettu. Jos laitteesi pystyy löytämään muiden reitittimien SSID-nimiä, mutta ei oman reitittimesi SSID:tä, siirry kohtaan Advanced Settings (Lisäasetukset) > Wireless (Langaton) > General (Yleinen), valitse No (Ei) kohdassa Hide SSID (Piilota SSID) ja valitse Auto (Automaattinen) kohdassa Control Channel (Ohjauskanava). • Jos käytät langatonta LAN-sovitinta, tarkista onko käytössä oleva langaton kanava maassasi/alueellasi käytettävissä olevien kanavien mukainen.
Internet ei ole käytettävissä. • • Tarkista pystyykö reititin muodostamaan yhteyden internetpalveluntarjoajasi WAN IP -osoitteeseen. Tee se käynnistä graafinen web-käyttöliittymä ja siirry kohtaan General (Yleinen)> Network Map (Verkkokartta) ja tarkista Internet Status (Internet-tila).
• Nollaa reititin oletusasetuksiin. Käynnistä graafisessa käyttöliittymässä Administration (Järjestelmänvalvonta) > Restore/Save/Upload Setting (Palauta/Tallenna/Siirrä asetus) ja napsauta Restore (Palauta). Oletuskirjautumistili ja salasana ovat molemmat "admin". Kuinka järjestelmän voi palauttaa oletusasetuksiin?? Siirry kohtaan Administration (Järjestelmänvalvonta) > Restore/Save/Upload Setting (Palauta/Tallenna/Siirrä asetus) ja napsauta Restore (Palauta).
Graafista web-käyttöliittymää ei voi käyttää Ennen kuin määrität langattoman reitittimen, suorita isäntätietokoneelle ja verkkoasiakkaille tässä osassa kuvatut vaiheet. A. Ota välityspalvelin pois käytöstä, jos se on käytössä. Windows® 7 1. Napsauta Start (Käynnistä) > Internet Explorer käynnistääksesi selaimen. 2. Napsauta Tools (Työkalut) > Internet options (Internetvalinnat) > Connections (Yhteydet) -välilehdellä > LAN settings (LANasetukset). 3.
MAC OS 1. Napsauta Safariselaimessa Safari > Preferences (Asetukset) > Advanced (Lisäasetukset) > Change Settings... (Muuta asetuksia) 2. Poista Verkko-näytöstä asetukset FTP Proxy (FTP-välityspalvelin) ja Web Proxy (HTTP) (Web-välityspalvelin (HTTP). 3. Napsauta Apply Now (Käytä nyt), kun valmis. HUOMAUTUS: Katso selaimen Ohje-tiedostoista lisätietoja välityspalvelimen ottamisesta pois käytöstä. B. Aseta TCP/IP-asetukset hakemaan automaattisesti IPosoitteen. Windows® 7 1.
3. Voit hakea iPv4 IP -asetukset automaattisesti rastittamalla kohdan Obtain an IP address automatically (Hanki IPosoite automaattisesti). Voit hakea iPv6 IP -asetukset automaattisesti rastittamalla kohdan Obtain an IPv6 address automatically (Hanki IPv6-osoite automaattisesti). 4. Napsauta OK, kun olet valmis. MAC OS 1. Osoita näytön vasemmassa yläkulmassa sijaitsevaa Apple-kuvaketta . 2. Osoita System Preferences (Järjestelmäasetukset) > Network (Verkko) > Configure... (Määritä...) 3.
C. Ota modeemiyhteys pois käytöstä, jos se on käytössä. Windows® 7 1. Napsauta Start (Käynnistä) > Internet Explorer käynnistääksesi selaimen. 2. Napsauta Tools (Työkalut) > Internet options (Internetvalinnat) > Connections (Yhteydet) -välilehdellä. 3. Valitse Never dial a connection (Älä käytä koskaan puhelinverkkoyhteyttä). 4. Napsauta OK, kun olet valmis. HUOMAUTUS: Katso selaimen Ohje-tiedostoista lisätietoja puhelinverkkoyhteyden ottamisesta pois käytöstä.
Liitteet Ilmoitukset ASUS Recycling/Takeback Services ASUS recycling and takeback programs come from our commitment to the highest standards for protecting our environment. We believe in providing solutions for you to be able to responsibly recycle our products, batteries, other components, as well as the packaging materials. Please go to http://csr.asus. com/english/Takeback.htm for the detailed recycling information in different regions.
This equipment generates, uses and can radiate radio frequency energy and, if not installed and used in accordance with the instructions, may cause harmful interference to radio communications. However, there is no guarantee that interference will not occur in a particular installation.
Prohibition of Co-location This device and its antenna(s) must not be co-located or operating in conjunction with any other antenna or transmitter except in accordance with FCC multi-transmitter product procedures. Declaration of Conformity for R&TTE directive 1999/5/EC Essential requirements – Article 3 Protection requirements for health and safety – Article 3.1a Testing for electric safety according to EN 60950-1 has been conducted. These are considered relevant and sufficient.
Canada, Industry Canada (IC) Notices This device complies with Industry Canada license-exempt RSS standard(s). Operation is subject to the following two conditions: (1) this device may not cause interference, and (2) this device must accept any interference, including interference that may cause undesired operation of the device.
WARNING! • This radio transmitter (3568A-RT0V00) has been approved by Industry Canada to operate with the antenna types listed below with the maximum permissible gain and required antenna impedance for each antenna type indicated. Antenna types not included in this list, having a gain greater than the maximum gain indicated for that type, are strictly prohibited for use with this device.
NCC 警語 經型式認證合格之低功率射頻電機,非經許可,公司、商號或 使用者均不得擅自變更頻率、加大功率或變更原設計之特性及 功能。低功率射頻電機之使用不得影響飛航安全及干擾合法通 信;經發現有干擾現象時,應立即停用,並改善至無干擾時方 得繼續使用。前項合法通信,指依電信法規定作業之無線電通 信。低功率射頻電機須忍受合法通信或工業、科學及醫療用電 波輻射性電機設備之干擾。 GNU General Public License Licensing information This product includes copyrighted third-party software licensed under the terms of the GNU General Public License. Please see The GNU General Public License for the exact terms and conditions of this license.
authors commit to using it. (Some other Free Software Foundation software is covered by the GNU Library General Public License instead.) You can apply it to your programs, too. When we speak of free software, we are referring to freedom, not price.
that any patent must be licensed for everyone’s free use or not licensed at all. The precise terms and conditions for copying, distribution and modification follow. Terms & conditions for copying, distribution, & modification 0. This License applies to any program or other work which contains a notice placed by the copyright holder saying it may be distributed under the terms of this General Public License.
these conditions: a) You must cause the modified files to carry prominent notices stating that you changed the files and the date of any change. b) You must cause any work that you distribute or publish, that in whole or in part contains or is derived from the Program or any part thereof, to be licensed as a whole at no charge to all third parties under the terms of this License.
3.
attempt otherwise to copy, modify, sublicense or distribute the Program is void, and will automatically terminate your rights under this License. However, parties who have received copies, or rights, from you under this License will not have their licenses terminated so long as such parties remain in full compliance. 5. You are not required to accept this License, since you have not signed it. However, nothing else grants you permission to modify or distribute the Program or its derivative works.
is intended to apply and the section as a whole is intended to apply in other circumstances. It is not the purpose of this section to induce you to infringe any patents or other property right claims or to contest validity of any such claims; this section has the sole purpose of protecting the integrity of the free software distribution system, which is implemented by public license practices.
programs whose distribution conditions are different, write to the author to ask for permission. For software which is copyrighted by the Free Software Foundation, write to the Free Software Foundation; we sometimes make exceptions for this. Our decision will be guided by the two goals of preserving the free status of all derivatives of our free software and of promoting the sharing and reuse of software generally.
For Turkey only Authorised distributors in Turkey: BOGAZICI BIL GISAYAR SAN. VE TIC. A.S. Tel. No.: +90 212 3311000 Address: AYAZAGA MAH. KEMERBURGAZ CAD. NO.10 AYAZAGA/ISTANBUL CIZGI Elektronik San. Tic. Ltd. Sti. Tel. No.: +90 212 3567070 Address: CEMAL SURURI CD. HALIM MERIC IS MERKEZI No: 15/C D:5-6 34394 MECIDIYEKOY/ ISTANBUL KOYUNCU ELEKTRONiK BiLGi iSLEM SiST. SAN. VE DIS TIC. A.S. Tel. No.: +90 216 5288888 Address: EMEK MAH.ORDU CAD. NO:18, SARIGAZi, SANCAKTEPE ISTANBUL AEEE Yönetmeliğine Uygundur.
ASUS-yhteystiedot ASUSTeK COMPUTER INC. (Asia Pacific) Osoite Puhelin Tuki-faksi Web-sivusto 4F, No. 150, Li-Te Rd., Peitou, Taipei 112, Taiwan +886-2-2894-3447 +886-2-2890-7798 www.asus.com/ Tekninen tuki Puhelin Tuki-faksi Online-tuki +86-21-38429911 +86-21-5866-8722, ext. 9101# http://qr.asus.com/techserv ASUS COMPUTER INTERNATIONAL (America) Osoite Puhelin Tuki-faksi Web-sivusto 800 Corporate Way, Fremont, CA 94539, USA +1-510-739-3777 +1-510-608-4555 http://www.asus.
Verkkojen globaali puhelinpalvelu -tiedot Region Country 102 Service Hours 09:00-13:00 ; 14:00-18:00 Mon-Fri 09:00-18:00 Mon-Fri Cyprus 800-92491 France Hungary 0033-170949400 0049-1805010920 0049-1805010923 (component support) 0049-2102959911 ( Fax ) 0036-15054561 Italy 199-400089 Greece 00800-44142044 Austria Netherlands/ Luxembourg Belgium Norway Sweden Finland Denmark Poland Spain Portugal Slovak Republic Czech Republic Switzerland-German Switzerland-French Switzerland-Italian United Kingdo
Verkkojen globaali puhelinpalvelu -tiedot Region Country Australia New Zealand Japan Korea Thailand Asia-Pacific Singapore Malaysia Philippine India India(WL/NW) Indonesia Americas Hotline Numbers 1300-278788 0800-278788 0800-1232787 0081-570783886 ( Non-Toll Free ) 0082-215666868 0066-24011717 1800-8525201 0065-64157917 0065-67203835 ( Repair Status Only ) 0060-320535077 1800-18550163 1800-2090365 0062-2129495000 500128 (Local Only) Vietnam 1900-555581 Hong Kong USA Canada Mexico 00852-35824770
Verkkojen globaali puhelinpalvelu -tiedot Region Middle East + Africa Country Egypt Saudi Arabia UAE Turkey South Africa Israel Romania Bosnia Herzegovina Bulgaria Balkan Countries Croatia Montenegro Serbia Slovenia Estonia Latvia Baltic Countries Lithuania-Kaunas Lithuania-Vilnius Hotline Numbers 800-2787349 800-1212787 00971-42958941 0090-2165243000 0861-278772 *6557/00972-39142800 *9770/00972-35598555 0040-213301786 Service Hours 09:00-18:00 Sun-Thu 09:00-18:00 Sat-Wed 09:00-18:00 Sun-Thu 09:00-18:0