CP220 / CP240 Series Zero client display User Guide
Table of contents Notices.......................................................................................................... iv Safety information........................................................................................ v Care and cleaning........................................................................................ vi ii 1.1 Welcome........................................................................................ 1-1 1.2 Package contents...........................
Copyright © 2013 ASUSTeK COMPUTER INC. All Rights Reserved. No part of this manual, including the products and software described in it, may be reproduced, transmitted, transcribed, stored in a retrieval system, or translated into any language in any form or by any means, except documentation kept by the purchaser for backup purposes, without the express written permission of ASUSTeK COMPUTER INC. (“ASUS”).
Notices Federal Communications Commission Statement This device complies with Part 15 of the FCC Rules. Operation is subject to the following two conditions: • This device may not cause harmful interference, and • This device must accept any interference received including interference that may cause undesired operation. This equipment has been tested and found to comply with the limits for a Class B digital device, pursuant to Part 15 of the FCC Rules.
Safety information Use only the AC/DC adapter model: EXA1203YH • Before setting up the display, carefully read all the documentation that came with the package. • To prevent fire or shock hazard, never expose the display to rain or moisture. • Never try to open the display cabinet. The dangerous high voltages inside the display may result in serious physical injury. • If the power supply is broken, do not try to fix it by yourself. Contact a qualified service technician or your retailer.
Care and cleaning • Before you lift or reposition your display, it is better to disconnect the cables and power cord. Follow the correct lifting techniques when positioning the display. When lifting or carrying the display, grasp the edges of the display. Do not lift the display by the stand or the cord. • Cleaning. Turn your display off and unplug the power cord. Clean the display surface with a lint-free, non-abrasive cloth. Stubborn stains may be removed with a cloth dampened with mild cleaner.
Where to find more information Refer to the following sources for additional information and for product and software updates. 1. ASUS websites The ASUS websites worldwide provide updated information on ASUS hardware and software products. Refer to http://www.asus.com 2. Optional documentation Your product package may include optional documentation that may have been added by your dealer. These documents are not part of the standard package.
1.1 Welcome Thank you for purchasing the ASUS® display. The latest display from ASUS provides a crisper, broader, and brighter screen, plus a host of features that enhance your viewing experience. With these features, you can enjoy the convenience and delightful visual experience that the display brings you! 1.
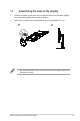
1.3 Assembling the base of the display 1. Attach the base to the arm and fix with the screw to join them tightly. You can easily tighten the screw by fingers. 2. Adjust the monitor to the angle that is most comfortable for you. 2 1 • We recommend that you cover the table surface with soft cloth to prevent from damaging the display.
1.4 Display introduction 1.4.1 Front of the display LED1 LED2 1. Client LED Indicator: • 2. Power Indicator: • 1-3 The color of client LED Indicator is as below. The color of power indicator is as below.
1.4.2 Rear of the display 9 10 11 6 12 USB 1 2 3 4 5 1. RJ45 2. DVI connector 3. VGA connector 4. Microphone input 5. audio-in jack 6. earphone-out 7. USB connector 8. Power-in jack 9. Screw holes of mounting interface 7 8 10. USB connector 11. Kensington lock 12.
1.4.
2.1 Detaching the arm/stand (for wall mounting) To detach the arm/stand. 1. Disconnect power and signal cables. Carefully put the front of the monitor face down on a clean table. 2. Use your fingers gently pull away the plate that covers the stand neck. Use a screwdriver to remove the four screws that secure the stand to the monitor. 3. Detach the stand from the monitor. • We recommend that you cover the table surface with soft cloth to prevent from damaging the display.
2.2 Adjusting the display • For optimal viewing, we recommend that you look at the full face of the display, and then adjust the display to the angle that is the most comfortable to you. • Hold the stand to prevent the display from falling while changing its angle. • You may adjust the display’s angle from -5˚ to 23˚.
3.1 OSD (On-Screen Display) menu 3.1.1 How to reconfigure CP220 Splendid Scenery Mode Color Standard Mode Picture Theater Mode Input Select Game Mode Menu Night View Mode sRGB Move OK Exit 1. Press the MENU button to activate the OSD menu. 2. Press and button to navigate through the functions. Press the OK button to highlight and activate the desired function. If the selected function has a sub-menu, press and button again to navigate through the sub-menu.
• Theater Mode: This is the best choice for movie watching with SPLENDID™ Video Intelligence. • Game Mode: This is the best choice for game playing with SPLENDID™ Video Intelligence. • Night View Mode: This is the best choice for playing dark-scene game or watching movie with SPLENDID™ Video Intelligence. • sRGB: This is the best choice for viewing photos and graphics from PCs. • 2. In the User Mode of the Color Temp.
3. Picture You may adjust the Aspect Control, Over Scan, Position (VGA only), and Focus (VGA only) in this menu item. CP220: CP220 Splendid Sharpness Color Aspect Control Picture Position Input Select Focus 50 Full Menu Move OK Exit CP240: CP240 Splendid Sharpness Color Trace Free Picture Aspect Control Input Select Position Menu Focus Move OK 40 60 Full Exit • Sharpness:Adjust the picture sharpness. The adjusting range is from 0 to 100.
4. Input Select 5. Select the input source from VGA, client source input signal. CP220 Splendid VGA Color Client Picture Input Select Select Input Menu Move 5. OK Exit Menu Adjusts the system configuration. CP220 Splendid OSD Setup Color Information Picture Language Input Select All Reset English Menu Move 3-4 OK Exit • OSD Setup:To adjust the OSD Timeout, DDC/CI, Transparency, and Power indicator. • Information: To show the information of the display.
3.2 Client setting 1. Turn on power and press to select [Client] as your input source. Client MENU:Exit 2. Login Client widget, click “[Options]“ on top left corner. Options 3. Select “[Options]” --> “[Configuration]”.
4. Enter “[Configuration]” --> [Network],and select “Enable DHCP”. Configuration Network IPv6 SCEP Label Discovery Session Language Power Display Access Audio Reset Change the network settings for the device Enable DHCP: IP Address: 192 . 168 . 100 . 51 Subnet Mask: 255 . 255 . 255 . 0 Gateway: 192 . 168 . 100 . 1 Primary DNS Server: 192 . 168 . 100 . 2 Secondary DNS Server: 0 . 0 .0 .0 Domain Name: FQDN: Auto Ethernet Mode: Enable 802.
6. Select [Language] sheet ,and choice requisite language, then click “Apply” to execute. Configuration Network IPv6 SCEP Label Discovery Session Language Power Display Access Audio Reset Select language for the user interface Language: Keyboard Layout: English US OK Cancel Apply 7. Select [OK] to finish [Configuration]. 8. Return to main manual, select [Options] on top left corner and go to [User settings].
9. Select [Certificate] sheet, choice item and setting, then click [OK]. User Settings Certificate Mouse Keyboard Image Display Topology Touch Screen vmware Horizon View Client TM Certificate Checking Mode: This mode determines how the client proceeds when it cannot verify that your connection to the server is secure. It is not recommended that you change this setting unless instructed to do so by your system administrator.
11. Enter “User name” and “password”, then click [Login]. https://192.168.100.252 Enter your user name and password User name: Password: Server: 192.168.100.252 Login Cancel 12. Click [Connect]. win7 Connect Log on to desktop Reser VM Cancel 13. Enter client interface.
14. Select desktop “Start”, choice “Logout” to exit client.
3.3 Specifications Model CP220 CP240 Panel Size 21.5” (54.61 cm) 23.8” (60.47 cm) Max. Resolution 1920 x 1080 1920 x 1080 Brightness (Typ.) 250cd/m 250cd/m2 Intrisinc Contrast Ratio (Typ.) 2 1000:1 1000:1 160°(V); 170°(H) 178°(V); 178°(H) 16.7 M 16.7 M Response Time (Typ.) 5ms 5ms (G to G) D-Sub input Yes Yes Viewing Angle (CR≧0) Display Colors Power ON Consumption ON Mode: <50 W* ON Mode: <50 W* *Based on Energy Star 6.0 standard *Based on Energy Star 6.
3.4 Trouble shooting (FAQ) Problem Power LED is not ON Possible Solution • Press the button to check if the monitor is in the ON mode. • Check if the power cord is properly connected to the monitor and the power outlet. • Check if the monitor and the computer are in the ON mode. • Make sure the signal cable is properly connected the monitor and the computer. The power LED lights amber and • Inspect the signal cable and make sure none of the there is no screen image pins are bent.
3.