MX27U-Serie LCD-Monitor Anwenderhandbuch
Erste Ausgabe September 2016 Copyright © 2016 ASUSTeK COMPUTER INC. Alle Rechte vorbehalten. Kein Teil dieses Handbuchs sowie keine hierin beschriebenen Produkte und Programme dürfen ohne ausdrückliche schriftliche Genehmigung von ASUSTeK COMPUTER INC. (ASUS) vervielfältigt, übertragen, abgeschrieben, in einem Archivsystem abgelegt, in irgendeiner Form oder mit irgendeinem Werkzeug übersetzt werden; ausgenommen hiervon sind Kopien des Käufers für Sicherungszwecke.
Inhalt Notices.......................................................................................................... iv Sicherheitshinweise..................................................................................... v Pflege und Reinigung................................................................................. vii Rücknahmedienste.................................................................................... viii 1.1 Herzlich willkommen!............................................
Notices Federal Communications Commission Statement This device complies with Part 15 of the FCC Rules. Operation is subject to the following two conditions: • This device may not cause harmful interference, and • This device must accept any interference received including interference that may cause undesired operation. This equipment has been tested and found to comply with the limits for a Class B digital device, pursuant to Part 15 of the FCC Rules.
Sicherheitshinweise • Es empfiehlt sich, vor dem Aufstellen des Monitors die mitgelieferte Dokumentation aufmerksam durchzulesen. • Um Brände oder einen Stromschlag zu verhindern, darf der Monitor nicht Regen oder Feuchtigkeit ausgesetzt werden. • Versuchen Sie nicht, das Monitorgehäuse zu öffnen. Die gefährliche Hochspannung im Geräteinnern kann zu schweren Verletzungen führen. • Versuchen Sie nicht, das Netzteil selbst zu reparieren.
vi • Bei technischen Problemen mit dem Monitor wenden Sie sich an einen qualifizierten Servicetechniker bzw. den Händler, bei dem Sie das Gerät erworben haben. • Dieses Produkt kann Chemikalien enthalten, die im Staat Kalifornien als Ursache für Krebs und Geburtsfehler oder andere Fortpflanzungsschäden bekannt sind. Waschen Sie sich Ihre Hände nach dem Kontakt.
Pflege und Reinigung • Vor Hochheben oder Versetzen des Monitors sollten sämtliche Kabel herausgezogen werden. Halten Sie sich beim Aufstellen des Monitors an die Hinweise zum Anheben des Geräts. Fassen Sie das Gerät beim Heben oder Tragen an den Kanten, nicht am Fuß oder am Kabel an. • Reinigung: Schalten Sie den Monitor aus und ziehen Sie das Stromkabel heraus. Reinigen Sie die Oberfläche mit einem fusselfreien, weichen Tuch.
Weitere Informationsquellen Folgende Informationsquellen liefern weitere Hinweise sowie Updates für Produkte und Software: 1. ASUS-Websites Die Websites des Unternehmens für die einzelnen Länder liefern aktualisierte Informationen über Hardware und Software von ASUS. Die allgemeine Website: http://www.asus.com 2. Optionale Dokumentation Das Gerätepaket enthält u. U. eine vom Händler beigelegte Zusatzdokumentation. Diese ist nicht Teil des Standardpakets.
1.1 Herzlich willkommen! Wir bedanken uns, dass Sie einen ASUS® LCD-Monitor gekauft haben! Dieser neueste Widescreen-LCD-Monitor von ASUS verfügt über ein schärferes, breiteres und helleres Display als seine Vorgänger, plus eine Reihe von Funktionen, die das Arbeiten mit dem Gerät noch angenehmer und die Darstellung noch natürlicher machen. Diese Funktionen sorgen für optimale, augenfreundliche und brillante Bildwiedergabe am Monitor! 1.
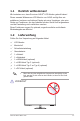
1.3 Zusammenbau des Monitorfußes 1. Legen Sie den Monitor mit der Bildfläche nach unten auf einen Tisch. 2. Bringen Sie den Fuß am Arm an. 3. Drehen Sie die Schraube zur Befestigung des Fußes im Uhrzeigersinn. Stellen Sie dann einen für Sie angenehmen Neigungswinkel ein. •• Um Schäden am Monitor zu verhindern, sollte der Tisch mit einem weichen Tuch bedeckt werden.
1.4 Anschluss der Kabel 1.4.1 Rückseite des LCD-Monitors HDMI 9 1 8 HDMI 2 3 4 5 1. Bedientasten 2. HDMI-Anschluss 3. DisplayPort 4. USB-Anschluss Typ C 5. USB 3.1-Anschlüsse x 2 6. Line-Eingang (Audioeingang) 7. Gleichstromeingang 8. Lautsprecher 9.
1.5 Vorstellung des Monitors 1.5.1 Bedientasten verwenden Passen Sie die Bildeinstellungen mit den Bedientasten an der Unterseite des Monitors an. Berühren Sie die Tasten 1 bis 6 zur Aktivierung der Tastenlistenseite. Menü Schließen Eingangswahl QuickFit Lautstärke Blaulichtfilter 1 1 1. 2 3 3 4 4 5 5 6 6 7 Schnelltaste 2: • 2. Dies ist eine Schnelltaste. Die Standardeinstellung ist Blaulichtfilter. Schnelltaste 1: • 3. Dies ist eine Schnelltaste.
• Die QuickFit-Funktion enthält mehrere Optionen mit allgemeinen Gittermustern sowie Papier- und Fotogrößen. Einzelheiten finden Sie auf der Seite 1-6. 4. Eingangstaste: • 5. Schaltet die Eingangsquelle um. Schließen-Taste: • 6. Schließt das OSD-Menü. Menütaste: • 7. Ruft das OSD-Menü auf. Ein-/Austaste / Betriebsanzeige: • Taste zum Ein- und Ausschalten des Monitors.
1.5.2 QuickFit-Funktion Die QuickFit-Funktion verfügt über drei Muster: (1) Gitter (2) Papiergröße (3) Fotogröße. QuickFit besitzt drei Muster: 1. Gittermuster: Vereinfacht Designern und Nutzern das Organisieren von Inhalten und Layout auf einer Seite und die Erzielung eines einheitlichen Aussehens und Gefühls. Alignment Grid 2. Papiergröße: Ermöglicht Nutzern die Anzeige ihrer Dokumente in realer Größe am Bildschirm. A4 B5 Letter A4 B5 Letter EXIT 3.
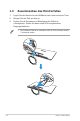
2.1 Basis abnehmen Nehmen Sie den Fuß wie folgt ab: 1. Trennen Sie Stromversorgungs- und Signalkabel. Legen Sie den Monitor mit der Bildfläche nach unten vorsichtig auf einen sauberen Tisch. 2. Lösen Sie die Schraube an der Unterseite des Fußes durch Drehen gegen den Uhrzeigersinn. 3. Alternativ können Sie auch gleich die Schraube, welche den Fuß am Ständer fixiert, mit einem Schraubendreher lösen und den Fuß dann vom Ständer abnehmen.
2.2 Anpassung des Monitors • Für eine optimale Sicht sollten Sie direkt auf das Display schauen und dabei den Neigungswinkel des Monitors so einstellen, dass Sie das Display bequem ansehen können. • Halten Sie während der Winkeleinstellung den Monitorständer fest. • Möglich sind Neigungswinkel zwischen -5˚ und 20˚. -5° to +20°  •• 2-2 Es ist normal, dass der Monitor leicht wackelt, während Sie den Betrachtungswinkel anpassen.
3.1 OSD-Menü (On-Screen Display) 3.1.1 Konfiguration Splendid ASUS MX27U Standardmodus HDMI 3840 x 2160 @ 60Hz Landschaftsmodus Standardmodus Theatermodus Spielmodus Nachtmodus sRGBmodus Lesemodus Dunkelkammer-Modus 1. Blenden Sie das OSD-Menü mit der MENU-Taste ein. 2. Drücken Sie zum Umschalten zwischen den Menüoptionen die Tasten und . Während Sie von einem Symbol zum nächsten navigieren, wird der jeweilige Optionsname hervorgehoben. 3.
3.1.2 1. OSD-Funktionen: Einführung Splendid Diese Funktion enthält 8 Optionen, die Sie nach Bedarf einstellen können. Alle Modi verfügen über eine Funktion zum Zurücksetzen, d. h., Sie können die Einstellung beibehalten oder zum vordefinierten Modus zurückkehren.
 • • • 2. Im Standardmodus können die Funktionen Sättigung, Hautton, Schärfe und ASCR nicht vom Nutzer konfiguriert werden. Im sRGBmodus können die Funktionen Sättigung, Farbtemp., Hautton, Schärfe, Helligkeit, Kontrast und ASCR nicht vom Nutzer konfiguriert werden. Im Lesemodus können die Funktionen Sättigung, Hautton, ASCR, Kontrast und Farbtemp. nicht vom Nutzer konfiguriert werden. Blaulichtfilter Verringert die Intensität des von der LED-Hintergrundbeleuchtung abgestrahlten blauen Lichts.
3. Farbe In diesem Menü wählen Sie die gewünschte Bildfarbe. Farbe ASUS MX27U Standardmodus HDMI 3840 x 2160 @ 60Hz Helligkeit Kontrast Sättigung Farbtemp. Hautton • Helligkeit: Zum Anpassen der Helligkeit. Möglich sind Werte zwischen 0 und 100. • Kontrast: Zum Anpassen des Kontrasts. Möglich sind Werte zwischen 0 und 100. • Sättigung: Zum Anpassen der Sättigung. Möglich sind Werte zwischen 0 und 100. • Farbtemp.: Wählen Sie die gewünschte Farbtemperatur.
4. Bildeinrichtung Sie können Schärfe, Trace Free, Kontrollen, VividPixel, ASCR und Adaptive-Sync in diesem Menü anpassen. Bildeinrichtung ASUS MX27U Standardmodus HDMI 3840 x 2160 @ 60Hz Schärfe Trace Free Kontrollen VividPixel ASCR Adaptive-Sync • Schärfe: Zum Einstellen der Bildschärfe. Möglich sind Werte zwischen 0 und 100. • Trace Free: Zur Beschleunigung der Reaktionszeit in der Overdrive-Technologie. Möglich sind Werte zwischen 0 und 100.
5. Klang Konfigurieren Sie die Toneinstellungen. Klang ASUS MX27U Standardmodus HDMI 3840 x 2160 @ 60Hz Lautstärke Quelle AudioWizard • Lautstärke: Zum Anpassen der Lautstärke. • Quelle: Zur Wahl der Audioquelle. Verfügbare Optionen: LineIn, HDMI, DisplayPort und Typ C.  • • • • • Die Standardaudioquelle ist HDMI, DisplayPort oder Typ C. Nach Einstellung einer dieser digitalen Quellen werden die beiden anderen ausgegraut und sind nicht verfügbar.
6. Eingangswahl Zum Auswählen der Eingangsquelle.
7. System-Einstellungen Zum Einstellen der Systemkonfiguration. ASUS MX27U System-Einstellungen Standardmodus HDMI 3840 x 2160 @ 60Hz Splendid Demo Mode DisplayPort Stream ECO Mode OSD-Einstellungen Sprache Tastensperre Information Mehr (Seite 1/2) ASUS MX27U System-Einstellungen Standardmodus HDMI 3840 x 2160 @ 60Hz Zurück Betriebsanzeige Ein-/Austaste-Sperre USB-Einstellungen Fabrikseinst (Seite 2/2) 3-8 • Splendid Demo Mode: Aktiviert den Demomodus für "Splendid"-Funktion.
• Tastensperre: Wenn Sie die zweite Taste auf der rechten Seite länger als fünf Sekunden gedrückt halten, aktivieren Sie die Tastensperre. • Information: Zur Anzeige der Monitordaten. • Mehr: Zum Aufrufen der nächsten Seite mit Systemeinstellungen. • Zurück: Zum Aufrufen der vorherigen Seite mit Systemeinstellungen. • Betriebsanzeige: Zum Ein-/Ausschalten der Betriebsanzeige (LED). • Ein-/Austaste-Sperre: Zum Deaktivieren/Aktivieren der Ein-/ Austaste. • USB-Einstellungen (USB 2.0 / USB 3.
8. Verknüpfung Weisen Sie den beiden Schnelltasten spezifische Funktionen zu. ASUS MX27U Verknüpfung Standardmodus HDMI 3840 x 2160 @ 60Hz Verknüpfung 1 Blaulichtfilter Verknüpfung 2 Splendid Helligkeit Kontrast Farbtemp. Lautstärke GamePlus (Verknüpfung 1) ASUS MX27U Verknüpfung Standardmodus HDMI 3840 x 2160 @ 60Hz Verknüpfung 1 Blaulichtfilter Verknüpfung 2 Splendid Helligkeit Kontrast Farbtemp.
3.1.2.1 GamePlus-Funktion Die GamePlus-Funktion sorgt für eine perfekte Spielerfahrung bei unterschiedlichsten Spielen. Die Fadenkreuz-Überlagerung mit vier verschiedenen Fadenkreuzoptionen ermöglicht Ihnen die Auswahl der für Ihr Spiel am besten geeigneten Variante. Der Onscreen-Timer kann zur Überwachung der verstrichenen Spielzeit auf die linke Seite der Anzeige gesetzt werden. Durch den Bilder/s-Zähler wissen Sie, wie reibungslos das Spiel läuft. So aktivieren Sie GamePlus: 1.
Position GamePlus – Bilder/s – Position FPS Position 3-12 Kapitel 3: Allgemeines
3.2 Technische Daten Modell MX27UC Display-Größe 27-Zoll-Diagonale (Aktiver Anzeigebereich: 596,74 (H) x 335,66 (V) mm) Max. Auflösung 3840 x 2160 Helligkeit (typ.) 300 cd/m2 Kontrastverhältnis 1000:1 (typ.) Betrachtungswinkel (CR ≤ 10) 178 SDgr (V); 178 SDgr (H) Anzeigefarben 1,07 Milliarden Farben, 10 Bit (8 Bit + A-FRC) Reaktionszeit (typ.) 5 ms (G zu G) Anschlüsse Eingänge: 1 x HDMI, 1 x DP (DisplayPort), 1 x USB Typ C, 2 x USB 3.
3.3 Problembeseitigung (FAQ) Problem Betriebsanzeige (LED) leuchtet NICHT Lösungsvorschlag • Prüfen Sie durch Drücken der Monitor eingeschaltet ist. -Taste, ob der • Überprüfen Sie, ob Netzteil und Netzkabel richtig an Monitor und Steckdose angeschlossen sind. • Prüfen Sie die Betriebsanzeige-Funktion im Bildschirmmenü. Wählen Sie zum Einschalten der Betriebsanzeige (LED) „EIN“. Die Betriebsanzeige (LED) leuchtet bernsteinfarben, doch auf dem Display ist nichts zu sehen.
3.