Benutzerhandbuch DSL-N10_C1 11N-WLAN-ADSL-Modem-Router
G8762 Erste Ausgabe Dezember 2013 Copyright © 2013 ASUSTeK Computer Inc. Alle Rechte vorbehalten. Kein Teil dieses Handbuchs, einschließlich der darin beschriebenen Produkte und Software, darf ohne ausdrückliche, schriftliche Genehmigung von ASUSTeK COMPUTER INC. (“ASUS”) in irgendeiner Form, ganz gleich auf welche Weise, vervielfältigt, übertragen, abgeschrieben, in einem Wiedergewinnungssystem gespeichert oder in eine andere Sprache übersetzt werden.
Inhaltsverzeichnis 1 Übersicht 5 Packungsinhalt.............................................................................................. 5 Ihr ADSL-Router............................................................................................ 6 2 Netzwerkeinrichtung 9 Router Aufstellen.......................................................................................... 9 Vorraussetzungen......................................................................................
Hinweise........................................................................................................36 Globale Netzwerk-Hotlines.....................................................................50 ASUS Kontaktinformationen..................................................................
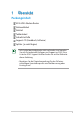
1 Übersicht Packungsinhalt ADSL-WiFi-Modem-Router Netzwerkkabel Netzteil Telefonkabel Schnellstarthilfe Support-CD (Handbuch, Software) Splitter ( je nach Region) • Falls Artikel beschädigt oder nicht vorhanden sind, wenden Sie sich für technische Anfragen und Support an ASUS. Eine Liste der ASUS Support Hotlines finden Sie auf der Rückseite dieser Anleitung. • Bewahren Sie die Originalverpackung für den Fall eines zukünftigen Garantieanspruchs wie Nachbesserung oder Ersatz gut auf.
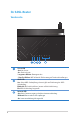
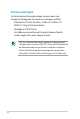
Ihr ADSL-Router Vorderseite DSL-N10 11N Wireless ADSL Modem Router Strom-LED A us:Kein Strom. An: Gerät ist bereit. Langsames Blinken: Rettungsmodus S chnelles Blinken: WPS in Betrieb / Rücksetzung auf Standardeinstellungen.. ADSL LED Aus: Keine ADSL-Verknüpfung oder umöglich zur Einrichtung der ADSLVerknüpfung. Blinkend: ADSL wird intialisiert./ wartet auf die Initialisierung. Ein: ADSL-Verbindung hergestellt. Internet-LED A us: Keine Stromversorgung oder keine Internetverbindung.
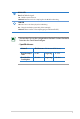
WLAN-LED Aus: Kein Drahtlossignal. A n: Drahtlossystem ist bereit. B linkend: Datenversand oder -empfang über die Drahtlosverbindung. LAN LED A us: Kein Strom oder keine physische Verbindung. n: Physische Verbindung mit LAN (Lokales Netzwerk). A B linkend: Daten senden oder empfangen (per Ethernet-Kabel).. • Verwenden Sie nur das mitgelieferte Netzteil. Andere Netzteile könnten das Gerät beschädigen. • Spezifikationen: Netzteil Gleichstrom: +12V mit max 0.
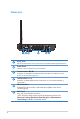
Hinterseite Reset-Taste Mit dieser Taste können Sie das System auf dessen Werkseinstellungen zurücksetzen. Netzschalter Zum Ein- oder Ausschalten des Systems drücken. Stromanschluss (DC-IN) Verbinden das mitgelieferte Netzteil mit diesem Anschluss und schließen Sie den Router an eine Stromversorgung an.. LAN-Anschlüsse 1 ~ 4 Verbinden Sie Netzwerkkabel mit diesen Anschlüssen, um eine LAN-Verbindung einzurichten..
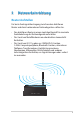
2 Netzwerkeinrichtung Router Aufstellen Für beste Funksignalübertragung zwischen dem drahtlosen Router und damit verbundenen Netzwerkgeräten sollten Sie: • Den drahtlosen Router in einem zentralen Bereich für maximale Funkabdeckung der Netzwerkgeräte aufestellen. • Das Gerät von Metallhindernissen oder direkten Sonnenlicht fernhalten. • Das Gerät von 802.11g oder nur 20MHz Wi-Fi-Geräten, 2.
Vorraussetzungen Zur Netzwerkeinrichtung benötigen Sie einen oder zwei Computer, die folgende Systemvorraussetzungen erfüllen: • Ethernet RJ-45 (LAN)-Anschluss (10Base-T/100Base-TX) • IEEE 802.11b/g/n Drahtlosfunktion • Verfügbarer TCP/IP-Dienst • Ein Webbrowser wie Microsoft Internet Explorer, Mozilla Firefox, Apple Safari, oder Google Chrome • Falls Ihr Computer über keine integrierte Drahtlosfunktion verfügt, können Sie einen IEEE 802.
Drahtlosen Router einrichten • Beim Einrichten Ihres drahtlosen Routers verwenden Sie bitte eine Kabelverbindung, um Einrichtungsprobleme infolge von Signalstörungen zu vermeiden. • Bevor Sie den drahtlosen ASUS Router aufbauen, sollten Sie: • Den aktuellen Router vom Netzwerk trennen (falls vorhanden). • Alle Kabel/Leitungen der aktuellen Modem-Konfiguration trennen. Entfernen Sie auch jegliche Batterien (falls vorhanden). • Starten Sie den Computer neu (empfohlen).
Bevor Sie beginnen Bevor Sie den drahtlosen Router konfigurieren, folgen Sie bei Ihren Host-Computer und Netzwerk-Clients den Anweisungen in diesem Abschnitt A. Proxyserver deaktivieren (falls aktiviert). Windows® 7 1. Klicken Sie auf Start > Internet Explorer, um den Webbrowser zu laden. 2. Klicken Sie auf Extras (Tools) > Internetoptionen (Internet options) > Auswahl Verbindungen (Connections) > LANEinstellungen (LAN settings).
3. Im Fenster Einstellungen für lokales Netzwerk, deaktivieren Sie Proxyserver für LAN verwenden (Use a proxy server for your LAN). 4. Klicken Sie auf OK, anschließlich auf Anwenden (Apply). MAC OSX 1. Klicken Sie in der Menüleiste auf Safari > Einstellungen... (Preferences...) > Erweitert (Advanced) Einstellungen Ändern... (Change Settings...). 2. Deaktivieren Sie in der Protokollliste FTP Proxy und Web Proxy (HTTP). 3. Klicken Sie auf OK, anschließlich auf Anwenden (Apply).
B. TCP/IP-Einstellungen für automatische IPErkennung. Windows® 7 1. Klicken Sie auf Start > Systemsteuerung (Control Panel) > Netzwerk und Internet (Network and Internet) > Netzwerk- und Freigabecenter (Network and Sharing Center) > Adaptereinstellungen ändern. 2. Klicken Sie im Netzwerkverbindungsfenster auf die LAN-Verbindung. 3. Klicken Sie im LANStatus-Fenster (Local Area Connection Network Status) auf Eigenschaften. 4.
6. Klicken Sie auf IP-Adresse automatisch beziehen (Obtain an IP address automatically). 7. Klicken Sie auf OK. MAC OSX 1. Klicken Sie auf Apple-Menü> Systemeinstellungen... (System Preferences) > Netzwerk (Network). 2. Klicken Sie im linken Bereich auf Ethernet. 3. Unter ConfigureIPv4 konfigurieren wählen Sie. DHCP verwenden (Using DHCP). 4. Klicken Sie auf Übernehmen (Apply).
ADSL-Router einrichten 1. Vergewissern Sie sich, dass die ADSL-LED an der Frontblende des DSL-N10_C1 konstant leuchtet, nicht blinkt. 2. Starten Sie den Webbrowser. Die QIS-Seite erscheint automatisch und beginnt mit der Erkennung Ihrer Verbindungsart. Wenn die QIS-Webseite nicht erscheint, nachdem Sie den Webbrowser gestartet haben, deaktivieren Sie die ProxyEinstellungen in Ihrem Webbrowser.
3 Netzwerkkonfiguration über die Web-Benutzeroberfläche Anmeldung bei Web-GUI Ihr drahtloser ASUS Router ist mit einer intuitiven webbasierten grafischen Oberfläche (GUI) ausgerüstet, um Ihnen die Einrichtung seiner vielseitigen Funktion durch einen Webbrowser wie Internet Internet Explorer, Mozilla Firefox, Apple Safari, or Google Chrome. So melden Sie sich bei der Web-GUI an: 1. Geben Sie die Standard-IP-Adresse des WLAN-Routers manuell in Ihren Webbrowser ein: 192.168.1.
3. Über die grafische Benutzeroberfläche des WLAN-Routers können Sie auf unterschiedlichste Konfigurationsseinstellungen zugreifen.
Einrichten der Drahtlos-Sicherheit Um Ihr Netzwerk vor unautorisierten Zugriff zu schützen, müssen Sie dessen Sicherheitseinstellungen einrichten. So richten Sie die Drahtlos-Sicherheitseinstellungen ein: 1. Geben Sie http://router.asus.com oder 192.168.1.1 in Ihren Webbrowser ein. 2. Geben Sie im Anmeldefenster den Standardbenutzernamen (admin) und das Standardkennwort (admin) ein und klicken sie auf OK. Die Web-GUI Ihres drahtlosen Routers wird geladen. 3.
4. Geben Sie im Feld Wireless name (Drahtlos-Kennung, SSID) Ihrem drahtlosen Netzwerk einen individuellen Namen. 5. Wählen Sie in der Dropdownliste Security Level (Sicherheitsstufe) eine Verschlüsselungsmethode für Ihr drahtloses Netzwerk. Der IEEE 802.11n/ac-Standard erkennt die Verwendung eines hohen Durchsatzes mit WEP oder WPATKIP als Unicastchiffrierung nicht an. Falls Sie diese Verschlüsselungsmethoden verwenden, wird Ihre Datenrate auf die IEEE 802.11g 54Mbps-Verbindung heruntergestuft. 6.
Verwalten der Netzwerk-Clients So verwalten Sie die Netzwerk-Clients: 1. Laden Sie die Web-GUI Ihres Routers. 2. Wählen Sie im Fenster Network Map (Netzwerkübersicht) das Symbol Client Status (Clientstatus), um Informationen über Ihre Netzwerk-Clients anzuzeigen.
Traffic Manager verwenden Verwalten der QoS (Quality of Service) -Bandbreite Mit Quality of Service (QoS) können Sie die Bandbreitenpriorität einstellen und den Netzwerkverkehr verwalten. So richten Sie die Bandbreitenpriorität ein: 1. Starten Sie die Web GUI des Routers. 2. Wählen Sie im Traffic Manager-Fenster den Tab QoS. 3. Klicken Sie auf ON, um die Standardregel zu aktivieren und füllen Sie die Felder für Up- und Download-Bandbreite aus. • Die Bandbreiteninformationen erhalten Sie von Ihren ISP.
Traffic überwachen Mit dieser Funktion können Sie die Bandbreitenverwendung und -geschwindigkeit Ihrer Internet-, LAN-, Kabel-, WLAN- (2.4GHz oder 5GHz) Verbindungen festlegen.
Konfigurieren der erweiterten Einstellungen Erweiterte Einstellungen gestatten Ihnen die Konfiguration weiterer Funktionen Ihres drahtlosen Routers. Einrichten eines DHCP-Servers Sie können die Funktion DHCP Server Ihres drahtlosen Routers aktivieren, damit Clients Ihres Netzwerks automatisch eine IPAdresse von Ihrem Drahtlos-Router beziehen können. Ihr drahtloser ASUS Router kann mit bis zu 253 IP-Adressen im Netzwerk betrieben werden. So richten Sie einen DHCP-Server ein: 1.
3. Klicken Sie im Feld Enable the DHCP Server? (DHCP-Server aktivieren?) auf die Auswahl Yes (Ja). 4. Geben Sie im Feld IP Pool Starting Address (IP-Pool Startadresse) die IP-Startadresse ein. 5. Geben Sie im Feld IP Pool Ending Address (IP-Pool Endadresse) die IP-Endadresse ein. 6. Geben Sie im Feld Lease Time (Lease-Zeitraum) die Ablaufzeit für die IP-Adressen ein, damit der drahtlose Router Ihren Clients im Netzwerk automatisch neue IP-Adressen zuweisen kann.
Aktualisieren der Firmware Laden Sie die neueste Firmware von der ASUS-Webseite unter http://support.asus.com herunter. So aktualisieren Sie die Firmware: 1. Klicken Sie im Navigationsmenü auf der linken Seite auf Advanced Setting (Erweiterte Einstellungen). 2. Klicken Sie im Menü Administration auf Firmware Upgrade (Firmware Aktualisieren). 3. Klicken Sie im Feld New Firmware File (Neue Firmwaredatei) auf Browse (Durchsuchen), um von Ihrem Computer aus die neue Firmware auszuwählen. 4.
Wiederherstellen/Speichern/Hochladen der Einstellungen So werden die Einstellungen wiederhergestellt/gespeichert/ hochgeladen: 1. Klicken Sie im Navigationsmenü auf der linken Seite auf Advanced Setting (Erweiterte Einstellungen). 2. Klicken Sie auf Restore/Save/Upload Setting (Einstellungen Wiederherstellen/speichern/Hochladen). 3.
4 Verwenden der Hilfsprogramme • Installieren Sie Hilfsprogramme für den drahtlosen Router aus der beigelegten Support-CD. • Falls Autorun (Autom. Ausführen der CD) deaktiviert ist, starten Sie setup.exe im Hauptverzeichnis Ihrer Support-CD. Device Discovery Device Discovery (Gerätesuche) ist ein ASUS WLANHilfsprogramm, dass einen drahtlosen ASUS Router erkennen kann und Ihnen die Konfiguration des Gerätes ermöglicht.
Firmware Restoration Firmware Restoration (Firmware-Wiederherstellung) wird bei einem drahtlosen ASUS Router verwendet, welches während des Aktualisierungsprozesses ausfällt. Es ladet die von Ihnen angegebenen Firmware hoch. Der Vorgang kann drei bis vier Minuten dauern. Bevor sie die Anwendung Firmware Restoration verwenden, starten Sie den Rettungsmodus. So starten Sie den Rettungsmodus zusammen mit dem Hilfsprogramm Firmware Restoration: 1. Trennen Sie die Stromversorgung des drahtlosen Routers. 2.
5 Fehlerbehebung Falls Sie auf hier nicht beschriebene Probleme Stoßen, wenden Sie sich an die Technische Unterstützung von ASUS. Fehlerbehebung Der Router lässt sich nicht über einen Webbrowser konfigurieren. • Löschen Sie Cookies und vorläufige Dateien in Ihrem WebBrowser. Dazu folgen Sie die Fortschritte im Internet Explorer 8: 1. Öffnen Sie Ihren Webbrowser und klicken anschließend auf Tools (Extras) > Internet Options... (Internetoptionen). 2.
Autentifizierung: • Stellen Sie eine Kabelverbindung mit dem Router her. • Prüfen Sie die drahtlosen Sicherheitseinstellungen. • Drücken Sie den Knopf „Restore“ an der Rückseite für mindestens fünf Sekunden. Der Router wird nicht erkannt. • Drücken Sie den Knopf „Restore“ an der Rückseite für mindestens fünf Sekunden. • Prüfen Sie die Einstellung im drahtlosen Adapter wie z.B. die SSID- und Verschlüsselungseinstellungen.
Wenn die ADSL-LED „Link“ am ADSL-Modem leuchtet (nicht blinkt), bedeutet es, dass das Internet zugänglich ist. • Starten Sie den Computer neu. • Prüfen Sie, ob die Internet-LED am WLAN-Router leuchtet. • Prüfen Sie die drahtlosen Verschlüsselungseinstellungen. • Prüfen Sie, ob der Computer die IP-Adresse erhält (über das Kabelnetzwerk sowie das drahtlose Netzwerk). • Prüfen Sie die Einstellung Ihres Webbrowsers und stellen sicher, dass der Webbrowser das lokale LAN statt einen Proxy-Server verwendet.
Wie stellt man die Standardeinstellungen für das System wieder her? • Drücken Sie den Knopf „Restore“ an der Rückseite des drahtlosen Routers für mindestens fünf Sekunden. • Beziehen Sie sich auf den Abschnitt Wiederherstellen/ Speichern/Hochladen der Einstellungen im diesem Benutzerhandbuch. Die werkseigenen Standardeinstellungen sind wie folgt: Benutzername: admin Kennwort: admin DHCP-Aktivierung: Ja IP-Adresse: 192.168.1.1 Domänenname: (Leer) Subnetzmaske: 255.255.255.0 DNS-Server 1: 192.168.1.
ASUS DDNS Service Der ASUS DSL-N10_C1 unterstützt den ASUS DDNS-Dienst. Falls Sie sich für den ASUS DDNS-Dienst registriert haben und Ihren ursprünglichen Domänennamen beibehalten wollen, ist Datenstransfer vor dem Gerätetausch beim örtlichen Kundendienst ein muss. Besuchen Sie Ihr örtliches Kundenzentrum für mehr Informationen. • Falls es für 90 Tage keine Aktivität in der Domäne gibt – wie z.B.
3. Ich habe bereits einen Domänennamen registriert und es hat gut funktioniert, aber meine Freunde haben mir gesagt, dass sie nicht auf meinen Domänennamen zugreifen konnten. Prüfen Sie folgendes: 1. Das Internet arbeitet korrekt 2. Der DNS-Server arbeitet korrekt. 3. Das Datum, zu dem Sie den Domänennamen zum letzten Mal aktualisiert haben. Falls es immer noch Probleme mit dem Zugriff auf Ihren Domänennamen geben sollte, kontaktieren Sie bitte den Kundendienst. 4.
Anhänge Hinweise ASUS Recycling/Takeback Services ASUS recycling and takeback programs come from our commitment to the highest standards for protecting our environment. We believe in providing solutions for you to be able to responsibly recycle our products, batteries, other components, as well as the packaging materials. Please go to http://csr.asus. com/english/Takeback.htm for the detailed recycling information in different regions.
This equipment generates, uses and can radiate radio frequency energy and, if not installed and used in accordance with the instructions, may cause harmful interference to radio communications. However, there is no guarantee that interference will not occur in a particular installation.
Safety Information To maintain compliance with FCC’s RF exposure guidelines, this equipment should be installed and operated with minimum distance 20cm between the radiator and your body. Use on the supplied antenna. Declaration of Conformity for R&TTE directive 1999/5/EC Essential requirements – Article 3 Protection requirements for health and safety – Article 3.1a Testing for electric safety according to EN 60950-1 has been conducted. These are considered relevant and sufficient.
Operation is subject to the following two conditions: (1) this device may not cause interference, and (2) this device must accept any interference, including interference that may cause undesired operation of the device. Radio Frequency (RF) Exposure Information The radiated output power of the Wireless Device is below the Industry Canada (IC) radio frequency exposure limits. The Wireless Device should be used in such a manner such that the potential for human contact during normal operation is minimized.
NCC 警語 經型式認證合格之低功率射頻電機,非經許可,公司、商號或 使用者均不得擅自變更頻率、加大功率或變更原設計之特性及 功能。低功率射頻電機之使用不得影響飛航安全及干擾合法通 信;經發現有干擾現象時,應立即停用,並改善至無干擾時方 得繼續使用。前項合法通信,指依電信法規定作業之無線電通 信。低功率射頻電機須忍受合法通信或工業、科學及醫療用電 波輻射性電機設備之干擾。 Autorisierte Händler in der Turkei BOGAZICI BIL GISAYAR SAN. VE TIC. A.S. Tel: +90 212 3311000 Adresse: AYAZAGA MAH. KEMERBURGAZ CAD. NO.10 AYAZAGA/ISTANBUL CIZGI Elektronik San. Tic. Ltd. Sti. Tel: +90 212 3567070 Adresse: CEMAL SURURI CD.
GNU General Public License Licensing information This product includes copyrighted third-party software licensed under the terms of the GNU General Public License. Please see The GNU General Public License for the exact terms and conditions of this license. We include a copy of the GPL with every CD shipped with our product. All future firmware updates will also be accompanied with their respective source code. Please visit our web site for updated information.
pieces of it in new free programs; and that you know you can do these things. To protect your rights, we need to make restrictions that forbid anyone to deny you these rights or to ask you to surrender the rights. These restrictions translate to certain responsibilities for you if you distribute copies of the software, or if you modify it. For example, if you distribute copies of such a program, whether gratis or for a fee, you must give the recipients all the rights that you have.
Terms & conditions for copying, distribution, & modification 0. This License applies to any program or other work which contains a notice placed by the copyright holder saying it may be distributed under the terms of this General Public License.
a) You must cause the modified files to carry prominent notices stating that you changed the files and the date of any change. b) You must cause any work that you distribute or publish, that in whole or in part contains or is derived from the Program or any part thereof, to be licensed as a whole at no charge to all third parties under the terms of this License.
In addition, mere aggregation of another work not based on the Program with the Program (or with a work based on the Program) on a volume of a storage or distribution medium does not bring the other work under the scope of this License. 3.
4. 5. 6. 7. 46 If distribution of executable or object code is made by offering access to copy from a designated place, then offering equivalent access to copy the source code from the same place counts as distribution of the source code, even though third parties are not compelled to copy the source along with the object code. You may not copy, modify, sublicense, or distribute the Program except as expressly provided under this License.
your obligations under this License and any other pertinent obligations, then as a consequence you may not distribute the Program at all. For example, if a patent license would not permit royalty-free redistribution of the Program by all those who receive copies directly or indirectly through you, then the only way you could satisfy both it and this License would be to refrain entirely from distribution of the Program.
Each version is given a distinguishing version number. If the Program specifies a version number of this License which applies to it and “any later version”, you have the option of following the terms and conditions either of that version or of any later version published by the Free Software Foundation. If the Program does not specify a version number of this License, you may choose any version ever published by the Free Software Foundation. 10.
12 IN NO EVENT UNLESS REQUIRED BY APPLICABLE LAW OR AGREED TO IN WRITING WILL ANY COPYRIGHT HOLDER, OR ANY OTHER PARTY WHO MAY MODIFY AND/OR REDISTRIBUTE THE PROGRAM AS PERMITTED ABOVE, BE LIABLE TO YOU FOR DAMAGES, INCLUDING ANY GENERAL, SPECIAL, INCIDENTAL OR CONSEQUENTIAL DAMAGES ARISING OUT OF THE USE OR INABILITY TO USE THE PROGRAM (INCLUDING BUT NOT LIMITED TO LOSS OF DATA OR DATA BEING RENDERED INACCURATE OR LOSSES SUSTAINED BY YOU OR THIRD PARTIES OR A FAILURE OF THE PROGRAM TO OPERATE WITH ANY OTHE
Globale Netzwerk-Hotlines Region Land 50 Serviceszeiten 09:00-13:00 ; 14:00-18:00 Mon-Fri 09:00-18:00 Mon-Fri Cyprus 800-92491 France Hungary 0033-170949400 0049-1805010920 0049-1805010923 ( component support ) 0049-2102959911 ( Fax ) 0036-15054561 Italy 199-400089 Greece 00800-44142044 Austria Netherlands/ Luxembourg Belgium Norway Sweden Finland Denmark Poland Spain Portugal Slovak Republic Czech Republic Switzerland-German Switzerland-French Switzerland-Italian United Kingdom Ireland Russia
Region Land Australia New Zealand Japan Korea Thailand Singapore Asia-Pacific Malaysia Philippine India India(WL/NW) Indonesia Americas Hotline-Nummer 1300-278788 0800-278788 0800-1232787 0081-473905630 ( Non-Toll Free ) 0082-215666868 0066-24011717 1800-8525201 0065-64157917 0065-67203835 ( Repair Status Only ) 0060-320535077 1800-18550163 1800-2090365 0062-2129495000 500128 (Local Only) Vietnam 1900-555581 Hong Kong USA Canada Mexico 00852-35824770 1-812-282-2787 001-8008367847 Servicezeiten 09:0
Region Middle East + Africa Land Egypt Saudi Arabia UAE Turkey South Africa Israel Romania Bosnia Herzegovina Bulgaria Balkan Countries Croatia Montenegro Serbia Slovenia Estonia Latvia Lithuania-Kaunas Lithuania-Vilnius Hotline-Nummer 800-2787349 800-1212787 00971-42958941 0090-2165243000 0861-278772 *6557/00972-39142800 *9770/00972-35598555 0040-213301786 Servicezeiten 09:00-18:00 Sun-Thu 09:00-18:00 Sat-Wed 09:00-18:00 Sun-Thu 09:00-18:00 Mon-Fri 08:00-17:00 Mon-Fri 08:00-17:00 Sun-Thu 08:30-17:30 S
ASUS Kontaktinformationen ASUSTeK COMPUTER INC. (Asien-Pazifik) Adresse Webseite 15 Li-Te Road, Peitou, Taipei, Taiwan 11259 www.asus.com.tw Technische Unterstützungt Telefon Support-Fax Online-Support +886228943447 +886228907698 support.asus.com ASUS COMPUTER INTERNATIONAL (Amerika) Adresse Telefon Fax Webseite Online-Support 800 Corporate Way, Fremont, CA 94539, USA +15107393777 +15106084555 usa.asus.com support.asus.
Hersteller: Autorisierte Niederlassung in Europa: 54 ASUSTeK Computer Inc. Tel: +886-2-2894-3447 Adresse: 4F, No. 150, LI-TE RD., PEITOU, TAIPEI 112, TAIWAN ASUS Computer GmbH Adresse: HARKORT STR.