DSL-N10E 11n Wireless Router User Manual
E7255 Second Edition March 2012 Copyright © 2012 ASUSTeK Computer Inc. All Rights Reserved. No part of this manual, including the products and software described in it, may be reproduced, transmitted, transcribed, stored in a retrieval system, or translated into any language in any form or by any means, except documentation kept by the purchaser for backup purposes, without the express written permission of ASUSTeK Computer Inc. (“ASUS”).
Table of contents About this guide..................................................................................... 5 Chapter 1: Knowing your wireless router Package contents................................................................................... 7 System requirements............................................................................. 7 Before you proceed................................................................................ 7 Hardware features............................
Table of contents Configuring the diagnostic settings................................................... 47 Checking your wireless router’s status and basic settings............. 48 Chapter 5: Troubleshooting Troubleshooting.................................................................................... 49 Appendices Notices................................................................................................... 52 ASUS Contact Information..................................................
About this guide This user guide contains information that you need to install and configure the ASUS Wireless Router. How this guide is organized This guide contains the following parts: • Chapter 1: Knowing your wireless router This chapter provides information on the package contents, system requirements, hardware features, and LED indicators of the ASUS Wireless Router.
Conventions used in this guide WARNING: Information to prevent injury to yourself when trying to complete a task. CAUTION: Information to prevent damage to the components when trying to complete a task. IMPORTANT: Instructions that you MUST follow to complete a task. NOTE: Tips and additional information to aid in completing a task.
1 Knowing your wireless router Package contents Check the following items in your ASUS Wireless Router package. DSL-N10E Wireless Router x1 External splitter x1 Power adapter x1 RJ11 cable x2 Support CD x1 RJ45 cable x1 Quick Start Guide x1 Note: If any of the items is damaged or missing, contact your retailer.
• • • Keep the device away from transformers, heavy-duty motors, fluorescent lights, microwave ovens, refrigerators, and other industrial equipment to prevent signal loss. Install the device in a central area to provide ideal coverage for all wireless mobile devices. Install the device at least 20cm from a person to insure that the product is operated in accordance with the RF Guidelines for Human Exposure adopted by the Federal Communications Commission.
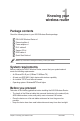
Status indicators LED Status Indication Off No connection or in bridge mode. Flashing Internet data is transmitted in the routing mode. On The Internet connection is normal in the routing mode and no Internet data is being transmitted. Off No power or no physical connection On Has physical connection to an Ethernet network.
Rear panel 6 1 Item 1 2 4 3 5 Description WPS button Press this button for more than five seconds to enable the WPS function. Note: If you press the button for one to five seconds, no function takes effect. 10 2 ADSL port Connect an RJ-11 telephone cable to this port or a splitter connected from this port. 3 LAN 1 ~ 4 ports Connect RJ-45 Ethernet cables to these ports to establish LAN connection.
Bottom panel 1 2 Item Description 1 Mounting hooks Use the mounting hooks to mount your router on concrete or wooden surfaces using two round head screws. 2 Air vents These vents provide ventilation to your router. Note: For details on mounting your router on a wall or ceiling, refer to the section Mounting options on the next page of this user manual.
Mounting options The ASUS Wireless Router is designed to sit on a raised flat surface like a file cabinet or book shelf. The unit may also be converted for mounting to a wall or ceiling. To mount the ASUS Wireless Router: 1. 2. 3. 4. Look on the underside for the two mounting hooks. Mark two upper holes on a flat surface. Tighten two screws until only 1/4'' is showing. Latch the hooks of the ASUS Wireless Router onto the screws.
2 Getting started Setting up the wireless router The ASUS Wireless Router includes a web graphics user interface (web GUI) that allows you to configure the wireless router using your web browser on your computer. Note: For details on configuring your wireless router using the web GUI, refer to Chapter 4: Configuring via the web GUI. Accessing the router’s web GUI To access the router’s web GUI: 1. In your web browser, key in http://192.168.1.1. . Key in the user name and password.
Using the Quick Internet Setup (QIS) The Quick Internet Setup (QIS) function guides you in quickly setting up your Internet connection. Important: Obtain the necessary information about your Internet connection type from your ISP. 14 1. . Click Quick Internet Setup. In Step 1: Web Account Setup page, key in the necessary information and click Next. . In Step 2: Time Zone Setup page, tick Enable to enable the NTP function, and key in the necessary information. Click Next.
4. In Step 3: WAN Interface Setup page, fill in the necessary information, and click Next. 5. In Step 4: WLAN Interface Setup page, set up the parameter for your WLAN network. Notes: • Do not include quotation marks (" or ') in your SSID or use spaces as the start of your SSID. • For WPA pre-shared key and WEP key settings, neither use quotation marks (" or '), angle brackets (>), square brackets (]) and spaces as the start of your key nor use two spaces in between.
6. 16 In Step 5: Configuration Saving page, click Finish to save the configuration settings. Click Back to modify the settings. Click Reset to cancel the settings.
3 Configuring the network clients Managing your network clients To manage your network clients to your ASUS Wireless Router, you must have the correct parameters for wireless, LAN, and WAN connection types. Ensure that the clients’ IP addresses are within the same subnet as the ASUS Wireless Router. By default, the ASUS Wireless Router integrates the DHCP server function that automatically assigns the IP addresses to the clients in your network.
Windows® 2000 1. Click Start > Control Panel > Network and Dial-up Connection. Right-click Local Area Connection, then click Properties. 2. Select Internet Protocol (TCP/IP), then click Properties. 3. Select Obtain an IP address automatically if you want the IP settings to be assigned automatically. Otherwise, select Use the following IP address: and key in IP address, Subnet mask, and Default gateway. 4.
Windows® XP 1. Click Start > Control Panel > Network Connection. Right-click Local Area Connection, then select Properties. 2. Select Internet Protocol (TCP/IP), then click Properties. 3. Select Obtain an IP address automatically if you want the IP settings to be assigned automatically. Otherwise, select Use the following IP address: and key in IP address, Subnet mask, and Default gateway. 4. Select Obtain DNS server address automatically if you want the DNS server settings to be assigned automatically.
Windows® Vista/7 1. Click Start > Control Panel > Network and Internet > Network and Sharing Center. Click View status > Properties > Continue. 2. Select Internet Protocol Version 4 (TCP/IPv4), then click Properties. 3. Select Obtain an IP address automatically if you want the IP settings to be assigned automatically. Otherwise, select Use the following IP address: and key in IP address and Subnet mask. 4.
4 Configuring via the web GUI Configuring the network settings The Network page allows you to configure the settings of these three network types: Wireless, LAN, and WAN. Configuring the wireless network settings The Wireless page allows you to configure the wireless settings. Configuring the basic wireless network settings To configure the wireless network settings: 1. Click Network > Wireless tab. .
Configuring the security settings The Security page allows you to configure the security settings to protect your wireless network from unauthorized access. To configure the security settings: 1. Click Network > Wireless tab > Security. . In the Wireless Security Setup screen, select a SSID, its encryption method and fill in its authentication settings. . Click Apply Changes to apply the settings made.
Controlling access to your wireless network The Access Control page allows you to allow or deny specific clients from accessing your wireless network. To control access to your wireless network: 1. Click Network > Wireless tab > Access Control. . In the Wireless Access Control Mode field, select the access control type. . In the MAC Address field, key in the client’s MAC address and click Add to add it to the control list. 4. Click Apply Changes to apply the settings made.
Configuring the multi-SSID settings The Multi-SSID page allows you to enable or disable a virtual access point (VAP) and set up its SSID and authentication type. To configure the multi-SSID settings: 1. Click Network > Wireless tab > Multi-SSID. . Tick Enable VAPX to enable a VAP. . In the SSID filed, key in the SSID you want to use. 4. Select the Authentication type, and select Enable or Disable to enable or disable SSID broadcast and Relay Blocking. 5. Click Apply Changes to apply the settings made.
Configuring the wireless advanced settings The Advanced Setting page allows you to configure the advanced settings for your wireless network. Important: Configure the advanced settings only if you have sufficient knowledge about wireless networking. If you are not an experienced or knowledgeable user, we recommend that you keep the default values. To configure the wireless advanced settings: 1. Click Network > Wireless tab > Advanced Setting. .
Setting up the Wi-Fi Protected Setup (WPS) WPS (Wi-Fi Protected Setup) allows you to set up a secure and protected wireless network easily. Note: Ensure that you use a wireless LAN adapter with WPS function. To set up the WPS: 1. Press the WPS button on your router. . Click Network > Wireless tab >WPS. . Press the WPS button on the wireless LAN card and click Start PBC. You may also choose to key in the wireless LAN card’s PIN code, then click Start PIN.
Configuring the local area network (LAN) settings The LAN page allows you to configure your local area network (LAN) settings. Configuring the LAN IP settings The LAN IP Interface Setup page allows you to configure the interface of your local area network. To configure the LAN settings: 1. Click Network > LAN tab > LAN IP. In the LAN Interface Setup screen, key in the Interface Name, IP Address, and Subnet Mask. . Click Apply Changes to apply the settings made.
Configuring the DHCP settings The DHCP Mode page allows you to configure the DHCP settings. To configure the DHCP settings: 1. Click Network > LAN tab > DHCP. . In the DHCP Mode dropdown list, select None, DHCP Relay, or DHCP Server. . In the Interface field, select the port you want to use. 4. In the IP Pool Range field, key in the range of IP addresses that you want to use. 5. Key in the Default Gateway, Max Lease Time, Domain Name, and DNS Server address. 6.
Configuring the DHCP static IP settings The DHCP Static IP Configuration page allows you to assign the IP addresses on the LAN to a specific individual PCs based on the MAC addresses. To configure the DHCP Static IP settings: 1. Click Network > LAN tab > DHCP Static IP. . In the IP Address field, key in the specified IP address within the IP pool range which is assigned to the host. . In the MAC Address field, key in the MAC address of the host on the LAN. 4.
Configuring the wide area network (WAN) settings The WAN page allows you to configure your wide area network (WAN) settings. Configuring the WAN channel The Channel Configuration page allows you to configure the Internet settings in WAN channel. To configure the WAN settings: 1. Click Network > WAN tab > WAN. . In the Default Route Selection field, select Auto or Specified. . In the VPI field, key in the virtual path values for the asynchronous transfer mode ranging from 0 to 255. 4.
To configure the WAN IP settings: 1. In the Type dropdown list, you can select Fixed IP or DHCP. . In the Local IP Address field, key in the IP address of the WAN inteface provided by your ISP. . In the Netmask field, key in t he subnet mask of the local IP address. Tick Unnumbered to enable the IP unnumbered function. 4. Click Add to add the configured parameters into the Current ATM VC Table. 5. To modify the parameters on this page, select from the Current ATM VC Table, and modify the parameters.
Configuring the Internet service settings The Internet Service function allows you to configure the following Internet service settings: DNS, Firewall, UPnP, IGMP, Proxy, TR-069, and ACL. 1. Click Internet Service. . Click the tabs of the following Internet service configuration: DNS, Firewall, UPnP, IGMP Proxy, TR-069 and ACL.
Configuring the DDNS Settings The DDNS (Dynamic DNS) page allows you to configure the DDNS settings from DDNS providers DynDNS or TZO. To configure the DDNS settings: 1. Click Internet Service > DNS tab > DDNS. . In the DDNS provider dropdown list, select the DDNS provider. . In the Host Name field, assign the DDNS host name. 4. In the Interface dropdown list, select the Internet connection type. 5. Key in the user name and password for the DDNS provider. 6.
Configure the firewall settings The Firewall page allows you to configure the security settings for your wireless network. Configure the IP/Port filter settings The IP/Port Filter page allows you to restrict certain types of outgoing or incoming Internet data packets from or to your network. To configure the IP/port filter settings: 1. Click Internet Service > Firewall tab > IP/Port Filter. . Select the Rule Action as Permit or Deny. . In the Protocol dropdown list, select the protocol type. 4.
Configure the MAC filter settings The MAC Filter page allows you to restrict certain types of outgoing or incoming data packets from or to network clients based on their MAC addresses. To configure the MAC filter settings: 1. Click Internet Service > Firewall tab > MAC Filter. . In the Direction field, select Outgoing or Incoming. . In the Source MAC address field, key in the MAC address of the network client where the data packets will be coming from. 4.
Configure the URL Blocking settings The URL Blocking page allows you to block certain websites or online contents based on specific keywords. To configure the keyword filter settings: 1. Click Internet Service > Firewall tab > URL Blocking. . In the URL Blocking Capacity field, click Disable or Enable. . In the Keyword field, enter the keyword that you want to block. 4. Click Add Keyword to add the keyword to the URL Blocking Table.
Configuring the ALG settings The NAT ALG and Passthrough page allows you to allow certain protocols or applications to pass through your network’s firewall. To configure the ALG settings: 1. Click Internet Service > Firewall tab > ALG Setting. . Select the protocols or applications that you want to enable. . Click Apply Changes to save the settings made.
Configuring the UPnP settings The UPnP (Universal Plug and Play) Configuration page allows you to access the media of the UPnP devices found in your network. To configure the UPnP settings: 1. Click Internet Service > UPnP tab. . In the UPnP field, tick Enable to enable UPnP connection. . In the WAN Interface dropdown list, choose a network protocol group to enable the UPnP connection. 4. Click Apply Changes to save the settings.
Configuring the IGMP Configuration settings The IGMP (Internet Group Management Protocol) Proxy Configuration page allows you to configure the amount of IPTV packets that can be received through a proxy. To configure the IGMP settings: 1. Click Internet Service > IGMP Proxy tab. . Tick Enable in IGMP Proxy and Multicast Allowed options. . In the Robust Count and Last Member Query Count fields, key in their variables. The default values are 2 and 1 respectively. 4.
Configuring the advanced settings The Advanced Setting page allows you to configure your ASUS WIreless Router’s advanced settings such as Bridge Setting, Routing, Port Mapping, QoS, SNMP, and other miscellaneous settings. NOTE: Configure the Advanced settings only if you are an experienced user and has vast knowledge about networking.
Configuring the administration settings The Administration page allows you to restore the wireless router to its default or to its saved configuration settings, upgrade the firmware, view the system logs, create, edit, or delete user accounts, and configure the system settings. Restoring the wireless router’s settings The Commit/Reboot page allows you to restore the wireless router to its default settings or to a previously saved configuration settings. To configure the Commit/Reboot settings: 1.
Upgrading the firmware The Upgrade Firmware page allows you to upgrade the wireless router’s firmware version. NOTE: Download the latest firmware from the ASUS Support site at http://support.asus.com. To upgrade the firmware: 1. Click Administration > Upgrade tab > Upgrade Firmware. . In the Select File field, click Browse to locate the new firmware file on your computer. . Click Upload. Wait for a few minutes for the uploading process to complete.
Backing up/Restoring the settings The Backup/Restore Settings page allows you to backup or save the configuration settings to a file in your preferred path and to restore the wireless router’s settings using the saved configuration file. To backup the settings: 1. Click Administration > Upgrade tab > Backup/Restore. . In the Save Settings to File field, click Save to save the configuration settings to your preferred path. To restore the settings: 1. Click Administration > Upgrade tab > Backup/Restore. .
Configuring the System Logs The Log Setting page allows you to enable or disable the system log function and view the system logs. Note: You can tick both boxes to view the system logs in the Events Log Table. To configure the system log settings: 1. Click Administration > System Log tab. . Check the Error and Notice boxes to view the system event logs. . Click Apply Changes. The log information (Error and Notice logs) will be shown in the Events Log Table. 4.
Configuring the user account settings The User Account Configuration page allows you to create, modify, or delete user accounts. To add a user account: 1. Click Administration > Password tab. . In the User Name field, key in the desired user name. . In the Privilege dropdown list, select the privilege type: Root or User. 4. Key in your password to the New Password and Confirm Password fields. 5. Click Add to add your new account to the User Account Table. To modify a user account: 1.
Configuring the system time settings The System Time Configuration page allows you to configure the system time manually or obtain the system time automatically from the time server. To configure the system time manually: 1. Click Administration > Time Zone tab. . In the System Time field, key in the necessary information. . Click Apply Changes to save the settings made. To obtain the system time automatically: 1. Click Administration > Time Zone tab. .
Configuring the diagnostic settings The Diagnostic page allows you to detect, isolate, and troubleshoot problems with your network.
Checking your wireless router’s status and basic settings The Router Status page allows you to view the current status of your wireless router, the connection status, and the system logs. Click the tabs to view these information: • System tab The System Status page displays the current status and some basic settings of the wireless router such as software version, DSP version, uptime, upstream speed, and downstream speed.
5 Troubleshooting Troubleshooting This troubleshooting guide provides solutions to some common problems that you may encounter while installing or using the ASUS Wireless Router. These problems require simple troubleshooting that you can perform by yourself. Contact the ASUS Technical Support if you encounter problems not mentioned in this chapter. Problem The client cannot establish a wireless connection with the router. Action Out of Range: • Put the router closer to the wireless client.
Problem Cannot access the Internet via wireless LAN adapter. Action • • • • • • Internet is not accessible. • • When ADSL Modem “Link” light is ON (not blinking), this means Internet Access is possible. • • • • • • 50 Move the router closer to the wireless client. Check whether the wireless adapter is connected to the correct wireless router. Check whether the wireless channel in use conforms to the channels available in your country/area. Check the encryption settings.
Problem How to restore the system to its default settings? Action • • Insert a needle into the Reset hole at the rear panel of the wireless router for more than five seconds. Refer to the section Backing up/Restoring the settings in Chapter 4 of this user manual. The following are the factory default settings: User Name: admin Password: admin Enable DHCP: Yes (if WAN cable is plugged in) IP address: 192.168.1.1 Domain Name: (Blank) Subnet Mask: 255.255.255.0 DNS Server 1: 192.168.1.
Appendices Notices For the following equipment: DSL-N10E Is herewith confirmed to comply with the requirements setout in the Council Directive on the Approximation of the Laws of the MemberStates relating to Electromagnetic Compatibility (2004/108/EC), Low-voltageDirective (2006/95/EC) and R&TTE (1999/5/EC).The equipment was passed The test was performed according to thefollowing European standards: ETSI EN 301 489-17 V2.1.1: 2009 ETSI EN 301 489-1 V1.8.1: 2008 ETSI EN 300 328 V1.7.
This equipment generates, uses and can radiate radio frequency energy and, if not installed and used in accordance with the instructions, may cause harmful interference to radio communications. However, there is no guarantee that interference will not occur in a particular installation.
IC Warning The Class B digital apparatus meets all requirements of the Canadian InterferenceCausing Equipment Regulation. Cet appareil numerique de la class B respecte toutes les exigences du Reglement sur le materiel brouilleur du Canada. GNU General Public License Licensing information This product includes copyrighted third-party software licensed under the terms of the GNU General Public License. Please see The GNU General Public License for the exact terms and conditions of this license.
For example, if you distribute copies of such a program, whether gratis or for a fee, you must give the recipients all the rights that you have. You must make sure that they, too, receive or can get the source code. And you must show them these terms so they know their rights. We protect your rights with two steps: (1) copyright the software, and (2) offer you this license which gives you legal permission to copy, distribute and/or modify the software.
2. You may modify your copy or copies of the Program or any portion of it, thus forming a work based on the Program, and copy and distribute such modifications or work under the terms of Section 1 above, provided that you also meet all of these conditions: a) You must cause the modified files to carry prominent notices stating that you changed the files and the date of any change.
corresponding source code. (This alternative is allowed only for noncommercial distribution and only if you received the program in object code or executable form with such an offer, in accord with Subsection b above.) The source code for a work means the preferred form of the work for making modifications to it.
receive copies directly or indirectly through you, then the only way you could satisfy both it and this License would be to refrain entirely from distribution of the Program. If any portion of this section is held invalid or unenforceable under any particular circumstance, the balance of the section is intended to apply and the section as a whole is intended to apply in other circumstances.
THE COPYRIGHT HOLDERS AND/OR OTHER PARTIES PROVIDE THE PROGRAM “AS IS” WITHOUT WARRANTY OF ANY KIND, EITHER EXPRESSED OR IMPLIED, INCLUDING, BUT NOT LIMITED TO, THE IMPLIED WARRANTIES OF MERCHANTABILITY AND FITNESS FOR A PARTICULAR PURPOSE. THE ENTIRE RISK AS TO THE QUALITY AND PERFORMANCE OF THE PROGRAM IS WITH YOU. SHOULD THE PROGRAM PROVE DEFECTIVE, YOU ASSUME THE COST OF ALL NECESSARY SERVICING, REPAIR OR CORRECTION.
ASUS Contact Information ASUSTeK COMPUTER INC. (Asia Pacific) Address Website Technical Support Telephone Support Fax Online support 15 Li-Te Road, Peitou, Taipei, Taiwan 11259 www.asus.com.tw +886228943447 +886228907698 support.asus.com ASUS COMPUTER INTERNATIONAL (America) Address Telephone Fax Website Online support 800 Corporate Way, Fremont, CA 94539, USA +15029550883 +15029338713 usa.asus.com support.asus.
Manufacturer: ASUSTeK Computer Inc. Tel: +886-2-2894-3447 Address: No. 150, LI-TE RD., PEITOU, TAIPEI 112, TAIWAN Authorised representative ASUS Computer GmbH in Europe: Address: HARKORT STR. 21-23, 40880 RATINGEN, GERMANY BOGAZICI BIL GISAYAR SAN. VE TIC. A.S. Authorised distributors in Turkey: Tel: +90 212 3311000 Address: AYAZAGA MAH. KEMERBURGAZ CAD. NO.10 AYAZAGA/ISTANBUL CIZGI Elektronik San. Tic. Ltd. Sti. Tel: 0090 2123567070 Address: CEMAL SURURI CD.