DSL-N10S Wireless-N150 ADSL Modem Router User Manual
E9742 First Edition September 2014 Copyright © 2014 ASUSTeK Computer Inc. All Rights Reserved. No part of this manual, including the products and software described in it, may be reproduced, transmitted, transcribed, stored in a retrieval system, or translated into any language in any form or by any means, except documentation kept by the purchaser for backup purposes, without the express written permission of ASUSTeK Computer Inc. (“ASUS”).
Table of contents About this guide..................................................................................... 5 Chapter 1 Knowing your wireless router Package contents................................................................................... 7 System requirements............................................................................. 7 Before you proceed................................................................................ 7 Hardware features.............................
Table of contents Status..................................................................................................... 37 Checking your device information and basic settings...................... 37 Configuring the System Log............................................................. 38 Setting up the Wi-Fi Protected Setup (WPS)...................................... 39 Chapter 5 Troubleshooting Troubleshooting...................................................................................
About this guide This user guide contains information that you need to install and configure the ASUS Wireless Router. How this guide is organized This guide contains the following parts: • Chapter 1: Knowing your wireless router This chapter provides information on the package contents, system requirements, hardware features, and LED indicators of the ASUS Wireless Router.
Conventions used in this guide WARNING: Information to prevent injury to yourself when trying to complete a task. CAUTION: Information to prevent damage to the components when trying to complete a task. IMPORTANT: Instructions that you MUST follow to complete a task. NOTE: Tips and additional information to aid in completing a task.
1 Knowing your wireless router Package contents Check the following items in your ASUS Wireless Router package. DSL-N10S Wireless-N150 ADSL Modem Router RJ-45 cable RJ-11 cable Power adapter Warranty card Quick Start Guide External splitter Note: If any of the items is damaged or missing, contact your retailer.
• • • Keep the device away from transformers, heavy-duty motors, fluorescent lights, microwave ovens, refrigerators, and other industrial equipment to prevent signal loss. Install the device in a central area to provide ideal coverage for all wireless mobile devices. Install the device at least 20cm from a person to comply with the RF Guidelines for Human Exposure of the Federal Communications Commission (FCC).
Status indicators LED Status Indication Off No connection or in bridge mode. Flashing Internet data is transmitted in the routing mode. On The Internet connection is normal in the routing mode and no Internet data is being transmitted. Off No power or no physical connection On Has physical connection to an Ethernet network.
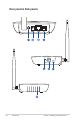
Rear panel & Side panels 10 DSL-N10S Chapter 1: Knowing your wireless router
Item Description Power switch Press this button to turn the power on/off. Power (DC-In) port Insert the AC adapter into this port to connect your router to a power source. LAN port Connect a RJ-45 Ethernet cable to this port to establish LAN connection. ADSL port Connect an RJ-11 telephone cable to this port or a splitter connected from this port. WPS button / Wi-Fi switch* WPS mode: Press this button for more than four seconds to enable the WPS function.
DSL-N10S Chapter 1: Knowing your wireless router
2 Getting started Setting up the wireless router The ASUS Wireless Router includes a web graphical user interface (web GUI) that allows you to configure the wireless router using your web browser on your computer. Note: For details on configuring your wireless router using the web GUI, refer to Chapter 4: Configuring via the web GUI. Accessing the router’s web GUI To access the router’s web GUI: 1. In your web browser, key in http://192.168.1.1. 2. Key in the user name and password.
Using the Quick Internet Setup (QIS) The Quick Internet Setup (QIS) function guides you in quickly setting up your Internet connection. Important: Obtain the necessary information about your Internet connection type from your ISP. 14 1. 2. Click Quick Start. In Step 1: Quick Start - Password page, set up your password and click Next. 3. In Step 2: Quick Start - Time Zone page, select the appropriate time for your location and click Next.
4. In Step 3: Quick Start - ISP Connection Type page, select your Internet connection type, and click Next.
5. In Step 4: Quick Start - Wlan page, set up the parameter for your WLAN network. Notes: • Do not include quotation marks (" or ') in your SSID or use spaces at the start of your SSID. • For WPA pre-shared key and WEP key settings, do not use quotation marks (" or '), angle brackets (>), square brackets (]) and spaces at the start of your key, and spaces at the start or two spaces between your key. 6. 16 In Step 5: Quick Start Complete!! page, click Next to save the configuration settings.
3 Configuring the network clients Managing your network clients To manage your network clients to your ASUS Wireless Router, you must have the correct parameters for wireless, LAN, and WAN connection types. Ensure that the clients’ IP addresses are within the same subnet as the ASUS Wireless Router. By default, the ASUS Wireless Router integrates the DHCP server function that automatically assigns the IP addresses to the clients in your network.
Windows® 2000 1. Click Start > Control Panel > Network and Dial-up Connection. Right-click Local Area Connection, then click Properties. 2. Select Internet Protocol (TCP/IP), then click Properties. 3. Select Obtain an IP address automatically if you want the IP settings to be assigned automatically. Otherwise, select Use the following IP address: and key in IP address, Subnet mask, and Default gateway. 4.
Windows® XP 1. Click Start > Control Panel > Network Connection. Right-click Local Area Connection, then select Properties. 2. Select Internet Protocol (TCP/IP), then click Properties. 3. Select Obtain an IP address automatically if you want the IP settings to be assigned automatically. Otherwise, select Use the following IP address: and key in IP address, Subnet mask, and Default gateway. 4. Select Obtain DNS server address automatically if you want the DNS server settings to be assigned automatically.
Windows® Vista/7 1. Click Start > Control Panel > Network and Internet > Network and Sharing Center. Click View status > Properties > Continue. 2. Select Internet Protocol Version 4 (TCP/IPv4), then click Properties. 3. Select Obtain an IP address automatically if you want the IP settings to be assigned automatically. Otherwise, select Use the following IP address: and key in IP address and Subnet mask. 4.
4 Configuring via the web GUI Configuring the Interface Setup The Interface Setup page allows you to configure the settings of these three network types: Internet, LAN, and Wireless. Configuring the Internet settings The Internet page allows you to configure your Internet settings.
To configure the Internet settings: 1. Click Interface Setup > Internet tab. 2. In the AMT VC dropdown list, select the virtual circuit, and key in the virtual path values for the asynchronous transfer mode ranging from 0 to 255 in the VPI field, and the VCI values ranging from 1 to 65535. 3. In the IPv4/IPv6 field, select IPv4, IPv4/IPv6 or IPv6. 4. In the Encapsulation item, select Dynamic IP Address, Static IP address, PPPoA/PPPoE or Bridge Mode. To configure the PPP settings: 1.
Configuring the local area network (LAN) settings The LAN page allows you to configure your local area network (LAN) settings. Configuring the LAN settings The LAN page allows you to configure the interface of your local area network. To configure the LAN settings: 1. Click Interface Setup > LAN tab. In the Router Local IP field, key in the IP Address and IP Subnet Mask. 2. In the DHCP options, select Disabled, Enabled, or Relay. 3. Key in the Starting IP Address, IP Pool Count and Lease Time.
Configuring the wireless network settings The Wireless page allows you to configure the wireless settings. Configuring the basic wireless network settings To configure the wireless settings: 1. Click Interface Setup > Wireless tab. 2. In the Access Point Settings, select Activated or Deactivated to enable or disable the access point. 3. Key in the necessary parameters for Access Point and select the wireless mode. 4.
6. 7. 8. unique name containing up to 32 characters for your SSID (Service Set Identifier) or network name to identify your wireless network. Wi-Fi devices can identify and connect to the wireless network via your assigned SSID. The SSIDs on the information banner are updated once new SSIDs are saved to the settings. Select the Authentication type. In WDS Settings field, tick On or Off to enable or disable the WDS (Wireless Distribution System).
Configuring the routing settings The Routing page displays the devices on the routing list and allows you to configure the routing settings. Configuring the routing settings If your network makes use of more than one wireless router, you can configure a routing table to share the same Internet service. Note: We recommend that you do not change the default route settings unless you have advanced knowledge of routing tables. If you want to add a device on the list, click ADD ROUTE.
Configure the NAT settings NAT (Network Address Translation) allows a Virtual Private Network (VPN) connection to pass through the router to the network clients. To configure the NAT settings: 1. 2. 3. 4. Go to Advanced Setup > NAT. Select the Virtual Circuit and Number of IPs. Enter DMZ and Virtual Servers settings. Click Save.
Configure the ADSL settings This page allows you to configure the ADSL settings. Select the ADSL mode and ADSL type, click SAVE when done.
Configuring the Access Management The Advanced Setup page allows you to configure the following advanced settings: ACL, Filter, SNMP, UPnP, and DDNS. Configuring the ACL The ACL (Access Control List) configuration page allows you to specify the services that are accessible from LAN or WAN side. To configure the ACL settings: 1. Click Access Management > ACL tab. 2. In ACL, tick Activated to enable ACL management. 3. In the IP Address fields, key in the desired IP to add. 4. Click Save.
Configure the Filter settings The Filter page allows you to restrict certain types of outgoing or incoming data packets from or to the network clients based on their MAC addresses. To configure the Filter settings: 1. Click Access Management > Filter tab. 2. Select the Filter Type Selection. 3. In the Direction field, select Outgoing, Incoming, or Both. 4. In the Source IP address field, key in the IP address of the network client whose incoming packets you want to restrict. 5.
Configure the SNMP settings This page allows you to configure the SNMP (Simple Network Management Protocol) settings. To configure the SNMP settings: 1. Click Access Management > SNMP tab. 2. Tick Activated to enable SNMP. 3. Key in the trap host. 4. Click Save when done. Configuring the UPnP settings The UPnP (Universal Plug and Play) Configuration page allows you to access the media of the UPnP devices found in your network. To configure the UPnP settings: 1. Click Access Management > UPnP tab. 2.
Configuring the DDNS settings Setting up DDNS (Dynamic DNS) allows you to access the router from outside your network through the provided ASUS DDNS Service or another DDNS service. To configure the DDNS settings: 1. Click Access Management > DDNS tab. 2. In the Dynamic DNS field, tick Activated to enable DDNS connection. 3. Configure the following settings below. When done, click Save. • My Host Name: Key in the Host Name in the format of xxx.asuscomm.com (xxx is your host name).
Configuring the Maintenance settings The Maintenance page allows you to restore the wireless router to its default or to its saved configuration settings, upgrade the firmware, view the system logs and diagnostics. Configuring the Administrator settings The Administrator page allows you to modify the password. To modify a password: 1. Click Maintenance > Administration tab. 2. Key in your password to the New Password and Confirm Password fields. 3. Click Save to modify the selected user account.
Upgrading the firmware The Firmware page allows you to upgrade the wireless router’s firmware version. NOTE: Download the latest firmware from the ASUS Support site at http://support.asus.com. To upgrade the firmware: 1. Click Maintenance > Administration tab. 2. In the New Firmware Location field, click Browse to locate the new firmware file on your computer. 3. Click Upgrade. Wait for a few minutes for the uploading process to complete.
Restoring the wireless router settings The SysRestart page allows you to restore the wireless router to its default settings or to a previously saved configuration settings. To configure the SysRestart settings: 1. Click Maintenance > SysRestart tab. 2. Select Current Settings or Factory Default Settings. 3. Click Restart to load the selected configuration and reboot the router’s system.
Diagnostics The Diagnostics page allows you to detect and view problems with your network.
Status The Status page allows you to view the current status of your wireless router, the connection status, and the system logs. Checking your device information and basic settings Go to Status > Device Info tab to view these information: • LAN The LAN field displays some basic LAN settings of the wireless router, the LAN IP address, Subnet mask and DHCP server status. • WAN The WAN field displays the basic status of WAN and DNS server of the router.
Viewing the System Log The System Log page allows you to view the system logs. To configure the system log: 1. Click Status > System Log tab. 2. Click Save Log to save a copy of logs information to your local drive. 3. Click Clear Log to clear the system logs from the table.
Setting up the Wi-Fi Protected Setup (WPS) WPS (Wi-Fi Protected Setup) allows you to set up a secure and protected wireless network easily. Note: Ensure that you use a wireless LAN adapter with WPS function. To enable the WPS function, press the WPS button on your router for more than four seconds.
5 Troubleshooting Troubleshooting This troubleshooting guide provides solutions to some common problems that you may encounter while installing or using the ASUS Wireless Router. These problems require simple troubleshooting that you can perform by yourself. Contact the ASUS Technical Support if you encounter problems not mentioned in this chapter. Problem The client cannot establish a wireless connection with the router. Action Out of Range: • Put the router closer to the wireless client.
Problem Internet is not accessible. Action • • When ADSL Modem “Link” light is ON (not blinking), this means Internet Access is possible. • • • • • • Check the status indicators on the ADSL modem and the wireless router. Ensure that the WAN LED on the wireless router is ON. If the LED is not ON, change the cable and try again. Restart your computer. Refer to the Quick Start Guide of the wireless router and re-configure the settings. Check if the WAN LED on the wireless router is ON.
Problem How to restore the system to its default settings? Action • • Insert a pointed blunt object in the Reset hole at the right side of the wireless router for more than five seconds. Refer to the section Restoring the wireless router settings in Chapter 4 of this user manual. The following are the factory default settings: User Name: admin Password: admin Enable DHCP: Yes (if WAN cable is plugged in) IP address: 192.168.1.1 Domain Name: (Blank) Subnet Mask: 255.255.255.0 DNS Server 1: 192.168.1.
Appendices Notices For the following equipment: DSL-N10S ASUS Recycling/Takeback Services ASUS recycling and takeback programs come from our commitment to the highest standards for protecting our environment. We believe in providing solutions for you to be able to responsibly recycle our products, batteries, other components, as well as the packaging materials. Please go to http://csr.asus.com/english/Takeback.htm for the detailed recycling information in different regions.
Prohibition of Co-location This device and its antenna(s) must not be co-located or operating in conjunction with any other antenna or transmitter. Safety Information To maintain compliance with FCC’s RF exposure guidelines, this equipment should be installed and operated with minimum distance 20cm between the radiator and your body. Use on the supplied antenna.
GNU General Public License Licensing information This product includes copyrighted third-party software licensed under the terms of the GNU General Public License. Please see The GNU General Public License for the exact terms and conditions of this license. We include a copy of the GPL with every CD shipped with our product. All future firmware updates will also be accompanied with their respective source code. Please visit our web site for updated information.
Also, for each author’s protection and ours, we want to make certain that everyone understands that there is no warranty for this free software. If the software is modified by someone else and passed on, we want its recipients to know that what they have is not the original, so that any problems introduced by others will not reflect on the original authors’ reputations. Finally, any free program is threatened constantly by software patents.
b) You must cause any work that you distribute or publish, that in whole or in part contains or is derived from the Program or any part thereof, to be licensed as a whole at no charge to all third parties under the terms of this License.
definition files, plus the scripts used to control compilation and installation of the executable. However, as a special exception, the source code distributed need not include anything that is normally distributed (in either source or binary form) with the major components (compiler, kernel, and so on) of the operating system on which the executable runs, unless that component itself accompanies the executable.
It is not the purpose of this section to induce you to infringe any patents or other property right claims or to contest validity of any such claims; this section has the sole purpose of protecting the integrity of the free software distribution system, which is implemented by public license practices.
PROGRAM PROVE DEFECTIVE, YOU ASSUME THE COST OF ALL NECESSARY SERVICING, REPAIR OR CORRECTION.
For Turkey only Authorised distributors in Turkey: BOGAZICI BIL GISAYAR SAN. VE TIC. A.S. Tel. No.: +90 212 3311000 Address: AYAZAGA MAH. KEMERBURGAZ CAD. NO.10 AYAZAGA/ISTANBUL CIZGI Elektronik San. Tic. Ltd. Sti. Tel. No.: +90 212 3567070 Address: CEMAL SURURI CD. HALIM MERIC IS MERKEZI No: 15/C D:5-6 34394 MECIDIYEKOY/ISTANBUL KOYUNCU ELEKTRONiK BiLGi iSLEM SiST. SAN. VE DIS TIC. A.S. Tel. No.: +90 216 5288888 Address: EMEK MAH.ORDU CAD.
ASUS Contact Information ASUSTeK COMPUTER INC. (Asia Pacific) Address Website 15 Li-Te Road, Peitou, Taipei, Taiwan 11259 www.asus.com.tw Technical Support Telephone Support Fax Online support +886228943447 +886228907698 support.asus.com ASUS COMPUTER INTERNATIONAL (America) Address Telephone Fax Website Online support 800 Corporate Way, Fremont, CA 94539, USA +15107393777 +15106084555 usa.asus.com support.asus.
Networks Global Hotline Information Region Country Hotline Number Service Hours 09:00-13:00 ; 14:00-18:00 Mon-Fri 09:00-18:00 Mon-Fri Cyprus 800-92491 France 0033-170949400 0049-1805010920 09:00-18:00 Mon-Fri 0049-1805010923 (component support) 10:00-17:00 Mon-Fri 0049-2102959911 ( Fax ) 0036-15054561 09:00-17:30 Mon-Fri 09:00-13:00 ; 199-400089 14:00-18:00 Mon-Fri 09:00-13:00 ; 00800-44142044 14:00-18:00 Mon-Fri 0043-820240513 09:00-18:00 Mon-Fri Germany Hungary Italy Greece Austria Netherlands/ Lu
Networks Global Hotline Information Region Country Australia New Zealand Japan Korea Thailand Singapore Asia-Pacific Malaysia Philippine India India(WL/NW) Indonesia Americas 54 Hotline Numbers 1300-278788 0800-278788 0800-1232787 0081-473905630 ( Non-Toll Free ) 0082-215666868 0066-24011717 1800-8525201 0065-64157917 0065-67203835 ( Repair Status Only ) 0060-320535077 1800-18550163 1800-2090365 0062-2129495000 500128 (Local Only) Vietnam 1900-555581 Hong Kong USA Canada Mexico 00852-35824770 1-812
Networks Global Hotline Information Region Middle East + Africa Country Egypt Saudi Arabia UAE Turkey South Africa Israel Romania Bosnia Herzegovina Bulgaria Hotline Numbers 800-2787349 800-1212787 00971-42958941 0090-2165243000 0861-278772 *6557/00972-39142800 *9770/00972-35598555 0040-213301786 Service Hours 09:00-18:00 Sun-Thu 09:00-18:00 Sat-Wed 09:00-18:00 Sun-Thu 09:00-18:00 Mon-Fri 08:00-17:00 Mon-Fri 08:00-17:00 Sun-Thu 08:30-17:30 Sun-Thu 09:00-18:30 Mon-Fri 00387-33773163 09:00-17:00 Mon-Fri