® EA-N66 3-in-1 Dual-Band Wireless-N900 Gigabit Access Point / Wi-Fi Bridge / Range Extender Step-by-Step Setup Manual
E7648 First Edition August 2012 Copyright © 2012 ASUSTeK Computer Inc. All Rights Reserved. No part of this manual, including the products and software described in it, may be reproduced, transmitted, transcribed, stored in a retrieval system, or translated into any language in any form or by any means, except documentation kept by the purchaser for backup purposes, without the express written permission of ASUSTeK Computer Inc. (“ASUS”).
Table of contents 1. Introduction............................................................................... 4 1.1 Package contents....................................................................................4 1.2 System requirements............................................................................4 2. Network Map.............................................................................. 5 2.1 Step-by-Step for Wi-Fi Bridge Mode................................................6 2.
EA-N66 Step-by-Step Setup Manual 1. Introduction 1.1 Package contents ASUS EA-N66 x1 Quick Start Guide x1 Support CD x1 Warranty card x1 Ethernet cable x1 If any of the above items is damaged or missing, contact your retailer immediately. 1.2 System requirements To set up your network, you need one or two computers that meet the following system requirements: • Ethernet RJ-45 (LAN) port • IEEE 802.
EA-N66 Step-by-Step Setup Manual 2. Network Map This is an overview of the EA-N66’s Network Map page. Click each of the icons on the Network Map to display detailed information regarding each network device. The icon on the left is for the parent Access Point. The icon on the right is for clients on the network. Clicking the middle icon displays the current status and information about the EA-N66. On the left side of the screen is the Advanced Setup panel.
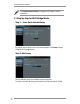
EA-N66 Step-by-Step Setup Manual Click Quick Internet Setup to configure the EA-N66’s network connection. 2.1 Step-by-Step for Wi-Fi Bridge Mode Step 1: Enter Quick Internet Setup By default, the EA-N66 serves as a network adapter. Click Next to begin setup for Wi-Fi Bridge Mode. Step 2: Site Survey The EA-N66 will search for available wireless networks. To assist in network discovery, place the Access Point near the EA-N66.
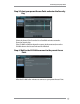
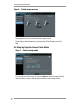
EA-N66 Step-by-Step Setup Manual Step 3: Select your parent Access Point and enter the Security Key Select the Access Point from the list of available wireless networks. Enter the Security Key. If the EA-N66 is unable to detect the correct wireless network, move the EA-N66 closer to the Access Point and click Refresh. Step 4: Wait for the EA-N66 to connect to the parent Access Point Allow the EA-N66 a few minutes to connect to your parent Access Point.
EA-N66 Step-by-Step Setup Manual Step 5: Finish setup process Congratulations! You have finished the setup process! Please refer to the illustrations to interpret the LED indicators on the EAN66. 2.2 Step-by-Step for Access Point Mode Step 1: Select setup mode To set up Access Point mode, do not click Next on the first page of Quick Internet Setup. Instead, click the link provided to switch setup mode.
EA-N66 Step-by-Step Setup Manual Step 2: Select Access Point mode Select “I wish to establish a new wireless network”. Click Next. Step 3: Set up the SSID and password Assign a new SSID and password to the EA-N66. Enter a unique SSID to any avoid any network issues. EA-N66 cannot run on two frequencies (2.4 GHz and 5GHz) at the same time. A frequency of 2.4GHz works best for most wireless devices but a frequency of 5GHz is recommended for better performance and less interference.
EA-N66 Step-by-Step Setup Manual Step 4: Wait for setup to complete Allow a few minutes for the EA-N66 to establish the new wireless network. Step 5: Finish setup Follow the short tutorial to complete setup. Disconnect the Ethernet cable between the EA-N66 and your PC or laptop. Connect the Ethernet cable to the EA-N66 and the wireless router.
EA-N66 Step-by-Step Setup Manual Step 6: Bookmarking the Setup Page It is recommended that you reset the EA-N66 when changing any settings. However, you can create a bookmark on your browser to quickly access setup page at any time. 2.3 Step-by-Step for Range Extender Mode Step 1: Select setup mode To set up Wireless Range Extender mode, do not click Next on the first page of Quick Internet Setup. Instead, click the link provided to switch setup mode.
EA-N66 Step-by-Step Setup Manual Step 2: Choose Repeater mode Select I wish to extend my existing wireless network. Click Next. Step 3: Site Survey The EA-N66 will search for available wireless networks. To assist in network discovery, place the Access Point near the EA-N66.
EA-N66 Step-by-Step Setup Manual Step 4: Select your parent Access Point and enter the Security Key Select the Access Point from the list of available wireless networks. Enter the Security Key. If the EA-N66 is unable to detect the correct wireless network, move the EA-N66 closer to the Access Point and click Refresh. Step 5: Set up the SSID and password for your extended network By default, the EA-N66 will assign an SSID using the following format: “original-SSID_RPT”.
EA-N66 Step-by-Step Setup Manual Step 6: Please wait while EA-N66 extends your wireless network Step 7: Finish setup process Congratulations! You have finished the setup process! Please refer to the illustrations to interpret the LED indicators on the EAN66.
EA-N66 Step-by-Step Setup Manual Additional setup and settings recommendations 1. Place the EA-N66 no closer than 1.5 meters from network clients under Access Point mode, or from its parent Access Point under Wi-Fi Bridge or Range Extender mode. The EA-N66 is designed to transmit signals over a distance. Place the EA-N66 at a distance of 1.5-3 meters away from the receiving device to get optimal performance. 2. Place the EA-N66 in an open are for a stronger signal.
EA-N66 Step-by-Step Setup Manual The WPS tab provides configuration options for the Wi-Fi Protected Setup feature. The Wireless MAC Filter tab allows you to block specific MAC addresses from accessing the wireless network.
EA-N66 Step-by-Step Setup Manual The RADIUS Setting tab allows you to set up additional parameters for authorizing wireless clients through a RADIUS server. Configure RADIUS settings when using [WPA-ENTERPRISE / WPA2ENTERPRISE] as Authentication Method in the Wireless General tab.
EA-N66 Step-by-Step Setup Manual 4. LAN Settings The LAN settings area provides configuration options for your Local Area Network IP address, DNS, and default gateway. 5. Administration The Administration area provides options for changing modes, configuring the EA-N66’s login password, and upgrading or restoring the firmware.
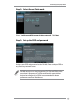
EA-N66 Step-by-Step Setup Manual Firmware Upgrade tab The Firmware Upgrade tab allows users to upgrade the firmware of the EA-N66 by uploading the firmware file.
EA-N66 Step-by-Step Setup Manual • Settings configured in the old firmware are retained during the upgrade process. If the upgrade process fails, EA-N66 will enter Emergency mode automatically. • The LED lights on the front panel of the EA-N66 will indicate that it is currently in Emergency mode. Use the Firmware Restoration utility on the CD to restore the firmware to factory defaults.
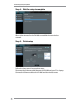
EA-N66 Step-by-Step Setup Manual 6. System Log Events and errors that occur while using the EA-N66 are recorded on the System Log. Refer to information provided by the System Log when contacting ASUS for technical support.
EA-N66 Step-by-Step Setup Manual Notices Federal Communications Commission This device complies with FCC Rules Part 15. Operation is subject to the following two conditions: • This device may not cause harmful interference, and • This device must accept any interference received, including interference that may cause undesired operation. This equipment has been tested and found to comply with the limits for a class B digital device pursuant to part 15 of the FCC Rules.
EA-N66 Step-by-Step Setup Manual FCC Radiation Exposure Statement This equipment complies with RFCC radiation exposure limits set forth for an uncontrolled environment . This equipment should be installed and operated with minimum 20cm between the radiator and your body. CE Mark Warning This is a Class B product, in a domestic environment, this product may cause radio interference, in which case the user may be required to take adequate measures. Operation Channels: Ch1~11 for N.
EA-N66 Step-by-Step Setup Manual IC Warning Statement Under Industry Canada regulations, this radio transmitter may only operate using an antenna of a type and maximum (or lesser) gain approved for the transmitter by Industry Canada. To reduce potential radio interference to other users, the antenna type and its gain should be so chosen that the equivalent isotropically radiated power (e.i.r.p.) is not more than that necessary for successful communication.
EA-N66 Step-by-Step Setup Manual ASUS Recycling/Takeback Services ASUS recycling and takeback programs come from our commitment to the highest standards for protecting our environment. We believe in providing solutions for you to be able to responsibly recycle our products, batteries, other components as well as the packaging materials. Please go to http://csr.asus. com/english/Takeback.htm for the detailed recycling information in different regions.
EA-N66 Step-by-Step Setup Manual Manufacturer: ASUSTeK Computer Inc. Tel: Authorised representative in Europe: Authorised distributors in Turkey: +886-2-2894-3447 Address: No. 150, LI-DE RD., PEITOU, TAIPEI 112, TAIWAN ASUS Computer GmbH Address: HARKORT STR. 21-23, D-40880 RATINGEN, DEUTSCHLAND BOGAZICI BIL GISAYAR SAN. VE TIC. A.S. Tel: +90 212 3311000 Address: AYAZAGA MAH. KEMERBURGAZ CAD. NO.10 AYAZAGA/ISTANBUL CIZGI Elektronik San. Tic. Ltd. Sti. Tel: +90 212 3567070 Address: CEMAL SURURI CD.