E5050 Eee PC User Manual Windows® 7 Edition Eee PC 1201 Series 15G06Q191000
Table of Contents About This User’s Manual.......................................................................................................iv Notes for This Manual..............................................................................................................iv Safety Precautions.....................................................................................................................v Transportation Precautions...................................................................
Eee Sharing................................................................................................................3-8 Eee Xperience...........................................................................................................3-8 Eee Tools.....................................................................................................................3-9 Microsoft® Office Trial..........................................................................................................
About This User’s Manual You are reading the Eee PC User’s Manual. This User’s Manual provides information regarding the various components in the Eee PC and how to use them. The following are major sections of this User’s Manual: 1. Knowing the Parts Provides information on the Eee PC’s components. 2. Getting Started Provides information on getting started with the Eee PC. 3. Using the Eee PC Provides information on using the Eee PC’s utilities. 4.
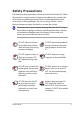
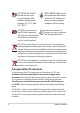
Safety Precautions The following safety precautions will increase the life of the Eee PC. Follow all precautions and instructions. Except as described in this manual, refer all servicing to qualified personnel. Do not use damaged power cords, accessories, or other peripherals. Do not use strong solvents such as thinners, benzene, or other chemicals on or near the surface. Disconnect the AC power before cleaning.
SAFE TEMP: This Eee PC should only be used in environments with ambient temperatures between 5°C (41°F) and 35°C (95°F) INPUT RATING: Refer to the rating label on the bottom of the Eee PC and be sure that your power adapter complies with the rating. DO NOT carry or cover a Eee PC that is powered ON with any materials that will reduce air circulation such as a carrying bag. Incorrect installation of battery may cause explosion and damage the Eee PC. DO NOT throw the Eee PC in municipal waste.
Charging Your Batteries If you intend to use battery power, be sure to fully charge your battery pack before going on long trips. Remember that the power adapter charges the battery pack as long as it is plugged into the computer and an AC power source. Be aware that it takes much longer to charge the battery pack when the Eee PC is in use. Remember to fully charge the battery (8 hours or more) before first use and whenever it is depleted to prolong battery life.
viii Table of Contents
Top Side Bottom Side Front Side Right Side Left Side Keyboard Usage Touchpad Usage 1 Chapter 1: Knowing the Parts
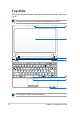
Top Side Refer to the diagram below to identify the components on this side of the Eee PC. The top side may vary in appearance depending on models. 1 2 3 4 5 6 7 The keyboard differs for each territory.
1 Built-in Camera 2 Display Panel 3 Touchpad key Toggles the touchpad ON/OFF. You can also turn on/off the function by pressing + . 4 Power Switch The power switch allows powering ON and OFF the Eee PC and recovering from STR. Press the switch once to turn ON and hold it to turn OFF the Eee PC. The power switch only works when the display panel is opened. 5 Keyboard The keyboard provides keys with comfortable travel (depth at which the keys can be depressed) and palm rest for both hands.
Powered OFF / Standby mode With Adapter High battery power Green ON (95%–100%) Medium battery power Orange ON (11%–94%) Low battery power Orange Blinking (0%–10%) Without Adapter Off Off Off Hard Disk Drive (HDD) Indicator The hard disk drive indicator blinks when data is written to or read from the disk drive. Wireless/Bluetooth Indicator This is only applicable on models with built-in wireless LAN/ Bluetooth (on selected models).
Bottom Side Refer to the diagram below to identify the components on this side of the Eee PC. The bottom side may vary in appearance depending on model. 1 1 2 3 2 4 The bottom of the Eee PC can get very hot. Be careful when handling the Eee PC while it is in operation or recently been in operation. High temperatures are normal during charging or operation. DO NOT use on soft surfaces such as beds or sofas, which may block the vents.
2 Battery Pack The battery pack is automatically charged when connected to an AC power source and maintains power to the Eee PC when AC power is not connected. This allows use when moving temporarily between locations. Battery time varies by usage and by the specifications for this Eee PC. The battery pack cannot be disassembled and must be purchased as a single unit. 3 Battery Lock - Spring The spring battery lock keeps the battery pack secure.
Right Side Refer to the diagram below to identify the components on this side of the Eee PC. 1201HA 1 2 3 4 5 6 2 3 4 5 6 1201N/T 1 4 1 Memory Card Slot 2 Headphone Output Jack The 1/8” stereo headphone jack (3.5mm) connects the Eee PC’s audio out signal to amplified speakers or headphones. Using this jack automatically disables the built-in speakers.
5 LAN Port The eight-pin RJ-45 LAN port (10/100M bit) supports a standard Ethernet cable for connection to a local network. The built-in connector allows convenient use without additional adapters. 6 Kensington® Lock port The Kensington® lock port allows the Eee PC to be secured using Kensington® compatible security products. These security products usually include a metal cable and lock that prevent the Eee PC to be removed from a fixed object.
Left Side Refer to the diagram below to identify the components on this side of the Eee PC. 1201HA 1 1 4 2 3 4 5 6 1 4 2 3 4 5 6 2 3 4 1201N HDMI 1 2 4 3 5 1 2 4 3 5 HDMI 1201T 1 1 2 4 3 Display (Monitor) Output4 1 2 3 The 15-pin D-sub monitor port supports a standard VGAcompatible device such as a monitor or projector to allow viewing on a larger external display.
2 Power (DC) Input The supplied power adapter converts AC power to DC power for use with this jack. Power supplied through this jack supplies power to the Eee PC and charges the internal battery pack. To prevent damage to the Eee PC and battery pack, always use the supplied power adapter. THE ADAPTER MAY BECOME WARM TO HOT WHEN IN USE. BE SURE NOT TO COVER THE ADAPTER AND KEEP IT AWAY FROM YOUR BODY. 3 USB Port (2.0/1.1) 4 Air Vents The air vents allow cool air to enter and warm air to exit the Eee PC.
Keyboard Usage Special Function Keys The following defines the colored hot keys on the Eee PC’s keyboard. The colored commands can only be accessed by first pressing and holding the function key while pressing a key with a colored command. Some function icons appear in the Notification area after activation. The Hot Key locations on the function keys may vary depending on model but the functions should remain the same. Follow the icons whenever your hot key locations do not match the manual.
Super Hybrid Engine (Fn+Space Bar): Toggles among various power saving modes. The selected mode is shown on the display. Num Lk (Insert): Toggles the numeric keypad (number lock) ON and OFF. Allows use of a larger portion of the keyboard for number entering. Scr Lk (Delete): Toggles the “Scroll Lock” ON and OFF. Allows you to use a larger portion of the keyboard for cell navigation. CD Play/Pause During CD stop, begins CD play. During CD play, pauses CD play.
Touchpad Usage Multi-finger gesture input Finger gesture Two-finger zooming in/out Two-finger rotating Two-finger scrolling up/down or left/right Applications Adobe reader, Windows Photo Viewer Adobe reader, Windows Photo Viewer Three-finger page up/down Adobe reader, MS Word, MS Excel Adobe reader, MS Word, MS Excel Two-finger zooming in/out - Moving two fingertips apart or together on the touchpad to zoom in or zoom out. This is convenient when viewing photos or reading documents.
Two-finger scrolling up/down or left/right- Use two fingertips to slide up/down or left/right on the touchpad to scroll a window up/down or left/ right. If your display window includes several sub-windows, move the pointer on that pane before scrolling. Three-finger page up/down- Use three fingers to move horizontally on the touchpad to swipe pages. Swipe from left to the right to view the next page or right to the left to return to the previous pages.
Powering on your Eee PC First-time Startup Desktop Network Connection 2 Chapter 2: Getting Started
Powering on your Eee PC These are only quick instructions for using your Eee PC. 1. Install the battery pack 3 2 1 3. 2. Connect the AC power adapter 2 1 3 110 V-220V Turn ON the Eee PC Damage may occur if you use a different adapter to power the Eee PC. You may damage both your battery pack(s) and the Eee PC with a faulty ACDC adapter.
First-time Startup For the first time you start your Eee PC, the Windows wizard will launch automatically and lead you through setting up your preferences and some basic information. Follow the wizard instructions to finish the initialization: 1. Select the language you use. Click Next to continue. 2. Select you system settings by specifying the region you are in, the time zone you are in, and the keyboard type you use. Click Next to continue. 3.
2-4 5. Read the end user license agreement and check the two boxs before I accept the license terms. Click Next to continue. 6. 7. Specify the time zone you are 8. in and the local date and time. Click Next to continue. Click Use recommended settings to get the latest important updates. Connect to a wireless network and click Next to continue, or click Skip to set up the wireless connection later.
9. Select the network's location. Click Next to continue. 10. The initialization is finished. Desktop There are several shortcuts on the desktop. Double-click them to launch the corresponding applications and enter the specified folders. Some applications would form minimized icons in the Notification area. The actual Desktop screen may vary according to different models.
Network Connection Configuring a wireless network connection 1. Click the wireless network icon with an orange star Windows® Notification area. in the If the wireless connection icon does not show in the Notification area, activate the wireless LAN function by pressing + ( + ) before configuring a wireless network connection. 2. Select the wireless access point you want to connect to from the list and click Connect to build the connection.
Local Area Network To establish a wired network, follow the instructions below: Using a dynamic IP / PPPoE network connection: 1. Click the network icon with a yellow warning triangle in the Windows® Notification area and select Open Network and Sharing Center. 2. Click Change adapter settings in the left blue pane. 3. Right-click Local Area Connection and select Properties.
4. Click Internet Protocol Version 4(TCP/IPv4) and click Properties. 5. Click Obtain an IP address automatically and click OK. (Continue the following steps if using PPPoE) 6. 2-8 Return to the Network and Sharing Center and then click Set up a new connection or network.
7. Select Connect to the Internet and click Next. 8. Select Broadband (PPPoE) and click Next. 9. Enter your User name and, Password, and Connection name. Click Connect. 10. Click Close to finish the configuration. 11. Click the network icon in the taskbar and click the connection you just created. 12. Enter your user name and password. Click Connect to connect to the Internet.
Using a static IP: 1. 2 3. 4. 5. Repeat the step 1–4 of Using a dynamic IP to start the static IP network configuration. Click Use the following IP address. Enter the IP address, Subnet mask and Gateway from your service provider. If needed, enter the preferred DNS Server address and alternative address. After entering all the related values, click OK to build the network connection. Contact your Internet Service Provider (ISP) if you have problems connecting to the network.
ASUS Update Bluetooth Connection Super Hybrid Engine Eee Docking Microsoft® Office Trial Digital Zoom Control 3 Chapter 3: Using the Eee PC
ASUS Update The ASUS Update is a utility that allows you to manage, save, and update the Eee PC BIOS in Windows® environment. The ASUS Update utility allows you to: • Save the current BIOS file • Download the latest BIOS file from the Internet • Update the BIOS from an updated BIOS file • Update the BIOS directly from the Internet, and • View the BIOS version information. This utility is pre-loaded in your Eee PC and is also available in the support DVD that comes with the Eee PC package.
3. Select the ASUS FTP site nearest you to avoid network traffic, or click Auto Select. Click Next. 4. From the FTP site, select the desired BIOS version and click Next. 5. Follow the screen instructions to complete the update process. The ASUS Update utility is capable of updating itself through the Internet. Always update the utility to avail all its features. Updating the BIOS through a BIOS file To update the BIOS through a BIOS file: 1. 2. 3. 4.
Bluetooth Connection Bluetooth technology eliminates the need for cables for connecting Bluetooth-enabled devices. Examples of Bluetooth-enabled devices may be Notebook PCs, Desktop PCs, mobile phones, and PDAs. To connect to a Bluetooth-enabled device: 1. Press + repeatedly until Bluetooth ON or WLAN & Bluetooth ON is shown. 3-4 2. From Control Panel, go to Network and Internet > Network and Sharing Center and then click Change adapter settings in the left blue pane. 3.
4. Click Add a device to look for new devices. 5. Select a Bluetooth-enabled device from the list and click Next. 6. Enter the Bluetooth security code into your device and start pairing. 7. The paired relationship is successfully built. Click Close to finish the setting.
Super Hybrid Engine Super Hybrid Engine offers different power modes. The power saving modes control many aspects of your Eee PC to maximize performance versus battery time. The selected mode is shown on the display. To change the power mode • • • Click Start > All Programs > ASUS > EeePC > SuperHybridEngine > SuperHybridEngine. Right-click the Super Hybrid Engine icon in the Notification area, and select a preferred power mode. Press + .
Eee Docking (on selected models) Eee Docking contains multiple useful applications. The Eee Docking tool bar is at the top of the desktop. Eee Amuse Eee Sharing Eee Xperience Eee Tools • The applications in Eee Docking may vary depending on models. • The names of the applications in Eee Docking are subject to change without notice. Eee Amuse ASUS @Vibe ASUS @Vibe allows you to enjoy online entertainment contents including Radio, Live TV and Games, etc.
Eee Sharing ASUS WebStorage (on selected models) Eee PC users can enjoy free online space. With Internet connection, you can access and share any files whenever you want and wherever you are. The ASUS WebStorage help file is accessible only when your Eee PC connects to the Internet. Eee Xperience Eee Splendid Eee Splendid helps improve your Eee PC display in terms of the contrast, brightness, skin tone, and color saturation for red, green, and blue independently.
Eee Tools Live Update Live Update keeps your Eee PC up-to-date by checking the online updates. Font Resizer Font Resizer allows you to adjust the font/text size on your Eee PC screen. LocaleMe LocaleMe is a web mapping service application, offering easy search for streets or companies sorted by multiple categories all over the world. System Setting System Setting offers you quick access to the configuration of the desktop background and the Ad-hoc mode.
Microsoft® Office Trial Eee PC users can enjoy Microsoft Office Suite free trial for 60 days. Do the following instructions to start the free trial. 1. 2. Ensure that your Eee PC is connected to the Internet and doubleclick Microsoft Office 60 Day Trial - Online on the desktop. Click TRY NOW. 3. Enter your E-mail address and click SUBMIT. 4. Copy your product key and click the link. 5.
Digital Zoom Control Digital Zoom Control is a software that helps you control your built-in camera whenever it is in use. You can zoom, pan or tilt the camera with Digital Zoom Control. Function keys Zoom in or out Pan or tilt The following is the example when using E-Cam: You can use Digital Zoom Control when making a video call or having a video chat. Press + <1> to zoom in and + <2> to zoom out. ASUS Eee PC Press + to pan left and + to pan right.
Press + to tilt up. Press + to tilt down. Panning and tilting is only available when you have zoomed in the camera.
Support DVD information System Recovery Boot Booster 4 Chapter 4: Support DVD & System Recovery
Support DVD information The support DVD that comes with the Eee PC package contains the drivers, software applications, and utilities that you can install to avail all the features. Running the support DVD Insert the support DVD in the external optical drive. The DVD automatically displays the Drivers menu if Autorun is enabled in your computer.
Drivers menu The Drivers menu shows available device drivers when the system detects installed devices. Install the necessary drivers to activate the devices. Utilities menu The Utilities menu shows the applications that the Eee PC supports. Contact Click the Contact tab to display the ASUS contact information. Other information The icons on the top right corner of the screen provide additional information on the Eee PC and the contents of the support DVD.
System Recovery Disable Boot Booster in BIOS setup before you perform system recovery from USB flash disk, external optical drive or hidden partition. Refer to the end of this chapter for details. Using Recovery Partition (F9 Recovery) About the Recovery Partition The Recovery Partition is a space reserved on your hard disk drive used to restore the operating system, drivers, and utilities installed on your Eee PC at the factory.
1. Connect an external optical drive to your Eee PC and insert the Support DVD into the optical drive (System needs to be powered ON). 2. Press on bootup and Please select boot device: the Please select boot device HDD:PM-ST9160310AS screen appears. Select USB: USB:XXXXXXXX XXXXXX (may be labeled as the ODD brand name) to boot from the optical drive. Press ↑ and ↓ to move selection ENTER to select boot device and then press any key to continue. The ASUS Recovery CD/DVD window appears.
Boot Booster The Boot Booster item in BIOS setup helps shorten your Eee PC bootup time. However, you MUST disable this BIOS item before you change any Eee PC components or perform system recovery (from USB flash disk, external optical drive or hidden partition). Follow the instructions below to disable Boot Booster: 1. 2. Start the system and press on bootup to show the POST screen. Press again to enter the BIOS setup. Set Boot Booster to [Disabled].
Declarations and Safety Statements Copyright Information Limitation of Liability Service and Support A Appendix
Declarations and Safety Statements Federal Communications Commission Statement This device complies with FCC Rules Part 15. Operation is subject to the following two conditions: • This device may not cause harmful interference, and • This device must accept any interference received, including interference that may cause undesired operation.
(Reprinted from the Code of Federal Regulations #47, part 15.193, 1993. Washington DC: Office of the Federal Register, National Archives and Records Administration, U.S. Government Printing Office.) FCC Radio Frequency (RF) Exposure Caution Statement Any changes or modifications not expressly approved by the party responsible for compliance could void the user’s authority to operate this equipment. “The manufacture declares that this device is limited to Channels 1 through 11 in the 2.
Declaration of Conformity (R&TTE directive 1999/5/EC) The following items were completed and are considered relevant and sufficient: • • • • • • • Essential requirements as in [Article 3] Protection requirements for health and safety as in [Article 3.1a] Testing for electric safety according to [EN 60950] Protection requirements for electromagnetic compatibility in [Article 3.
IC Radiation Exposure Statement for Canada This equipment complies with IC radiation exposure limits set forth for an uncontrolled environment. To maintain compliance with IC RF exposure compliance requirements, please avoid direct contact to the transmitting antenna during transmitting. End users must follow the specific operating instructions for satisfying RF exposure compliance.
Wireless Operation Channel for Different Domains N. America 2.412-2.462 GHz Ch01 through CH11 Japan 2.412-2.484 GHz Ch01 through Ch14 Europe ETSI 2.412-2.472 GHz Ch01 through Ch13 France Restricted Wireless Frequency Bands Some areas of France have a restricted frequency band. The worst case maximum authorized power indoors are: • 10mW for the entire 2.4 GHz band (2400 MHz–2483.5 MHz) • 100mW for frequencies between 2446.5 MHz and 2483.
67 Bas Rhin 68 Haut Rhin 70 Haute Saône 71 Saône et Loire 75 Paris 82 Tarn et Garonne 84 Vaucluse 88 Vosges 89 Yonne 90 Territoire de Belfort 94 Val de Marne This requirement is likely to change over time, allowing you to use your wireless LAN card in more areas within France. Please check with ART for the latest information (www.art-telecom.fr) Your WLAN Card transmits less than 100mW, but more than 10mW.
Required for UL 1642 covering primary (nonrechargeable) and secondary (rechargeable) lithium batteries for use as power sources in products. These batteries contain metallic lithium, or a lithium alloy, or a lithium ion, and may consist of a single electrochemical cell or two or more cells connected in series, parallel, or both, that convert chemical energy into electrical energy by an irreversible or reversible chemical reaction. • Do not dispose the Eee PC battery pack in a fire, as they may explode.
Nordic Lithium Cautions (for lithium-ion batteries) CAUTION! Danger of explosion if battery is incorrectly replaced. Replace only with the same or equivalent type recommended by the manufacturer. Dispose of used batteries according to the manufacturer’s instructions. (English) ATTENZIONE! Rischio di esplosione della batteria se sostituita in modo errato. Sostituire la batteria con un una di tipo uguale o equivalente consigliata dalla fabbrica. Non disperdere le batterie nell’ambiente.
ATTENTION! Il y a danger d’explosion s’il y a remplacement incorrect de la batterie. Remplacer uniquement avec une batterie du mêre type ou d’un type équivalent recommandé par le constructeur. Mettre au rebut les batteries usagées conformément aux instructions du fabricant. (French) ADVARSEL! Eksplosjonsfare ved feilaktig skifte av batteri. Benytt samme batteritype eller en tilsvarende type anbefalt av apparatfabrikanten. Brukte batterier kasseres i henhold til fabrikantens instruksjoner.
Copyright Information No part of this manual, including the products and software described in it, may be reproduced, transmitted, transcribed, stored in a retrieval system, or translated into any language in any form or by any means, except documentation kept by the purchaser for backup purposes, without the express written permission of ASUSTeK COMPUTER INC. (“ASUS”).
Limitation of Liability Circumstances may arise where because of a default on ASUS’ part or other liability, you are entitled to recover damages from ASUS.