Grafikus kártya Szoftverhasználati útmutató
Hun1729 Első kiadás 2005 Copyright© 2005 ASUSTeK COMPUTER INC. Minden jog fenntartva. Az ASUSTeK COMPUTER INC. (“ASUS”) kifejezett írásos engedélye nélkül ennek a kézikönyvnek semmilyen részét -beleértve a benne leírt termékeket és szoftvert - nem szabad reprodukálni, továbbítani, átírni, adattároló rendszerben tárolni, vagy bármely nyelvre lefordítani bármilyen formában és bármilyen eszközzel, kivéve az olyan dokumentációt, amelyet a vevő biztonsági pótlás céljára tart.
Tartalom Megjegyzések ..................................................................................... iv Biztonsági tudnivalók ........................................................................... v Erről az útmutatóról ............................................................................ vi 1. 2. 3. 4. 5. 6. 7. ASUS GameFace Messenger .................................................... 1 1.1 Bevezetés .................................................................. 1 1.
Megjegyzések A Szövetségi Távközlési Bizottság (FCC) nyilatkozata Ez az eszköz megfelel az FCC előírásai 15. részének. A működtetés a következő két feltétellel történhet: • • Ez az eszköz nem okozhat káros interferenciát, és Ennek az eszköznek ki kell állnia minden vett interferenciát, beleértve a nem kívánatos működést okozó interferenciát. Ezt az eszközt megvizsgálták, és a B osztályú digitális eszközökre érvényes határértékek között maradt, az FCC előírásai 15. részének megfelelően.
Biztonsági tudnivalók Elektromos biztonság • Ha a rendszerhez eszközöket kapcsolunk vagy veszünk el belőle, ügyeljünk arra, hogy az eszközök hálózati tápkábeleit a jelkábelek csatlakoztatása előtt kihúzzuk. Ha lehetséges, a meglévő rendszer összes hálózati tápkábelét húzzuk ki, mielőtt egy eszközt csatlakoztatnánk hozzá. • Ügyeljünk arra, hogy a tápegység a megfelelő hálózati feszültségre legyen beállítva. Ha nem biztos a hálózati feszültség értékében, lépjen kapcsolatba a helyi áramszolgáltatóval.
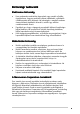
Erről az útmutatóról Az ebben az útmutatóban használt jelzések Annak érdekében, hogy Ön helyesen végezzen el bizonyos feladatokat, vegye figyelembe az ebben a használati utasításban használt következő szimbólumokat. FIGYELMEZTETÉS: olyan tudnivaló, amellyel megakadályozhatja a személyi sérülést egy feladat elvégzésekor. VIGYÁZAT: olyan tudnivaló, amellyel megakadályozhatja egy alkatrész megsérülését egy feladat elvégzésekor. F O N T O S : olyan tudnivaló, amelyet be KELL tartani egy feladat elvégzésekor.
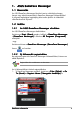
1. ASUS GameFace Messenger 1 . 1 Bevezetés Az ASUS GameFace Messenger lehetővé teszi a valósidejű szöveges, hangos vagy videó kommunikációt GameFace Messenger felhasználókkal. A program segítségével egyidejűleg lehet online játékot és többoldalú videokonferenciát folytatni. 1 . 2 Indítás 1.2.1 Az ASUS GameFace Messenger elindítása Az ASUS GameFace Messenger elindításához: Kattintson a S t a r t ( S t a r t ) gombra.
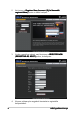
2 2. Kattintson az R e g i s t e r N e w A c c o u n t ( Ú j f e l h a s z n á l ó r e g i s z t r á l á s a ) pontra az alábbi honlapon. 3. Írja be a személyes adatait, majd kattintson a R E G I S T E R N O W ( R E G I S Z T R Á L Á S M O S T ) pontra, ha befejezte. 4. Kövesse a képernyőn megjelenő útmutatást a regisztrálás befejezéséhez.
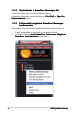
1.2.3 Bejelentkezés a GameFace Messenger-be A GameFace Messenger-be történő bejelentkezéshez: 1. Ha a GameFace Messenger-ben nincs az automatikus bejelentkezés beállítva az Internetre történő csatlakozáskor, Kattintson a F i l e (Fájl) > Sign In (Bejelentkezés) - vagy kattintson a C l i c k h e r e t o s i g n ( K a t t i n t s o n i d e a b e j e l e n t k e z é s h e z ) pontra a főmenüben. A következő ablak jelenik meg. 2.
1.2.4 Kijelentkezés a GameFace Messenger-ből A GameFace Messenger-ből történő kijelentkezéshez: A GameFace Messenger menüből kattintson a F i l e ( F á j l ) > S i g n O u t ( K i j e l e n t k e z é s ) pontra. 1.2.5 Felhasználók meghívása GameFace Messenger konferenciára Felhasználókat úgy hívhat meg GameFace Messenger konferenciára, ha: 4 1. A jobb egérgombbal az egyik online felhasználóra kattint. 2.
3. Az ASUS GameFace Messenger legfeljebb nyolc (8) felhasználó számára teszi lehetővé a csatlakozást a konferenciához. A következő képernyő négyfős konferenciát mutat. 4. Nyomja meg a képernyőmenü (OSD) gyorsbillentyűjét az OSD menü megjelenítéséhez. Jelölje ki a E n a b l e G a m e f a c e ( G a m e F a c e e n g e d é l y e z é s e ) jelölőnégyzetet a GameFace Messenger teljes képernyős játék alatti megjelenítéséhez.
1.2.6 A megjelenítendő név megváltoztatása A GameFace-ben megjelenítendő név megváltoztatásához: A GameFace Messenger menün kattintson az T o o l s ( E s z k ö z ö k ) > Change Display Name (A megjelenítendő név m e g v á l t o z t a t á s a ) pontra. Kövesse a képernyőn megjelenő útmutatásokat. 1.2.
1 . 3 Kapcsolatok 1.3.1 Új kapcsolat létrehozása Új kapcsolat létrehozásához: A GameFace Messengeren kattintson a C o n t a c t ( K a p c s o l a t ) > A d d a C o n t a c t ( K a p c s o l a t h o z z á a d á s a ) pontra. Kövesse a képernyőn megjelenő útmutatásokat. 1.3.2 Kapcsolat törlése Meglévő kapcsolat törléséhez: A GameFace Messenger menüből kattintson a C o n t a c t ( K a p c s o l a t ) > D e l e t e a C o n t a c t ( K a p c s o l a t t ö r l é s e ) pontra.
1.3.3 A kapcsolatok nézetének megváltoztatása A kapcsolatlista nézetének megváltoztatásához: A GameFace Messenger menüből kattintson a C o n t a c t ( K a p c s o l a t ) > V i e w C o n t a c t ( K a p c s o l a t m e g t e k i n t é s e ) pontra, majd jelölje ki a kapcsolatnak vagy a B y D i s p l a y N a m e ( M e g j e l e n í t e t t n é v )), vagy az B y E m a i l ( E m a i l c í m ) szerinti nézetét. 1.3.
1.3.5 Csoportok létrehozása A csoportok lehetővé teszik, hogy a kapcsolatait különböző kategóriákba szervezze. Az új csoport létrehozásához: A GameFace Messenger menüből kattintson a C o n t a c t ( K a p c s o l a t ) > C r e a t e a N e w G r o u p ( Ú j c s o p o r t l é t r e h o z á s a ) pontra. Kövesse a képernyőn megjelenő útmutatásokat. 1.3.
1.4.2 Fájl küldése Fájl küldéséhez: 1. 2. Kattintson kétszer az egyik online felhasználóra. Kattintson az T o o l s ( E s z k ö z ö k ) > S e n d a F i l e o r P h o t o ( F á j l v a g y f é n y k é p k ü l d é s e ) pontra. Kövesse a képernyőn megjelenő útmutatásokat a fájl vagy fénykép küldéséhez. 1.4.3 Email küldése Email küldéséhez: 1. Kattintson kétszer az egyik online felhasználóra. 2. Kattintson az T o o l s ( E s z k ö z ö k ) > S e n d E m a i l ( E m a i l k ü l d é s e ) pontra.
1 . 5 Beállítások 1.5.1 Általános beállítások Az általános beállítások megjelenítéséhez: 1. A GameFace Messenger menüből kattintson az T o o l s ( E s z k ö z ö k ) > Option (Opciók) > General Setting (Általános beállítások) pontra. A következő ablak jelenik meg. Kattintson a jelölőnégyzetre az engedélyezéshez vagy tiltáshoz Írja be az Ön megjelenítendő nevét Írja be a percek számát, mielőtt az Ön állapota "Away"-t (Távol) jelezne Kattintson a jelölőnégyzetre az engedélyezéshez vagy tiltáshoz 2.
1.5.2 Adatvédelmi beállítások Az adatvédelemi beállítások megjelenítéséhez: A GameFace Messenger menüből kattintson az T o o l s ( E s z k ö z ö k ) > Option (Opciók) > Privacy Setting (Adatvédelmi beállítások) pontra. A következő ablak jelenik meg. Kattintson a jelölőnégyzetre az engedélyezéshez vagy tiltáshoz Válasszon ki egy elemet a listából, majd kattintson az Allow (< > )).. 2.
1.5.3 Proxy beállítások A proxy beállítások megjelenítéséhez: A GameFace Messenger menüből kattintson az T o o l s ( E s z k ö z ö k ) > O p t i o n ( O p c i ó k ) > P r o x y S e t t i n g ( P r o x y b e á l l í t á s o k ) pontra. A következő ablak jelenik meg. Proxy szerver beállítása Írja be a proxy nevét és a portot Kattintson a jelölőnégyzetre az engedélyezéshez vagy tiltáshoz Írja be a felhasználónevet és a jelszót a hitelesítéshez 2.
1.5.4 Megjelenési beállítások A megjelenési beállítások megmutatásához: A GameFace Messenger menüből kattintson az T o o l s ( E s z k ö z ö k ) > Option (Opciók) > Skin Setting (Megjelenési beállítások) pontra. A következő ablak jelenik meg. Válasszon a rendelkezésre álló megjelenési lehetőségekből Kattintson rá a beállítás alkalmazásához 2.
1.5.5 GameFace beállítások A GameFace beállítások megjelenítéséhez: A GameFace Messenger menüből kattintson az T o o l s ( E s z k ö z ö k ) > Option (Opciók) > GameFace Setting (GameFace beállítások) pontra. A következő ablak jelenik meg. Gyorsbillentyűk megadása Kattintson a jelölőnégyzetre az engedélyezéshez vagy tiltáshoz Jelölje ki a videó- és a bemeneti eszközt Jelölje ki a hangeszközt A csúszkán állítsa be a felvételi hangerőt 2.
2. ASUS Splendid 2 . 1 Bevezetés Az ASUS Splendid videó-tökéletesítő technológia jelentősen javítja az Ön rendszerének megjelenítési minőségét. A Splendid segítségével megjelenítési üzemmódokat állíthat be, használhat dinamikus kontrasztot, és kiemelhet egyes területeket a képernyőn. 2 . 2 Az ASUS Splendid elindítása Az ASUS Splendid elindításához: 1. 16 Kattintson a S t a r t ( S t a r t ) gombra.
2. Jelölje ki az A S U S fület, majd az A S U S S p l e n d i d d-et a következők megjelenítéséhez. Súgó Az ASUS Splendid engedélyezése vagy tiltása A dinamikus kontraszt engedélyezése A kijelzett terület beállítása Az üzemmód kiválasztása (lásd az alábbi táblázatban a részleteket) Előnézeti képernyő Splendid üzemmód táblázata ÜZEMMÓD Leírás Enriched (Gazdagított) Otthoni szórakoztató rendszerekhez. Vivid Colors (Élénk színek) Javítja a telítettséget és a kontrasztot a telítettebb színek érdekében.
18 ASUS grafikus kártya
3. ASUS OSD (Képernyőmenü) 3 . 1 Bevezetés Az ASUS OSD (Képernyőmenü) segítségével Ön dinamikusan állíthat a megjelenítési jellemzőkön teljes képernyős 3D és OpenGL játékok futtatása közben is. 3 . 2 Az ASUS OSD engedélyezése Az ASUS OSD elindításához: 1. 2. 3. 4. 5. Kattintson a S t a r t ( S t a r t ) gombra. Menjen a C o n t r o l P a n e l ( V e z é r l ő p u l t r a )), és töltse be a D i s p l a y ( M e g j e l e n í t é s t )).
4. ASUS GameLiveShow 4 . 1 Bevezetés Az ASUS GameLiveShow lehetővé teszi a felhasználók számára, hogy teljes képernyős játékok játszása közben a játékélményt valós időben, élőben megosszák egymással. A távoli GameFaceLive adásokat az Internet Explorer böngészővel lehet figyelemmel kísérni. A GameReplay szolgáltatás a játékmenet rögzítésére és visszajátszására szolgál. 4 . 2 Indítás 4.2.
4.2.3 A GameReplay beállítása A GameReplay beállítások menüje lehetővé teszi a felbontás, a képsebesség, a fájlkönyvtár és a GameReplay gyorsbillentyű beállítását. Kattintson a G A M E R E P L A Y S E T U P ( G A M E R E P L A Y B E Á L L Í T Á S ) ikonra a következők megjelenítéséhez. A beállítási lehetőségek kijelzése Írja be a mentési célkönyvtár nevét, vagy kattintson a gombra a tallózáshoz Felbontás beállítása Képsebesség megváltoztatása Beállítások mentése 4.2.
4.2.5 A GameReplay engedélyezése az OSD-n A GameReplay engedélyezéséhez az OSD: 1. 2. 3. 22 Teljes képernyős játék alatt indítsa el az ASUS OSD-t az OSD gyorsbillentyűk segítségével. Jelölje ki a G a m e L i v e S h o w S e t t i n g ss-at ( G a m e L i v e S h o w B e á l l í t á s o k )), majd jelölje be a E n a b l e G a m e R e p l a y y-t ( G a m e R e p l a y e n g e d é l y e z é s é )). Nyomja le a GameReplay gyorsbillentyűket (Ctrl+Alt+S) a rögzítés elindításához vagy leállításához.
4.2.6 A GameLiveShow engedélyezése az OSD-n Mielőtt más kliensek az Ön adását megtekinthetnék, indítsa el a Képernyőmenüt (OSD), és engedélyezze a GameLiveShow-t. A GameLiveShow engedélyezéséhez az OSD-n: 1. 2. Teljes képernyős játék alatt indítsa el az ASUS OSD-t az OSD gyorsbillentyűk segítségével.
4.2.7 Távoli kliens beállítása Mielőtt Ön megtekinthetné egy másik felhasználó távoli GameLiveShowadását, be kell állítania az Internet Explorer biztonsági opcióit. Az Internet Explorer böngésző konfigurálásához: 1. 2. 24 Indítsa el az Internet Explorert. Kattintson az T o o l s ( E s z k ö z ö k ) > I n t e r n e t O p t i o n ss-ra ( I n t e r n e t b e á l l í t á s o k )). 3.
7. Kattintson az C u s t o m L e v e l ( E g y é n i s z i n t ) gombra a Biztonsági beállítások ablak megjelenítéséhez. 8. Engedélyezze az összes elemet, majd kattintson az O K K-re ( O K )). Kattintson az O K K-re ( O K ) Az internet-beállítások párbeszédablakból történő kilépéshez. 9.
4.2.8 Távoli kliens adásának megtekintése Miután konfigurálta az Internet Explorer biztonsági beállításait, elkezdheti egy távoli GameLiveShow adás megtekintését. A távoli adás megtekintéséhez: 26 1. Az Internet Explorer címsorába írja be annak a számítógépnek az IP címét, amelyik GameLiveShow-adást sugároz. 2. Nyomja le a Lejátszás gombot a megtekintés elkezdéséhez.
5. ASUS SmartDoctor Az ASUS SmartDoctor arra tervezték, hogy felügyelje az Ön grafikus kártyájának a hőmérsékletét, a feszültségét és a ventilátor állapotát. Ez a segédprogram intelligensen szabályozza a GPU (grafikus feldolgozóegység) hűtését, és lehetővé teszi, hogy Ön beállítsa a grafikus kártya órajelét. 5.1 • Funkciók Felügyeli a grafikus lapka hőmérsékletét, a ventilátor sebességét és a feszültséget.
6. ASUS SmartDoctor A segédprogram egyszerűen használható menüvel rendelkezik a képességeinek kihasználásához. 6.1 A feszültség állapota Kattintson a V o l t a g e s t a t u s ( F e s z ü l t s é g á l l a p o t a ) fülre a grafikus kártya feszültsége állapotának megjelenítéséhez. 6.2 • Az AGP busz VDDQ feszültségét és az AGP busz 3,3 V-os feszültségét az alaplapnak állandóan biztosítania kell. A rendszer különben összeomlik.
6.3 A ventilator sebességének állapota Kattintson a F a n s p e e d ( V e n t i l á t o r s e b e s s é g e ) fülre a grafikus kártya jelenlegi ventilátorsebességének megjelenítéséhez. 6.4 A grafikus mag és a memória órajelének állítása Kézzel állítható a videókártya grafikus magjának (GPU) és mamóriájának órajele a grafikus kártya teljesítményének növeléséhez. A mag és a memória órajelének állításához: 1. 2 A E n g i n e ( M a g ) órajel csúszkáját mozgassa a mag órajelének állításához.
6.5 Speciális beállítások A SmartDoctor Beállítások párbeszédablakának megnyitásához kattintson a -ra a SmartDoctor menüben. 6.5.1 Beállítások A beállítások megváltoztatásához kattintson a S e t t i n g s ( B e á l l í t á s o k ) fülre a SmartDoctor Beállítások párbeszédablakában. A felügyelet beállításai A felügyelet beállításának megváltoztatásához: 1.
6.5.2 Felügyelet A feszültség, hőmérséklet és ventilátor-sebesség felügyelet beállításainak megváltoztatásához: 1. Kattintson a M o n i t o r ( F e l ü g y e l e t ) fülre a a SmartDoctor Beállítások párbeszédablakában. Feszültség riasztás beállításai • • Jelölje be a jelölőnégyzetet az AGPVDDQ (AGP kártyákhoz) vagy a PCIE 12V (PCIE kártyákhoz), VCC, FBVDDQ vagy VCORE feszültségi riasztásának engedélyezéséhez vagy tiltásához. Mozgassa a csúszkát a feszültség százalékos hibájának beállításához.
6.5.3 A ventilátor vezérlése A ventilátor vezérlési beállításainak megváltoztatásához: 1. Kattintson a F a n C o n t r o l ( V e n t i l á t o r v e z é r l é s e ) fülre a SmartDoctor Beállítások párbeszédablakában. 2. Kattintson az opciók gombjaira a ventilátor vezérlésének kiválasztásához. A ventilátor vezérlésének három lehetősége van: Kézi üzemmód, Intelligens hűtés, és Automatikus ventilátor-vezérlés.
6.5.4 HyperDrive Az ASUS HyperDrive beállítások megváltoztatásához: 1. Kattintson a H y p e r D r i v e fülre a SmartDoctor Beállítások párbeszédablakában. ASUS HyperDrive A HyperDrive aktiválásához: 1. 2. Kattintson a E n a b l e H y p e r D r i v e ( H y p e r D r i v e e n g e d é l y e z é s e ) jelölőnégyzatre a HyperDrive funkció engedélyezéséhez vagy tiltásához. Kattintson az opciógombokra a HyperDrive üzemmód kijelöléséhez.
3. 4. 5. 34 Ha a HyperDrive engedélyezve van, engedélyezheti a M a n u a l H y p e r D r i v e C l o c k R a t e ( K é z i H y p e r d r i v e ó r a f r e k v e n c i á t )), és a csúszkával beállíthatja a frekvenciát. Kattintson az D e f a u l t ( A l a p é r t e l m e z e t t ) gombra az optimális értékek betöltéséhez. Kattintson az A p p l y ( A l k a l m a z ) gombra a beállítások alkalmazásához, vagy kattintson az O K K-re ( O K ) a beállítások elmentéséhez és a kilépéshez.
7. ASUS Video Security Online 7.1 Az ASUS Video Security elindítása Az ASUS Video Security elindításához: A Windows eszközsorán kattintson a S t a r t gombra, majd jelölje ki a A l l Programs (Programok) -> ASUS -> ASUS Video Security - > A S U S V i d e o S e c u r i t y pontot a következő menü megjelenítéséhez.
7.2 Beállítás Az ASUS Video Security beállítási ablakának megjelenítéséhez kattintson a -ra az ASUS Video Security menüben. 7.2.1 Fő beállítások A fő beállítások rész lehetőséget ad az érzékelési érzékenység, az érzékelési időköz és a munkakönyvtár beállítására. Ez a rész tartalmazza azokat a jelölőnégyzeteket, amelyekkel a különböző képességeket engedélyezheti, köztük a riasztást, az automatikus indítást, a többcélú eszközök használatát és az érzékelési késleltetés beállítását.
• A hőmérséklet és a megvilágítás befolyásolhatják a megfigyelést. • A videó felvételi eszköz minősége szintén nagyon fontos az érzékenység beállításánál. • Az optimális teljesítmény érdekében próbáljon ki különböző értékeket ennek a paraméternek a finomhangolásához. Az érzékelési időköz paraméter beállítása Az érzékelési időköz paraméter beállításához: Mozdítsa el az D e t e c t i n g i n t e r v a l ( É r z é k e l é s i i d ő k ö z ) csúszkát.
Más jellemzők beállítása Az automatikus indítás, valamint több érzékelő egyidejű használatának engedélyezéséhez vagy tiltásához, és/vagy az érzékelési késleltetés beállításához: • Kattintson az A u t o r u n d e t e c t w h e n p r o g r a m r u n ( A u t o m a t i k u s i n d í t á s , h a a p r o g r a m f u t ) jelölőnégyzetre az ASUS Video Security automatikus indítási képességének engedélyezéséhez vagy tiltásához.
7.2.2 Üzemmód Az Üzemmód rész lehetővé teszi, hogy Ön az érzékelési és nyomkövetési módszert konfigurálja. Az Üzemmód beállításainak módosításához kattintson az M o d e ( Ü z e m m ó d ) pontra az ASUS Video Security beállítási párbeszédablakában. A következő almenü jelenik meg: Az érzékelési üzemmód beállítása Az érzékelési üzemmód beállításához: Kattintson a kívánt üzemmód választógombjára.
A nyomkövetési módszer beálltása A nyomkövetési módszer beállításához: Az engedélyezéshez kattintson a S t a r t t r a c i n g w h e n e v e r a condition is detected (Feltétel bekövetkezésekor kezdje el a n y o m k ö v e t é s t ) jelölőnégyzetre.
7.2.3 Email beállítás Az Email beállítás rész a szükséges email jellemzőket tartalmazza levélküldéshez, ha engedélyezve avn az email riasztási képesség. Az email beállítások módosításához kattintson az E m a i l S e t t i n g ( E m a i l b e á l l í t á s o k ) pontra a beállítási párbeszédablakban. A következő almenü jelenik meg: Az email riasztási képesség használata Az email riasztási képesség használatához: 1.
2. 3. Kattintson az E m a i l S e t t i n g ( E m a i l b e á l l í t á s o k ) pontra a beállítási párbeszédablakban, majd a jelölőnégyzet bejelölésével engedélyezze az S e n d o u t a n e m a i l a s w a r n i n g ( E m a i l k ü l d é s é t r i a s z t á s k o r )). Írja be a címzett(ek) email címe(i)t, a tárgyat és az üzenet tartalmát.
4. Kattintson a S e n d i n g M a i l S e t t i n g s ( L e v é l k ü l d é s b e á l l í t á s a i ) pontra az email paraméterek konfigurálásához. A következő ablak jelenik meg: Ha szükséges, lépjen kapcsolatba a rendszeradminisztrátorával a hitelesítéshez és a szerver más paramétereinek beállításaihoz. 4.1 Szerver beállításai Az Ön emailjének elküldéséhez szükséges paramétereket és protokollokat tartalmazza.
4.2 Egyéb szerverbeállítások Az Misc (Egyéb) csoport különféle paramétereket és szerverbeállításokat tartalmaz. A paraméterek leírása a következő: Auto Connect to the Internet (Automatikus csatlakozás a z I n t e r n e t r e ) – ha engedélyezve van, a segédprogram ellenőrzi, hogy létezik-e már kapcsolat az Internethez. Ha a kapcsolat az Ön IPje és a címzett levelezőszerver között létrehozható, a segédprogram automatikusan tárcsáz.
7.2.4 Rögzítés beállításai A Rögzítés beállításai rész olyan paramétereket tartalmaz, amelyek lehetővé teszik a rögzítés hosszának konfigurálását, ha egy feltétel bekövetkezését érzékeli. A rögzítési paraméterek beállításához kattintson a R e c o r d s e t t i n g ( R ö g z í t é s i b e á l l í t á s o k ) pontra a beállítási párbeszédablakban. A következő almenü jelenik meg: A rögzítési paraméterek beállításához: 1.
7.2.5 Eszköz beállításai Az Eszköz beállításai rész lehetővé teszi a videórögzítő eszköz és a színek beállítását. A videórögzítő eszköz vagy a színek beállításához kattintson az D e v i c e S e t t i n g ( E s z k ö z b e á l l í t á s a ) pontra az ASUS Video Security beállítási párbeszédablakban. A következő almenü jelenik meg: A rögzítőeszköz konfigurálása Az eszköz konfigurálásához: 1. Kattintson az D e v i c e s ( E s z k ö z ö k ) választólistára a videórögzítő eszköz kiválasztásához. 2.
3. A csúszkával állíthatja a világosságot, a telítettséget, a kontrasztot vagy a színárnyalatot. - VAGY Kattintson az D e f a u l tt-re ( A l a p é r t e l m e z e t t r e ) az ajánlott értékek betöltéséhez. 4. Ha befejezte, kattintson az O K K–re ( O K ) a beállítások mentéséhez és a kilépéshez.
7.2.6 Haladó beállítások A Haladó beállítások HTTP beállításokat és paramétereket tartalmaz. Ezeknek a pontoknak a konfigurálásához kattintson a A d v a n c e d ( S p e c i á l i s ) fülre a beállítási oldalon. Ha szükséges, hívja segítségül a rendszeradminisztrátorát. A HTTP szerver beállítása A HTTP szerver engedélyezéséhez és paraméterei beállításához: 1. Kattintson a E n a b l e H T T P S e r v e r ( H T T P s z e r v e r e n g e d é l y e z é s e ) jelölőnégyzetre. 2. 3. 4. 5.
7.3 Videójel forrásának beállításai A Videójel forrása menü felsorolja a rendszerre telepített, rendelkezésre álló videóeszközöket. Ezek közül választhatja ki a megfelelő jelforrást. 7.3.1 Videójel forrásának kiválasztása A videójel forrásának kiválasztásához: 1. Kattintson a V i d e o S o u r c e e-ra ( V i d e ó j e l f o r r á s á ) a Video Security főmenüjében. 2. A felugró menüben válasszon a rendelkezésre álló videójel-forrásokból.
7.4 Érzékelési terület beállítása Az érzékelési terület olyan, a felhasználó által meghatározott terület (vagy területek) amelyen a Video Security a feltételek változását figyeli. Az érzékelési terület tulajdonságainak konfigurálásához kattintson az S e t d e t e c t r e g i o n ( É r z é k e l é s i t e r ü l e t b e á l l í t á s a ) pontra a Video Security főmenüben. A következő párbeszédablak jelenik meg. Az érzékelési terület beállításához: 1.
2. Kattintson az S e t d e t e c t r e g i o n ( É r z é k e l é s i t e r ü l e t b e á l l í t á s a ) pontra a Video Security főmenüben az Shape Properties (Alak tulajdonságai) párbeszédablak megjelenítéséhez. 3. Kattintson a választógombokra a terület fajtájának a beállításához. 4. Kattintson a választógombokra az alak fajtájának a beállításához. 5. Kattintson a választógombokra a rajzolás módjának a beállításához. 6. Kattintson az O K K-re ( O K ) a beállítások alkalmazásához.
7. Kattintson és húzza az egeret egy területre az érzékelési terület beállításához. Érzékelési terület Legfeljebb tíz (10) érzékelési területet lehet beállítani. 8. 52 Kattintson a -ra a felügyelet elindításához.
Előzmények Az érzékelési területen rögzített felvételek listáját tartalmazza. Az alábbiak a főmenü H i s t o r y ( E l ő z m é n y e k ) részét írják le. Kattintson az előzőleg rögzített felvételek kijelöléséhez Kattintson az összes előzményfájl törléséhez Kattintson a kép vagy videó megtekintéséhez Kattintson a felvétel törléséhez 1. Más rögzített felvételek kijelöléséhez kattintson a rögzítés dátumával és időpontjával megjelölt választólistára. 2.
54