LED projector E-Manual 0.
E14384 First Edition March 2019 COPYRIGHT AND WARRANTY INFORMATION No part of this manual, including the products and software described in it, may be reproduced, transmitted, transcribed, stored in a retrieval system, or translated into any language in any form or by any means, except documentation kept by the purchaser for backup purposes, without the express written permission of ASUSTeK COMPUTER INC. (“ASUS”).
Table of Contents About this manual.............................................................................................. 5 Conventions used in this manual................................................................ 6 Typography.......................................................................................................... 6 Multi-language versions................................................................................. 6 Safety precautions.....................................
Chapter 3: Using the onscreen display menu Using your LED projector for the first time..............................................38 Adjusting your LED projector's settings...................................................39 Onscreen display menu options..................................................................40 Image Display Input System .............................................................................................................40 ..............................................
About this manual This manual provides information about the hardware and software features of your LED projector through the following chapters: Chapter 1: Knowing your LED Projector This chapter details the parts of your LED projector and its accompanying remote control. Chapter 2: Setting up This chapter shows you how to set up your LED projector and use its parts for input device connection.
Conventions used in this manual To highlight key information in this manual, some text are presented as follows: IMPORTANT! This message contains vital information that must be followed to complete a task. NOTE: This message contains additional information and tips that can help complete tasks. WARNING! This message contains important information that must be followed to keep you safe while performing tasks and prevent damage to your LED projector's data and components.
Safety precautions Using your LED projector • Refer to the manual and take note of the safety instructions before operating your LED projector. • Follow the notes and warnings stated in the user manual. • Do not place your LED projector on uneven or unstable surfaces. • Do not use your LED projector in smoky environments. Smoke residue may cause build-up on critical parts and damage the LED projector or decrease its performance.
Caring for your LED projector • Switch off then unplug the LED projector from the power outlet before cleaning it. • When cleaning the LED projector’s housing, use a clean soft cloth dampened with water or a mix of water and neutral detergent. Wipe it dry using a soft dry cloth. • Ensure that the lens is cool before cleaning it. Gently wipe the lens using a lens cleaning paper. Do not touch the lens with your hands. • Do not use liquid or aerosol cleaners, benzene, or thinners on your LED projector.
Chapter 1: Knowing your LED projector Chapter 1: Knowing your LED projector LED projector E-Manual 9
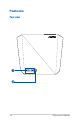
Features Top view 10 LED projector E-Manual
Control panel buttons These buttons correspond to a specific LED projector setting as indicated below. Keystone Input Power NOTE: In the event that your LED projector becomes unresponsive, unplug the power cord and wait until your LED projector shuts down. Joystick This joystick allows you to navigate the onscreen display menu and select menu settings. This joystick also correspond to specific LED projector settings as indicated below.
Front view 0. 8: 1S HO R TH RO W EN S Lens cover The lens cover protects the lens from scratches and possible dirt build-up. IMPORTANT! Remove the lens cover before using your LED projector. Lens The lens projects video or image files onscreen from your input device. WARNING! Do not touch the lens using your hands or any sharp object. Auto focus camera This camera helps the LED projector with the auto focus feature.
Rear view Power (DC) input port Insert the bundled power adapter into this port to supply power to your LED projector. WARNING! The adapter may become warm to hot while in use. Do not cover the adapter and keep it away from your body while it is connected to a power source. IMPORTANT! Use only the bundled power adapter to supply power to your LED projector.
Power output port This power output port provides up to 5V/2A of output voltage and current. You can connect your mobile device to this port to keep it charged. VGA port This port allows you to connect your LED projector to other VGA-compatible devices. Audio output jack port The audio output jack port allows you to connect your LED projector to amplified speakers or headphones. Left side Air vents The air vents allow cool air to enter and warm air to exit your LED projector.
Right side Kensington® security slot The Kensington® security slot allows you to secure your LED projector using Kensington® compatible LED projector security products. Air vents The air vents allow cool air to enter and warm air to exit your LED projector. WARNING! Ensure that paper, books, clothing, cables, or other objects do not block any of the air vents or else overheating may occur.
Bottom view Built-in stand This LED projector comes with a built-in stand that allows you to adjust the height of the projector by either 5.7 degrees or 8.2 degrees. Ceiling mount holes Use these holes to connect the LED projector to a ceiling mount. Tripod socket Connect the LED projector to a tripod using this socket.
AURA RGB LED The AURA RGB LED provides several lighting schemes for you to customize your LED projector. NOTE: For more details on customizing the AURA RGB LED, refer to the Using the onscreen display menu section in this manual. Mounting your LED projector Aside from using the LED projector as a tabletop device, you can also mount it on the ceiling using the ceiling mount holes on its bottom side. IMPORTANT! Ask a specialist or your retailer for assistance when mounting your LED projector to the ceiling.
Projecting files from a mounted position After mounting your LED projector, you need to change its image position settings to ensure that files are automatically flipped and projected correctly onscreen. To change your image position settings: 1. Navigate to Display > Projection Position on your LED projector. 2. Select Front Ceiling or Rear Ceiling to change the settings of your LED projector.
LED projector remote control NOTE: Actual appearance may vary depending on model. Battery compartment The battery compartment allows you to use CR2032 lithium coin batteries to power your LED projector’s remote control. NOTE: For more details on using the battery compartment, refer to the Replacing the battery section in this manual.
Remote control buttons These additional buttons allow you to use the LED projector from a distance of up to 8 meters. Power - Press this button to turn your LED projector on or off. Auto focus - Press this button to automatically focus the image. / Back/Splendid - Press this button to go back to the previous screen or select a Splendid mode for your LED projector. Keystone - Press this button to adjust the keystone of your projection onscreen. Input - Press this button to change the input source.
Replacing the battery A. Slide the battery cover down and remove it completely. B. Remove the old batteries.
C. Insert the new CR2032 lithium coin batteries with the positive sides (+) facing up. D. Slide the battery cover up all the way in until you hear a soft click, indicating that the battery cover is locked back in place.
Remote control effective range The remote sensor is located on the rear of your LED projector. The remote control must be held at an angle of ±30 degrees perpendicular to the projector’s remote control to function correctly. The distance between the remote control and the sensor should not exceed 8 meters (about 26 feet). NOTE: Ensure sure that there are no obstacles between the remote control and the remote sensor on your LED projector.
LED projector E-Manual
Chapter 2: Setting up Chapter 2: Setting up LED projector E-Manual 25
Operating your LED projector For your safety and to maintain the quality of this unit, refer to the following steps when operating your LED projector. Connect the LED projector to the power adapter A. Connect the AC/DC power cord to the power adapter. B. Connect the AC power cord to a power source. C. Connect the DC power connector to your LED projector. Power adapter information: - Input voltage: 100-240Vac - Input frequency: 50-60Hz - Rating output current: 6.32A max.
AC power cord requirements Use the correct AC plug type according to your current location. IMPORTANT! Contact your sales dealer if the AC power cord bundled with your LED projector does not match your local power source. NOTE: We highly recommend that you use a video source device that also uses a grounding type plug to prevent signal interference due to voltage fluctuations. For Australia and Mainland China For U.S.A., Canada, and Taiwan For Continental Europe For U.K.
Connect the LED projector to your device A.
B.
C.
D.
Adjust the height of the LED projector Your LED projector comes with a built-in stand that helps adjust the image height onscreen. WARNING! Ensure that the built-in stand is fully retracted before placing the LED projector inside the projector bag. NOTES: 32 • Place the LED projector on a stable flat surface. • Keep a space of 30 cm or more between the sides of the LED projector. • Consult your dealer for special installation procedures like suspending the LED projector from the ceiling.
Screen size and projection distance table Adjust the LED projector’s distance from the screen using the table below. Screen size LED projector Projection distance Screen Size Screen Diagonal Width inch cm inch 25” 63.5 ft m 21.79 55.35 12.26 31.13 1.41 0.45 56.5” 143.51 49.24 125.08 27.70 70.36 3.28 1.00 65” 165.1 56.65 143.9 31.87 80.94 3.773 1.15 80” 203.2 69.73 177.11 39.22 99.62 4.66 1.42 87.16 221.38 49.03 124.53 5.81 1.
Press the power button 34 LED projector E-Manual
Adjust the image focus Push the focus button on the LED projector up or down, or press the focus button on the remote control to adjust the image focus. NOTE: Use a still image when adjusting the onscreen display.
LED projector E-Manual
Chapter 3: Using the onscreen display menu Chapter 3: Using the onscreen display menu LED projector E-Manual 37
NOTE: The following screenshots are for reference only and may be updated without prior notice. Screenshots may also vary depending on the LED projector model. Using your LED projector for the first time Refer to the following steps when using your LED projector for the first time. NOTE: Ensure that your LED projector is connected to the power adapter before turning it on for the first time. We strongly recommend that you use a grounded wall socket while using your LED projector on power adapter mode. 1.
Adjusting your LED projector's settings To adjust your LED projector settings: 1. Press the center of the joystick on your LED projector (or press the Menu/OK button on your remote control) to launch the onscreen display menu. 2. Move the joystick up or down (or press the Focus up/Up or Focus down/Down button on your remote control) to select the menu option you would like to adjust. 3.
Onscreen display menu options Image The options under this menu allows you to adjust image options to fine tune your image projection onscreen. • Brightness - Select this menu option to adjust the brightness of your projection onscreen. • Contrast - Select this menu option to adjust the contrast of your projection onscreen. • Saturation - Select this menu option to adjust the saturation of your projection onscreen.
• Wall Color - This option allows you to choose a proper color according to the wall. • Gamma - Select this menu option to adjust the gamma of your projection onscreen. Display The options under this menu allows you to adjust how the image projection will be displayed. • Auto Focus - This option allows you to turn Auto Focus on or off. • Projection Position - This option allows you to change the way your projections are oriented onscreen based from the current location of your LED projector.
• Digital Zoom - This option allows you to zoom in, zoom out, and pan your projection onscreen. • 3D - Select this menu option to adjust 3D settings of your projection onscreen. Input The options under this menu allows you to select the input source for your LED projector. • Auto Source - This option allows you to turn Auto Source on or off. Turn this option on to scan the connected devices to your LED projector automatically. • VGA/PC - Select this menu option to project images from the VGA port.
System The options under this menu allows you to configure system settings for your LED projector. • OSD Timeout - This option allows you to set the number of seconds before the onscreen display menu disappears from your projection screen. • Sound - This option allows you to adjust the projector sound settings. • Auto Power On - This option allows the LED projector to automatically turn on when it is connected to a power source.
• Information - Select this menu option to see an overview of information about your LED projector. • Reset all - This option allows you to reset all the settings you have currently set up for your LED projector. NOTE: Please wait for at least eight (8) seconds for the reset process to complete, then reselect a language.
Turning off your LED projector 1. Press the power button. 2. When the following screen appears, press the power button again to completely turn off your LED projector.
Using 3D glasses Your LED projector supports 3D technology for an enhanced viewing experience. IMPORTANT! Purchase DLP Link 3D glasses. Your 3D files must be compatible with the 3D format. NOTE: For more details on viewing 3D files, refer to the user guide that comes with your 3D glasses. To view 3D files: 1. Play your 3D file, then navigate to Display > 3D on your LED projector. NOTE: The 3D mode is set to Off by default. 2.
Multi-language versions Download other language versions of this E-Manual via this website: https://www.asus.
LED projector E-Manual
Appendices Appendices Appendices LED projector E-Manual 49
Federal Communications Commission Statement This equipment has been tested and found to comply with the limits for a class B digital device, pursuant to Part 15 of the Federal Communications Commission (FCC) rules. These limits are designed to provide reasonable protection against harmful interference in a residential installation.
Compliance Statement of Innovation, Science and Economic Development Canada (ISED) This device complies with Innovation, Science and Economic Development Canada licence exempt RSS standard(s). Operation is subject to the following two conditions: (1) this device may not cause interference, and (2) this device must accept any interference, including interference that may cause undesired operation of the device.
Global Environmental Regulation Compliance and Declaration ASUS follows the green design concept to design and manufacture our products, and makes sure that each stage of the product life cycle of ASUS product is in line with global environmental regulations. In addition, ASUS disclose the relevant information based on regulation requirements. Please refer to http://csr.asus.com/english/Compliance.
Specifications for F1 series LED projector F1 Display Projection Lens Display Technology 0.47” DLP® Light Source R/G/B LED Light Source Life 30,000 hours (Max) True Resolution (native) FHD 1920x1080 Light Output (Max) 1200 Lumens Contrast Ratio 3500:1(DCR), 800:1 (Typical) Color Saturation (NTSC) 100% Display Colors 16.7 Million Colors Throw Ratio (@16:9) 0.8:1 (56.5” @ 1m) Projection Distance 0.43 ~ 3.
Analog Signal Frequency F1 Horizontal: 15.37 ~ 91.14 KHz Vertical: 24 ~ 60 Hz Digital Signal Frequency Horizontal: 15.37 ~ 91.14 KHz Vertical: 24 ~ 120 Hz Power On Mode <120W Standby Mode <0.5W Noise Acoustic Noise Standard mode: 32dB - 34dB Theater mode: 28dB - 30dB Input or Output PC Signal Input 1 x D-sub 2 x HDMI (HDCP support) Audio Out Earphone out USB port Yes (1 x Type A for 5V/2A charging) Wi-Fi 802.11 a/b/g/n @ 2.
F1 Weight Net Weight (Esti.) 1.80 Kg Gross Weight (Esti.) 3.80 Kg Operating Temperature 0 ~ 40o C Operating Humidity 20 ~ 90% Accessories Carrying bag, power adapter, power cord, HDMI cable, Quick Start Guide, remote control, warranty card * Specifications are subject to change without prior notice. ** Product availability may vary by region. *** All brand and product names mentioned are trademarks of their respective companies.
Supported PC Timings VGA Resolution 720 x 400 640 x 480 800 x 600 1024 x 768 1152 x 864 1280 x 720 1280 x 800 1280 x 1024 1280 x 960 1360 x 768 1440 x 900 1600 x 1200 1680 x 1050 640 x 480@67Hz 832 x 624@75Hz 1024 x 768@75Hz 1920 x 1080@60Hz Mode 720 x 400_70 VGA_60 VGA_72 VGA_75 SVGA_60 SVGA_72 SVGA_75 XGA_60 XGA_70 XGA_75 1152 x 864_60 1280 x 720_60 1280 x 720_120 WXGA_60 SXGA_60 SXGA_75 1280 x 960_60 1360 x 768_60 WXGA+_60 UXGA 1680 x 1050_60 MAC13 MAC16 MAC19 1920 x 1080_60 Refresh rate (Hz) 70.
HDMI (PC) Resolution 720 x 400 640 x 480 800 x 600 1024 x 768 1152 x 864 1280 x 720 1280 x 800 1280 x 1024 1280 x 960 1360 x 768 1440 x 900 1680 x 1050 640 x 480@67Hz 832 x 624@75Hz 1024 x 768@75Hz 1920 x 1080@60Hz Mode 720 x 400_70 VGA_60 VGA_72 VGA_75 SVGA_60 SVGA_72 SVGA_75 XGA_60 XGA_70 XGA_75 1152 x 864_60 1280 x 720_60 1280 x 720_120 WXGA_60 SXGA_60 SXGA_75 1280 x 960_60 1360 x 768_60 WXGA+_60 1680 x 1050_60 MAC13 MAC16 MAC19 1920 x 1080_60 Refresh rate (Hz) 70.087 59.94 72.809 75 60.317 72.
Simplified EU Declaration of Conformity ASUSTek Computer Inc. hereby declares that this device is in compliance with the essential requirements and other relevant provisions of Directive 2014/53/EU. Full text of EU declaration of conformity is available at https://www.asus.