E-Handbuch
G8154 April 2013 URHEBERRECHTINFORMATIONEN Kein Teil dieses Handbuchs, einschließlich der darin beschriebenen Produkte und Software, darf ohne ausdrückliche schriftliche Genehmigung von ASUSTeK COMPUTER INC. (“ASUS”) mit jeglichen Mitteln in jeglicher Form reproduziert, übertragen, transkribiert, in Wiederaufrufsystemen gespeichert oder in jegliche Sprache übersetzt werden, abgesehen von vom Käufer als Sicherungskopie angelegter Dokumentation.
Inhaltsverzeichnis Über diese Anleitung...................................................................................................... 6 In dieser Anleitung verwendete Schreibweisen................................................... 7 Schriftarten......................................................................................................................... 7 Sicherheitshinweise.........................................................................................................
Google Now aufrufen...................................................................................................34 Home-Bildschirm............................................................................................................36 Bildschirmansichten......................................................................................................37 Sperren der Bildschirmausrichtung.........................................................................38 Anruffunktionen verwenden.....
Play Store ..........................................................................................................................71 Maps ..........................................................................................................................72 MyLibrary..........................................................................................................................74 SuperNote Lite................................................................................................
Über diese Anleitung Diese Anleitung liefert Informationen über die Hardware- und Softwaremerkmale Ihres Fonepads, geordnet durch folgende Kapitel: Kapitel 1: Hardwareeinrichtung Dieses Kapitel beschreibt die Hardware-Komponenten Ihres Fonepads. Kapitel 2: Ihr Fonepad im Einsatz Dieses Kapitel zeigt den Einsatz verschiedener Teile Ihres Fonepads. Kapitel 3: Mit Android® arbeiten Dieses Kapitel zeigt Ihnen, wie Sie Android® in Ihrem Fonepad verwenden können.
In dieser Anleitung verwendete Schreibweisen Um bestimmte, wichtige Informationen in dieser Anleitung hervorzuheben, werden solche Hinweise wie folgt dargestellt: WICHTIG! Diese Meldung enthält wichtige Informationen denen Sie folgen müssen, um die Aufgabe fertig zu stellen. HINWEIS: Dies Meldung enthält zusätzliche Informationen und Tipps, die Ihnen bei der Fertigstellung einer Aufgabe helfen können.
Sicherheitshinweise Akku aufladen Laden Sie den Akku Ihres Fonepads voll auf, bevor Sie das Gerät für längere Zeit benutzen. Das Netzteil lädt den Akku auf, solange es mit einer Steckdose und Ihrem Gerät verbunden ist. Die Ladezeit verlängert sich erheblich, wenn Sie das Fonepad in dieser Zeit benutzen. WICHTIG! Entfernen Sie das Fonepad vom Netzteil, sobald der Akku voll aufgeladen ist. Das Fonepad ist nicht dafür geeignet, für längere Zeiträume mit dem Netzteil verbunden zu sein.
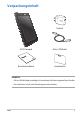
Verpackungsinhalt Netzteil ASUS Fonepad user Micro-USB-Kabel ual man Benutzerhandbuch Garantiekarte HINWEISE: • Falls ein Teil fehlt oder beschädigt ist, kontaktieren Sie bitte umgehend Ihren Händler. • Der Inhalt kann sich je nach Verkaufsregion unterscheiden.
ASUS Fonepad E-Manual
Kapitel 1:Hardware-Einrichtung Kapitel 1: Hardware-Einrichtung K004 11
Kennenlernen Ihres Fonepads Voderseite Touchscreen Über den Touchscreen können Sie Ihr FonePad mit Gesten oder einem Stylus-Stift bedienen. Hörmuschelempfänger Der Hörmuschelempfänger ermöglicht Ihnen, die Person am anderen Ende der Leitung zu hören.
Näherungssensor Der Näherungssensor erkennt die Entfernung zwischen Ihnen und Ihrem FonePad. Wenn Sie Ihr FonePad zum Absetzen oder Empfangen eines Anrufs nutzen, deaktiviert es die Sensorfunktion automatisch und schaltet die Hintergrundbeleuchtung aus. Frontkamera Die eingebaute 1-Megapixel-Kamera können Sie mit FonePad zum Aufnehmen von Fotos und Videos verwenden.
Rückseite Audio-Lautsprecher Die eingebauten Audio-Lautsprecher ermöglichen Ihnen die direkte Tonausgabe von Ihrem Fonepad. Die Audiofunktionen sind Softwaregesteuert. Rückseitenkamera Die eingebaute 3-Megapixel-Kamera können Sie zum Aufnehmen von HDFotos und HD-Videoaufnahmen verwenden. HINWEIS: Verfügbarkeit der rückseitigen Kamera variiert je nach Land oder Region. Mikrofon Das eingebaute Mikrofon kann für Videokonferenzen, Sprachführungen oder einfache Audioaufnahmen verwendet werden.
Rückseitiges Fach Das Fach an der Rückseite enthält einen Micro-SIM-Kartenschlitz, Micro-SD-Kartenschlitz, ein Loch zur manuellen Rücksetzung und eine Mikrofonöffnung. HINWEIS: Hinweise zu den Merkmalen des rückseitigen Fachs finden Sie im Abschnitt Im rückseitigen Fach. Ein-/Austaste Halten Sie die Ein-/Austaste zum Einschalten Ihres FonePad oder zum Aufwecken aus dem Bereitschaftsmodus zwei (2) Sekunden gedrückt.
Lautsprecher- / Headset-Anschluss Über diesen Anschluss können Sie Ihr FonePad an verstärkte Lautsprecher oder ein Headset anschließen. WICHTIG! Dieser Port unterstützt kein externes Mikrofon.
Im rücksetigen Fach Mikrofonöffnung Durch die Mikrofonöffnung können Geräusche für Standardmikrofonfunktionen zum integrierten Mikrofon gelangen. Micro-SIM-Kartensteckplatz Das FonePad verfügt über einen integrierten Micro-SIM-Kartenschlitz (Subscriber Identity Module), der GSM- und WCDMA-Netzwerkbänder unterstützt. HINWEIS: Beziehen Sie sich für weitere Details auf den Abschnitt Installieren einer Micro-SIM-Karte.
Manuelle Reset-Taste Falls Ihr System nicht mehr reagiert, drücken Sie einen gerade gebogene Büroklammer in das Loch zur manuellen Rücksetzung; ein Neustart Ihres FonePads wird erzwungen. WICHTIG! Der erzwungene Neustart kann zu Datenverlust führen. Wir empfehlen Ihnen dringend, dass Sie Ihre Daten regelmäßig sichern. HINWEIS: Beziehen Sie sich für weitere Details auf den Abschnitt Ihr FonePad rücksetzen.
Kapitel 2: Ihr Fonepad im Einsatz Kapitel 2: Ihr Fonepad im Einsatz K004 19
Einrichten Ihres Fonepads Installieren Ihres Fonepads Bevor Sie Anrufe absetzen, Textmitteilungen versenden oder sich über Ihr FonePad mit einem mobilen Breitbandnetz verbinden können, müssen Sie eine Micro-SIM-Karte einlegen. So installieren Sie eine Micro-SIM-Karte: 1. Entfernen Sie die Abdeckung des rückseitigen Fachs von Ihrem FonePad.
2. Richten Sie eine Micro-SIM-Karte am Micro-SIM-Kartensteckplatz aus und stecken sie ein. 3. Bringen Sie die Abdeckung des rückseitigen Fachs wieder an.
Installieren einer microSD-Karte So installieren Sie eine microSD-Karte 1. Entfernen Sie die Abdeckung des rückseitigen Fachs von Ihrem FonePad. 2. Richten Sie eine microSD-Karte am microSD-Kartensteckplatz aus und stecken sie ein.
3. Bringen Sie die Abdeckung des rückseitigen Fachs wieder an. Ihr Fonepad zurücksetzen So setzen Sie Ihr FonePad zurück: 1. Entfernen Sie die Abdeckung des rückseitigen Fachs von Ihrem FonePad.
2. Stecken Sie eine gerade gebogene Büroklammer in das Loch zur manuellen Rücksetzung. Mikrofonöffnung Manuelle Reset-Taste 3. Bringen Sie die Abdeckung des rückseitigen Fachs wieder an.
Aufladen Ihres Fonepads So laden Sie den Akku Ihres Fonepads auf: Verbinden Sie das USB-Docking-Kabel mit dem Netzteil. Stecken Sie den Micro-USB-Stecker in das Fonepad. Stecken Sie das Netzteil in eine geerdete Steckdose. Laden Sie Ihr Fonepad vor der ersten Benutzung unter dem AkkuModus für 8 Stunden auf.
WICHTIG! • Damit es nicht zu Schäden an Ihrem Gerät und am Akku kommt, benutzen Sie ausschließlich das mitgelieferte Netzteil und das Micro-USB-Kabel, um Ihr Fonepad aufzuladen. Ein anderes Netzteil kann Ihr Fonepad beschädigen. • Ziehen Sie die Schutzbeschichtung vom Netzteil und dem Micro-USB-Kabel, bevor Sie das Fonepad laden. • Vergewissern Sie sich, dass Sie das Netzteil in die richtige Steckdose mit der korrekten Eingangsspannung gesteckt haben.
Einschalten Ihres Fonepads Halten Sie die Ein-/Austaste zum Einschalten Ihres Fonepad circa zwei (2) Sekunden gedrückt.
Gesten für das Fonepad Über den Touchscreen können folgende Gesten zur Navigation, Interaktion und Ausführung von exklusiven Funktionen Ihres Fonepad ausgeführt werden. Ziehen/Antippen und halten/Lange antippen • • • Ziehen/Antippen und halten/Lange antippen Zum Löschen einer App vom Hauptbildschirm halten Sie die App angetippt und ziehen Sie in den oberen Bildschirmbereich. Halten Sie zur Aufnahme des Bildschirminhaltes angetippt.
Tippen/Berühren • • Tippen Sie zum Starten auf eine App. Tippen Sie in der Dateimanager-App zum Auswählen und Öffnen auf eine Datei. Verkleinern • Führen Sie zwei Finger auf dem Touchpanel zum Verkleinern eines Bildes in Galerie, Karten oder Orte zusammen.
Vergrößern Ziehen Sie zwei Finger auf dem Touchpanel zum Vergrößern eines Bildes in Galerie, Karten oder Orte auseinander. Wischen Wischen Sie mit Ihrem Finger auf dem Touchpanel zum Umschalten zwischen den Bilderschirmen oder zum Blättern durch Seiten eines eBooks oder einer Bildergalerie nach links oder rechts.
Kapitel 3: Mit Android® arbeiten Kapitel 3: Mit Android® arbeiten K004 31
Erste Inbetriebnahme Wenn Sie Ihr Fonepad das erste Mal starten, erscheint eine Reihe von Bildschirmen, die Sie durch die Konfiguration der Grundeinstellungen Ihres Android®-Betriebssystems führen. So starten Sie Ihr Fonepad das erste Mal: 1. Schalten Sie Ihr Fonepad ein. 2. Wählen Sie eine Sprache, tippen Sie dann auf . 3. Wählen Sie eine Eingabemethode oder ein Tastaturformat, tippen Sie dann auf . 4.
Android®-Sperrbildschirm Ihr Gerät entsperren Tippen Sie das gesperrte Symbol und ziehen Sie es auf das entsperrte Symbol. Kameramodus aufrufen Tippen Sie auf das Schlosssymbol und ziehen Sie es auf das Kamerasymbol.
Notrufwähler aufrufen Tippen Sie zum Wählen einer Notrufnummer auf . WICHTIG! Notrufnummern variieren je nach Land. Google Now aufrufen Tippen Sie auf das Google-Symbol und ziehen Sie es auf das Kamerasymbol.
Google Now Google Now ist Ihr persönlicher Fonepad-Assistent, der Ihnen sofortige Aktualisierungen zu Wetterbedingungen, nahegelegenen Restaurants, Flugplänen, Terminen und anderen Informationen basierend auf Ihrem Webverlauf, synchronisierten Kalendern und Erinnerungen liefert.
Home-Bildschirm Benachrichtigungsfeld & Einstellungen Google Textsuche öffnen Google Sprachsuche öffnen Zeigt lokale Zeit, Datum, Wetterinformationen und Zeitalarm. Zum Anpassen von WetterWidget-Einstellungen, Standort, Zeitalarm und Frequenzaktualisierungen antippen. Informiert Sie über Emails in Ihren Posteingang.
Bildschirmansichten Der integrierte Gravitätssensor Ihres Fonepad ermöglicht automatische Bildschirmdrehungen entsprechend der aktuellen Ausrichtung. Sie können schnell zwischen Hoch- und Querformat wechseln, indem Sie Ihr Fonepad nach links oder rechts neigen.
Sperren der Bildschirmausrichtung Standardmäßig wechselt der Bildschirm Ihres Fonepads automatisch von Querformat zu Hochformat und zurück, wenn Sie Ihr Fonepad entsprechend drehen. Durch Befolgen dieser Schritte können Sie die Funktion zur automatischen Bildschirmdrehung deaktivieren: 1. Tippen Sie am Startbildschirm zum Öffnen des Bildschirms Alle Apps auf File Manager 2. Tippen Sie auf .
MyCloud asus@vibe App Locker App Backup SuperNote Lite AudioWizard ASUS Studio 3. Tippen Sie oben rechts am Bildschirm auf > Import/Export von Kontakten. 4. Tippen Sie auf Von SIM-Karte importieren, dann zur Auswahl der Kontakte, die Sie auf Ihr Fonepad importieren möchten, antippen. 5. Tippen Sie dann auf .
Bluetooth nutzen Bluetooth an Ihrem Gerät de-/aktivieren Bluetooth ist ein kabelloser Standard zum Datenaustausch über kurze Distanzen. Bluetooth wird von vielen Produkten, wie Smartphones, Computern, TabletGeräten und Headsets, unterstützt. Bluetooth ist bei der Übertragung von Daten zwischen zwei oder mehr in der Nähe befindlichen Geräten sehr praktisch. Wenn Sie erstmals eine Verbindung zu einem Bluetooth-Gerät herstellen, müssen Sie es mit Ihrem Fonepad koppeln.
3. Falls Ihr Fonepad die Suche abgeschlossen hat, bevor Ihr Bluetooth-Gerät bereit war, tippen Sie auf NACH GERÄTEN SUCHEN. 4. Tippen Sie in der Liste verfügbarer Geräte auf das Bluetooth-Gerät, mit dem Sie Ihr Produkt koppeln möchten. Befolgen Sie die Bildschirmanweisungen zum Abschließen der Kopplung. Beachten Sie bei Bedarf die mit dem Gerät gelieferte technische Dokumentation.
Apps verwalten App-Verknüpfungen erstellen Erhalten Sie durch Erstellung von App-Verknüpfungen auf Ihrem Startbildschirm einfachen Zugang zu einigen Ihrer Lieblingsapplikationen. So erstellen Sie App-Verknüpfungen: 1. Tippen Sie zum Aufrufen des Bildschirms Alle Apps auf File Manager . Settings Play Store 2. Tippen Sie am Bildschirm Alle Apps auf das App-Symbol und ziehen es auf den Startbildschirm.
App-Info anzeigen Sie können detaillierte App-Informationen betrachten, während Sie eine Verknüpfung für die App erstellen. Während Sie eine App am Bildschirm Alle Apps gedrückt halten, wechselt die Anzeige zum Startbildschirm und App-Info erscheint im oberen Bereich des Startbildschirms. Ziehen Sie die App zur Anzeige detaillierter Informationen auf App-Info.
App-Ordner erstellen Sie können Ordner zum Organisieren von Verknüpfungen an Ihrem Startbildschirm erstellen. So erstellen Sie einen App-Ordner: 1. Tippen Sie am Startbildschirm auf eine App oder Verknüpfung und ziehen Sie diese auf eine andere App, bis ein schwarzer Kreis erscheint. HINWEISE: • Der erstellte Ordner wird in einem schwarzen Kreis angezeigt. • Sie können mehrere Apps in Ihrem Ordner hinzufügen. 2.
Apps am Bildschirm Zuletzt verwendet betrachten Der Bildschirm Zuletzt verwendet ermöglicht Ihnen die Betrachtung einer Liste von App-Verknüpfungen basierend auf Ihren zuletzt gestarteten Apps. Über den Bildschirm Zuletzt verwendet können Sie ganz einfach zu zuletzt gestarteten Apps zurückkehren bzw. zwischen diesen wechseln. So greifen Sie auf den Bildschirm Zuletzt verwendet zu: 1. Tippen Sie unten links am Startbildschirm auf File Manager Settings . Play Store 2.
So betrachten Sie das Menü einer zuletzt verwendeten App: 1. Halten Sie eine kürzlich verwendeten App zur Anzeige des Menüs angetippt. 2. Wählen Sie zum Entfernen der App aus der Liste Aus Liste entfernen. Wählen Sie zur Anzeige der zugehörigen Informationen App-Info. HINWEIS: Sie können auch eine aktuell verwendete App aus der Liste entfernen, indem Sie sie nach links oder rechts wischen.
rary Lite Task Manager ASUS Task Manager zeigt eine Liste der zurzeit laufenden Programme und Anwendungen, sowie deren Verwendung in Ihrem Fonepad. Auch können Sie laufende Apps einzeln öffnen und schließen oder mit der Close All-Funktion alle Apps und Dienstprogramme schließen. So verwalten Sie den Task Manager: 1. Tippen Sie zum Aufrufen des Bildschirms Alle Apps auf File Manager . Tippen Sie Settings Play Store anschließend auf Widgets, um das Widgets-Menü zu öffnen. 2.
Dateimanager Mit dem Dateimanager können Sie Ihrer Dateien im Gerät oder auf einen angeschlossenen externen Datenträger einfach verwalten. Auf den internen Speicher zugreifen So greifen Sie auf den internen Speicher zu: 1. Tippen Sie zum Aufrufen des Bildschirms Alle Apps auf . Settings File Manager Play Store 2.
Ihre Inhalte anpassen Über den Dateimanager können Sie Inhalte Ihres Gerätes und des installierten externen Speichergerätes kopieren, ausschneiden, teilen und löschen. Wenn Sie eine Datei oder einen Ordner anpassen, setzen Sie ein Häkchen im Kästchen neben der Datei oder dem Ordner und die Aktionsleiste erscheint oben rechts am Bildschirm. HINWEISE: • Die -Aktion erscheint nur, wenn Sie eine Datei oder Dateien im Ordner anpassen.
Einstellungen Auf dem Einstellungsbildschirm können Sie einige der Einstellungen Ihres Fonepads konfigurieren. Mit dieser System-App können Sie die Drahtloskonnektivitäts-, Hardware-, persönliche Konten- und Systemeinstellungen Ihres Fonepads konfigurieren. Es gibt zwei Arten auf den Einstellungsbildschirm zuzugreifen. 1. Tippen Sie am Bildschirm Alle Apps zur Anzeige des Menüs auf . 2.
ASUS-Schnelleinstellungen Lokales Datum und Uhrzeit anzeigen Wi-Fi-Einstellungen Einstellungsmenü Audio Wizard Schnelleinstellungspanel. Tippen Sie auf die entsprechenden Symbole, um die jeweilige Funktion ein- oder auszuschalten. Einstellungen anzeigen Automatische Helligkeit Manuelle Helligkeitseinstellung ASUS-Schnelleinstellungspanel Tippen Sie auf das entsprechenden Programmsymbol, um seine Funktion zu aktivieren/deaktivieren.
Benachrichtigungsfeld In den Schnelleinstellungen erscheinen Benachrichtigungsboxen, um auf Alarme, Updates in Apps, eingehende E-Mails und Programmstatus hinzuweisen. HINWEIS: Wischen Sie die Benachrichtigung zum Entfernen des Elements aus der Liste nach rechts oder links.
Fonepad ausschalten Sie können Ihr Fonepad über eines der folgenden Verfahren ausschalten: • • Halten Sie die Ein-/Austaste etwa zwei (2) Sekunden gedrückt, tippen Sie bei Aufforderung auf Ausschalten und anschließend auf OK. Falls Ihr Fonepad nicht reagiert, halten Sie die Ein-/Austaste mindestens sechs (6) Sekunden gedrückt, bis sich Ihr Fonepad ausschaltet. WICHTIG! Eine erzwungene Abschaltung des Systems kann zu Datenverlusten führen. Achten Sie darauf, Ihre Daten regelmäßig zu sichern.
ASUS Fonepad E-Manual
Kapitel 4: Vorinstallierte Apps Kapitel 4: Vorinstallierte Apps K004 55
Bereitgestellte vorinstallierte Apps Play Music Die App Play Music, bietet eine integrierte Schnittstelle für Ihre Musiksammlung, und ermöglicht Ihnen, Ihre intern oder auf einem externen Speichergerät abgespeicherten Musikdateien wiederzugeben. Sie können alle Musikdateien mischen und zufällig wiedergeben oder zur Auswahl eines gewünschten Albums schnell wischen.
HINWEISE: Vom Ihrem Fonepad unterstützt Audio- und Video-Codecs: • Decoder Audio Codec: AAC LC/LTP, HE-AACv1(AAC+), HE-AACv2(enhanced AAC+), AMR-NB, AMR-WB, MP3, FLAC, MIDI, PCM/WAVE, Vorbis, WAV a-law/mu-law, WAV linear PCM, WMA 10, WMA Lossless, WMA Pro LBR Video Codec: H.263, H.264, MPEG-4, VC-1/WMV, VP8 • Encoder Audio Codec: AAC LC/LTP, AMR-NB, AMR-WB Video Codec: H.263, H.
Kamera Die Kamera-App ermöglicht Ihnen die Aufnahme von Fotos und Videos mit Ihrem Fonepad. Tippen Sie zum Starten der Kamera-App am Startbildschirm auf dann auf . Fertig. File Manager Gallery tippen Sie Settings Polaris Office Play Store Camera My Library Lite Play Music Maps HINWEIS: Bilder und Videodateien werden automatisch in der Galerie gespeichert.
Bildschirmansicht Modusumschalter Moduseinstellungen Effekte Zoomregler Bildgröße Belichtung Aufnahmetaste Weißabgleich Vorder-/Rück Kamera Anzeigeeinstellungen Kameraeinstellungen Vorschau Videomodus Bildschirmansicht Belichtung Kameraeinstellungen Anzeigeeinstellungen Videoqualität Modusumschalter Moduseinstellungen Effekte Belichtung Modusumschalter Vorschau Vorder-/Rück Kamera K004 Aufnahmetaste 59
Bildschirmansicht Moduseinstellungen Modusumschalter Effekte Videoqualität Belichtung Aufnahmetaste Weißabgleich Anzeigeeinstellungen Kameraeinstellungen 60 Vorder-/Rück Kamera Vorschau ASUS Fonepad E-Manual
Galerie Über die Galerie-App können Sie Bilder auf Ihrem Fonepad betrachten und Videos wiedergeben. Diese App ermöglicht Ihnen außerdem das Bearbeiten, Teilen und Löschen der auf Ihrem Fonepad gespeicherten Bild- und Videodateien. Über die Galerie können Sie Bilder als Diaschau wiedergeben oder die ausgewählte Bildbzw. Videodatei durch Antippen betrachten. Tippen Sie zum Starten von Galerie am Startbildschirm auf auf .
Teilen und löschen von Alben Halten Sie zum Teilen eines Albums ein Album angetippt, bis eine Werkzeugleiste im oberen Bildschirmbereich erscheint. Sie können ausgewählte Alben hochladen oder online teilen bzw. von Ihrem Fonepad löschen. Werkzeugleist Tippen Sie zum Teilen des ausgewählten Albums via ASUS Webstorage, Bluetooth®, Picasa®, Google+® oder Gmail® auf dieses Symbol. Tippen Sie zum Löschen des ausgewählten Albums auf dieses Symbol.
Freigeben, löschen und bearbeiten von Bildern Teilen, bearbeiten oder löschen Sie ein Bild, indem Sie das Bild durch Antippen öffnen und dann zum Einblenden der Werkzeugleiste im oberen Bildschirmbereich auf das Bild tippen. Bilder teilen So teilen Sie ein Bild: File Manager Settings Play Store 1. Öffnen Sie am Galerie-Bildschirm das Album mit dem Bild, das Sie teilen möchten. 2. Wählen Sie es durch Antippen, tippen Sie dann auf und wählen Sie aus der Liste von Freigabe-Apps.
So teilen Sie mehrere Bilder: 1. Öffnen Sie am Galerie-Bildschirm das Album mit dem Bild, das Sie teilen möchten. 2. Halten Sie ein Bild angetippt, tippen Sie dann auf weitere Bilder. File Manager Gallery Settings Polaris Office Play Store My Library Lite 3. Tippen Sie auf Camera Play Music Maps , wählen Sie dann aus der Liste mit Freigabe-Apps.
Ein Bild bearbeiten So bearbeiten Sie ein Bild: File Manager Settings Play Store 1. Öffnen Sie am Galerie-Bildschirm das Album mit dem Bild, das Sie bearbeiten möchten. 2. Öffnen Sie ein Bild durch Antippen, tippen Sie dann auf > Bearbeiten. 3. Beginnen Sie mit der Bearbeitung, indem Sie die Bearbeitungswerkzeuge antippen.
Bilder löschen So löschen Sie ein Bild: Settings File Manager Play Store 1. Öffnen Sie am Galerie-Bildschirm das Album mit dem Bild, das Sie löschen möchten. 2. Öffnen Sie ein Bild durch Antippen, tippen Sie dann auf . 3. Tippen Sie auf OK. Gallery Polaris Office My Library Lite Camera Play Music Maps Email So löschen Sie mehrere Bilder: 1. Öffnen Sie am Galerie-Bildschirm das Album mit den Bildern, die Sie löschen möchten. 2. Halten Sie ein Bild angetippt, tippen Sie dann auf weitere Bilder. 3.
Galerie-Widget aufrufen Das Fotogalerie-Widget ermöglicht Ihnen vom Home-Bildschirm aus, direkten Zugriff auf Ihre Lieblingsfotos oder Alben. So zeigen Sie das Widget Fotogalerie am Startbildschirm an: 1. Tippen Sie zum Aufrufen des Bildschirms Alle Apps auf File Manager Settings . Play Store 2. Tippen Sie auf WIDGETS, um das Widgets-Menü zu öffnen. 3. Halten Sie Fotogalerie angetippt, bis das Widget-Fenster am Startbildschirm erscheint und das Bilder wählen-Dialogfenster anzeigt. 4.
E-Mail Mit der E-Mail-App können Sie POP3-, IMAP- und Exchange-Konten hinzufügen und E-Mails direkt an Ihrem Fonepad empfangen, erstellen und durchsuchen. WICHTIG! Damit Sie ein E-Mail-Konto hinzufügen bzw. E-Mails von hinzugefügten Konten versenden und empfangen können, müssen Sie mit dem Internet verbunden sein. Ein E-Mail-Konto einrichten So richten Sie ein E-Mail-Konto ein: 1. Tippen Sie zum Aufrufen des Bildschirms Alle Apps auf File Manager . Settings Play Store 2.
ibrary Lite @vibe 5. Geben Sie einen Kontennamen an, der in ausgehenden Nachrichten angezeigt werden soll; tippen Sie dann zum Anmelden an Ihrem Posteingang auf Weiter. E-Mail-Konten hinzufügen So fügen Sie E-Mail-Konten hinzu: 1. Tippen Sie zum Aufrufen des Bildschirms Alle Apps auf . Play Store File Manager 2. Tippen Sie auf Camera Play Music Settings , melden Sie sich dann über Ihr Konto an Maps Gallery Polaris Office My Library Lite Play Store Camera Play Music 3.
Google Mail Mit der Google Mail-App können Sie ein neues Google Mail-Konto erstellen oder Ihr bestehendes Google Mail-Konto synchronisieren und E-Mails direkt an Ihrem Fonepad versenden, empfangen und durchsuchen. Die Aktivierung dieser App ermöglicht Ihnen, auf andere Google-Apps zuzugreifen, die ein Google-Konto benötigen; z. B. Play Store. Ein Google Mail-Konto einrichten So richten Sie ein Google Mail-Konto ein: 1. Tippen Sie zum Aufrufen des Bildschirms Alle Apps auf File Manager .
Play Store Greifen Sie über Ihr Google-Konto auf zahlreiche Spiele und Werkzeuge im Play Store zu. WICHTIG! Sie können nur durch Anmeldung an Ihrem Google-Konto auf Play Store zugreifen. Play Store aufrufen So greifen Sie auf den Play Store zu: 1. Tippen Sie am Startbildschirm auf Play Store File Manager Settings . Play Store 2. Falls Sie bereits über ein Google-Konto verfügen, tippen Sie auf Vorhandenes Konto und geben Ihr E-Mail-Konto und Kennwort an.
HINWEISE: • Sie können gelöschte Anwendungen nicht wiederherstellen, aber Sie können sich mit den gleichen Kontodaten wieder anmelden und diese erneut herunterladen. • Einige Applikationen sind kostenlos, andere belasten möglicherweise Ihre Kreditkarte. Maps Mit Google Maps können Sie Orte und Einrichtungen betrachten und auffinden sowie Richtungsanweisungen erhalten. Es ermöglicht Ihnen, Ihren aktuellen Standort zu prüfen und diese Informationen mit anderen zu teilen.
Ansicht im Querformat Suche Werkzeugleiste Erweiterte Einstellungen Ebenen Richtungsanweisungen Lokale Orte Aktueller Standort K004 73
Gallery Polaris Office Camera MyLibrary Lite Play Music Maps MyLibrary Email MyLibrary ist eine integrierte Schnittstelle für Ihre gespeicherten Bücher. Sie können verschiedene Bücherregale für unterschiedliche Themengebiete erstellen. Ihre gekauften E-Books aller Verlage werden auch im Bücherregal abgelegt. Gmail SuperNote Tippen Sie zum Ausführen von MyLibrary auf MyCloud asus@vibe Settings Locker FileApp Manager Alle Apps angezeigt.
Lesen Ihrer Ebooks Wenn Sie ein eBook lesen, wischen Sie mit Ihrem Finger zum Umblättern zur nächsten Seite nach links und zum Umblättern zur vorherigen Seite von links nach rechts.
Eine Seite umblättern Wischen Sie zum Umblättern auf die nächste Seite von rechts nach links. Wischen Sie zum Umblättern auf die vorherige Seite von links nach rechts.
Manager llery Lesezeichen einfügen Ein Lesezeichen markiert eine Seite des Buches, so dass Sie diese einfach und schnell wiederfinden können. Settings So fügen Sie ein Lesezeichen ein: Polaris Office nter My Library Lite Camera Play Music Maps File Manager Settings Play Store 1. Tippen Sie zum Anzeigen der Werkzeugleiste auf eine beliebige Stelle am Bildschirm. 2. Tippen Sie auf , um die Seite zu markieren. Sie können beliebig viele Seiten markieren.
Seite anmerken Durch das Hinzufügen von Anmerkungen in Ihren eBooks können Sie die Definition eines Wortes aufrufen, ein Wort oder eine Wortgruppe kopieren, per E-Mail teilen oder via Text-zu-Sprache-Funktion anhören. Wortgruppe anmerken Ein Wort anmerken So versehen Sie eine Seite mit Anmerkungen: 1. Halten Sie das/den gewünschte(n) Wort/Satz angetippt, bis Werkzeugleiste und Wörterbuchhinweis angezeigt werden.
Gallery Polaris Office MyLibrary Lite Camera Play Music SuperNote Lite Em SuperNote ist eine nützliche App zum Schreiben und Zeichnen. Sie können Notizen schreiben, Sofortnachrichten senden, Skizzen zeichnen, E-Cards mit Audioaufnahmen erstellen oder Tagebücher mit Video ergänzen und vieles mehr. Gmail Sie können auch Ihre Notizbücher über Ihr ASUS WebStorage-Konto teilen.
Notizbuch erstellen So erstellen Sie ein neues Notizbuch: 1. Tippen Sie auf Neu. 2. Benennen Sie die Datei und wählen Sie für die Seitengröße Für Pad oder Für Telefon. 3. Wählen Sie eine Vorlage. Die neue Notizseite erscheint umgehend.
SuperNote Notizbuch-Oberfläche Teilen und exportieren Speichern Rückkehrpfad Seite einfügen Seite löschen Einstellungen Notizbuch-Werkzeugleiste Vorherige Seite Nächste Seite Moduseinstellungen und Seitennummern HINWEIS: Moduseinstellungen und Notizbuch-Werkzeugleiste ändern sich, wenn Sie auf K004 , oder -Modus tippen.
Notizbuch anpassen Mit SuperNote können Sie mit Ihren Notizbüchern kreativ sein. Wenn Sie von der oberen oder unteren Seite des Bildschirms wischen, erscheint eine Werkzeugleiste mit verschiedenen Werkzeugen, mit denen Sie Ihre Notizbücher bearbeiten können. HINWEIS: Die Einstellungen der Werkzeugleiste können je nach Modell variieren. So bearbeiten Sie Ihr Notizbuch: 1. Tippen Sie im SuperNote-Hauptbildschirm auf das Notizbuch, welches Sie bearbeiten wollen. 2.
SuperNote-Schreibschutzmodus Zum Aktivieren des Bearbeitungsmodus antippen Notizbuch umbenennen So benennen Sie Ihr Notizbuch um: 1. Halten Sie am SuperNote-Hauptbildschirm die Notizbuchdatei angetippt, tippen Sie dann auf Umbenennen. 2. Geben Sie den Dateinamen ein, tippen Sie dann auf OK.
Notizbuch verstecken So verstecken Sie Ihr Notizbuch: 1. Halten Sie am SuperNote-Hauptbildschirm die Notizbuchdatei angetippt, tippen Sie dann auf Zum Verstecken sperren. 2. Geben Sie Ihr Kennwort ein, tippen Sie dann auf OK. HINWEISE: • Wenn Sie Ihr Notizbuch zum ersten Mal ausblenden, werden Sie zur Eingabe eines neuen Kennwortes aufgefordert. • Tippen Sie zum Anzeigen versteckter Notizbücher am Hauptbildschirm auf und anschließend auf Gesperrtes Notizbuch anzeigen.
ay Store amera ackup ASUS Studio ASUS Studio ist eine App, mit der Sie die auf Ihrem Fonepad gespeicherten Fotos und Videos verwalten können. Mit ASUS Studio können Sie Fotos und Videos durchsuchen und anordnen, Fotos und Filtereffekte bearbeiten, angepasste Alben erstellen und diese per E-Mail oder über soziale Netzwerkseiten teilen.
Ihre gespeicherten Fotos anpassen Passen Sie ein Foto an, indem Sie das Album mit dem Foto, das Sie anpassen möchten, öffnen und dann das Foto zur Auswahl und zum Anzeigen der Werkzeugleiste antippen. Zum Zurückkehren zum vorherigen Bildschirm antippen Zum Teilen des Fotos antippen Einstellungen Werkzeugleiste Die Werkzeugleiste besteht aus folgenden Funktionen: Zum Hinzufügen des Fotos zu den Favoriten antippen. Zum Markieren des Fotos und zur Auswahl einer Kategorie antippen.
Ein Foto bearbeiten So bearbeiten Sie ein Foto: 1. Tippen Sie in der Werkzeugleiste auf . 2. Beginnen Sie mit der Bearbeitung, indem Sie die Bearbeitungswerkzeuge antippen.
BuddyBuzz Settings File Manager Play Store BuddyBuzz ist ein exklusiver Aggregator für soziale Netzwerke von ASUS, der Ihnen den Zugriff auf mehrere Konten sozialer Netzwerke an einem Ort ermöglicht. Mit BuddyBuzz können Sie zwischen Ihren sozialen Netzwerkkonten, wie Facebook, Twitter und Plurk, umschalten. Gallery Polaris Office My Library Lite Camera Play Music HINWEIS: Denken Sie daran, Ihre sozialen Netzwerkkonten zu registrieren, wenn Sie BuddyBuzz das erste Mal benutzen.
ce Play Store My Library Lite AudioWizard Camera Play Music Maps AudioWizard ermöglicht Ihnen die Anpassung der Tonmodi Ihres Fonepad zur klareren Audioausgabe entsprechend dem vorliegenden Nutzungsszenario. Email Tippen Sie zum Starten von AudioWizard am Startbildschirm auf dann auf .
File Manager MyPainter Gallery Settings Polaris Office Play Store My Library Lite Camera Play Music Maps MyPainter ist eine exklusive Zeichen-App von ASUS, mit der Sie eine Bilddatei erstellen oder Kalligraphie, Effekte und Fotos zu einer bestehenden Bilddatei hinzufügen können Email Gmail SuperNote MyNet Tippen Sie zum Starten von MyPainter am Startbildschirm auf dann auf .
MyPainter-Bearbeitungsbildschirm Zum Teilen einer Zeichnung antippen Zum Erstellen einer neuen Zeichnung antippen Zum Speichern einer Zeichnung antippen Zeichenwerkzeugleiste Eine Zeichnung bearbeiten So bearbeiten Sie eine Zeichnung: 1. Wählen Sie am MyWorks-Bildschirm durch Antippen eine Zeichnung. 2. Beginnen Sie mit der Bearbeitung, indem Sie die Bearbeitungswerkzeuge antippen.
Settings File Manager App Locker Gallery Polaris Office Play Store My Library Lite App Locker ist eine Sicherheits-App, mit der Sie Ihre privaten Apps vor unautorisierter Nutzung schützen können. Camera Play Music Maps Email App Locker verwenden So verwenden Sie App Locker: Gmail 1. Tippen Sie am Startbildschirm auf File Manager SuperNote und dann auf Settings Play Store MyCloud . asus@vibe App Locker App Backup SuperNote Lite 2.
App Locker-Bildschirm Verschieben Sie den Regler zur Aktivierung der App-Sperre und zum Einblenden der App-Liste nach rechts. Zum Konfigurieren der Einstellungen von App Locker antippen. Tippen Sie auf die Apps, die Sie sperren möchten. Tippen Sie zum Freigeben einer App einfach auf die App, die Sie zuvor gesperrt haben. HINWEISE: • Neben den geschützten Apps erscheint auf dem Home-Bildschirm ein Schlosssymbol.
Anwendungssicherung Die Sicherung ermöglicht Ihnen, Ihre installierten Apps und Daten auf dem internen oder externen Speicher Ihres Fonepad zu sichern und mit einem Kennwort zu schützen. Außedem können Sie mit dieser App die zuvor von Ihrem Fonepad gelöschten Apps und Daten wiederherstellen, nachdem die Geräte-Firmware aktualisiert oder das Gerät auf seine Standardeinstellungen zurückgesetzt wurde.
Ihre Apps und Daten sichern So sichern Sie Ihre Apps und Daten: 1. Tippen Sie am Anwendungssicherung-Hauptbildschirm im linken Bereich auf Sicherungsliste; dadurch wird eine Liste der installierten Apps und Daten angezeigt. 2. Setzen Sie Häkchen bei den Apps, die Sie sichern möchten; tippen Sie dann auf . 3. Geben Sie den Dateinamen Ihrer Sicherungsdatei ein, tippen Sie dann auf OK.
5. Tippen Sie zum Fortfahren mit der Applikationssicherung auf OK. 6. Tippen Sie nach Abschluss der Sicherung auf OK.
Wiederherstellungsliste-Bildschirm Zum Löschen von Sicherungsdateien antippen Zum Teilen von Sicherungsdateien antippen Zur Auswahl aller Sicherungsdateien antippen Zum Starten der Dateimanager-App antippen Liste von Sicherungsdateien K004 97
Ihre Apps und Daten wiederherstellen So stellen Sie Ihre Apps und Daten wieder her: 1. Tippen Sie am App-Sicherung-Hauptbildschirm im linken Bereich auf Wiederherstellungsliste; dadurch wird eine Liste der Sicherungsdateien angezeigt. 2. Tippen Sie auf die Datei, die Sie wiederherstellen möchten, und anschließend auf OK. 3. Geben Sie das Kennwort ein, das Sie bei Erstellung der Sicherungsdatei eingerichtet haben; tippen Sie dann auf OK. 4.
5. Tippen Sie zum Fortfahren der Wiederherstellung von Apps in Ihrem System auf OK. 6. Tippen Sie nach Abschluss der Wiederherstellung auf OK.
Widgets Widgets sind kleine Apps, mit denen Sie über den Startbildschirm Ihres Fonepad komfortabel auf praktische und unterhaltsame Applikationen zugreifen können. Tippen Sie zur Anzeige von Widgets am Startbildschirm auf File Manager , tippen Sie dann Settings Play Store auf WIDGETS. Ein Widget am Startbildschirm anzeigen Gallery Polaris Office My Library Lite Camera Play Music Maps Wischen Sie am Widgets-Bildschirm mit Ihrem Finger zur Auswahl eines Widget nach links oder rechts.
Ein Widget vom Startbildschirm entfernen Halten Sie am Startbildschirm das Widget angetippt, bis X Entfernen erscheint. Ziehen Sie das Widget zum Entfernen vom Startbildschirm auf X Entfernen, ohne den Finger vom Bildschirm abzuheben.
ASUS Battery ASUS Battery ist ein spezielles Widget zur prozentualen und farblichen Anzeige des Akkustatus Ihres Fonepad und des angeschlossenen Zubehörs. Tippen Sie zur Anzeige des ASUS Battery-Widgets am Startbildschirm auf File Manager Settings Play Store ,tippen Sie dann auf WIDGETS. ASUS Battery-Widget am Startbildschirm anzeigen Gallery Polaris Office My Library Lite Camera Play Music Wischen Sie am Widgets-Bildschirm zur Suche nach dem Widget ASUS-Akku mit Ihrem nach links oder rechts.
Anhänge Anhänge K004 103
EC-Konforamitätserklörung Dieses Produkt befolgt die konformitätserklärung für die R&TTE Directive 1999/5/ EC. Diese Konformitätserklärung kann von der Website http://www.support.asus. com geladen werden. Gehörschutz Um mögliche Gehörschäden zu vermeiden, hören Sie nicht über einen lange Zeitdauer unter hoher Lautstärke. À pleine puissance, l’écoute prolongée du baladeur peut endommager l’oreille de l’ utilisateur. Für Frankreich, wie gefordert von French Article L.
RF Exposure information (SAR) - CE Dieses Gerät erfüllt die EU-Anforderungen (1999/519/EG) zur Beschränkung der Exposition der Bevölkerung gegenüber elektromagnetischen Feldern zum Schutz der Gesundheit. Die Grenzwerte sind Teil umfassender Empfehlungen zum Schutz der Bevölkerung. Diese Empfehlungen wurden durch regelmäßige und gründliche Evaluationen wissenschaftlicher Studien von unabhängigen wissenschaftlichen Organisationen entwickelt und geprüft.
Hinweis zur Beschichtung WICHTIG! Zur Aufrechterhaltung der elektrischen Isolierung und elektrischen Sicherheit, ist auf dem Gerät, außer im Bereich der Anschlüsse, eine Beschichtung aufgebracht. Hinweis zur abnehmbaren Abdeckung WICHTIG! Die Abdeckung des hinteren Fachs enthält die Antenne, mit der Sie Anrufe absetzen oder empfangen können. Wenn Sie die Abdeckung des hinteren Fachs zum Installieren einer Micro-SIM-Karte oder Micro-SD-Karte entfernen, denken Sie daran, sie wieder sicher anzubringen.
Richtige Entsorgung Wenn Der Akku mit einen falschen Typ ausgetauscht wird, kann dies eine Explosionsgefahr hervorrufen. Entsorgen Sie defekte Akkus entsprechend den örtlichen Bestimmungen. Batterien NICHT im normalen Hausmüll entsorgen. Das Symbol der durchgestrichenen Mülltonne zeigt an, dass Batterien nicht im normalen Hausmüll entsorgt werden dürfen. Das Fonepad NICHT im normalen Hausmüll entsorgen. Dieses Produkt wurde entwickelt, um ordnungsgemäß wiederverwertet und entsorgt werden zu können.
EC Declaration of Conformity We, the undersigned, Manufacturer: ASUSTeK COMPUTER INC. Address, City: 4F, No. 150, LI-TE Rd., PEITOU, TAIPEI 112, TAIWAN Country: TAIWAN Authorized representative in Europe: ASUS COMPUTER GmbH Address, City: HARKORT STR.