REPUBLIC OF GAMERS ROG GR8 Brugervejledning
DA9561 Første udgave Januar 2015 OPHAVSRET INFORMATION Ingen del af denne manual, inklusive produkterne og softwaren beskrevet heri, må - undtagen som reservedokumentation for køberen selv - på nogen måde kopieres, transmitteres, transkriberes, lagres på et søgesystem eller oversættes til andet sprog uden udtrykkelig, skriftlig tilladelse fra ASUSTeK COMPUTER INC. (“ASUS”).
Indhold Om denne manual.............................................................................................. 5 Konventioner, brugt i denne manual......................................................... 5 Typografi............................................................................................................... 5 Pakkeindhold........................................................................................................ 6 Gør dig bekendt med din ROG GR8 Egenskaber............
Indhold Opgradering af din ROG GR8 Opgradering af hukommelsesmoduler....................................................32 Installering af en 2,5” harddisk ....................................................................37 Tillæg Sikkerhedsinformation....................................................................................44 Installation af systemet.................................................................................44 Forsigtighed under brugen....................................
Om denne manual Denne manual indeholder oplysninger om hardwaren og softwaren i din ROG GR8. Den er organiseret i følgende kapitler: Kapitel 1: Gør dig bekendt med din ROG GR8 I dette kapitel beskrives hardware-komponenterne i din ROG GR8. Kapitel 2: Sådan bruger du din ROG GR8 Dette kapitel fortæller dig, hvordan du bruger din ROG GR8. Kapitel 3: Opgradering af din ROG GR8 Dette kapitel fortæller dig, hvordan du opgraderer hukommelsesmoduler og drevet på din ROG GR8.
Pakkeindhold Din ROG GR8-pakke skal indeholde følgende dele: Dokumenter med tekniske oplysninger ROG GR8 Strømkabel* AC strømadapter* sæt skruer BEMÆRK: De faktiske produktspecifikationer og pakkens indhold kan variere, afhængig af dit land eller område.
1 Gør dig bekendt med din ROG GR8
Egenskaber Forside 8 ROG GR8
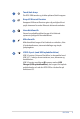
Tænd/sluk-knap Din ROG GR8 tændes og slukkes på tænd/sluk-knappen. Knap til Miracast Receiver Knappen til Miracast Receiver giver dig mulighed for at spejle skærmen fra andre Miracast-aktiverede enheder. Hovedtelefonstik Stereo-hovedtelefonstikket bruges til at forbinde systemets lydsignal til hovedtelefoner. Mikrofonstik Mikrofonstikket bruges til at forbinde en mikrofon, f.eks. til videokonferencer, stemmeindtalinger og simple lydoptagelser. USB 2.0 port (med USB-opladefunktion) USB 2.
Set nedefra Set oppefra Ventilationsåbninger Lufthullerne gør, at køligt luft kan komme ind i kabinettet på din ROG GR8, og derved uddrive den varme luft. VIGTIGT! For at opnå en optimal varmeafledning og luftventilation, skal du sørge for at intet spærrer for ventilationshullerne. Gummifødder Gummifødderne gør, at din ROG GR8 ikke glider og gør den tilmed mere stabil, når den står på højkant.
Bagsiden LED-indikator til harddisk/drev Denne indikator lyser op, når din ROG GR8 bruger det interne hukommelsesdrev. Lydindgangsstik Dette 1/8” stereostik kan bruges til at tilslutte en stereolydkilde til din ROG GR8. Funktionen bruges hovedsageligt til at føje lyd til multimedie-programmer. Lydudgangsstik Dette stereostik bruges til at forbinde systemets lydudgang til forstærkede højttalere og hovedtelefoner.
Mikrofonstik Mikrofonstikket bruges til at forbinde en mikrofon, f.eks. til videokonferencer, stemmeindtalinger og simple lydoptagelser. Digital lydudgang (S/PDIF optisk) Denne optiske port, Sony/Philips Digital Interface (S/PDIF), giver dig mulighed for at overføre digital lyd fra din ROG GR8 til en forstærker eller et fjernsyn.
Strømindgang (DC 19V) Den medfølgende strømadapter omformer vekselstrøm (AC) til jævnstrøm (DC) til brug med dette stik. Pc’en bliver strømforsynet gennem dette stik. For at undgå at beskadige din pc, skal du altid bruge den medfølgende strømadapter. ADVARSEL: Strømadapteren kan blive meget varm under brug. Undgå at tildække adapteren, og hold den væk fra kroppen. Beslaglås + hul til en Kensington-lås Beslaglåsen på oversiden låser sidebeslaget på din ROG GR8.
ROG GR8
2 Sådan bruger du din ROG GR8
Kom i gang Placering af din ROG GR8 Din ROG GR8 kan placeres på højkant eller ligge ned. Når du placerer din ROG GR8, skal du sørge for at gummiknopperne eller gummifødder er i kontakt med en flad og stabil overflade, som fx et bord eller skrivebord.
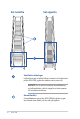
Slut AC-adapteren Sådan sluttes AC-strømadapteren til din ROG GR8: A. Slut strømkablet til AC-DC omformeren. B. Sæt AV-strømadapteren i en 100~240 V strømkilde. C. Sæt DC-strømadapteren i VivoPC’ens strømindgang (DC). BEMÆRK: Strømadapterens udseende kan variere afhængig af modellen og din region.
VIGTIGT! • Vi anbefaler stærkt, at du kun bruger AC-adapteren og kablet, der følger med din ROG GR8. • Vi anbefaler stærkt, at du kun slutter din ROG GR8 til en jordforbundet stikkontakt. • Stikkontakten skal være nem tilgængelig og være i nærheden af din ROG GR8. • For at afbryde din ROG GR8 fra strømforsyningen, skal du trække stikket ud af stikkontakten.
Tilslutning af en skærm Du har mulighed for at slutte en skærm eller en projektor til din ROG GR8, hvis de har følgende stik: • HDMI stik • DisplayPort-stik • VGA-stik (bruges med en DisplayPort til VGA-adapter eller HDMI til VGA-adapter) • DVI-stik (bruges med en HDMI til DVI-adapter) BEMÆRK: HDMI til DVI-adapter, DisplayPort til VGA-adapter eller HDMI til VGA-adapter sælges separat. Sådan slutter du en skærm til din ROG GR8: Forbind et skærmkabel enten til HDMI- eller DisplayPort-porten.
Tilslutning af tastatur og mus Det er muligt at tilslutte stor set alle slags USB-tastature og mus til din ROG GR8. Det er også muligt at tilslutte en USB-dongle til trådløse tastaturer og mus. Sådan slutter du et tastatur og en mus til din ROG GR8: Slut USB-kablet fra tastaturet og musen til en af USB 2.0/3.0 portene på din ROG GR8.
Tænd for din ROG GR8 Tryk på tænd/sluk-knappen for at tænde for din ROG GR8.
Brug af Miracast Receiver Din ROG GR8 giver dig mulighed for at spejle skærmen fra andre Miracast-aktiverede enheder eller en pc, via funktionen Miracast Receiver BEMÆRK: Miracast-visningen understøttes kun på HDMI-porten. Tilslutning af en Miracast-aktiveret Android-enhed 1. Slut den medfølgende strømadapter til din ROG GR8. 2. Tryk på knappen til Miracast Receiver. BEMÆRK: LED-indikatoren på Miracast Receiver-knappen lyser op, og skifter til rødt for at angive, at Miracast Receiver er aktiveret. 3.
Tilslutning af Windows® 8.1 / Windows 8.1 PRO-enheder 1. Slut den medfølgende strømadapter til din ROG GR8. 2. Tryk på knappen til Miracast Receiver. BEMÆRK: LED-indikatoren på Miracast Receiver-knappen lyser op, og skifter til rødt for at angive, at Miracast Receiver er aktiveret. 3. På din enhed, der kører med Windows 8.1 / Windows 8.1 PRO, skal du åbne symbollinjen, og vælg derefter Devices (Enheder). 4.
Tilslutning af Intel® WiDi-understøttede enheder 1. Tænd for din ROG GR8. 2. Tryk på knappen til Miracast Receiver. BEMÆRK: LED-indikatoren på Miracast Receiver-knappen lyser op, og skifter til rødt for at angive, at Miracast Receiver er aktiveret. 3. Start Intel WiDi på din enheden. 4. I vinduet Detected Adapters (Fundne adaptere), skal du vælge SSID’et til din ROG GR8, og klik på Connect (Forbind). 5. Indtast WPS-pinkoden, der vises på din tv-skærm, og klik derefter på Next (Næste). 6.
Genopretning af systemet VIGTIGT! Dette afsnit gælder kun for modeller, hvor det medfølgende operativsystem er installeret på din ROG GR8. Nulstilling af din pc Valgmuligheden Reset your PC (nulstil din pc), gendanner din ROG GR8 til dens fabriksindstillinger. VIGTIGT! Sørg for, at lave en backup af alle dine data før du bruger denne funktion. Sådan nulstiller du din pc: 1. Tryk på under opstart.
Gendannelse med en systembilledfil VIGTIGT! Dette afsnit gælder kun for modeller, hvor det medfølgende operativsystem er installeret på din ROG GR8. Du kan oprette et USB-gendannelsesdrev, og brug dette til at gendanne indstillingerne på din pc Oprettelse af et USB-gendannelsesdrev ADVARSEL! Alle filerne på din USB-lagerenhed slettes permanent. Før du fortsætter, skal du sørge for at du laver en backup af alle dine date. Sådan opretter du et USB-gendannelsesdrev: 1.
Sådan fjerner du alt og geninstallere Windows VIGTIGT! This section only applies for models with the bundled operating system installed in your ROG GR8. Du kan gendanne din ROG GR8 til dens originale indstillinger, ved at bruge valgmuligheden Remove everything and reinstall (Fjern alt og geninstaller) i pc-indstillingerne. Se trinene nedenfor, hvordan du bruger denne funktion. VIGTIGT! Back up all your data before using this option. BEMÆRK: Denne proces kan godt tage et stykke tid. 1. Åbn symbollinjen.
Sådan slukker du for din ROG GR8 Hvis din ROG GR8 holder op med at reagere, skal du holde tænd/ sluk-knappen nede i mindst fire (4) sekunder, indtil den slukker. Sådan sætter du din ROG GR8 i dvale For at sætte din ROG GR8 i dvale, skal du trykke en gang på tænd/ sluk-knappen. Åbning til BIOS-opsætningen BIOS (Basic Input and Output System) gemmer hardwareindstillinger, som skal bruges til at starte systemet på din ROG GR8.
Hurtig adgang til din BIOS Sådan får du hurtig adgang til din BIOS: • Sluk din ROG GR8, tryk derefter på tænd/sluk-knappen for at tænde din ROG GR8 igen, og tryk herefter på eller under POST. • Når din pc er slukket, skal du trække strømkablet ud af den. Sæt strømkablet i igen, og tryk på tænd/sluk-knappen, for at tænde for din ROG GR8. Tryk på eller under POST. BEMÆRK: POST (Power-On Self Test) er en række softwarestyrede diagnosetests, som kører når du tænder for din pc.
3 Opgradering af din ROG GR8
Opgradering af hukommelsesmoduler Din ROG GR8 har to stik til SO-DIMM-kort, der giver dig mulighed for at installere op til to 8 GB DDR3L 204-ben SO-DIMM-moduler, og i alt få 16 GB hukommelse. VIGTIGT! Der kan kun installeres DDR3L (1.35V Low Voltage) 204-ben SO-DIMM i DIMM-stikkene på din ROG GR8. BEMÆRK: Du kan finde en liste over kompatible DIMMs på http://www.asus.com. Sådan installerer eller opgraderer du hukommelsesmodulet: 1. Sluk for ROG GR8. 2. Fjern alle kabler og periferiudstyr. 3.
5. Tryk sidedækslet bagud for at frigøre det, og løft det forsigtigt op for at tage det af kabinettet. 6. Lirk låget til SO-DIMM-stikket åben.
7. Fjernelse af hukommelsesmodulerne. Sådan tages et hukommelsesmodul ud: A. Tryk på hver side af klemmerne, for at frigøre hukommelsesmodulet. B. Tag forsigtigt hukommelsesmodulet ud. C. Gentag trin A og B, for at tage det andet hukommelsesmodul ud. Bemærkninger: • Brug det samme model og hastighed, når du udskifter hukommelsesmodulerne. • Tag først det øverste hukommelsesmodul ud, hvis du også ønsker at udskifte det nederste hukommelsesmodul.
8. Hent dine udskiftningsmoduler. 9. Sæt de nye hukommelsesmoduler i stikket. VIGTIGT! Sæt altid det nederste modul i først, uanset om der skal sættes ét eller to moduler i. Sådan sættes et nyt hukommelsesmodul i: Sæt hukommelsesmodulet ind i stikket (A), og tryk det ned (B), indtil det er sikkert rigtigt på plads. 10. Sæt låget på SO-DIMM-stikket igen. Sørg for, at modulet sidder ordentligt i stikket.
11. Sæt sidebeslag på igen, og skub den mod forsiden på din ROG GR8. 12. Tryk låsen opad, for at fastgøre sidedækslet til kabinettet.
Installering af en 2,5” harddisk Din ROG GR8 understøtter en 2,5" harddisk eller en 2,5" SSD-disk for ekstra lagerkapacitet. Sådan installerer du en 2,5” harddisk eller SSD-disk: 1. Sluk for ROG GR8. 2. Fjern alle kabler og periferiudstyr. 3. Løg din ROG GR8 på siden på en stabil og plan overflade. 4. Tryk låsen på bagsiden nedad for at frigøre sidebeslaget. BEMÆRK: Inden du fjerner sidedækslet, skal du sørge for at du kan se etiketten UNLOCK på låsen.
5. Tryk sidedækslet bagud for at frigøre det, og løft det forsigtigt op for at tage det af kabinettet. 6. Fjern de fire skruer, der fastholder 2,5” harddisken/SSD-disken til udvidelsesbåsen. 7. Brug flappen til at trække udvidelsesbåsen ud af kabinettet.
8. Forbered en 2,5” harddisk eller SSD-harddisk, og det medfølgende sæt af fire skruer. 9. Vend udvidelsesbåsen om, og put en 2,5” harddisk/SSDdisk i båses, som vist på billedet. Sørg for, at skruehullerne på 2,5” harddisk/SSD-disk passer med skruehullerne på udvidelsesbåsen. 2,5” harddisk/SSD Skruehuller i harddisk/SSD-disk 2,5” udvidelsesbås Skruehuller i udvidelsesbås 10. Spænd 2,5” harddisken eller SSD-harddisken fast til udvidelsesbåsen med de medfølgende skruer.
11. Put forsigtigt 2,5” harddisken/SSD-disken og udvidelsesbåsen ind i drevbåsen, og tryk den mod SATA-stikket. 2,5” harddisk/SSD-disk og udvidelsesbås SATA-stik på harddisk/SSD-disk SATA-stik i drevbåsen 12. Spænd 2,5” udvidelsesbås fast med de fire skruer.
13. Sæt sidebeslag på igen, og skub den mod forsiden på din ROG GR8. 14. Tryk låsen opad, for at fastgøre sidedækslet til kabinettet.
ROG GR8
Tillæg
Sikkerhedsinformation Din ROG GR8 konstrueret og testet til at opfylde de seneste sikkerhedsstandarder for informationsteknologiudstyr. Af hensyn til din sikkerhed er det imidlertid vigtigt, at du læser nedenstående sikkerhedsinstruktioner. Installation af systemet • Læs og følg alle dokumentationens anvisninger, inden du bruger systemet. • Brug ikke produktet nær vand eller varmekilder. • Anbring systemet på en stabil overflade. • Dækslets åbninger er til ventilation.
Advarsel vedrørende lithium-batterier PAS PÅ! Fare for eksplosion, hvis batteriet anbringes forkert. Udskift kun med samme eller tilsvarende type anbefalet af fabrikanten. Bortskaf brugte batterier i henhold til fabrikantens anvisninger. SKIL IKKE AD Garantien dækker ikke, hvis produktet har været skilt ad af brugere Smid IKKE ROG GR8 ud med husholdningsaffaldet. Dette produkt er designet på en sådan måde, at dele af det kan gebruges.
Regulative bemærkninger REACH Idet vi overholder REACH (registrering, vurdering og godkendelse af samt begrænsninger for kemikalier) bestemmelserne, offentliggør vi vores produkters kemiske stoffer på ASUS REACH webstedet http://csr.asus.com/english/REACH.htm. ASUS Genbrug / Returservice ASUS’s genbrugs- og returprogrammer skyldes vores forpligtelse til at opfylde de højeste standarder indenfor miljøbeskyttelse.
eller fjernsynsmodtagelsen, som kan fastslås ved at slukke og tænde for udstyret, er brugeren forpligtiget til at prøve at afhjælpe interferensen ved hjælp af en, eller flere af følgende foranstaltninger: • Reorienter eller finde en anden placering til modtageantennen. • Forøge afstanden mellem udstyret og modtageren. • Forbinde udstyret til en stikkontakt på et andet kredsløb, end det, hvor modtageren er forbundet. • Kontakt forhandleren, eller en erfaren radio/TV tekniker for hjælp.
Begrænsning på trådløse frekvensbånd i Frankrig Nogle områder i Frankrig har begrænsninger på nogle frekvensbånd. Den “worst case” maksimum autoriserede effekt indendørs er: • 10mW for hele 2,4 GHz båndet (2400 MHz–2483,5 MHz) • 100mW for frekvenser mellem 2446,5 MHz og 2483,5 MHz BEMÆRK: Kanal 10 til 13 inklusive opererer i båndet 2446,6 MHz til 2483,5 MHz.
Disse krav bliver sandsynligvis ændret over tid, hvilket tillader dig at bruge dit trådløse LAN kort i flere områder af Frankrig. Kontroller venligst med ART, for den seneste information (www.art-telecom.fr) BEMÆRK: Dit WLAN kort transmitterer mindre end 100mW, men mere end 10mW.
CE mærkning advarsel CE mærkning af enheder uden trådløs LAN/Bluetooth Den afsendte version af denne enhed overholder kravene i EEC direktiverne 2004/108/EC vedrørende ”Elektromagnetisk kompatibilitet” og 2006/95/EC , ”Lavspændingsdirektivet”. CE mærkning af enheder med trådløs LAN/Bluetooth Dette udstyr overholder kravene i direktiv 1999/5/EC fra Europaparlamentet og –kommissionen af 9. Marts 1999 vedrørende radio- og telekommunikationsudstyr og gensidig anerkendelse af overensstemmelse.
ENERGY STAR overholdende produkt ENERGY STAR er et fælles program under U.S. Environmental Protection Agency og U.S. Department of Energy og hjælper os alle med at spare penge og beskytte miljøet via energieffektive produkter og -praksisser. Alle ASUS produkter med ENERGY STAR bomærket overholder ENERGY STAR standarden og enegistyringsfunktionen er som standard aktiveret.Skærmen og computeren er indstillet til automatisk, at gå i dvale efter henholdsvis 10 og 30 minutter uden aktivitet.
ASUS kontaktinformation ASUSTeK COMPUTER INC. Adresse 15 Li-Te Road, Peitou, Taipei, Taiwan 11259 Telefon +886-2-2894-3447 Fax +886-2-2890-7798 E-mail info@asus.com.tw Websted www.asus.com.com/ Teknisk hjælp Telefon +86-21-38429911 Fax +86-21-58668722, Udv. 9101# Online-brugerhjælp http://www.asus.com/tw/support/ ASUS COMPUTER INTERNATIONAL (Amerika) Adresse 800 Corporate Way, Fremont, CA 94539, USA Telefon +1-510-739-3777 Fax +1-510-608-4555 Websted http://www.asus.
EC Declaration of Conformity We, the undersigned, Manufacturer: ASUSTeK COMPUTER INC. Address: 4F, No. 150, LI-TE Rd., PEITOU, TAIPEI 112, TAIWAN Authorized representative in Europe: ASUS COMPUTER GmbH Address, City: HARKORT STR.
DECLARATION OF CONFORMITY Per FCC Part 2 Section 2. 1077(a) Asus Computer International Responsible Party Name: 800 Corporate Way, Fremont, CA 94539. Address: Phone/Fax No: (510)739-3777/(510)608-4555 hereby declares that the product Product Name : Desktop PC Model Number : GR8 Conforms to the following specifications: FCC Part 15, Subpart B, Unintentional Radiators Supplementary Information: This device complies with part 15 of the FCC Rules.