REPUBLIC OF GAMERS ROG GR8 Manuale utente
I9561 Prima edizione Agosto 2014 INFORMAZIONI SUL COPYRIGHT Nessuna parte di questo manuale, compresi i prodotti e i software in esso descritti, può essere riprodotta, trasmessa, trascritta, archiviata in un sistema di recupero o tradotta in alcuna lingua, in alcuna forma e in alcun modo, fatta eccezione per la documentazione conservata dall’acquirente a scopi di backup, senza l’espressa autorizzazione scritta di ASUSTeK COMPUTER INC. (“ASUS”).
È responsabilità dell’utente, prima ancora di richiedere l’assistenza, effettuare il backup dei contenuti presenti sul Prodotto, inclusi i dati archiviati o il software installato. ASUSTeK COMPUTER INC. non è in alcun modo responsabile per qualsiasi danno, perdita di programmi, dati o altre informazioni archiviate su qualsiasi supporto o parte del prodotto per il quale viene richiesta l’assistenza; ASUSTeK COMPUTER INC.
Indice Informazioni sul manuale................................................................................ 6 Note e messaggi del manuale...................................................................... 6 Formati carattere............................................................................................... 6 Contenuto della confezione............................................................................ 7 Conoscete il vostro ROG GR8 Caratteristiche................................
Upgrade del ROG GR8 Aggiunta di moduli di memoria RAM........................................................33 Installazione un hard disk da 2.5-pollici....................................................38 Appendice Informazioni sulla sicurezza..........................................................................45 Informazioni preliminari...............................................................................45 Precauzioni d'uso.................................................................
Informazioni sul manuale Questo manuale descrive le caratteristiche hardware e software del vostro PC e le organizza nei seguenti capitoli: Capitolo 1: Conoscete il vostro ROG GR8 Descrizione delle componenti hardware del vostro ROG GR8. Capitolo 2: Utilizzo del vostro ROG GR8 Informazioni sull'uso del ROG GR8. Capitolo 5: Upgrade del ROG GR8 Questo capitolo fornisce informazioni su come aumentare la memoria e lo spazio di archiviazione del vostro ROG GR8.
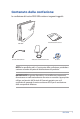
Contenuto della confezione La confezione del vostro ROG GR8 contiene i seguenti oggetti: ROG GR8 Cavo di alimentazione* Documentazione tecnica Adattatore di alimentazione AC* Set di viti NOTA: Le specifiche reali, e il contenuto della confezione, potrebbero variare a seconda del paese di distribuzione del prodotto.
1 Conoscete il vostro ROG GR8
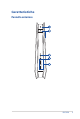
Caratteristiche Pannello anteriore ROG GR8 9
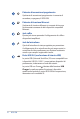
Pulsante di accensione/spegnimento Il pulsante di accensione/spegnimento vi consente di accendere, o spegnere, il ROG GR8. Pulsante di ricezione Miracast Il pulsante di ricezione Miracast vi consente di ricevere la schermata trasmessa da altri dispositivi compatibili Miracast. Jack cuffie Questo jack stereo permette il collegamento di cuffie o altoparlanti amplificati.
Vista dal basso Vista dall'alto Prese d'aria Le prese d'aria permettono all'aria fresca di entrare e all'aria calda di uscire dal vostro ROG GR8. IMPORTANTE! Per assicurare una dissipazione corretta e una sufficiente ventilazione verificate che le prese d'aria non siano ostruite. Piedini in gomma I piedini in gomma prevengono lo scivolamento del ROG GR8 e conferiscono maggiore stabilità quando il ROG GR8 è installato in verticale.
Pannello posteriore Indicatore LED HDD Questo indicatore si illumina quando il vostro ROG GR8 accede alla memoria interna. Jack ingresso audio Il jack d'ingresso audio (3.5mm) permette di collegare una sorgente audio stereo al ROG GR8. Questa funzione è utile, principalmente, per aggiungere una sorgente audio alle applicazioni multimediali. Jack uscita audio Questo jack stereo permette il collegamento del vostro sistema a cuffie o altoparlanti amplificati.
Jack del microfono Il jack del microfono è stato progettato per permettere il collegamento di un microfono esterno che può essere usato in occasione di video-conferenze, per sfruttare l'assistente vocale o per semplici registrazioni audio. Uscita audio digitale (S/PDIF ottica) L'uscita ottica S/PDIF (Sony/Philips Digital Interface) vi permette di trasferire il segnale audio digitale ad un amplificatore o ad una TV.
Ingresso alimentazione (DC 19V) L'adattatore di alimentazione AC/DC in dotazione converte la corrente alternata del vostro impianto domestico in corrente continua e la fornisce a questo ingresso. L'alimentazione fornita a questo ingresso fornisce alimentazione al PC. Per prevenire possibili danni al PC usate solamente l'adattatore di alimentazione in dotazione. ATTENZIONE! L'adattatore di alimentazione potrebbe riscaldarsi durante l'uso.
2 Utilizzo del vostro ROG GR8
Per iniziare Posizionamento del vostro ROG GR8 Il vostro ROG GR8 può essere installato in verticale o in orizzontale. Quando posizionate il vostro ROG GR8 assicuratevi che i piedini in gomma siano a contatto con la superficie su cui installate il sistema. Questa superficie deve essere il più possibile piatta e stabile.
Collegamento dell'adattatore di alimentazione Per collegare l'adattatore di alimentazione al ROG GR8: A. Collegate il cavo di alimentazione AC all'adattatore AC/DC. B. Collegate il cavo di alimentazione ad una presa di corrente che fornisca una tensione compresa nell'intervallo 100V~240V. C. Collegate l'uscita DC dell'alimentatore all'ingresso DC del ROG GR8. NOTA: L'adattatore di alimentazione potrebbe variare nell'aspetto a seconda della regione in cui vi trovate.
IMPORTANTE! • Raccomandiamo vivamente di usare solamente l'adattatore di alimentazione AC/DC, e il cavo di alimentazione, forniti con il vostro ROG GR8. • Assicuratevi che la presa a muro che intendete usare con il vostro ROG GR8 sia dotata di messa a terra. • La presa di corrente deve essere vicina all'unità e facilmente accessibile. • Per interrompere l'alimentazione principale scollegate il ROG GR8 dalla presa di corrente.
Collegamento di un display esterno Potete collegare un monitor, o un proiettore, al vostro ROG GR8 il quale può fornire le seguenti uscite: • Connettore HDMI • Connettore DisplayPort • Connettore VGA (tramite gli adattatori DisplayPort > VGA o HDMI > VGA) • Connettore DVI (tramite l'adattatore HDMI > DVI) NOTA: Gli adattatori HDMI > DVI, DisplayPort > VGA e HDMI > VGA sono acquistabili separatamente.
Collegamento di tastiera e mouse Potete collegare ogni tastiera USB, o mouse USB, al vostro ROG GR8. Potete anche scegliere di collegare un dongle USB per un sistema di tastiera e mouse senza fili. Per collegare una tastiera e un mouse al vostro ROG GR8: Collegate il cavo USB della vostra tastiera, o del vostro mouse, a una qualunque delle porte USB del vostro ROG GR8.
Accensione del ROG GR8 Premete il pulsante di accensione/spegnimento del vostro ROG GR8.
Utilizzo del ricevitore Miracast Il ROG GR8 vi consente di ricevere la schermata trasmessa da altri dispositivi compatibili Miracast, o PC, tramite la funzione ricevitore Miracast. NOTA: Il display Miracast è supportato solamente sulla porta HDMI. Collegamento di dispositivi Android compatibili Miracast 1. Collegate l'adattatore di alimentazione in dotazione al vostro ROG GR8. 2.
Connessione di dispositivi Windows® 8.1 / Windows® 8.1 PRO 1. Collegate l'adattatore di alimentazione in dotazione al vostro ROG GR8. 2. Premete il pulsante di ricezione Miracast. NOTA: Il LED sul pulsante di ricezione Miracast si illumina di colore rosso per indicare che la funzione ricevitore Miracast è abilitata. 3. Sul vostro dispositivo Windows® 8.1 / Windows® 8.1 PRO avviate la Charm bar quindi selezionate Dispositivi. 4. In Dispositivi selezionate Proietta quindi cliccate sul SSID del ROG GR8.
Connessione di dispositivi compatibili Intel WiDi® 1. Accendete il vostro ROG GR8. 2. Premete il pulsante di ricezione Miracast. NOTA: Il LED sul pulsante di ricezione Miracast si illumina di colore rosso per indicare che la funzione ricevitore Miracast è abilitata. 3. Avviate Intel WiDi sul vostro dispositivo. 4. Nella finestra Adattatori rilevati selezionate il SSID del ROG GR8 quindi cliccate su Connetti. 5. Digitate il PIN WPS che appare sulla vostra TV, quindi cliccate su Avanti. 6.
Ripristino del vostro sistema IMPORTANTE! Questa sezione è valida solamente per i modelli con il sistema operativo in dotazione installato sul ROG GR8. Reset del PC L'opzione Reimposta il PC ripristina il vostro ROG GR8 alle impostazioni predefinite di fabbrica. IMPORTANTE! Fate un backup dei vostri dati prima di procedere con questa operazione. Per resettare il vostro PC: 1. Premete durante l'avvio del PC.
Ripristino da un file immagine di sistema IMPORTANTE! Questa sezione è valida solamente per i modelli con il sistema operativo in dotazione installato sul ROG GR8. Potete creare un'unità di ripristino USB e utilizzarla in seguito per ripristinare le impostazioni del PC. Creazione di un'unità di ripristino USB ATTENZIONE! Durante il processo saranno cancellati, in modo permanente, tutti i file contenuti nel dispositivo di archiviazione USB.
Rimuovi tutto e reinstalla Windows IMPORTANTE! Questa sezione è valida solamente per i modelli con il sistema operativo in dotazione installato sul ROG GR8. Il ripristino del ROG GR8 alle impostazioni predefinite di fabbrica può essere fatto mediante l'opzione Rimuovi tutto e reinstalla Windows nel menu Impostazioni PC. Per utilizzare questa opzione fate riferimento alle istruzioni qui di seguito. IMPORTANTE! Fate un backup dei vostri dati prima di procedere con questa operazione.
Spegnimento del ROG GR8 Nel caso in cui il vostro ROG GR8 non dia risposta alle vostre istruzioni premete e tenete premuto il pulsante di accensione/ spegnimento per circa quattro (4) secondi fino a quando il ROG GR8 non si spegne. Attivazione della modalità di Sospensione Per attivare la modalità di Sospensione premete una volta il pulsante di accensione/spegnimento.
Accesso rapido al BIOS Per entrare rapidamente nel BIOS: • Spegnete il ROG GR8, premete di nuovo il pulsante di accensione/spegnimento per riaccendere il ROG GR8 quindi premete o durante la fase di POST. • Quando il ROG GR8 è spento scollegate il cavo di alimentazione dal connettore di alimentazione del ROG GR8. Collegate nuovamente il cavo di alimentazione e premete il pulsante di accensione/spegnimento per accendere il ROG GR8. Premete o durante la fase di POST.
ROG GR8 31
Upgrade del ROG GR8 3
Aggiunta di moduli di memoria RAM Il vostro ROG GR8 è dotato di due slot di memoria che vi permettono di installare due moduli di memoria DDR3 8 GB SO-DIMM da 2 GB, 4 GB o 8 GB, per un totale massimo di 16 GB. IMPORTANTE! Negli slot DIMM del ROG GR8 potete installare solamente moduli DDR3 (1.35V Low Voltage) 204-pin SO-DIMM. NOTA: Fate riferimento a http://www.asus.com per l'elenco dei moduli DIMM compatibili. Per installare, o aggiornare, i moduli di memoria: 1. Spegnete il vostro ROG GR8. 2.
5. Fate scivolare la cover verso l'esterno per estrarla dallo chassis quindi sollevatela leggermente per rimuoverla. 6. Sollevate la cover per accedere allo slot SO-DIMM.
7. Estraete i moduli di memoria. Per rimuovere un modulo di memoria: A. Premete le clip su ambo i lati per rilasciare il modulo di memoria. B. Rimuovete delicatamente il modulo di memoria. C. Ripetete i passaggi A e B per rimuovere l'altro modulo di memoria. NOTE: • Quando sostituite i moduli di memoria assicuratevi di usare moduli dello stesso modello e velocità. • Se volete sostituire il modulo di memoria inferiore assicuratevi di aver rimosso prima il modulo superiore.
8. Prendete il nuovo modulo di memoria. 9. Installate i nuovi moduli di memoria nello slot. IMPORTANTE! Quando installate i moduli di memoria installate prima quello inferiore. Per installare un nuovo modulo di memoria. Allineate e inserite il modulo di memoria nello slot (A) quindi spingetelo verso il basso fino a quando non è inserito correttamente (B). 10. Riposizionate la cover dello slot SO-DIMM. Assicuratevi che la cover sia installata correttamente.
11. Riposizionate la cover laterale e fatela scorrere verso la parte anteriore del ROG GR8 per ancorarla. 12. Spostate il fermo verso l'alto per bloccare la cover allo chassis.
Installazione un hard disk da 2.5-pollici Il ROG GR8 supporta un HDD da 2.5-pollici o un SSD da da 2.5-pollici per fornire capacità di archiviazione addizionale. Per installare un HDD o SSD da 2.5-pollici: 1. Spegnete il vostro ROG GR8. 2. Scollegate tutti i cavi e le periferiche. 3. Posizionate il ROG GR8 su un lato e su una superficie piana e stabile. 4. Spostate il fermo verso il basso per liberare la cover laterale.
5. Fate scivolare la cover verso l'esterno per estrarla dallo chassis quindi sollevatela leggermente per rimuoverla. 6. Rimuovete le quattro viti che fissano l'HDD/SSD da 2.5-pollici. 7. Usando la linguetta estraete la slitta dell'hard disk per rimuoverla dallo chassis.
8. Preparate un HDD/SSD da 2.5 pollici e le quattro viti in dotazione. 9. Girate la slitta verso l'alto e posizionate l'HDD/SSD da 2.5-pollici su di essa come mostrato in figura. Assicuratevi che i fori per le viti dell'HDD/SSD da 2.5-pollici corrispondano ai fori sulla slitta per hard disk. HDD/SSD da 2.5 pollici Fori per le viti dell'HDD/SSD slitta per hard disk da 2.5-pollici Fori per le viti slitta HDD/SSD 10. Fissate l'HDD/SSD da 2.5 pollici alla slitta usando le viti in dotazione.
11. Posizionate l'HDD/SSD da 2.5 pollici e slitta nell'alloggiamento quindi fate scivolare il blocco verso i connettori SATA. HDD/SSD da 2.5 pollici e slitta Connettore SATA HDD/SSD Connettore SATA 12. Fissate la slitta con le quattro viti in dotazione.
13. Riposizionate la cover laterale e fatela scorrere verso la parte anteriore del ROG GR8 per ancorarla. 14. Spostate il fermo verso l'alto per bloccare la cover laterale allo chassis.
Appendice
Informazioni sulla sicurezza Il vostro ROG GR8 è stato progettato e testato per soddisfare gli ultimi standard di sicurezza per dispositivi informatici. Tuttavia, per garantire la vostra sicurezza, è importante leggere e comprendere le seguenti istruzioni fondamentali. Informazioni preliminari • Leggete e seguite tutte le istruzioni di questa documentazione prima di accendere il sistema. • Non utilizzate questo prodotto vicino all'acqua o a fonti di calore come radiatori.
– Un liquido è stato versato nel sistema. – Il sistema non funziona correttamente nonostante si siano seguite le istruzioni operative. – Il sistema è caduto o la scocca è stata danneggiata. – Le prestazioni del sistema subiscono una variazione apprezzabile. Avvertenza sulla batteria agli ioni di Litio ATTENZIONE: Pericolo di esplosione se la batteria è sostituita in modo errato. Sostituite solo con un tipo uguale, o equivalente, consigliato dal produttore.
Avvisi sulle conformità Comunicazione REACH Nel rispetto del regolamento REACH (Registration, Evaluation, Authorisation and Restriction of Chemicals) le sostanze chimiche contenute nei prodotti ASUS sono state pubblicate sul sito web ASUS REACH: http://csr.asus.com/english/REACH.htm Servizio di ritiro e riciclaggio ASUS Il programma di ritiro e riciclaggio dei prodotti ASUS deriva dal costante impegno aziendale a raggiungere i più elevati standard di protezione ambientale.
Questi limiti sono stati definiti per offrire una ragionevole protezione contro le interferenze dannose quando l’apparecchio viene usato in ambienti residenziali. Questo apparecchio genera, usa e può emettere energia in radiofrequenza e, se non viene installato e utilizzato come indicato nel manuale d’uso, può provocare interferenze dannose alle comunicazioni radio. Non è tuttavia possibile garantire che non si verifichino interferenze in casi particolari.
Dichiarazione di conformità (Direttiva R&TTE 1999/5/EC) I seguenti requisiti sono stato soddisfatti e sono considerati rilevanti e sufficienti: • • • • Requisiti essenziali [Articolo 3] Requisiti di protezione per la salute e sicurezza [Articolo 3.1a] Test per la sicurezza elettrica [EN 60950] Requisiti di protezione per la compatibilità elettromagnetica [Articolo 3.1b] • Test per la compatibilità elettromagnetica [EN 301 489-1] & [EN 301 489-17] • Utilizzo effettivo dello spettro radio [Articolo 3.
Dipartimenti in cui è permesso l’utilizzo di dispositivi che sfruttano lo spettro di frequenza 2400-2483.
Avviso marchio CE Marchio CE per dispositivi sprovvisti di WLAN/Bluetooth Questa versione del dispositivo soddisfa i requisiti previsti dalla direttiva EEC 2004/108/EC “Electromagnetic compatibility” (Compatibilità elettromagnetica) e 2006/95/EC “Low voltage directive” (Direttiva per i sistemi in bassa tensione).
Prodotto compatibile ENERGY STAR energetico. ENERGY STAR è un programma congiunto dell'agenzia americana per la protezione ambientale (U.S. Environmental Protection Agency) e del ministero statunitense per l'energia (U.S.
Contatti ASUS ASUSTeK COMPUTER INC. (Asia e Pacifico) Indirizzo 15 Li-Te Road, Peitou, Taipei, Taiwan 11259 Telefono +886-2-2894-3447 Fax +886-2-2890-7698 E-mail info@asus.com.tw Sito web www.asus.com.tw Supporto Tecnico Telefono +86-21-3842-9911 Fax di supporto +86-21-5866-8722, est. 9101 # Supporto online http://support.asus.com/techserv/techserv.
EC Declaration of Conformity We, the undersigned, Manufacturer: ASUSTeK COMPUTER INC. Address: 4F, No. 150, LI-TE Rd., PEITOU, TAIPEI 112, TAIWAN Authorized representative in Europe: ASUS COMPUTER GmbH Address, City: HARKORT STR.
DECLARATION OF CONFORMITY Per FCC Part 2 Section 2. 1077(a) Asus Computer International Responsible Party Name: 800 Corporate Way, Fremont, CA 94539. Address: Phone/Fax No: (510)739-3777/(510)608-4555 hereby declares that the product Product Name : Desktop PC Model Number : GR8 Conforms to the following specifications: FCC Part 15, Subpart B, Unintentional Radiators Supplementary Information: This device complies with part 15 of the FCC Rules.