
User Manual


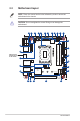
Table Of Contents
- Chapter 1 Product overview
- Chapter 2 Motherboard information
- Chapter 3 BIOS setup
- 3.1 BIOS setup program
- 3.1.1 BIOS menu screen
- 3.2 Main menu
- 3.3 Advanced menu
- 3.3.1 LVDS Configuration
- 3.3.2 PCH-FW Configuration
- 3.3.3 Trusted Computing
- 3.3.4 CPU Configuration
- 3.3.5 Graphics Configuration
- 3.3.6 Power Management
- 3.3.7 PCI Express Configuration
- 3.3.8 Super IO Configuration
- 3.3.9 Serial Console Redirection
- 3.3.10 SATA Configuration
- 3.3.11 Network Stack Configuration
- 3.3.12 USB Configuration
- 3.3.13 NVMe Configuration
- 3.3.14 Onboard Devices Configuration
- 3.3.15 APM Configuration
- 3.3.16 EZ-Flash
- 3.3.17 IO Expander Configuration
- 3.3.18 Watchdog Timer
- 3.4 Hardware Monitor menu
- 3.5 Security menu
- 3.6 Boot menu
- 3.7 Exit menu
- 3.1 BIOS setup program
- Appendix

2-1
Chapter 2: Motherboard information
Chapter 2
Motherboard information
2.1 Before you proceed
Take note of the following precautions before you install motherboard components
or change any motherboard settings.
CAUTION!
• Unplug the power cord from the wall socket before touching any
component.
• Before handling components, use a grounded wrist strap or touch a safely
grounded object or a metal object, such as the power supply case, to avoid
damaging them due to static electricity.
• Hold components by the edges to avoid touching the ICs on them.
• Whenever you uninstall any component, place it on a grounded antistatic
pad or in the bag that came with the component.
• Before you install or remove any component, always remove the AC power
by unplugging the power cord from the power outlet. Failure to do so may
cause severe damage to the motherboard, peripherals, or components.
Chapter 2 Motherboard information