1. Introduction Introduction The ASUS LS99 LAN/SCSI card can only be installed on a motherboard with an ASUS proprietary expansion slot. See 2.3 Installing the ASUS LAN/SCSI card for location of this slot. The ASUS LS99 LAN/SCSI card enables you to connect up to 30 SCSI devices— such as very large arrays of high-performance HDDs, external storage subsystems, clustered configurations, Ultra160 hard disk drives, scanners, and CD-ROM drives.
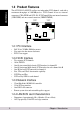
1.2 Product Features 1. Introduction The ASUS LS99 LAN/SCSI card has two independent SCSI channels, each with a maximum throughput of 160 MBytes/sec. SCSI Channel A has two internal connectors (CHA-WIDE and SCSI-50). SCSI Channel B has one internal connector (CHB-WIDE) and one external connector (CHBEXTWIDE).
Hardware Installation 2 2. HW Installation Discharge any static electricity build-up before handling your LAN/SCSI card by touching a grounded metal object (like the exposed metal parts on the back of your computer). Remove the ASUS LS99 Dual Channel LAN/SCSI card from the packing and check that it is not damaged. CAUTION: Static charges on your body can damage electronic components. Handle plug-in boards by the edge; do not touch board components or gold connector contacts.
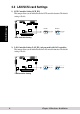
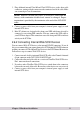
2.2 LAN/SCSI card Settings 1) SCSI Controller Setting (SCSI_EN) This jumper allows you to enable/disable the SCSI controller function. The default setting is Enable. ® 2. HW Installattion Enable Disable 1 2 3 1 2 3 SCSI_EN LAN_EN SCSI_EN LAN_EN SCSI Controller Setting 2) LAN Controller Setting (LAN_EN) (only on model with LAN controller) This jumper allows you to enable/disable the LAN controller function. The default setting is Enable.
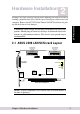
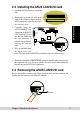
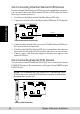
2.3 Installing the ASUS LAN/SCSI card 1. Locate the ASUS proprietary expansion slot. PCI Expansion Slot 2. Remove the expansion slot cover on the back of the computer aligned with the ASUS proprietary expansion slot. Save the slot cover screw. 2. HW Installation CHA-WIDE CHB-WIDE ® 1 CHBEXTWIDE 3. Carefully insert the ASUSCONNECT edge connection of the ASUS LS99 LAN/SCSI card into this slot. Make sure the edge connector is properly engaged before pressing the card into place.
2.5 Setting Up SCSI Devices There are several things to do before you connect your SCSI devices to the ASUS LS99 LAN/SCSI card: 2. HW Installattion • Check the SCSI IDs • Set the termination • Connect the power cables Since setup can vary from device to device, always refer to the device’s documentation for specific instructions. Below are some guidelines for setting SCSI IDs and termination on your devices. Refer to the Appendix for more information on these topics. 2.5.
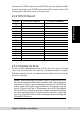
Determine the SCSI ID of each device on the SCSI bus. Note any duplications. Make any necessary changes to the SCSI IDs and record the IDs for future reference. The following table is provided as a place to keep this record. 2.5.2 SCSI ID Record SCSI Device Channel A SCSI Device Channel B 2. HW Installation SCSI ID 15 14 13 12 11 10 09 08 07 06 05 04 03 02 01 00 2.5.
2.6 Connecting Devices You can connect a total of 30 SCSI devices to the ASUS LS99 LAN/SCSI card, with up to 15 devices on each SCSI channel. Before connecting devices, be sure to review 2.5 Setting Up SCSI Devices. 2.6.1 Connecting Internal Ultra160 and Ultra2 Devices 2. HW Installattion A special 68-pin LVD cable is provided to connect internal Ultra160 or Ultra2 SCSI devices.
3. Plug additional internal Ultra160 and Ultra2 SCSI devices to the other cable connectors, starting with the connector at the terminated end of the cable. Make sure to match pin-1 on all connections. NOTE: Internal Ultra160 and Ultra2 SCSI devices come from the factory with termination disabled and cannot be changed. Proper termination is provided by the terminator at the end of the LVD SCSI cable. 2. HW Installation 4.
2.6.3 Connecting Ultra/Fast Narrow SCSI Devices If you have internal Ultra/Fast Narrow SCSI devices with standard 50-pin connectors, you can connect them to the 50-pin internal SE Narrow SCSI connector. Follow these steps to connect the devices: 1. Locate the provided 50-pin internal Ultra/Fast Narrow SCSI cable. 2. Connect one end of the cable to the 50-pin internal SE Narrow SCSI connector. 2. HW Installattion ® SCSI-50 1 Internal Narrow Internal Narrow SCSI Connector 3.
Follow these steps to connect external SCSI devices: 2. HW Installation 1. Connect one end of the external SCSI cable to the external Ultra160 connector. 2. Connect the other end of the cable to a SCSI connector on the back of an external device. Pin-1 must match on all connections. If you are installing only one external device, terminate the device and skip to step 4. 3. Connect the other external SCSI devices by linking each device to the previous one. Terminate only the device at the end of the chain.
2.6.7 Connecting to the Network A connector is available (only on model with LAN) to allow connection to a Local Area Network (LAN) through a network hub. ® 2.
Configuring the ASUS LS99 3 3.1 Configuring the Motherboard BIOS 3. Configuration To access the motherboard BIOS setup program, press during POST. This screen image is for reference purposes only. Refer to your motherboard BIOS for actual settings. Onboard LAN Boot ROM [Disabled] Leave on default setting. Configuration options: [Disabled] [Enabled] ONB SCSI BIOS First [No] Setting this field to [Yes] gives priority to the onboard SCSI BIOS for SCSI functions over other SCSI controllers.
3.2 Configuring Using SCSISelect SCSISelect, which is included with the ASUS LS99 SCSI Card, enables you to change SCSI settings without opening the computer or handling the card. SCSISelect also enables you to low-level format or verify the disk media of your SCSI hard disk drives. The following table lists the available and default settings for each SCSISelect option.
SCSISelect Options Available Settings Default Setting 0-15 Enabled Disabled Enabled Disabled Enabled Disabled 7 Disabled SCSI Bus Interface Definitions SCSI Controller ID SCSI Controller Parity Ch. A1 SCSI Controller Termination: Ch.
3.2.1 Starting SCSISelect Follow these steps to start SCSISelect: 1. Turn on or restart your computer. During the startup process, pay careful attention to the messages that appear on your screen. 2. When the following message appears on your screen, press the + keys simultaneously (this message appears for only a few seconds): Press for SCSISelect (TM) Utility! 3. Select SCSI Channel A or B. Most SCSISelect options can be set separately for each SCSI channel. 4.
Advanced Options Boot Device Configuration • Boot SCSI Controller—(Default: A First) Specifies which of the two SCSI channels the boot device is connected to (if the computer boots from a SCSI device). If you change this setting, the change automatically applies to both SCSI channels. • Boot SCSI ID—(Default: 0) Specifies the SCSI ID of your boot device. We recommend that you do not change the default setting. If you change this setting, the change automatically applies to both SCSI channels.
The following options have no effect if the SCSI Card BIOS is disabled. (The SCSI Card BIOS is normally enabled by default.) • • BIOS Multiple LUN Support—(Default: No) Leave this setting on No if the device does not have multiple Logical Unit Numbers (LUNs). When set to Yes, the SCSI card BIOS provides boot support for a SCSI device with multiple LUNs (for example, a CD “jukebox” device in which multiple CDs can be accessed simultaneously).
• SCSI Controller Int 13 Support—(Default: Enabled) Enables or disables the SCSI card BIOS. If you change this setting, the change automatically applies to both SCSI channels. • Leave on Enabled to enable the SCSI card BIOS and allow it to scan and initialize all SCSI devices. • Set to Disabled:Not scan if the devices on the SCSI bus (for example, CDROM drives) are controlled by software drivers and do not need the BIOS, and you do not want the BIOS to scan the SCSI bus.
3.2.4 Using SCSI Disk Utilities To access the SCSI disk utilities, follow these steps: 1. Select the SCSI Disk Utilities option from the menu that appears after starting SCSISelect.SCSISelect scans the SCSI bus (to determine the devices installed) and displays a list of all SCSI IDs and the devices assigned to each ID. 2. Use the arrow keys to move the cursor to a specific ID and device, then press . 3. A small menu appears, displaying the options Format Disk and Verify Disk Media.
Installing SCSI Drivers 4 4.1 Windows 95/98 To install Windows 98 from your CD-ROM drive, you will need to update the Windows 95/98 startup disk that came with your Windows 98 CD. You need to do this on a system that has DOS, Windows 95, or Windows 98 already installed. 1. Create a Windows 95/98 Startup disk if one is not provided with your Windows 95/98 CD. 2. Copy aspi8u2.sys and aspicd.sys from the ASUS support CD to the Windows 95/98 Startup disk. Fresh Windows 95/98 Installation From Floppy Disk 4.
4.2 Windows NT The adpu160m.sys driver is not embedded on the Windows NT 4.0 installation disks (or CD-ROM) and must be added during Windows NT installation. Fresh Windows NT 4.0 Installation From Floppy Disk 4. Driver Installation 1. Create the Windows NT driver disk. To create the Windows NT driver disk: a. Insert your ASUS support CD into your CD-ROM drive. b. Run Windows NT40.exe in e:\SCSI\MakeDisk\ or Copy the files from e:\SCSI\nt40 (where e is your CD-ROM drive letter) to a floppy disk. 2.
Troubleshooting 5 5.1 Troubleshooting Checklist Most problems with using the ASUS LS99 SCSI Card result from errors in preparing and connecting devices on the SCSI bus. If you have problems, check these items first. NOTE: If you have problems with a specific SCSI device when other connected SCSI devices are working correctly, please contact the manufacturer of the problem device for troubleshooting information.
When I start Windows 95/98, the system locks up when the Windows logo is displayed. How can I get the system to start so that I can verify that the SCSI card is functioning normally? 1. Start or restart your computer. 2. (For Windows 95:) When the message “Starting Windows 95” appears, press and release the F8 function key while the text is on your screen. (For Windows 98:) When the message “Starting Windows 98” appears, press and release the Ctrl key while the text is on your screen. 3.
An “X” inside a red circle appears with the ASUS LS99 SCSI card software driver in Device Manager. What does this mean? It means that the ASUS LS99 SCSI Card software driver is disabled and isn’t loading. To enable the driver 1. Double-click the ASUS LS99 SCSI card software driver in Device Manager. 2. Under the General tab, click the Original Configuration (current) box.
6. The setting and the hardware using the setting are displayed. • If a specific resource is not listed, the resource is not used by a device. • If a resource is listed more than once,the resource is used by more than one device. • If a resource is used by an unknown device, the resource is used but the device using the resource cannot be detected. (This condition is most common.) 7. Click Cancel to close the windows, then close Control Panel.
A Appendix A Understanding SCSI SCSI (pronounced “scuzzy”) stands for Small Computer Systems Interface. SCSI is an industry standard computer interface for connecting SCSI devices (such as a hard disk drive, CD-ROM drive, or scanner) to a common SCSI bus. A SCSI bus is an electrical pathway that consists of a SCSI adapter card (such as the ASUS LS99 SCSI Card) installed in a computer and one or more SCSI devices. SCSI cables are used to connect the devices to the SCSI adapter card.
• Appendix A • If you are booting your computer from a SCSI hard disk drive connected to the ASUS LS99 SCSI Card, the Boot SCSI ID setting in the SCSISelect utility must correspond to the SCSI ID of the device from which you are booting. By default, the Boot SCSI ID is set to 0. We recommend that you do not change this setting. In Windows® 95/98, you can use the Device Manager to determine which SCSI ID is assigned to each installed SCSI device.
Using SCSI Devices • Appendix A Using SCSI Hard Disk Drives If you connect a SCSI hard disk drive to the ASUS LS99 SCSI card that was previously connected to a different SCSI card, you must low-level format the drive before you can use it. Back up the data on the drive before you format it! (See 3.2.4 Using SCSI Disk Utilities for information on using the SCSISelect format utility.) CAUTION: A low-level format destroys all data on the drive.
Maximum Cable Lengths Appendix A The total length of cabling (internal and external) on the SCSI bus cannot exceed the maximum lengths listed in the following table. The third column lists the maximum number of SCSI devices you can connect to the SCSI card. Maximum Cable Length 25 m (82.0 ft) 12 m (39.4 ft) 3 m (9.8 ft) 3 m (9.8 ft) 3 m (9.8 ft) 1.5 m (4.
Glossary G Address - A specific location in memory, designated either numerically or by a symbolic name. Asynchronous Data Transfer - A method of transmission which does not require a common clock, but separates fields of data by stop and start bits. It is slower than synchronous data transfer. Glossary BIOS - Basic Input/Output System. Software that provides basic read/write capability. Usually kept as firmware (ROM based).
EISA - Extended Industry Standard Architecture. An extension of the 16-bit ISA bus standard. It allows devices to perform 32-bit data transfers. External SCSI Device - A SCSI device installed outside the computer cabinet. These devices are connected in a continuous chain using specific types of shielded cables. Fast SCSI - A standard for SCSI data transfers. It allows a transfer rate of up to 10 Mbytes/s over an 8-bit SCSI bus and up to 20 Mbytes/s over a 16-bit SCSI bus.
NVRAM - Non Volatile Random Access Memory. Actually an EEPROM (ElectronicallyErasable Programmable Read Only Memory chip) used to store configuration information. See EEPROM. Operating System - A program that organizes the internal activities of the computer and its peripheral devices. An operating system performs basic tasks such as moving data to and from devices, and managing information in memory. It also provides the user interface.
SCSI ID - A way to uniquely identify each SCSI device on the SCSI bus. Each SCSI bus has eight available SCSI IDs numbered 0 through 7 (or 0 through 15 for Wide SCSI). The host adapter usually gets ID 7 giving it priority to control the bus. SDMS - SCSI Device Management System. An ASUS software product that manages SCSI system I/O. STA - SCSI Trade Association. A group of companies that cooperate to promote SCSI parallel interface technology as a viable mainstream I/O interconnect for commercial computing.