
Network Card User Manual

Chapter 2 Hardware Installation 9
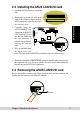
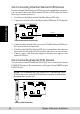
2. HW Installation
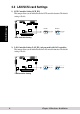
3. Plug additional internal Ultra160 and Ultra2 SCSI devices to the other cable
connectors, starting with the connector at the terminated end of the cable. Make
sure to match pin-1 on all connections.
NOTE: Internal Ultra160 and Ultra2 SCSI devices come from the
factory with termination disabled and cannot be changed. Proper
termination is provided by the terminator at the end of the LVD SCSI
cable.
4. Connect a power cable from your computer’s internal power supply to each
internal SCSI device.
5. Most PC cabinets are designed with a front panel LED, which may already be
connected to an existing IDE controller. You may connect this LED cable to
your SCSI host adapter. This connection causes the front panel LED to indicate
activity on the SCSI bus.
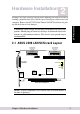
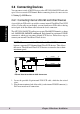
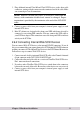
2.6.2 Connecting Internal Wide SCSI Devices
You can connect Wide SCSI devices to the internal LVD/SE connectors. If you do
this, we recommend that you connect them to the SCSI channel A LVD/SE connector
and that you connect all Ultra160 and Ultra2 devices to the SCSI Channel B connector.
Follow these steps to connect Wide SCSI devices:
1. Connect one end of a 68-pin internal Wide SCSI cable to the Channel A internal
68-pin connector on the ASUS LS99 LAN/SCSI card.
2. Connect the other end of the cable to a terminated Ultra/Fast Wide SCSI device.
Pin-1 must match on all connections.
3. If you have other Ultra/Fast Wide SCSI devices, attach them to the connectors
between the two ends of the cable. Be sure these other devices are unterminated.
4. Connect a power cable from your computer’s internal power supply to each
internal SCSI device.