QE3666 M2N-CM DVI Quick Start Guide Français Deutsch Italiano Español Русский Português Polski Česky Magyar Бъпгарски Română Srpski First Edition Published February 2008 Copyright © 2008 ASUSTeK COMPUTER INC. All Rights Reserved.
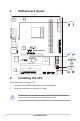
1. Motherboard layout 21.1cm (8.3in) USBPW5-10 2. FLOPPY USB56 USB78 USB910 USBPW5-10 8Mb BIOS Installing the CPU Follow these steps to install a CPU. 1. 2. Locate the 940-pin AM2+/AM2 socket on the motherboard. Lift up the socket lever to at least a 90° angle. The CPU fits only in one correct orientation.
. 4. 5. 3. Position the CPU above the socket such that the CPU corner with the gold triangle matches the socket corner with a small triangle. Carefully insert the CPU into the socket until it fits in place. When the CPU is in place, push down the socket lever to secure the CPU. The lever clicks on the side tab to indicate that it is locked.
. BIOS information The Flash ROM on the motherboard contains the BIOS. You can update the BIOS information or configure the parameters using the BIOS Setup utility. The BIOS screens include navigation keys and brief online help to guide you. If you encounter system problems, or if the system becomes unstable after you changed settings, load the Setup Defaults. Refer to Chapter 2 of the user guide for detailed BIOS information. Visit the ASUS website (www.asus.com) for updates.