Počítač Mini PC PL64 Řady Uživatelská příručka
CZ20696 První edice Prosinec 2022 INFORMACE O AUTORSKÝCH PRÁVECH Žádná část této příručky, včetně výrobků a softwaru v příručce popsaných, nesmí být reprodukována, přenesena, přepsána, uložena v systému pro ukládání dat, ani přeložena do žádného jazyka v žádné podobě a žádným způsobem, kromě dokumentace uložené kupujícím pro účel zálohování, bez písemného souhlasu firmy. ASUSTeK COMPUTER INC. (“ASUS”).
Obsah O této příručce.........................................................................................................................5 Konvence použité v této příručce....................................................................................6 Obsah balení............................................................................................................................7 Seznámení s přístrojem Mini PC Funkce.........................................................................
Obsah TPM Informace o TPM.....................................................................................................................44 Přílohy Bezpečnostní informace......................................................................................................46 Místo s omezeným přístupem...........................................................................................47 Příprava systému k použití.....................................................................................
O této příručce Tato příručka poskytuje informace o hardwaru a softwaru Mini PC, rozdělené do následujících kapitol: Kapitola 1: Seznámení s přístrojem Mini PC Tato kapitola podrobně popisuje hardwarové komponenty přístroje Mini PC. Kapitola 2: Používání přístroje Mini PC Tato kapitola uvádí informace o používání přístroje Mini PC.
Konvence použité v této příručce Zdůrazněné věty v této příručce uvádějí klíčové informace tímto způsobem: DŮLEŽITÉ! Tato zpráva uvádí zásadně důležité informace, které je nutno při provádění úkolu respektovat. POZNÁMKA: Tato zpráva uvádí doplňující informace a tipy, které mohou pomoci při provádění úkolů. VAROVÁNÍ! Tato zpráva uvádí důležité informace pro bezpečnost při provádění úkolů a předcházení poškození součástek Mini PC a dat.
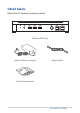
Obsah balení Balíček Mini PC obsahuje následující položky: ASUS Mini PC PL řady Adaptér střídavého napájení* Napájecí kabel* Technická dokumentace ASUS Mini PC PL Řady 7
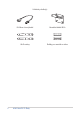
Volitelná položka(y) 8 RJ-50 na sériový kabel Montážní držák VESA Wi-Fi antény Držáky pro montáž na stěnu ASUS Mini PC PL Řady
POZNÁMKY: • Nejaktuálnější a nejpřesnější specifikace produktu jsou k dispozici ke stažení na www.asus.com. • Obrázky produktů a příslušenství jsou pouze ilustrativní. Skutečný vzhled a specifikace se mohou lišit v závislosti na modelu. • *Přiložený napájecí adaptér se může lišit podle modelu a oblasti. • Některé přiložené příslušenství s může u různých modelů lišit. Podrobnosti o tomto příslušenství viz příslušné uživatelské příručky. • Obrázek zařízení je pouze orientační.
ASUS Mini PC PL Řady
Seznámení s přístrojem Mini PC 1
Funkce Pohled zepředu Indikátor aktivity mechaniky Tato kontrolka svítí, když Mini PC využívá vnitřní úložná zařízení. Zdířka pro připojení sluchátek / Sluchátek s mikrofonem / Mikrofonu K tomuto portu lze připojit reproduktory se zesilovačem nebo sluchátka. K tomuto portu lze rovněž připojit sluchátka s mikrofonem nebo externí mikrofon. Port USB 3.2 Gen 2 Tento port USB 3.2 Gen 2 (Universal Serial Bus) podporuje přenosovou rychlost až 10 Gbit/s.
Sériový port (COM/RJ50) Tento sériový port podporuje standardy sériového portu RS-232, RS422 a RS485 s konfigurací 10P10C pro podporu specializovanějších aplikací, jako jsou zařízení pro sběr dat.
Pohled zleva Větrací otvory (vstup vzduchu) Tyto větrací otvory přivádějí chladnější vzduch do skříně počítače Mini PC. DŮLEŽITÉ! Pro zajištění optimálního rozptylu tepla a větrání vzduchu nesmí být větrací otvory zablokované.
Pohled zprava Větrací otvory (vstup vzduchu) Tyto větrací otvory přivádějí chladnější vzduch do skříně počítače Mini PC. DŮLEŽITÉ! Pro zajištění optimálního rozptylu tepla a větrání vzduchu nesmí být větrací otvory zablokované. Port USB 3.2 Gen 1 Tento port USB 3.2 Gen 1 (Universal Serial Bus) podporuje přenosovou rychlost až 5 Gbit/s.
Pohled zezadu Otvor pro resetování EDID Otvor pro tvrdý reset EDID (Extended Display Identification Data); zasunutím a stisknutím špičky rozložené kancelářské sponky bude vymazáno EDID uložené v Mini PC a bude odeslán požadavek, aby porty HDMI načetly EDID z připojeného displeje(ů). Další podrobnosti naleznete v části Enabling EDID Emulation or Virtual Display (Aktivace emulace EDID nebo virtuálního zobrazení).
Port HDMI™ Port HDMI™ (High Definition Multimedia Interface) umožňuje zobrazení na podporovaném větším externím zařízení 4K, například na televizoru LCD nebo monitoru. POZNÁMKY: Port HDMI1 podporuje technologii CEC (Consumer Electronics Control). K tomuto portu můžete připojit libovolné zařízení, které je kompatibilní s technologií CEC a které chcete ovládat dálkovým ovladačem, a zkontrolujte, zda je aktivována funkce HDMI-CEC zařízení.
Přehled základní desky Před instalací komponent základní desky nebo změnou nastavení základní desky dodržujte následující opatření. POZNÁMKA: Schémata v této kapitole jsou pouze orientační. Rozvržení základní desky se může u jednotlivých modelů lišit. DŮLEŽITÉ! Komponenty zobrazené v této části mohou vyžadovat další nákup. VAROVÁNÍ! • Než se dotknete jakékoli komponenty, odpojte napájecí kabel ze zásuvky.
Rozvržení základní desky EDID_BTN LAN1 HDMI1 LAN2 HDMI3 HDMI2 DC_PWR USB8 HDMI_CEC FPC_CON1 FPC_CON2 M.2(WIFI) FPC_CON1 U32G1_2 EXT_PWR SODIMM_B FPC_CON2 SODIMM_A U32G1_1 PWR_Header PWR_SW M.2_2 M.2(SOCKET3) GPIO_Header EXT_PWR COM_2 COM_1 Konektory 1. 2. 3. 4. BIOS_JUMPER U32G2_2 U32G2_1 U32G2_3 Audio SATA_LED Stránka Konektor HDMI CEC Konektor USB Konektor GPIO Napájecí konektor Propojky 20 20 21 21 Stránka 1.
Vnitřní konektory 1. Konektor HDMI CEC (4kolíkový HDMI_CEC) Tento konektor umožňuje připojit adaptér HDMI CEC. CEC PWRBTN#IN GND +5VSB HDMI_CEC 2. Konektor USB (4kolíkový USB8) Tento konektor umožňuje připojení USB modulu pro další USB porty.
3. Konektor GPIO (6kolíkový GPIO_Header) Tento konektor umožňuje připojit univerzální vstupní/výstupní modul pro přizpůsobení vstupu/výstupu digitálního signálu +3VSB +5VSB EC_GPA3 EC_GPH0 EC_GPE0 GND GPIO_Header 4. Napájecí konektor (5kolíkový PWR_Header) Tento konektor umožňuje připojení externího tlačítka napájení.
Vnitřní propojky 1. Propojka BIOS Tato propojka umožňuje nastavit, zda mají uživatelé přístup k nastavení systému BIOS. Při nastavení Normal Mode (Normální režim) je povolen přístup do systému BIOS. Při nastavení na Security Mode (Režim zabezpečení) nebudou mít uživatelé přístup k nastavení systému BIOS.
2 Používání přístroje Mini PC
Začínáme Připojení adaptéru střídavého napájení k přístroji Mini PC Pokyny pro připojení adaptéru střídavého napájení k přístroji Mini PC: A. Připojte kabel střídavého napájení k měniči střídavého napájení. B. Připojte výstup adaptéru k napájecímu vstupu Mini PC. C. Připojte napájecí adaptér do zásuvky 100 - 240 V. POZNÁMKA: Vzhled napájecího adaptéru se může lišit v závislosti na modelu a vašem regionu.
POZNÁMKA: V následující části jsou uvedeny další informace o adaptéru: 65 W napájecí adaptér • Napájecí napětí: 100 – 240 Vstř • Vstupní kmitočet: 50 – 60 Hz • Jmenovitý výstupní proud a napětí: 3,42 A (65 W) / 19 V 3,33 A (65 W) / 19,5 V ASUS Mini PC PL Řady 25
Připojení zobrazovacího panelu k přístroji Mini PC K přístroji Mini PC lze připojit zobrazovací panel nebo projektor vybavený následujícími konektory: • Port HDMI™ POZNÁMKY: • V závislosti na dostupných portech zobrazení lze připojit současně až tři panely*. • Pokud je pro výstup obrazu používán pouze jeden z níže uvedených portů, bude k dispozici následující maximální rozlišení**: - Port HDMI™ Podporuje rozlišení až 4096 x 2160 pixelů při 60 Hz. * Tento port se může lišit podle modelu.
Pokyny pro připojení zobrazovacího panelu k přístroji Mini PC: Připojte jeden konec kabelu HDMI™ k externímu displeji a druhý konec kabelu k portu HDMI™ zařízení Mini PC.
Připojení kabelu USB z klávesnice nebo myši K přístroji Mini PC lze připojit v podstatě jakoukoli USB klávesnici nebo myš. Rovněž lze připojit USB adaptér pro soupravu bezdrátové klávesnice a myši. Pokyny pro připojení klávesnice a myši k přístroji Mini PC: Připojte kabel USB z klávesnice nebo myši k některému portu USB přístroje Mini PC. POZNÁMKA: Klávesnice se liší podle země nebo regionu.
Zapnutí přístroje Mini PC Stisknutím vypínače zapněte přístroj Mini PC.
Vypnutí přístroje Mini PC Pokud přístroj Mini PC nereaguje, stiskněte a přidržte vypínač nejméně na čtyři (4) sekundy, dokud se přístroj Mini PC nevypne.
Načtení výchozích nastavení systému BIOS Pokyny pro načtení výchozích hodnot jednotlivých parametrů v systému BIOS: 1. Zadejte BIOS stisknutím nebo na obrazovce POST. POZNÁMKA: POST (Power-On Self Test) je řada softwarově řízených diagnostických testů, které se spustí po zapnutí počítače. 2. 3. 4. Přejděte do nabídky Exit (Konec). Vyberte možnost Load Optimized Defaults (Načíst optimalizované výchozí hodnoty) nebo stiskněte klávesu .
Aktivace emulace EDID nebo virtuálního zobrazení Emulace EDID je funkce, která umožňuje připojení displeje bez přerušení s trvalou emulací displeje, zatímco virtuální zobrazení je funkce, která umožňuje vzdálený přístup ke konfiguraci bez konektoru. Pokyny pro aktivaci emulace EDID nebo virtuálního zobrazení: 1. Stisknutím klávesy nebo na obrazovce POST vstupte do systému BIOS. 2.
Upgradování zařízení Mini PC 3
DŮLEŽITÉ! • Instalaci nebo upgrade paměťových modulů, bezdrátové karty a disku SSD doporučujeme provádět pod odborným dohledem. Požádejte o další pomoc servisní středisko ASUS. • Před dokončením instalace zajistěte, abyste měli suché ruce. Před instalací doplňků uvedených v tomto návodu, použijte uzemněný náramek nebo se dotkněte řádně uzemněného předmětu nebo kovového předmětu, aby se zabránilo poškození modulů statickou elektřinou. POZNÁMKA: Obrázky v této části jsou pouze orientační.
Vyjmutí spodního krytu 1. Před odpojením všech kabelů a periferií vypněte zařízení Mini PC. 2. Zařízení Mini PC umístěte na rovné a stabilní místo horní stranou vzhůru. 3. Zcela uvolněte šest (6) šroubky z dolního krytu. 4. Opatrně zvedněte spodní kryt ze skříně.
Nasazení spodního krytu 1. Zavřete spodní kryt a ujistěte se, že dva zářezy na spodním krytu jsou zarovnány s vybráním ve skříni.
2. Zajistěte dolní kryt utažením šest (6) šroubků.
Instalování paměťových modulů Tento počítač Mini PC je vybaven dvěma paticemi pro paměťové moduly SO-DIMM, do kterých můžete instalovat dva moduly DDR4 SO-DIMM. DŮLEŽITÉ! Seznam kompatibilních paměťových modulů DIMM viz http://www.asus.com. Do patic DIMM zařízení Mini PC lze nainstalovat pouze paměťové moduly DDR4 SO-DIMMs. Zorientujte a zasuňte paměťový modul do patice (A) a zatlačením (B) jej řádně usaďte na místo. Při instalaci dalšího paměťového modulu postupujte podle stejných pokynů.
Instalování jednotky M.2 SSD Zařízení Mini PC je vybaveno dvěma sloty M.2; jeden uprostřed skříně a další vedle bočních portů USB. Pokyny pro instalaci M.2 SSD do skříně 1. Zorientujte a vložte SSD disk 2280 M.2 do slotu uvnitř zařízení Mini PC. 2. Jemně zatlačte 2280 M.2 SSD na horní část stojanu a upevněte jej pomocí šroubu.
Instalování bezdrátové karty POZNÁMKA: Vaše zařízení Mini PC obsahuje slot M.2 pro bezdrátové adaptéry a Bluetooth adaptéry 2230. Seznam kompatibilních bezdrátových adaptérů a adaptérů Bluetooth viz http://www.asus.com. 1. (volitelný) Vyjměte SSD M.2, je-li nainstalován. Chcete-li jednotku M.2 SSD vyjmout, vyšroubujte šroubek z pilíře a potom vyjměte jednotku M.2 SSD. 2. Zorientujte a zasuňte bezdrátovou kartu do příslušné patice uvnitř počítače Mini PC. 3.
WIFI-AUX WIFI-AUX WIFI-Main WIFI-Main ASUS Mini PC PL Řady 41
Instalování vnějšího tlačítka POZNÁMKA: Externí vypínač je nezbytné zakoupit samostatně. Níže uvedené obrázky jsou poskytovány pouze pro ilustrační účely a váš skutečný vnější vypínač napájení se může lišit vzhledem. 1. Odstraňte kovový kryt z portu vnějšího tlačítka. POZOR! Při odstraňování kovového krytu postupujte zvláště opatrně. Aby se zabránilo poranění, pomocí nástroje (například šroubováku) ohněte a vyjměte kovový kryt. 2.
TPM 4
Informace o TPM Systém je dodáván se dvěma (2) možnostmi TPM: firmwarový TPM (fTPM) nebo diskrétní TPM (dTPM). dTPM je integrovaný čip a dostupnost integrovaného čipu dTPM se může u jednotlivých modelů lišit. POZNÁMKA: • FTPM je standardně podporováno, ale nemusí být povoleno. Další informace o aktivaci TPM naleznete na www.asus.com/support. • DTPM je volitelný a je dostupný u vybraných modelů.
Přílohy
Bezpečnostní informace Tento přístroj Mini PC byl zkonstruován a otestován, aby splňoval nejaktuálnější bezpečnostní normy pro technologii IT. Pro zajištění vaší bezpečnosti je ovšem nezbytné, abyste si přečetli následující bezpečnostní pokyny. • Zabraňte spolknutí baterie, hrozí nebezpečí chemického popálení. • Tento produkt obsahuje knoflíkovou baterii. V případě spolknutí knoflíkové baterie může do 2 hodin dojít k vážným vnitřním popáleninám a smrti. • Uchovávejte nové a použité baterie mimo dosah dětí.
Místo s omezeným přístupem Tento produkt je určen k instalaci pouze v počítačové učebně za následujících podmínek: • Přístup mají pouze SERVISNÍ OSOBY nebo UŽIVATELÉ, kteří byli poučeni o důvodech omezení vztahujících se na dané místo a o všech opatřeních, která je třeba dodržovat. • Přístup je zajištěn pomocí NÁSTROJE nebo jiných bezpečnostních prostředků a je řízen osobou odpovědnou za dané místo.
Údržba • • • • • • • • 48 Na napájecí kabel nestoupejte ani nepokládejte žádné předměty. Zabraňte potřísnění systému vodou nebo jinými tekutinami. Počítačem stále prochází malé množství elektrického proudu, i když je vypnutý. Před čištěním systému odpojte napájecí kabel od elektrické zásuvky. V případě následujících technických potíží s výrobkem odpojte napájecí kabel a obraťte se na kvalifikovaného servisního technika nebo prodejce. – Je poškozen napájecí kabel nebo zástrčka.
Regulatorní informace POZNÁMKA K IZOLACI DŮLEŽITÉ! K zajištění elektrického oddělení a udržení elektrické bezpečnosti je na povrch nanesen podvlak, který izoluje tělo Mini PC, kromě stran, kde se nacházejí vstupně výstupní porty. Prohlášení Federální komise pro komunikaci Toto zařízení je v souladu s pravidly FCC, část 15. Pro provoz musí splňovat tyto dvě podmínky: • • Zařízení nesmí být zdrojem škodlivého rušení.
DŮLEŽITÉ! Venkovní provoz v pásmu 5,15 ~ 5,25 GHz je zakázán. Funkce Ad-hoc tohoto zařízení není k dispozici pro 5250 ~ 5350 a 5470 ~ 5725 MHz. POZOR! Jakékoliv změny nebo úpravy výslovně neschválené garantem tohoto zařízení mohou vést k odebrání oprávnění uživatele používat toto zařízení.
Prohlášení o shodě pro směrnici upravující vliv produktů na životní prostředí Společnost ASUS při vývoji a výrobě svých produktů dodržuje koncepci ekologického designu a zajišťujte, aby byl každý stupeň životnosti produktu ASUS v souladu s globálními předpisy na ochranu životního prostředí. Kromě toho společnost ASUS zveřejňuje příslušné informace podle regulačních požadavků. Zásady zveřejňování informací na základě regulačních požadavků, které společnost ASUS dodržuje, jsou uvedeny na adrese http://csr.
Recyklační / Sběrné služby společnosti ASUS Programy pro recyklaci a zpětný odběr použitých produktů společnosti ASUS vycházejí z našeho závazku dodržování nejvyšších standardů pro ochranu našeho životního prostředí. Věříme, že poskytováním těchto řešení našim zákazníkům umožníme odpovědně recyklovat naše produkty, baterie a další součásti a také obalové materiály. Podrobné informace o recyklaci v různých regionech jsou uvedeny na adrese http://csr.asus.com/english/Takeback.htm.
Produkt vyhovující standardu ENERGY STAR ENERGY STAR je společný program americké Agentury pro ochranu životního prostředí a amerického ministerstva energetiky, který nám všem pomáhá ušetřit a zároveň chránit životní prostředí díky energeticky úsporným výrobkům a postupům. Všechny produkty společnosti ASUS označené logem ENERGY STAR vyhovují standardu ENERGY STAR a funkce řízení spotřeby je u nich povolena ve výchozím nastavení.
Zjednodušené prohlášení o shodě EU Společnost ASUSTek Computer Inc. tímto prohlašuje, že toto zařízení splňuje základní požadavky a další příslušná ustanovení směrnice 2014/53/EU. Plné znění prohlášení o shodě EU je k dispozici na adrese https://www.asus.com/support/. V zemích uvedených v tabulce níže je provoz sítě Wi-Fi v pásmu 5150 až 5350 MHz povolen pouze ve vnitřních prostorech: a.
Servis a podpora Navštivte náš web podporující více jazyků https://www.asus.com/support/.
ASUS Mini PC PL Řady