Mini PC PN30 Benutzerhandbuch
G15033 Erste Ausgabe Januar 2019 URHEBERRECHTSINFORMATION Kein Teil dieses Handbuchs, einschließlich der darin beschriebenen Produkte und Software, darf ohne ausdrückliche schriftliche Genehmigung von ASUSTeK COMPUTER INC. (“ASUS”) mit jeglichen Mitteln in jeglicher Form reproduziert, übertragen, transkribiert, in Wiederaufrufsystemen gespeichert oder in jegliche Sprache übersetzt werden, abgesehen von vom Käufer als Sicherungskopie angelegter Dokumentation.
Inhaltsverzeichnis Über dieses Handbuch............................................................................................................... 5 Anmerkungen zu diesem Handbuch...................................................................................6 Typographie....................................................................................................................................6 Verpackungsinhalt.................................................................................
Anhang Sicherheitsinformationen......................................................................................................... 36 Einrichten Ihres Systems............................................................................................................36 Umsicht bei der Benutzung.....................................................................................................36 Richtlinien und Vorschriften...............................................................................
Über dieses Handbuch Dieses Handbuch enthält Informationen über die Hardware- und Softwaremerkmale Ihres Mini PCs, geordnet in folgenden Kapiteln: Kapitel 1: Kennenlernen Ihres Mini PCs Dieses Kapitel beschreibt die Hardware-Komponenten Ihres Mini PCs. Kapitel 2: Ihren Mini PC verwenden Dieses Kapitel liefert Informationen zur Nutzung Ihres Mini PCs.
Anmerkungen zu diesem Handbuch Zum Hervorheben wichtiger Informationen sind manche Textabschnitte in diesem Handbuch wie folgt gekennzeichnet: WICHTIG! Diese Meldung enthält wichtige Informationen, denen Sie folgen müssen, um die Aufgabe fertigzustellen. HINWEIS: Diese Meldung enthält zusätzliche Informationen und Tipps, die Ihnen bei der Fertigstellung einer Aufgabe helfen können.
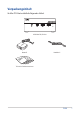
Verpackungsinhalt Ihr Mini PC-Paket enthält die folgenden Artikel: ASUS Mini PC, PN Serie Netzteil* Netzkabel* Technische Dokumentationen PN30 7
HINWEIS: • *Das mitgelieferte Netzteil kann je nach Modell und Region variieren. • Die mitgelieferten Zubehörteile können je nach Modell variieren. Für Einzelheiten zu diesem Zubehör schauen Sie in die jeweiligen Benutzerhandbücher. • Die Geräteabbildung dient nur der Veranschaulichung. Tatsächliche Produktspezifikationen können je nach Modell variieren.
1 Kennenlernen Ihres Mini PCs
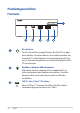
Produkteigenschaften Frontseite Ein-/Austaste Der Ein-/Ausschalter ermöglicht Ihnen, den Mini PC ein- oder auszuschalten. Sie können den Ein-/Ausschalter benutzen, um Ihren Mini PC in den Ruhezustand zu versetzen oder die Taste vier (4) Sekunden lang drücken, um die Abschaltung Ihres Mini PCs zu erzwingen. Kopfhörer-/Headset-/Mikrofonbuchse Über diesen Anschluss können Sie Ihren Notebook-PC an aktive Lautsprecher oder Kopfhörer anschließen.
USB 3.1 (Gen1)-Anschluss Der USB (Universal Serial Bus) 3.1 (Gen1)-Anschluss bietet Datenübertragungsraten bis zu 5 Gbit/s. Dieser Anschluss unterstützt auch die Akkuaufladetechnologie 1.2, mit der Sie Ihre USB-Geräte aufladen können. HINWEIS: Die Akkuaufladetechnologie 1.2 ist nur bei ausgewählten Modellen verfügbar. USB 2.0-Anschluss Dieser USB-Anschluss (Universal Serial Bus) ist mit USB 2.0- oder USB 1.1-Geräten kompatibel, z. B.
Linke Seite Lüftungsöffnungen (Lufteinlassöffnung) Die Belüftungsöffnungen sorgen dafür, dass kühlere Luft in Ihr Mini PC-Gehäuse gelangt. WICHTIG: Für eine optimale Wärmeableitung und Belüftung stellen Sie sicher, dass die Lüftungsschlitze nicht blockiert sind.
Rechte Seite Lüftungsöffnungen (Lufteinlassöffnung) Die Belüftungsöffnungen sorgen dafür, dass kühlere Luft in Ihr Mini PC-Gehäuse gelangt. WICHTIG: Für eine optimale Wärmeableitung und Belüftung stellen Sie sicher, dass die Lüftungsschlitze nicht blockiert sind. Kensington® Schlossanschluss Mit dem Kensington Schlossanschluss kann Ihr Mini PC mit Kensington-kompatiblen Sicherheitsprodukten gesichert werden.
Rückseite HDMI-Anschluss Der HDMI (High Definition Multimedia Interface)-Anschluss unterstützt ein Full-HD-Gerät, z.B. einen LCD-Fernseher, um Ihre Videoausgabe auf einer größeren Anzeige zu betrachten. Lüftungsöffnungen (Luftablassöffnung) Die Lüftungsöffnungen sorgen dafür, dass heiße Luft aus Ihrem Mini PC-Gehäuse ausströmt. WICHTIG: Für eine optimale Wärmeableitung und Belüftung stellen Sie sicher, dass die Lüftungsschlitze nicht blockiert sind.
Stromeingang Das mitgelieferte Netzteil wandelt Wechselstrom in Gleichstrom, der für die Stromversorgung des Gerätes benötigt wird, um. Der Mini PC wird über diese Buchse mit Strom versorgt. Um eine Beschädigung des Mini PCs zu vermeiden, verwenden Sie ausschließlich das mitgelieferte Netzteil. WARNUNG! Das Netzteil kann sich während des Betriebes erwärmen. Decken Sie es nicht ab und halten Sie es von Ihrem Körper fern.
USB 3.1 (Gen1) Typ-C™-/DisplayPort-Kombianschluss Dieser USB Typ-C™ (Universal Serial Bus) Anschluss bietet Datenübertragungsraten von bis zu 5 Gbit/s und unterstützt DisplayPort 1.2. Schließen Sie über einen USB Typ-C™-Adapter ein externes Display an Ihren Mini PC an. LAN-Anschluss Der 8-polige RJ-45 LAN-Anschluss unterstützt ein Standardnetzwerkkabel zur Verbindung mit einem lokalen Netzwerk. USB 3.1 (Gen1)-Anschluss Der USB (Universal Serial Bus) 3.
Ihren Mini PC verwenden 2
Erste Schritte Verbinden Sie das Netzteil mit Ihrem Mini PC So schließen Sie das Netzteil an Ihren Mini PC an: A. Verbinden Sie das Netzkabel mit dem Netzteil. B. Schließen Sie den kleinen Netzteilstecker an den Stromanschluss (DC) Ihres Mini PCs an. C. Verbinden Sie den Netzstecker des Netzteils mit einer Steckdose (100 – 240 V Wechselspannung). HINWEIS: Das Netzteil kann optisch je nach Modell und Region variieren.
WICHTIG! • Wir empfehlen dringend, dass Sie nur das mitgelieferte AC-Netzteil und -kabel für Ihren Mini PC verwenden. • Wir empfehlen dringend, falls für Ihr Produkt zutreffend, die Nutzung einer geerdeten Steckdose beim Einsatz Ihres Mini PCs. • Die Steckdose muss leicht zugänglich sein und sich in der Nähe Ihres Mini PCs befinden. • Trennen Sie Ihren Mini PC vom Netzstrom, indem Sie den Netzstecker aus der Steckdose ziehen.
Anschließen eines Displays an Ihren Mini PC Sie können ein Display oder einen Projektor an Ihren Mini PC über die folgenden Anschlüsse anschließen: • VGA-Anschluss • HDMI-Anschluss • DisplayPort HINWEIS: • Bis zu zwei Displays können gleichzeitig angeschlossen werden, wenn Sie den HDMI- und den konfigurierbaren Anschluss* oder den HDMI- und den USB 3.1 (Gen1) Typ-C™-/DisplayPort-Kombianschluss verwenden. • Bei Verwendung des USB 3.
So schließen Sie ein Display an Ihren Mini PC an: Verbinden Sie ein Ende eines VGA-, HDMI- oder DisplayPort-Kabels mit einem externen Display und das andere Kabelende mit dem VGA-, HDMI- oder DisplayPort-Anschluss Ihres Mini PCs.
Verbinden eines Displays via DisplayPort-Anschluss 22 PN30
Schließen Sie das USB-Kabel der Tastatur oder Maus an Sie können generell jede beliebige USB-Tastatur und -Maus an Ihren Mini PC anschließen. Auch USB-Empfänger für kabellose Tastaturen und Mäuse lassen sich anschließen. So verbinden Sie eine Tastatur und Maus mit Ihrem Mini PC: Schließen Sie das USB-Kabel von Tastatur und Maus an einen beliebigen freien USB-Anschluss Ihres Mini PCs an. HINWEIS: Die Tastatur variiert je nach Land oder Region.
Schalten Sie Ihren Mini PC ein Drücken Sie den Ein-/Ausschalter, um Ihren Mini PC einzuschalten.
Mini PC ausschalten Falls Ihr Mini PC nicht reagieren sollte, halten Sie die Ein-/Austaste mindestens vier (4) Sekunden lang gedrückt, bis sich der PC ausschaltet. Ihren Mini PC in den Ruhezustand versetzen Versetzen Sie Ihren Mini PC in den Ruhezustand, indem Sie einmal die Ein-/ Austaste drücken. BIOS-Setup aufrufen BIOS (Basic Input and Output System) speichert Systemhardwareeinstellungen, die zum Systemstart im Mini PC benötigt werden.
Laden der BIOS-Standardeinstellungen So laden Sie die Standardwerte für jeden Parameter in Ihrem BIOS: • Rufen Sie das BIOS auf, indem Sie im POST-Bildschirm oder drücken. HINWEIS: Der Selbsttest (POST) besteht aus einer Reihe diagnostischer Prüfungen, die nach dem Einschalten Ihres Mini PCs ausgeführt werden. • • • 26 Navigieren Sie zum Exit-Menü. Wählen Sie die Option Load Optimized Defaults (Optimierte Standardwerte laden) oder drücken Sie die Schnelltaste .
Ihren Mini PC nachrüsten 3
WICHTIG! • Es wird empfohlen, dass Sie die Speichermodule, die WLAN-Karte und den Solid State Drive (SSD) unter professioneller Aufsicht installieren oder aufrüsten. Besuchen Sie für weitere Unterstützung ein ASUS-Kundencenter. • Achten Sie darauf, dass Ihre Hände trocken sind, bevor Sie mit dem Rest des Installationsvorgangs fortfahren. Tragen Sie vor der Installation von Komponenten eine geerdete Manschette oder berühren Sie einen geerdeten Gegenstand bzw.
Einsetzen der unteren Abdeckung Schieben Sie die untere Abdeckung von der linken Seite nach rechts in den Mini PC hinein (A), befestigen Sie sie dann mit den vier (4) zuvor entfernten Schrauben (B).
Installieren von Speichermodulen Ihr Mini PC ist mit zwei SO-DIMM Speichersteckplätzen ausgestattet, in die Sie zwei DDR3 SO-DIMMs installieren können. HINWEIS: Hier finden Sie die maximal unterstützte Speichergröße: PN30: Maximal 8 GB Speicher. WICHTIG! Eine Liste kompatibler DIMMs finden Sie unter http://www.asus.com. Sie können in den DIMM-Steckplätzen Ihres Mini PCs nur DDR3 SO-DIMMs installieren. 1. Richten Sie das Speichermodul aus und setzen es in den Steckplatz ein (A).
Installieren von 2,5-Zoll-Festplatten oder SSDs 1. Bereiten Sie Ihre 2,5" Festplatte oder Ihr SSD vor, richten Sie diese(s) dann am Speicherschacht unter der unteren Abdeckung Ihres Mini PCs aus. 2. Legen Sie Ihre Festplatte oder Ihr SSD in den Speicherschacht ein (A), befestigen Sie diese(s) dann mit den vier (4) Schrauben (B). WICHTIG! Dieses Gerät unterstützt nur 7 mm und 9,5 mm 2,5" Festplatten oder SSDs.
Installieren des M.2 SSDs 1. Richten Sie das 2280 M.2 SSD am entsprechenden Steckplatz im Mini PC aus und stecken es ein. 2. Drücken Sie das 2280 M.2 SSD vorsichtig über dem Schraubenloch herunter und befestigen Sie es mit Hilfe einer der mitgelieferten 3 mm Rundkopfschrauben.
Installieren der WLAN-Karte HINWEIS: Ihr Mini PC besitzt einen M.2-Steckplatz für 2230 WLAN- und Bluetooth-Module. Unter http://www.asus.com finden Sie eine Liste mit kompatiblen WLAN- und Bluetooth-Modulen. 1. (optional) Entfernen Sie das M.2 SSD, falls dieses installiert ist. Entfernen Sie dazu die Schraube aus dem Schraubenloch und anschließend das M.2 SSD. 2. Richten Sie die WLAN-Karte am entsprechenden Steckplatz im Mini PC aus und stecken sie ein. 3.
HINWEIS: • Das Anschließen von Antennen an Ihre WLAN-Karte kann das WLANSignal verstärken. • Ein weiches klickendes Geräusch weist darauf hin, dass die Antenne an der WLAN-Karte sicher befestigt ist.
Anhang
Sicherheitsinformationen Ihr Mini PC wurde entwickelt und getestet, um die neuesten Sicherheitsstandards für IT-Ausrüstung zu erfüllen. Um Ihre Sicherheit zu gewährleisten, müssen Sie die folgenden Sicherheitsanweisungen sorgfältig lesen. Einrichten Ihres Systems • • • • • • • Lesen und folgen Sie den Anweisungen im Handbuch, bevor Sie Ihr System in Betrieb nehmen. Benutzen Sie das Produkt nicht in der Nähe von Wasser oder Heizquellen. Stellen Sie das Gerät auf eine stabile Oberfläche.
• Wenn Sie mit dem Produkt auf eines der folgenden technischen Probleme stoßen, ziehen Sie den Stecker aus der Steckdose und kontaktieren Sie einen qualifizierten Fachmann oder Ihren Händler. – Das Netzkabel oder der Stecker ist beschädigt. – In Ihr System ist eine Flüssigkeit eingetreten. – Das System funktioniert nicht richtig, selbst wenn Sie die Anweisungen beachtet haben. – Das Gerät ist heruntergefallen oder das Gehäuse ist beschädigt. – Die Systemleistung hat sich verändert.
Richtlinien und Vorschriften REACH Die rechtlichen Rahmenbedingungen für REACH (Registration, Evaluation, Authorisation, and Restriction of Chemicals) erfüllend, veröffentlichen wir die chemischen Substanzen in unseren Produkten auf unserer ASUS REACH-Webseite unter http://csr.asus.com/english/REACH.htm ASUS Recycling/Rücknahmeservices Das ASUS-Wiederverwertungs- und Rücknahmeprogramm basiert auf den Bestrebungen, die höchsten Standards zum Schutz der Umwelt anzuwenden.
Erklärung der Federal Communications Commission Dieses Gerät entspricht Teil 15 der FCC-Vorschriften. Im Betrieb müssen die folgenden beiden Bedingungen erfüllt werden: • • Dieses Gerät darf keine schädliche Störstrahlung abgeben und Dieses Gerät muss für empfangene Störstrahlung unempfindlich sein, auch für Störstrahlung, die unerwünschte Funktionen hervorrufen kann. Dieses Gerät wurde geprüft und entspricht den Grenzwerten für digitale Geräte der Klasse B gemäß Teil 15 der FCC-Vorschriften.
Wireless-Kanäle für unterschiedliche Gebiete N. Amerika 2.412-2.462 GHz Kanal 01 bis Kanal 11 Japan 2.412-2.484 GHz Kanal 01 bis Kanal 14 Europa ETSI 2.412-2.
ENERGY STAR konformes Produkt ENERGY STAR ist ein gemeinsames Programm der US-Umweltschutzbehörde und der US-Energiebehörde, welches helfen soll, Geld zu sparen und die Umwelt durch energieeffiziente Produkte und Technologien zu schützen. Alle ASUS-Produkte mit dem ENERGY STAR-Logo erfüllen den ENERGY STAR-Standard und die Energieverwaltungsfunktion ist standardmäßig aktiviert. Monitor und der Computer werden nach einer inaktiven Zeit von 10 und 30 Minuten automatisch in den Ruhezustand versetzt.
ASUS Kontaktinformation ASUSTeK COMPUTER INC. Adresse 4F, No. 150, Li-Te Road, Peitou, Taipei 112, Taiwan Telefon +886-2-2894-3447 Fax +886-2-2890-7798 Webseite www.asus.com Technischer Support Telefon Fax Online Support +86-21-38429911 +86-21-5866-8722, ext. 9101# https://www.asus.com/support/Product/ ContactUs/Services/questionform/?lang=en ASUS COMPUTER INTERNATIONAL (Amerika) Adresse 48720 Kato Rd.
PN30 43