
Users Manual Part 1


Quick Start Guide
4
English
Getting started
Installing the batteries to your gaming mouse:
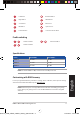
Refer to the table below for the battery status of your ROG STRIX CARRY Gaming Mouse.
LED color Duration Description
Green* Lights up for 5 seconds Battery Power 75% - 100%
Red Blinks twice every 0.5 seconds Battery Power under 25%
* The LED indicator will light green only when you set the connection mode to RF 2.4G Wireless mode,
or when setting to Bluetooth mode after the gaming mouse has already been paired.
CAUTION!
• Ensurethebatteriesareinstalledinthecorrect
orientation, refer to the direction indicated in
the battery compartment.
• Thebundledbatteriesarenon-rechargeable.
• DONOTmixnewbatterieswitholdbatteries.
IMPORTANT!
• Onlyuseakalinebatterieswheninstalling
batteries to your gaming mouse.
• Werecommendyouremovethebatteriesfrom
your gaming mouse if the gaming mouse will
not be in use for a prolonged period of time.
1. Lift the top cover from the rear of your gaming mouse
to remove the top cover.
2. Install the two (2) bundled AA batteries into the battery
compartment of your ROG STRIX CARRY Gaming
Mouse.
3. Replace the cover on top of your gaming mouse, then
push down on the left and right mouse buttons to
secure the top cover.
To connect your ROG STRIX CARRY Gaming Mouse:
Using the RF 2.4G Wireless mode
1. Connect the bundled USB dongle to your computer’s USB port.
2. Set the connection switch to the RF 2.4G Wireless mode.
3. Your gaming mouse should automatically start pairing. Once your gaming mouse has been
successfully paired, the LED indicator on your gaming mouse will light up green for 5 seconds.
Q15172_P508_STRIX_CARRY_Gaming_Mouse.indb 4 1/31/2019 4:41:43 PM