R P/I P65UP8 Baseboard for CPU Cards USER’S MANUAL
USER'S NOTICE No part of this manual, including the products and software described in it, may be reproduced, transmitted, transcribed, stored in a retrieval system, or translated into any language in any form or by any means, except documentation kept by the purchaser for backup purposes, without the express written permission of ASUSTeK COMPUTER INC. (“ASUS”).
ASUS CONTACT INFORMATION ASUSTeK COMPUTER INC. Marketing Info Address: Telephone: Fax: Email: 150 Li-Te Road, Peitou, Taipei, Taiwan 112, ROC +886-2-894-3447 +886-2-894-3449 info@asus.com.tw Technical Support Fax: BBS: Email: WWW: Gopher: FTP: +886-2-895-9254 +886-2-896-4667 tsd@asus.com.tw www.asus.com.tw gopher.asus.com.tw ftp.asus.com.
CONTENTS I. INTRODUCTION ......................................................... 7 How this Manual is Organized ........................................................ 7 Item Checklist .................................................................................. 7 Features of the ASUS P/I-P65UP8 Baseboard ................................ 8 II. FEATURES .................................................................. 8 Parts of the ASUS Baseboard ...................................................
(This page was intentionally left blank.
FCC & DOC COMPLIANCE Federal Communications Commission Statement This device complies with FCC Rules Part 15. Operation is subject to the following two conditions: • • This device may not cause harmful interference, and This device must accept any interference received, including interference that may cause undesired operation. This equipment has been tested and found to comply with the limits for a Class B digital device, pursuant to Part 15 of the FCC Rules.
I. INTRODUCTION I. INTRODUCTION (Manual / Checklist) How this Manual is Organized This manual is divided into the following sections: I. Introduction: II. Features: III. Installation: IV. VGA Installation: Manual information and checklist Information and specifications concerning this product Instructions on setting up the baseboard Instructions on setting up the onboard VGA Item Checklist Please check that your package is complete. If you discover damaged or missing items, please contact your retailer.
II. FEATURES Features of the ASUS P/I-P65UP8 Baseboard II. FEATURES (Features) The P/I-P65UP8 is carefully designed for the demanding PC user who wants great versatility in a computer system. This baseboard: • Versatile Processor Support: Supports dual 150–200MHz Pentium Pro or dual 233–333MHz Pentium II processors. • I2O: Includes onboard Intel’s i960RD I/O processor with 32KB NVRAM, 2x512KB Flash EPROM, and 2SIMM slots for up to 256MB memory.
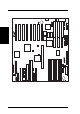
II. FEATURES Parts of the ASUS Baseboard Onboard Universal Programmable Keyboard S3 VGA Serial Bus Flash ROM 4 Secondary PCI Slots Parallel & Serial Connectors 3 ISA Slots Onboard VGA memory sockets IDE 1 & 2 Connectors CPU Card Slot Intel i960RD Symbios SCSI AT Power Connector Adaptec SCSI 72-pin SIMM I2O Memory Sockets AT Aux. Pwr.
Parallel Port P8 P9 Secondary IDE Main Power Input P10 Aux. Pwr In. ATX Power Input Infrared Floppy Drives 35 1 Battery Con.
III. INSTALLATION Jumpers 960SEL DRAMRAS 7880IDSEL RTCLR JP1, JP2 FS0, FS1, FS2 p. 13 i960 Setting (I2O/Bridge) p. 13 DRAM RAS Setting (Single/Double) p. 14 Adaptec 7880 ID Setting (9/15) p. 15 Real Time Clock RAM (Operation/Clear CMOS) p. 15 Battery Test Leads p. 16 CPU External Frequency (BUS) Selection III. INSTALLATION (Board Layout) 1) 2) 3) 4) 5) 6) Expansion Slots 1) 2) 3) 4) 5) SIMM1–SIMM8 I-SIMM1, I–SIMM2 CPU1, CPU2 PCI1-3, Secondary PCI1-4 SLOT1, SLOT2, SLOT3 p.
III. INSTALLATION Installation Steps Before using your computer, you must complete the following steps: 1. 2. 3. 4. 5. 6. Set Jumpers on the Baseboard Install DRAM Memory Modules Install the Central Processing Unit (CPU) Card Install Expansion Cards Connect Ribbon Cables, Cabinet Wires, and Power Supply Setup the BIOS Software (see the CPU Card BIOS section) 1. Jumpers III.
III. INSTALLATION Jumper Settings 1. i960 Bridge Setting The secondary PCI slots can function as standard PCI slots when the i960 is set to “Bridge” mode. When the i960 is set to “I2O” mode, the secondary PCI slots are controlled by the i960 and only intelligent I/O (I2O) cards can be used on the secondary PCI slots. Additional memory is required for the “I2O” mode. 960SEL I20 Bridge Setting [1-2] [2-3] 960SEL 3 2 1 I20 Bridge III.
III. INSTALLATION 3. 7880 ID Setting Set to SCSI ID 9, if you wish for the onboard Adpatec 7880 SCSI device to boot. Set to SCSI ID 15, if you wish for the onboard Symbios 53C876 device to boot. 7880IDSEL ID 9-Boot ID 15-No boot Setting [2-3] [1-2] R 7880IDSEL 7880IDSEL 3 2 1 3 2 1 SCSI ID 9 SCSI ID 15 III.
4. Real Time Clock (RTC) RAM (RTCLR) This clears the user-entered information stored in the CMOS RAM of the Real Time Clock such as hard disk information and passwords. To clear the RTC data: (1) Turn off your computer and unplug the AC power, (2) Move this jumper to Clear CMOS, (3) Power on the computer, (4) Power off the computer, (5) Remove this jumper, (6) Power on the computer, (7) Hold down during bootup and enter BIOS setup to re-enter user preferences.
III. INSTALLATION 6. CPU External (BUS) Frequency Selection (FS0, 1, 2) (Baseboard) These jumpers tells the clock generator what frequency to send to the CPU. These allow the selection of the CPU’s External frequency (or BUS Clock). The BUS Clock multiplied by the BUS Ratio equals the CPU’s Internal frequency (the advertised CPU speed). BUS Freq. FS2 50MHz [ON] 60MHz [----] 66MHz [----] FS1 [ON] [----] [----] FS0 [ON] [ON] [----] R FS0 FS1 FS2 FS0 FS1 FS2 FS0 FS1 FS2 III.
III. INSTALLATION III.
III. INSTALLATION 2. System Memory (DRAM) This baseboard supports eight 72-pin SIMMs (Single Inline Memory Modules) of 4MB, 8MB, 16MB, 32MB, 64MB, 128MB to form a memory size between 8MB to 1GB. The DRAM can be either 60ns or 70ns Fast Page Mode (Asymmetric or Symmetric), Extended Data Output (EDO), or Burst Extended Data Output (BEDO) (with C-P6ND only). SIMMs must be installed in pairs so that each bank contains two of the same size memory modules.
III. INSTALLATION DRAM Memory Installation Procedures IMPORTANT: Install memory modules in symmetric pairs. 1. The SIMM memory modules will only fit in one orientation as shown because of a “Plastic Safety Tab” on one end of the SIMM slots which requires the “Notched End” of the SIMM memory modules. 72 Pin SIMM Sockets 1 2 3 4 5 6 7 8 III. INSTALLATION (DRAM Memory) R 2 1 i960 Memory Notched End System Memory 2.
III. INSTALLATION 3. Central Processing Unit The P/I-P65UP8 baseboard provides a CPU card slot that can be used with the ASUS C-PKND or C-P6ND CPU cards, which are available separately. You must purchase any one of these CPU cards (see next page for a brief description) to complete the system’s board. System Case The system case must be a full-size tower or server case to give a clearance as follows: 5” (12.
III. INSTALLATION One end of the CPU card has a bracket, which should slide into the system case front panel. Be sure that the system case can support a long PCI card on the first slot and that a groove is available for the bracket. Refer to your respective CPU card’s documentation for details. III. INSTALLATION (CPU Card) General Installation Procedures for the ASUS CPU Card: 1. Remove the CPU card from its packaging without touching the integrated circuit (IC) chips, connectors, and other components.
III. INSTALLATION 4. Expansion Cards First read your expansion card documentation on any hardware and software settings that may be required to set up your specific card. WARNING! Unplug your power supply when adding or removing expansion cards or other system components. Failure to do so may cause severe damage to both your baseboard and expansion cards. Expansion Card Installation Procedure 1. 2. 3. 4. III. INSTALLATION (Expansion Cards) 5. 6. 7. 8. 9. Read the documentation for your expansion card.
III. INSTALLATION Some expansion cards need to use an IRQ to operate. Generally an IRQ must be exclusively assigned to one use. In a standard design there are 16 IRQs available but most of them are already in use, leaving 6 IRQs free for expansion cards. Both ISA and PCI expansion cards may require to use IRQs. System IRQs are available to cards installed in the ISA expansion bus first, then any remaining IRQs are available to PCI cards. Currently, there are two types of ISA cards.
III. INSTALLATION 5. External Connectors WARNING! Some pins are used for connectors or power sources. These are clearly differentiated from jumpers as shown in the baseboard layout on page 10. Placing jumper caps over these pins will cause damage to your baseboard. IMPORTANT: Connect ribbon cables such that the red stripe is on the pin 1 side of the connector. The four corners of the connectors are labeled on the baseboard. Pin 1 is the side closest to the power connector on hard and floppy disk drives.
III. INSTALLATION 3. Parallel Printer Connector (26-1 pin PRINTER) This connector supports the included parallel port ribbon cable with mounting bracket. Connect the ribbon cable to this connector and mount the bracket to the case on an open slot. You can make available the parallel port and choose the IRQ Onboard Parallel Port in Chipset Features of the BIOS SOFTWARE.
III. INSTALLATION 5. Primary/Secondary IDE Connectors (Two 40-1 pin IDE1 & IDE2) These connectors support the provided IDE hard disk ribbon cable. After connecting the single end to the board, connect the two plugs at the other end to your hard disk(s). If you install two hard disks on one connector (channel), then you must configure a second drive as Slave mode by setting its jumper according to your hard disk jumper diagram.
III. INSTALLATION 7. VGA Connector (16 pin VGACON) To use the onboard VGA, you must attach the provided VGA cable to this connector and mount the bracket to the system cabinet on a free expansion slot or remove the bracket and mount to the system cabinet’s serial port opening. The VGA cable then provides a standard 15-pin D-Sub connector for a monitor.
III. INSTALLATION 9. IrDA-compliant Infrared Module Connector (5-pin IR) This connector supports the optional wireless transmitting and receiving infrared module. This module mounts to a small opening on system cases that support this feature. You must also configure the setting through BIOS setup in Chipset Features to select whether UART2 is directed for use with COM2 or IrDA.
III. INSTALLATION 11. ASUS System Monitoring Module Connector (20-1 pin SERVER_CON) This connector is for an optional ASUS System Monitoring Module for monitoring system temperature and fan RPM. R Pin 1 III. INSTALLATION (Connectors) Server Connector 12. Chassis Open Alarm Connector (4-1 pin CHASSIS) This connector is for an optional ASUS System Monitoring Module for monitoring chassis open/close status.
III. INSTALLATION III. INSTALLATION (Connectors) 13. SMI Suspend Switch Lead (SMI) This allows the user to manually place the system into a suspend mode or “Green” mode where system activity will be instantly decreased to save electricity and expand the life of certain components when the system is not in use. This 2-pin connector (see the figure below) connects to the case-mounted suspend switch.
III. INSTALLATION 19. Ultra-Fast SCSI & Ultra-Wide SCSI Connectors This motherboard provides three onboard 50-Pin Ultra-Fast SCSI connector for 8-bit SCSI devices and three 68-Pin Ultra-Wide SCSI connector for 16-bit SCSI devices. R 68-pin Fast/Wide SCSI Connector 50-pin Fast/Narrow SCSI Connector III.
III. INSTALLATION 20. Main and Auxilliary AT Power Connectors (12-pin & 6-pin PWRCON) This connector connects to a standard 5 Volt power supply. To connect the leads from the power supply, ensure first that the power supply is not plugged. Most power supplies provide two plugs (P8 and P9), each containing six wires, two of which are black. An auxilliary connector (P10) is provided in case the power supplied through the main connectors are insufficient.
IV. VGA Installation Windows 95 Video Driver Installation IV. VGA Installation (Windows 95) Installing Video drivers in Windows 95 (New Hardware Found) If you are installing the S3 Trio64 graphics device for Windows 95 for the first time, a New Hardware Found window will appear: 1. Click OK to use the default selection: Driver from disk provided by hardware manufacturer 2. Insert ASUS support CD and click Browse button - Open window appears 3. Select your CD-ROM drive in the Drives: box 4.
IV. VGA Installation Windows 95 Video Driver Installation Using Control Panel 1. Start Windows 95, switch display to VGA mode, then restart. 2. Press right key of mouse on your desktop and select Properties. Click the Settings tab. IV. VGA Installation (Windows 95) 3. Select Change Display Type. 4. Click Change.. 5. Click Have Disk. Insert the ASUS support CD. Type D:\VGA\WIN95 (assuming your CD-ROM drive is letter D) or click Browse button to select the path of the display driver for Windows 95.
IV. VGA Installation Windows 95 Display Settings Changing display settings To enter the Display Properties at any time, right click your mouse on the desktop and select Properties or double click the Display icon in the Control Panel. Click the appropriate Tab as follows: IV. VGA Installation (Windows 95) Adjustment: Lets you change your monitor settings, such as position, size, refresh rate and performance.
IV. VGA Installation Adjust Performance Lowest performance Highest performance Hotkey: Allows you to assign hotkeys in the "Value" box to move your screen up, down, left, and right, or zoom in, zoom out in virtual desktop. IV. VGA Installation (Windows 95) List of hotkey options Value Description Hotkey enabled Set to default hotkey values Settings: Allows you to change your display settings, adjust screen resolution and color depth, virtual desktop, color palette and font size.
IV. VGA Installation Windows NT 4.0 Video Driver Installation ASUS P/I-P65UP8 User’s Manual IV. VGA Installation (Windows NT 4.0) 1. Boot Windows NT in standard VGA mode (recommended). 2. Run Windows NT Display program located in the Control Panel, under Settings in the Start menu. Alternatively, position the cursor on the background of the desktop, click the right mouse button, then select Properties from the popup menu. 3. Select the Settings page. 4. Select Display Type... 5. Select Change...
IV. VGA Installation Windows NT 3.51 Video Driver Installation 1. 2. 3. 4. 5. 6. 7. 8. IV. VGA Installation (Windows NT 3.51) Boot Windows NT in standard VGA mode (recommended). Double-click the Main icon. Double-click the Control Panel icon. Double-click the Display icon. Click Change Display Type button. Click Change button. Click Other. Insert the ASUS support CD into your CD-ROM drive. For Windows NT 3.51, type the following: D:\VGA\NT351 (assuming your CD-ROM drive is letter D) 9. Click OK button.
IV. VGA Installation IBM OS/2 Video Driver Installation IV. VGA Installation (OS/2,CAD, Micro.) WARNING: The S3 Trio64 device OS/2 video driver is to be used for the English version of OS/2 only. 1. Start OS/2 using standard VGA driver 2. Double-click the OS/2 System folder 3. Double-click the Command Prompts folder 4. Double-click the OS/2 Full Screen object 5. Insert the ASUS support CD (assuming your CD-ROM drive is letter D) 6. Type D:\VGA\OS2\ENGLISH and SETUP.CMD 7.
IV.